One issue that pops up from time to time on the Mercedes-Benz W124 cars (including our 036 & 034 varietals) is one of the following:
A) a shrill whining sound from the passenger side of the dashboard, near the A/C & heater duct
B) loss of temperature control inside the car -- meaning that the HVAC system is either full "heat" or full "cool" depending on where the wheel is set
Either of these symptoms points to a failing (A) or failed (B) ACC "blower sampler" fan motor. This is a small, black, cylindrical plastic electric fan that is located behind and beneath the right side dashboard vent. The purpose of this vent is to suck air from the small square grill next to the overhead sunroof switch, through a long rubber tube that goes down the passenger-side "A" pillar and inside of the dashboard. From this "sample" of interior cabin air, the ACC system is able to determine current cabin temperature and adjust itself to maintain the desired temperature indicated via the dashboard thumbwheel. It's the baseline by which the ACC system does its calculations.
There is one way to test the function of this sampler fan: you take about a 1-inch square piece of light (tissue) paper and place it directly on the little grill next to the sunroof switch. Then you turn the ignition on (either accessory mode or turn the engine on) and the ACC system in any position (economy, defrost, AC, etc.) except the OFF mode via the pushbuttons on the dashboard. A working sampler fan will hold the piece of tissue paper up against the grill via a tiny "suction" action. If the paper falls off the grill downward onto the center console or seat, you know immediately that your sampler fan is inoperative.
Fans that are going out quite often - but not always - give a shrill whining noise. Sometimes they just up and quit as well.
I recently had this issue happen to me, by which when the thumbwheel was turned to full AC, the car got quite cold inside. And any other position other than full AC (even stlll in the rather blue "cool" range of the wheel) it went to heating mode. Furthermore, the tissue paper trick indicated that that sampler fan was not working. This was not a bad thing in my book because I had a bit of unfinished business from the removal of the dashboard and center console I performed last year to replace all six of the ACC "vacuum pods" (see HERE for that job). I hadn't replaced the 5 or 6 rubber vacuum "elbows" that connected the vacuum lines to the vacuum distributor (located behind the airbag in the dash next to the center console) which I had wanted to do, but had neglected to order new elbows; and I also wanted to better connect the flexible plastic duct-work running from the ACC heater box to the passenger side air duct -- I hadn't gotten a 100% positive fit.
My reasoning for replacing the vacuum elbow connectors is because they were original, 16+ years old and over time the holes get enlarged where the vac lines enter them. For the tightest possible seal, I wanted to use new elbows. You can see from the photo below the difference in diameter size between an "old" and "new" rubber vacuum elbow.
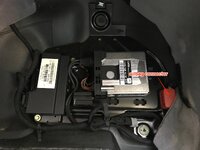
To do all of this work, the airbag & flexible duct had to come out so that I could access the vacuum distributor, as well as the sampler fan motor for replacement. The sampler fan is encased in a block of foam, and this assembly is then held in place with a C-shaped metal clip (see photos) so that it doesn't move around in the dashboard.
Tools needed to perform this job include:
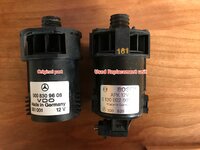
The part number for the fan is 000 830 19 08. As of February 2012, the MB list price for this fan is $63, and it is available through parts.com for $45. It is recommended to get the factory part, made by Bosch in Germany.
To replace all of these items, I did the following steps:
1) disconnected the battery via the negative terminal
2) removed the passenger side carpet and metal protective plate in the footwell, and unplugged the red airbag connector
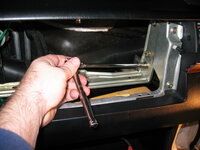
3) removed the airbag via the long screw under the dash, and disconnected the two plugs that electrically attach to the back of it
4) removed the metal reinforcing pieces/airbag mounts
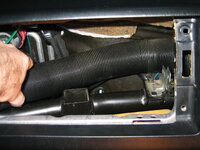
5) removed the black plastic flexible ducting piece running to the passenger side ACC vent
6) replaced 5 vacuum elbow connectors on the vacuum distributor
7) removed the sampler fan/foam assembly from its clip
8) briefly tested the sampler fan by reconnecting the battery, turning the ignition on, and seeing whether it was working or not (it wasn't turning)
9) checked the electrical connection to the sampler fan (after unplugging the fan) for voltage -- it tested out at 12.5 volts which was good
10) briefly attached the replacement fan to the connector to test its operation (it worked fine!)
11) installed the new sampler fan in the foam piece and re-clipped it into place
12) replaced the flexible plastic duct-work to the ACC box and the side vent, ensuring that everything was properly in place
13) checked speaker, night illumination and sampler fan wires in the dash for proper routing
14) re-installed metal airbag mount/dash reinforcement pieces
15) re-connected and re-installed passenger airbag
16) re-connected red plug in passenger side footwell and replaced metal plate
17) re-connected battery and reset (aftermarket) car alarm
18) entered radio code into radio
19) re-tested ACC sampler fan with a piece of tissue paper on grill (it worked!)
This is about a one-hour to 90-minute job if done slowly and carefully. Here are some photos attached to help illustrate the process.
Cheers,
Gerry
A) a shrill whining sound from the passenger side of the dashboard, near the A/C & heater duct
B) loss of temperature control inside the car -- meaning that the HVAC system is either full "heat" or full "cool" depending on where the wheel is set
Either of these symptoms points to a failing (A) or failed (B) ACC "blower sampler" fan motor. This is a small, black, cylindrical plastic electric fan that is located behind and beneath the right side dashboard vent. The purpose of this vent is to suck air from the small square grill next to the overhead sunroof switch, through a long rubber tube that goes down the passenger-side "A" pillar and inside of the dashboard. From this "sample" of interior cabin air, the ACC system is able to determine current cabin temperature and adjust itself to maintain the desired temperature indicated via the dashboard thumbwheel. It's the baseline by which the ACC system does its calculations.
There is one way to test the function of this sampler fan: you take about a 1-inch square piece of light (tissue) paper and place it directly on the little grill next to the sunroof switch. Then you turn the ignition on (either accessory mode or turn the engine on) and the ACC system in any position (economy, defrost, AC, etc.) except the OFF mode via the pushbuttons on the dashboard. A working sampler fan will hold the piece of tissue paper up against the grill via a tiny "suction" action. If the paper falls off the grill downward onto the center console or seat, you know immediately that your sampler fan is inoperative.
Fans that are going out quite often - but not always - give a shrill whining noise. Sometimes they just up and quit as well.
I recently had this issue happen to me, by which when the thumbwheel was turned to full AC, the car got quite cold inside. And any other position other than full AC (even stlll in the rather blue "cool" range of the wheel) it went to heating mode. Furthermore, the tissue paper trick indicated that that sampler fan was not working. This was not a bad thing in my book because I had a bit of unfinished business from the removal of the dashboard and center console I performed last year to replace all six of the ACC "vacuum pods" (see HERE for that job). I hadn't replaced the 5 or 6 rubber vacuum "elbows" that connected the vacuum lines to the vacuum distributor (located behind the airbag in the dash next to the center console) which I had wanted to do, but had neglected to order new elbows; and I also wanted to better connect the flexible plastic duct-work running from the ACC heater box to the passenger side air duct -- I hadn't gotten a 100% positive fit.
My reasoning for replacing the vacuum elbow connectors is because they were original, 16+ years old and over time the holes get enlarged where the vac lines enter them. For the tightest possible seal, I wanted to use new elbows. You can see from the photo below the difference in diameter size between an "old" and "new" rubber vacuum elbow.
To do all of this work, the airbag & flexible duct had to come out so that I could access the vacuum distributor, as well as the sampler fan motor for replacement. The sampler fan is encased in a block of foam, and this assembly is then held in place with a C-shaped metal clip (see photos) so that it doesn't move around in the dashboard.
Tools needed to perform this job include:
- hand-held flashlight or Maglite
- 1/4" ratchet and extension, plus 8mm and 10mm sockets
- medium-sized Phillips screwdriver
- multimeter (to test power at the fan connector)
The part number for the fan is 000 830 19 08. As of February 2012, the MB list price for this fan is $63, and it is available through parts.com for $45. It is recommended to get the factory part, made by Bosch in Germany.
To replace all of these items, I did the following steps:
1) disconnected the battery via the negative terminal
2) removed the passenger side carpet and metal protective plate in the footwell, and unplugged the red airbag connector
3) removed the airbag via the long screw under the dash, and disconnected the two plugs that electrically attach to the back of it
4) removed the metal reinforcing pieces/airbag mounts
5) removed the black plastic flexible ducting piece running to the passenger side ACC vent
6) replaced 5 vacuum elbow connectors on the vacuum distributor
7) removed the sampler fan/foam assembly from its clip
8) briefly tested the sampler fan by reconnecting the battery, turning the ignition on, and seeing whether it was working or not (it wasn't turning)
9) checked the electrical connection to the sampler fan (after unplugging the fan) for voltage -- it tested out at 12.5 volts which was good
10) briefly attached the replacement fan to the connector to test its operation (it worked fine!)
11) installed the new sampler fan in the foam piece and re-clipped it into place
12) replaced the flexible plastic duct-work to the ACC box and the side vent, ensuring that everything was properly in place
13) checked speaker, night illumination and sampler fan wires in the dash for proper routing
14) re-installed metal airbag mount/dash reinforcement pieces
15) re-connected and re-installed passenger airbag
16) re-connected red plug in passenger side footwell and replaced metal plate
17) re-connected battery and reset (aftermarket) car alarm
18) entered radio code into radio
19) re-tested ACC sampler fan with a piece of tissue paper on grill (it worked!)
This is about a one-hour to 90-minute job if done slowly and carefully. Here are some photos attached to help illustrate the process.
Cheers,
Gerry
Attachments
-
 IMG_0785.JPG326.1 KB · Views: 153
 -
 IMG_0775.JPG460.4 KB · Views: 111
 -
 IMG_0776.jpg413.9 KB · Views: 115
 -
 IMG_0778.JPG475.5 KB · Views: 114
 -
 IMG_0779.JPG438.4 KB · Views: 110
 -
 IMG_0780.JPG366 KB · Views: 107
 -
 IMG_0781.JPG491.5 KB · Views: 107
 -
 IMG_0782.JPG405.6 KB · Views: 108
 -
 IMG_0783.JPG594.8 KB · Views: 110
 -
 IMG_0784.JPG391.5 KB · Views: 110
 -
 IMG_0763.JPG575.1 KB · Views: 114
 -
 IMG_0764.JPG301.3 KB · Views: 109
 -
 IMG_0765.JPG384 KB · Views: 104
 -
 IMG_0766.JPG453.9 KB · Views: 98
 -
 IMG_0767.JPG380 KB · Views: 99
 -
 IMG_0769.JPG292.3 KB · Views: 101
 -
 IMG_0771.JPG416.7 KB · Views: 103
 -
 IMG_0772.JPG594.3 KB · Views: 109
 -
 IMG_0773.JPG420.1 KB · Views: 105
 -
 IMG_0774.JPG567.4 KB · Views: 103
 -
 IMG_0786.JPG348.5 KB · Views: 116
 -
 IMG_0787.JPG525.9 KB · Views: 102
 -
 IMG_0758.JPG381.7 KB · Views: 97
 -
 IMG_0759.JPG354.3 KB · Views: 100
 -
 IMG_0760.JPG528.2 KB · Views: 112


") [/sub]
[/sub] not that 'ALDI' crap.!
 Usually on Euro spec cars the A/C is never efficient enough.