• Hi Guest !

    Welcome to the 500Eboard forum.

    Since its founding in late 2008, 500Eboard has become the leading resource on the Internet for all things related to the Mercedes-Benz 500E and E500. In recent years, we have also expanded to include the 400E and E420 models, which are directly related to the 500E/E500.

    We invite you to browse and take advantage of the information and resources here on the site. If you find helpful information, please register for full membership, and you'll find even more resources available. Feel free to ask questions, and make liberal use of the "Search" function to find answers.

    We hope you will become an active contributor to the community!

    Sincerely,
    500Eboard Management

OWNER bclifton (300D)

Brian, don't give up hope yet. Main symptom I'd look for is "cold high pressure" in the upper radiator hose - if it's soft when cold, and the system is tight, you may be OK.

Worst case if the head is cracked (and confirmed as such), just replace the head. It is worth fixing this car, IMO. Only ~2500 imported to USA and I bet a third of them are deceased by now. The block should be fine, really the only concern here is the head.

Note that testing for exhaust gasses in the coolant may not be helpful. In some cases with a cracked head these can exhibit a symptom where there is no pressure in the cooling system when cool or warmed up to 80C, but after a single pull to redline there is instantly high pressure in the cooling system - indicating a crack that expands with higher cylinder pressure.

Don't give up yet though!

:flush:
 
Huge thanks for the encouragement Dave (and everybody else too). There's not too many people in real life I can talk to about these jobs - being able to take part in message boards like this is really a special thing for me 🙂

And wow - I didn't know the production numbers were so low - or rather the # imported into the US. Similar to @Bogeyman, I get lots of thumbs up and people saying "sweet car!" when taking the car around. Life is a learning experience - sometimes, it's fun. Sometimes it's less fun 😂

I'm with you on staying the course - it just took a while for the mind to clear. Things are going to be OK. 🙂 And I think I know exactly what went wrong (more on that below). Just in case, I've already started scouting for the #22 head (best price I can find is $2500-ish USD)- and have found some #18 heads at a great price ($700-ish USD).

My friend Al had a #14 head also and experienced cracks without overheating and sent some pictures to me too. Here's what the cracks looked like in his #14 head:
al-cracked-head1.jpegal-cracked-head4.jpegal-cracked-head3.jpegal-cracked-head2.jpeg

Rather than being immediate damage that prevents the car from running, it manifested for him over time. He shared he started experiencing loss of power and then other symptoms showed, like white smoke in the exhaust.

Here's where I think things went wrong. Hope this helps someone else who is still learning like me! 🙂

I inspected the thermostat and it seemed fine. I put it back together and then proceeded to fill the car with the G05. Knowing what I know now, I am 99.999999% sure that I ran into an airlock. I went through the FSM in good detail again

Here's an analysis of what happened with the two flushes I did (where it got to 120C and then fell down to 85C):
  1. I was only adding coolant to the expansion tank which is what I suspect the mistake was.
  2. The thermostat with the hole in it (special tool mentioned in FSM) would be letting coolant through... but a real thermostat only lets through when it comes to temp (82C).
  3. There appears to be a bypass for the thermostat, allowing fill from the expansion tank to the block, but it's a very small line. The water pump then blends this with coolant coming in from the thermostat (if open).
  4. I was starting the car minutes after adding the coolant. I didn't give time for the block to fill OR air bubbles to work themselves out (car was on ramps, front elevated... I could have just gave it an hour or so before trying to let out air).
  5. With car on, thermostat was stuck closed as designed... By the time it opened, the block was overheating. It sucked the expansion tank dry and I had to fill it again.

Thinking over things logically, the car can take 10 liters of coolant. In the two cases above, I added only 4 liters at most... which should have been a dead giveaway.

This time - I added coolant into the block directly on the OTHER side of the thermostat using the upper radiator hose. I fed well over 4 liters directly into the engine from there. Then, I filled the expansion tank with another 3-4 liters and started burping out the air. Lots of bubbles, I kept refilling the expansion tank.

I turned the car on quickly, then put defrost on - which activates the circulation pump (behind/under the washer bottle). I verified this was working and could feel air bubbles in the lines. I squeezed these and the air in the cabin seemed to be warming up (didn't leave car on very long though).

My next step would have been to let the car sit on the ramps for a good amount of time with the expansion tank cap open and let the air rise out. But when cleaning up, I noticed the thermostat leaking. The OM603 uses a different kind of seal than I've used before (not simply a rubber O ring) and inspecting it was enough to really break that seal. The leak was minimal, but I drained the coolant for now and will be ordering the parts ASAP (602-200-00-15 for thermostat and 601-203-00-76 for the seal). Maybe next weekend will be the moment of truth!

Thanks again for following along 🙂Hope everybody reading has a great weekend. Here in the US, it's Memorial day weekend
 
Last edited:
Glad you got the refill drill sorted out! Another tip when filling, pour so the reservoir is nearly overflowing - it takes some time for liquid to drain through the small vent hose. Keep adding liquid until nothing else goes in, then install the cap & start the engine, run the heater on max, etc. When the t-stat opens the "overfull" level in the tank will have dropped substantially, and it will take ~1 quart or so to top up after it cools down.

For these engines, I'm wondering if a vacuum fill tool might work well. Not sure - never tried it on the OM603, yet.

:choochoo:
 
Seems things are back to normal for now 🙂

I got a new thermostat / gasket and put that in last night. With that in, I filled the cooling system up with the steps I share before. I got about 9 liters in there - just taking things nice and slow. I turned the car on, put on defrost - heat came on pretty quickly 🙂 Added some more coolant, closed the cap... and everything was perfect. It worked like expected, no issues at all 🎉 Filling the block from the upper radiator hose was the secret trick

The car drives great - so happy to have it back up and running. Is there a problem with the head? Maybe - we'll see. No smoke out of the exhaust, idle is pretty smooth. The car does have over 400k miles on it... so at some point in the future, the head will need to get pulled anyways. But things seem pretty good for the moment! 😀
 
Not a huge update - but it's been a solid week after getting things back together and the car is running like a champ.

I captured how things look in a new video being uploaded now - you can skip around and see the important parts. Things look the same as before - not noticing any difference after the overheat incident. In the video, I show some of the interior too. These are just great cars 🙂

 
Car is still running beautifully 🙂👍

Super small detail, but replaced the dipstick with the original part number (602-010-14-72). It had a generic oil dipstick in there before which didn't seal. This one has the nice snap feel and sound you expect when you put it in 🙂
PXL_20230623_053205729.jpg

If you've followed along, I've been troubleshooting cruise control without too much luck. Having already replaced the cruise control amplifier (may have been OK?) and the cruise control actuator (was definitely broken) both with rebuilt parts from ProgRama, the next step was to check the basics. I know that cruise control will cut out when you hit the brakes... so I checked out the stop lamp switch.

This switch was original and definitely broken (was stuck all the way pushed in). Not sure how I missed this - the brake lights were basically on all the time 😂

I just finished putting the new one in (001-545-01-09) which is fairly easy. Remove the electrical connector, push the side tab in on the switch, turn it 45 degrees, and it pops right out. When putting the new one in, you want to pull the switch out all the way (during shipping, it may have been pushed in). The new part had two electrical connectors but of course my car only had one- so I plugged that one back in.

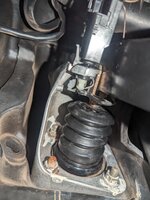
Replacing the switch didn't immediately solve the problem, so I took a peek at the brake pedal. At rest, there's a metal bar on the brake pedal that needs to be pushing in the stop lamp switch. Not pushing it in all the way, but enough that the brake lights turn off. In this case, someone (or something) had bent that metal bar and it wasn't even close to touching. Grabbed some channel locks, gave it some elbow grease, and bent that metal bar back into shape. You can use your hand to push the switch to get a feel for where it needs to be- I made sure it's pushed in at least 4mm in the rest position

Here's a pic - the switch is visible, it's like a white/yellow plastic cylinder and it's being pushed in. It's resting against the metal bar near the brake booster linkage.

PXL_20230623_045942631.jpg

Fixing this fixed the brake lights (works as you'd expect them now) and now cruise control is working great! 🎉 Super happy to have this resolved

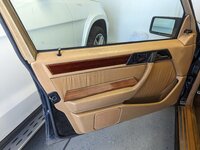
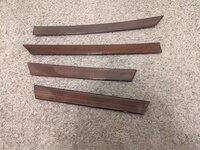
I hit the junkyard last weekend and took a bunch of parts from a 1990 300E (4Matic). I got an extra set of wood paneling for the doors and got that already mailed over to Igor to be refinished. I got this full set for about $5 (the guy rang it up as 4x "nuts and bolts").
PXL_20230619_045727122.jpg

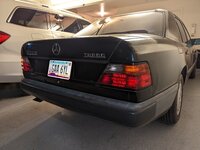
And then the last update - I got a set of tail lights for $14 ($7 each)! One of them (right) is flawless. The left one had a small crack that I didn't notice until getting home... but I found a NOS left lens on eBay for $100 and that came in today. I put them on and they're looking amazing. The car basically has a brand new set of tail lamps to go along with the new euro head lamps 🙂
PXL_20230623_051441839.jpgPXL_20230623_051502560.jpg

Next up are a few things which have been long standing:

I suspect my ignition switch is broken
There are times where the car "randomly" seems to act like it's in position 1... radio cuts out, windows stop working, and a few other things. You can tell when it clears up because the SRS light blinks and the radio comes back on (like you turned the car on again). I've traced the circuits themselves and they look good- it has to be the ignition switch. Backing up my suspicions, I found an old thread on peachparts where someone has the same car (87 300D Turbo) the same symptom and replaced the ignition switch- and it seemed to work for them. Got a new one (202-545-01-04) and will get this installed over the weekend.

The transmission is leaking fluid
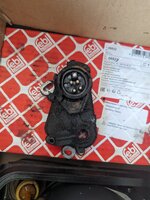
I got a new pan (126-270-10-12), pan gasket (126-271-11-80), filter (126-277-02-95). Shout out to Anthony at MB of Naperville (mboemparts.com). They've always been solid, but the past few months I've gotten fast email updates and tracking numbers. When I go to do this, I'll need to drain the torque converter too- doesn't look too difficult (turn the crankshaft until you can see the bolt). Will need a new crush washer for that too I suspect

Suspension overhaul
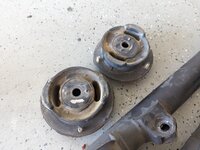
I got new unused set of front struts / bump stops / ball joints from @Alphasud40 a while back and I've been waiting for some tools to come in. I got a spring compressor and just today I got a super nice ball joint kit specifically for the W124. This will be my first time attempting any of this - will likely be a month or two before getting here though (will also replace strut mounts, got 2x new MB parts 124-320-14-44-64).

Pic of the tools. Spring compressor by 8milelake and ball joint tool by GuN design
1687502037087.pngball-join-tool2.jpg
 
Last edited:
Brian, you’re doing good work here. I see you’ve purchased an inexpensive spring compressor. Please be very careful. I just did the strut mounts on my 94 E320 last weekend. I purchased a used genuine MB tool from a member a few years ago. It wasn’t cheap but I feel safe using it. Personally I would not use one of these cheap tools like the one you purchased but that’s just me.
I’d be happy to lend you my compressor if you’re interested.

Regards,

Peter
 
Nice detective work on the brake switch. I can't believe the metal bracket was bent that much.

1) Ignition switch is likely toast at 400kmi+. Jeremy5848 has done some amazing DIY repairs and writeups, sadly he just sold his last W124 and only has a W210 and W211 diesel at the moment. His Fruitbird writeups can be very useful, like the one you found. I'm curious how your install goes, I did this on my 87 300D around 25 years ago and I recall it wasn't fun. I need to do the same job on an 036, there is a recent thread here with info, but it's slightly different due to the brake/shifter interlocks found on 90-up models, and lack of vacuum switch found only on diesels.

2) Absolutely drain the converter when servicing the transmission, and yes it needs a different crush washer (thin, aluminum). Refill will be right around 7qts total, I assume you know to fill half / start engine / fill the last with engine running. Note that leaks are, IME, rarely from the pan or pan gasket... unless everything above the pan is 1000% dry. When you locate the converter drain, mark the balancer up front so it's easy to locate next time.

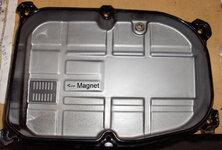
Add the pan magnet 220-271-00-98 if you have one, if not don't worry about it. (List price has doubled vs 15 years ago, now $6+). I torque to 5Nm first, then 8Nm, and a final 8Nm for grins. If the pan seems to leak afterwards, don't tighten beyond 8Nm, the leak is coming from north of the pan gasket surface.

3) The ball joints have a notch to indicate orientation, it is CRITICAL this is placed in the proper position when installing. If you move the new joint up/down vs side/side you'll understand why.

:banana2:

trans_pan_magnet1.jpg trans_pan_magnet2.jpg
 
Quick update on things - some forward progress and some backward progress 😅

First the good! I put in the new ignition switch, which was a piece of cake. I've put a decent amount of miles on the car and it's been perfect - no power cutting out, things are wonderful.

Thanks for the part# on that magnet, Dave! I got it ordered with MB of Chandler local along with a few other small things 🙂 I put a new crankcase breather pipe on recently and noticed the grommet on top of the valve cover was not in great shape (wasn't sealing; ordered a new one). The bottom of that pipe doesn't really seal tightly - not sure if that is regular.

The transmission pan itself (the one on the car) is in pretty poor shape (dents I think, super dirty); I'll have to check above the pan again for leaks. When doing this service, I might tackle putting in a new neutral safety switch, new shifter bushings, and the transmission mount (parts on hand; just need to set aside the time)

Now for the bad - I guess there's only one bad issue. Starting yesterday, I've been having a problem starting the car. When starting cold, it starts after 3 or 4 cranks. It used to start instantly 🤔And cold is a funny term - it's been in the high 90's / low 100's F (low 40's C). But if you try to start it again after it had been running, it has trouble starting again. It'll always eventually start - just takes some tries. Once it's running though, things are smooth

I did some quick troubleshooting and recorded what I found. I'm guessing the injection pump is trying to prime the system (so there will be fuel when you go to start)... but it's having a problem for sure. Clicking noises, almost sounds like air bubbles. I don't see any fuel leaks from the main supply, the fuel heater, the prefilter, or the return (all dry). There is some wetness on the block behind the injection pump

Will be digging in on this. Here's a link to the video so you can see it yourself 🙂
 
Last edited:
I've never heard sounds like that from an injection pump. Is the engine running in that video?

😨
 
I've never heard sounds like that from an injection pump. Is the engine running in that video?

😨
No this is in position 2 after the glow plugs turn on. Starting when it does not work sounds like cranking but no ignition (like there's no fuel)

Gas cars would be sending fuel from the fuel pump. Not exactly sure what's happened here 😅
 
Last edited:
No this is in position 2 after the flow plugs turn on. Starting when it does not work sounds like cranking but no ignition (like there's no fuel)

Gas cars would be sending fuel from the fuel pump. Not exactly sure what's happened here 😅
OK - with engine off, that noise probably isn't coming from the IP... however, you can disconnect the wires to the ELR (round red thingy at the top/rear) and see if there's any change.

Next, when you hear that weird noise, feel the glow plug relay at the driver fender well. That's the only thing that should be in operation with the key in position 2. Normally this should be almost silent.

:blink:
 
OK wow- this is a bit crazy. But I found what was making the noise and it's unrelated to the fuel system. Will need to troubleshoot this also

Basically, the thing making all the noises was the cruise control actuator. It's flipping out and you can test by unplugging it and the noise stops. Maybe when I replaced it there was a calibration I missed? It does work though if you get the car started and it seems to go away then

Two problems to troubleshoot lol. Loose connections around the PCV (breather pipe) shouldn't be a problem, right?
 
No calibration is needed for the cruise actuator. Contact the rebuilder and see if they know what might be happening. Gotta be either the cruise amp or the actuator, but I thought both were rebuilt, so uh-oh.

The PCV tube at the valve cover likes to leak slightly, even with a new grommet. I keep a couple of those grommets in stock, they harden after a few years. The other end pokes into the rubber intake air snorkel thingy, and it's a light press fit. If you get minor leakage there, add a hose clamp and just snug it down a bit.

:strawberry:
 
Small update

I got the new seal for the crankcase pipe (601-016-01-63) and installed - much better seal now on the top. The old plug was massive; totally swollen up. Not sure what happened there. The lower connection that goes to the accordion/air snorkel thing, I pushed the foam insulation that comes on the new crankcase pipe down over the light press fit and it's holding good 👍

I talked to ProgRama on the phone and they're super interested. I was wrong above - when the car starts, the cruise control actuator DOES continue to make the clicking sounds. I'll have to use my hand and see if it's moving- but it sounds like it's all internal (there are vibrations coming from the unit). They said to take my time (as getting to it involves removing intake manifold again) and they will inspect/repair help me get it sorted 🙂

That leaves me with just the difficulty starting. I charged the battery as it was down to 75% and even when fully charged, the problem is still there. Problem being that it'll crank endlessly but not actually start. I tried a total of 15 times and 3 of those times the car started. Once running, things are fine. No noises, no apparent leaks or anything. Just tricky to get things started

Will hit the books and search engines a bit, see what I can find. Any recommendations are appreciated too 🙂

One quick edit too: on a whim, I asked how many W124 windshields (matching for my VIN) are available (124-670-33-01-64). Part is out of production and dealership network only has 11 in stock- 10 in USA, 1 in Germany and my cost was $500 after taxes so I bought 1 of those 11 and it's on the way here 🙂 The current one has some small cracks - I'll keep this new part handy for a rainy day. If you're in need of a windshield, you might want to check and get one before it's too late
 
Last edited:
For the hard starting: Have you checked current draw at each of the 6 glow plugs, assuming all 6 measure <1.0 ohms at the 6-pole connector at the relay? Hard starting when cold is generally glow-plug related.

:scratchchin:
 
Found the cause - but not sure on the root cause yet.

  • I tested the glow plugs when new and made sure they all turn bright red/orange quick.
  • Just now, I tested the voltage to each glow plug - verified it's getting there through the relay, which is great.
  • I forgot how to test the resistance at the relay - but I verified the fuse was good and then I couldn't remember if you need to test the pole on the relay or the caps inside the connector.
You have to keep going back in the car, turning to position 0, then back to position 2 because the preglow will time out after 30 seconds. During this process, I noticed that the stop lever was down on the injection pump 🤔 Then one time I did position 2 and it raised itself up

It's believe it's supposed to release vacuum and raise the lever when you turn the ignition (not sure at which position), but that's not always happening for some reason. However, if you turn to position 2... wait a few seconds... then go to position 0 and then back to position 2 it releases the vacuum and the lever raises right up. When that happens, the car starts right up no problem.

Turning the car off puts the injection pump stop down and it holds there. If you pull on the lever by hand and mess with it (pull it up by hand, put it back down) it seems to lose vacuum slowly. That seems regular. To manually reset it, you can of course unplug the brown/blue vacuum connector going to it and it raises right up. Between the key to position 2/0/2 and manually unplugging the vacuum line, I have enough work-arounds to get around again 😂

But I am curious what is wrong. I did replace the ignition switch and made sure the vacuum connectors are back on the correct connectors on that ignition / steering lock assembly. If they were swapped, I think the car wouldn't be stopping when you turn it off. It stops just fine.

The stop lever seems to be leaking too, which is interesting (this stuff is totally new to me!). Good progress made diagnosing 🙂
 
Last edited:
  • I tested the glow plugs when new and made sure they all turn bright red/orange quick.
  • Just now, I tested the voltage to each glow plug - verified it's getting there through the relay, which is great.
  • I forgot how to test the resistance at the relay - but I verified the fuse was good and then I couldn't remember if you need to test the pole on the relay or the caps inside the connector.
Voltage to the plugs is good, but the accurate test is current draw. A weak / bad plug can show 12v but will have much lower current draw. To measure resistance, unplug the 6-pole connector from the relay, measure from each of the sockets to ground. A new plug is 0.6 ohms, you should see 1 ohm or less at each. BTW - the afterglow upgrade is really nice, particularly in cold weather. Need a relay from a 90-95 OM603 along with a different temp sensor at the cylinder head.


It's believe it's supposed to release vacuum and raise the lever when you turn the ignition (not sure at which position), but that's not always happening for some reason. However, if you turn to position 2... wait a few seconds... then go to position 0 and then back to position 2 it releases the vacuum and the lever raises right up. When that happens, the car starts right up no problem.
Correct - when you turn the key on, the stop lever should be released and flip upward.


But I am curious what is wrong. I did replace the ignition switch and made sure the vacuum connectors are back on the correct connectors on that ignition / steering lock assembly. If they were swapped, I think the car wouldn't be stopping when you turn it off. It stops just fine.
I'm curious as well. Make sure the vacuum tubes are plumbed correctly in the engine compartment. I don't think it matters if they are reversed at the ignition switch, but I'm not certain.


The stop lever seems to be leaking too, which is interesting (this stuff is totally new to me!). Good progress made diagnosing 🙂
Leaking oil at the shaft? There's an O-ring for that....

:jono:
 
No new work done - but have some stuff on deck 🙂 The 300D has just been a great driver. There have been a few times (3 times?) in the past month where the stop lever got stuck down. If it cranks for more than a second or two, I just pop the hood and check. If the lever is down, I just pull the vacuum line to the shut off switch and wait a few seconds. Plug the vacuum connector back in and then she starts right up.

I'm going to throw some parts at it - worth a shot I think 🙂 Just waiting on the parts (one part coming in from Germany, holding the order up for a few weeks). Taking the ignition out is fairly easy, there's a diesel specific valve on there that the vacuum lines plug into which I can replace (000-460-02-84). And then the actual shut off switch itself (000-070-46-53). The vacuum line itself is good as it's holding vacuum- it's just not releasing. I'm not exactly sure what releases the vacuum? but turning from position 0 to 2 and back to 0 will sometimes release vacuum and flip the shut off valve up.

I did receive the brand new windshield and have that stored in my shed 🙂 The 300D has an existing crack that's been slowly spreading- I figured once that gets bad this can be the replacement. It looks like there are some ways to protect the windshield (ex: like Lamin-X, but for your windshield). Will research that a bit more. Arizona deserts are brutal for windshield damage.

One job I'm planning out now is the transmission. It's shifting really bad from 2nd gear to 3rd gear - revving up like it's going to shift and then revving slows down. Oscillating up then down. It gets stuck like this indefinitely... until you either let go of the accelerator pedal OR push it down (activate kickdown solenoid). Then it breaks out. Reverse still works. Also, when you decelerate and go around a corner, that downshifting takes a minute to kick in and the car shakes when going into gear. I was going to pull apart the transmission to replace pan (new pan with the W220 magnet!), filter, pan gasket, neutral safety switch, shifter bushings... but the car is approaching 423k miles and I don't have any records of the transmission being rebuilt. There's a guy Adrian I know locally at German Transmission who does a great job. He can do a full rebuild and check out things like the flex disks while we're there. I gave him a call today and will be bringing the car in once the temperatures cool down a bit. It's been over 110F (43C) every day for over 25 days now

🥵🌵

Last thing I wanted to share - I took the family on a trip to New Jersey. I lived in Sparta Township as a kid (only ~4 years) but I remembered loving it. It was great to escape the heat here in Arizona and revisit the area (NJ/NY/PA) for the first time since the early 1990s. While we were in NJ, I made a trip up to Becker Auto Sound in Saddle Brook and got to meet everybody there. I had bought a Becker 754 w/ Bluetooth a while back and the tape player broke - they fixed it on the spot in under 10 minutes. I highly recommend checking them out if you want to keep your car OEM - they still have a ton of parts (pigtails for restoring the wiring, new faceplates, etc) and can rebuild/warranty parts too.
 
Last edited:
I did receive the brand new windshield and have that stored in my shed 🙂 The 300D has an existing crack that's been slowly spreading- I figured once that gets bad this can be the replacement. It looks like there are some ways to protect the windshield (ex: like Lamin-X, but for your windshield). Will research that a bit more. Arizona deserts are brutal for windshield damage.
I like the idea of Lamin-X for the windshield. I wonder how good the optics are, and how long it lasts?


One job I'm planning out now is the transmission. It's shifting really bad from 2nd gear to 3rd gear - revving up like it's going to shift and then revving slows down. Oscillating up then down. It gets stuck like this indefinitely... until you either let go of the accelerator pedal OR push it down (activate kickdown solenoid). Then it breaks out. Reverse still works. Also, when you decelerate and go around a corner, that downshifting takes a minute to kick in and the car shakes when going into gear. I was going to pull apart the transmission to replace pan (new pan with the W220 magnet!), filter, pan gasket, neutral safety switch, shifter bushings... but the car is approaching 423k miles and I don't have any records of the transmission being rebuilt.
If the other shifts are ok, it MIGHT be related to the valvebody. If you had time to kill, you can remove the VB, disassemble on the workbench, and clean / reassemble - assuming you don't find any broken springs or valves/pistons. Very few of the VB internals can be purchased separately. Remember that a typical transmission rebuild only replaces wear parts: clutches/bands/steels. I don't know what rebuilders typically do with the valvebody, if anything - it's worth asking though. But yeah, with possibly 423kmi, a rebuild would make sense. Ask about the VB and also what the warranty is.


There's a guy Adrian I know locally at German Transmission who does a great job. He can do a full rebuild and check out things like the flex disks while we're there. I gave him a call today and will be bringing the car in once the temperatures cool down a bit. It's been over 110F (43C) every day for over 25 days now

🥵🌵
Over 100F for a month straight? That's in-sane. :eek:


200.gif
 
@bclifton,
When I had my front end done with 3M Clear Bra the installer said he could do the windshield. Personally, I was a little skeptical about doing it but thought if I ever got a new windshield I might try it.

My concern was what happens if you use the windshield wiper? I’ve come to realize that my car hasn’t seen rain in probably 15 years so that wouldn’t be a problem fo me.

lol
 
Now that is a small world. I also lived in Sparta as a kid for about 4 years… when the heck were you there? It would be a kick if we overlapped!
 
Now that is a small world. I also lived in Sparta as a kid for about 4 years… when the heck were you there? It would be a kick if we overlapped!
@a777fan woah! That's awesome 🙂 Apologies I missed this (just saw your message now)

I was there in Sparta from 1986 until 1991

It was so great to visit. I could live there again, honestly. Especially with how horrible the weather is here in Arizona at the moment
 
Last edited:
Quick update to the above!

Despite the horrible weather (was 111F outside when I did the work in my garage), I set aside some time and replaced both sides of the shut off valve. The "vacuum box" that goes into the injection pump and the vacuum housing that goes on the ignition. I also took the time to verify which line was which - brown/blue to shut off valve, brown to brake booster. Problem solved!

Was it the parts? Did I hook up the vacuum lines in reverse when replacing the ignition switch a while back? The world may never know 😂 The car did shut off just fine before this fix- so that would be odd if reversing the vacuum lines was the culprit.

I had to take a few breaks, but it's all back together. It got so hot that the bolts, tools, and parts were slipping out of my hands from the sweat. Video up here of the process and the results 🙂
 
It's been a while since an update - but some happy things to report 😀

I took the car into German Transmission here in the Phoenix area for a full transmission rebuild. Some of the things addressed:
- All seals, clutch packs
- Replace front and rear bands
- Clean up valve body (was in good shape!)
- Replace modulator valve (the vacuum box), accumulator (green with springs; pictured below in baggie), neutral safety switch (was broken)
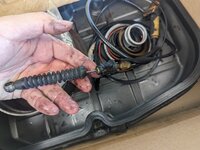
- Replaced kick down cable (this is getting close to NLA - get one while you can)
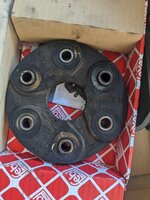
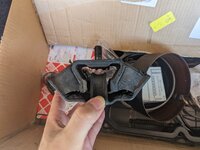
- New shifter bushings, new flex disc, new transmission mount
- New trans pan, filter, pan gasket

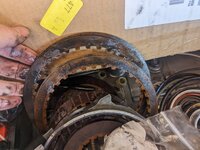
Some pictures of the old worn parts (trash)
PXL_20230909_221322009.jpgPXL_20230909_221336666.jpgPXL_20230909_221300961.jpg

PXL_20230909_221051316.jpgPXL_20230909_221003048.jpgPXL_20230909_221122393.jpgPXL_20230909_221152473.jpg

After the bench rebuild, Adrian (owner) didn't feel comfortable taking the car out without fixing the steering. I've had a really bad steering gear box leak and with everything it's dripped on, it's really eaten away at the rubber on the steering coupler. Both replacing the steering gear box and steering coupler were on my list but Adrian took care of them. Steering coupler falling apart 😱

PXL_20230909_220952770.jpg

The total for the thorough transmission rebuild and steering gear box reseal was $3,500 - which is a chunk of change. Buying the car was only $2,000. But overall, very happy and I know he did the work right. The car is shifting beautifully! 😍


I started tackling the AC which hasn't been the best. After the dash replacement, the vacuum pods are all sorted out and working as expected 👍 But it seems to be intermittent when the air gets cold. I replaced the climate control [KLIMA] relay with a used (seems to have been refurbished) part from eBay (003-545-69-05). This got the cold air coming out consistently when the car was moving.

I met with my friend Bud yesterday and he did an evac/recover on the system. No leaks found when testing - added new compressor oil (1 ounce) and put 2 pounds of R134a in. It's not getting cold when idle and I think we found the reason why. The electric fan (in front of the condenser) isn't coming on for the lower speed. The high speed works fine. There's a 0.2 ohms ballast resistor behind the LEFT headlamp, attached to the body. The wiring for this is sketchy first of all (missing some insultation) but then we also suspect the resistor is blown. I have a new one ordered from Latvia (000-158-25-45) - but it was hard to find! When the electric fan comes on, it should help cool the condenser coils which should let the refrigerant turn back into a liquid again and reduce pressure (reducing strain on compressor). When driving and getting air in the grill, it does seem to get nice and cold.


And then just things I need to address at some point:
  • Putting in that ballast resistor once it comes in to restore the electric fan low RPM operation - then AC should be good? 🤞
  • I need to address some steering and suspension components. The parts on my car are very tired. Both ball joints, strut, strut mount, tie rods, steering linkage, idler arm bushing, steering damper, and more. I have all the parts - just need to set the time aside.
  • Removing the cruise control actuator and sending back to ProgRama (it's clicking when idle; currently unplugged)
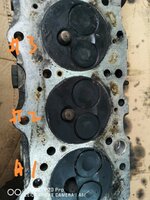
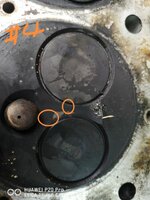
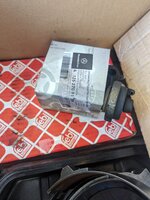
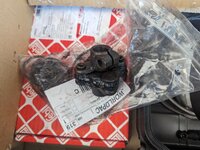
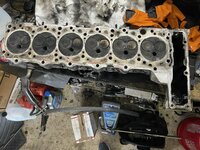
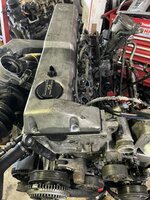
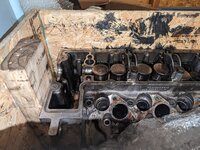
  • I ordered a #20 head so that I can start getting it ready. Part number 603-016-20-01 from a 1995 S350 (W140). Looks to be in great shape - with a few corrosion areas that can be filled when it's time for a machine shop. I hit the seller up and also got the prechambers, collar nuts, and injectors since those are likely different than mine (ex: collar splined, hole is at an incline)
head1.jpghead2.jpg
 
Last edited:
Brian, check if the pressure switch at the drier is green or red. The original switch is green and does not turn the electric fan on until 20 bar (!!), which is way too high, the fan does not run often enough. Later years changed to the red switch that turns the fan on at 16 bar. Unfortunately you have to evacuate the system to replace the switch.

You can test if the fan is working by shorting the pigtail leads of the switch, this should turn the fan on low speed through the preresistor, with the ignition on. Hopefully with the proper charge and airflow, it will cool better. Unfortunately, R-134a conversions do *not* work well on the early 124's. The best solution is to convert back to R-12, but that ain't cheap. The budget solution is to use EnviroSafe, HotShot, or other alternative blend. Those should outperform R-134a.

For the steering stuff, replace it all at the same time, along with whatever other suspension work needs to be done (rear subframe bushings, dampers, etc). That way you only pay for 1 outrageously priced dealer alignment. I'm curious what your dealer charges. I know some are as high as $300, although I think ±$200 is more common.

:spend:
Hi Dave - pressure switch is Red, which is great! I didn't know original ones were green - learning a lot about AC recently. Will definitely keep an eye on that 🙂 Each of these small clues helps analyze the car for what is original

It may take a while for the preresistor to come in from Latvia - I might grab one from the junkyard this weekend. Rolling the dice on if it'll work - but it'll be cheap enough in case it doesn't. A new 1987 260E came in locally with Palomino interior, will be pulling parts on Saturday 😀

Something small - but rewarding! With a small world twist. I had gotten a hazard triangle from the junkyard a few weekends ago - MINT shape. No missing paint, no rust, rubber feet in perfect shape.

1694734540158.png1694734519585.png1694734594264.png
The 420SEL I found the triangle in actually belonged to my friend Bud's previous customer, a person named Don. Don had passed away some time in the 2010's- the car was still in good shape. I found business cards in the car for that person and also the instrument cluster was marked with his last name and the name of Bud's shop (MB Motors).

Today, the bracket for the triangle came in (201-890-00-14) so I just installed it 😁
1694733174677.png

Of course, weeks before I got lucky and found this hazard triangle I had ordered one online from England. It's in good shape too. Unlike mine, this one is marked with MB part number 000-590-54-12. It has some missing paint along the edges. If anyone is looking for one let me know! (shoot me a DM, I can share pics)
 
Last edited:
Some more updates on this beast 😀 I got the #20 head in and it came in great shape. Basically, I have the head itself, the camshaft (and sprocket / cam towers), lifters, valves, springs, etc. I also got the injectors, prechambers, and collars from the same car / same head. I sent the injectors to my friend Al and he's refurbishing them now. I believe these are different than my current #14 head injectors because these new injectors thread into the prechamber instead of the collar (instead, the new collar has splines in it).


IMG_20230916_131439_01.jpgPXL_20230917_051928112.jpgPXL_20230917_045054224.jpg


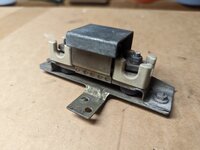
I did end up going to the junkyard again after my last post and pulled a used 0.2 ohms ballast resistor (000-158-25-45) and that worked beautifully! The electric fan is coming on to cool the condenser and the AC is working perfect at idle again! 😀

Here's what it looks like:
PXL_20230916_203909839.jpg

For W124, it's behind the LEFT headlamp. I don't think it's possible to replace without taking the headlight out, but that's pretty easy. The whole replacement took me 20 minutes. For the W126, it's buried near the fuse box / master cylinder and might be more of a nightmare. This is a part I'm going to pull from now on at the junkyard - want to have a stockpile of these as they are NLA. The Latvia seller still didn't ship my new part yet 🤷

After all this, I took a week long vacation with the family to our ranch in San Luis Potosi, Mexico. Had a great time there disconnecting from everything. Great weather, great food - really great people 🙂 Definitely a change of scenery when cows are walking down the street in front of your house
PXL_20230927_223747279.jpgPXL_20230926_130519412.jpg

There were two more small projects I tackled...

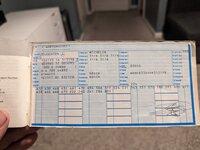
One was researching and making a reproduction "Data Plate". I think other car manufacturers called these "Protect-O-Plates". They were in Mercedes-Benz cars until the late 80's or early 90's - I'm not sure when it was phased out. I have a few from cars that I've stripped and was able to figure out most of the numbers that are supposed to be there using my 300D's data card:
PXL_20231001_070717871.jpgPXL_20231001_070639694.jpg

Here's a link to seller on eBay that made it for me - it was $20 shipped. They have an excel sheet you fill in

1696150387158.png

It's not perfect - I took some guesses. The 03050 looked to be the #25 Aufbau / Fahrerhaus field, but I don't know for sure. One field seems to be 000 And the field I marked as 1 can have other values too (not sure if that is which factory?). I couldn't find a real data plate for a W124 300D turbo, but I did find one for a W123 300D turbo and it had the model as 300D-T, so I used that.

PXL_20230921_065602910.jpg

It'll never be an authentic data plate - but I thought it was a fun thing to try and create. I used mb.vin to find a date to put into "production date" and then for the delivery date, I put the date when I personally bought the car (of course, putting my name/info too). 😂 The font on this one is slightly larger and I also noticed the plate was embossed upside down. But otherwise, it's a close match

The last small thing I did was get a small bracket that attaches to the fuel filter housing which holds the brake booster cable. I found an entire assembly on eBay and bought it - I'll resell the rest. Just need to get a clip so that the glowplug harness can get clipped onto this bracket. The glowplug harness is pretty beefy though- I don't have any clips that big.

Here's a before/after:
PXL_20231001_071625456.jpgPXL_20231001_074627567.jpg
 
Last edited:
Nice work! Many of the plastic clips are NLA, or have been replaced/superceded by different size (and different color) clips. Photo below shows the primary ones available 10+ years ago, I haven't checked to see if they are still available or not. Best bet is to scrounge good used clips from junkyard cars, and get a stockpile of original size / original color clips.


plastic_clips1.jpg


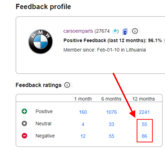
BTW: What is the name of the seller in Latvia? 1 month without shipping yet is unacceptable. I had a couple bad experiences buying from an eBay seller in Lithuania that claims to have NLA parts, but never ships, and hopes you will forget to file a claim before the claim window closes. Avoid carspoemparts like the plague (atrocious feedback here, click on the number below 12 months for neutral/negatives to see how they hose people). There's a seller in Latvia that I've purchased from, that won't ship for 2-3 weeks, indicating they are selling stuff they don't have on the shelf - not cool.

1696169930484.png
 
Nice work! Many of the plastic clips are NLA, or have been replaced/superceded by different size (and different color) clips. Photo below shows the primary ones available 10+ years ago, I haven't checked to see if they are still available or not. Best bet is to scrounge good used clips from junkyard cars, and get a stockpile of original size / original color clips.


View attachment 174829


BTW: What is the name of the seller in Latvia? 1 month without shipping yet is unacceptable. I had a couple bad experiences buying from an eBay seller in Lithuania that claims to have NLA parts, but never ships, and hopes you will forget to file a claim before the claim window closes. Avoid carspoemparts like the plague (atrocious feedback here, click on the number below 12 months for neutral/negatives to see how they hose people). There's a seller in Latvia that I've purchased from, that won't ship for 2-3 weeks, indicating they are selling stuff they don't have on the shelf - not cool.

View attachment 174828
Thanks for the part number on those clips! 🙂 (love those pics with part numbers). I just got a set of 9 of the 000-995-58-44 for $9.29 shipped, I think those will do the trick. I only have the 000-995-60-44 and haven't had luck finding good clips at the junkyard.

The seller on eBay is koplx55 - they have slightly better feedback ratings than the one you posted

After reaching out to them, I did get a shipment notification - so we'll see what happens. There are many folks who bought this part who gave positive feedback, so I have hope 🙂

I did hit the junkyard yesterday though and pulled a ballast resistor for a 1990 300E - it has a much different style. This appears to be part number 000-158-32-45 instead of the part number 000-158-25-45 that I have. I'm guessing this is what everybody with an E500E has too. I'm not sure if it's 0.2 ohms also? But I bought it just in case (was only $7). Kind of cool - the coils are exposed and visible instead of being inside the ceramic
PXL_20231002_004914234.jpgPXL_20231002_004940236.jpg
 
You are correct, the 000-158-32-45 resistor is used on the V8 models as well, and it's NLA. There are a few on eBay for $200+ now for NOS. I also am curious what the resistance is of each style, and if they are interchangeable. I believe the later/larger type is used with the dual-fan setup found on most M104 (?) and all M119 in the W124.

That seller koplx55 looks super sketch. Make SURE you keep a close eye on the tracking and also the last date you can submit a claim with eBay. IIRC it's a 60-day window, and you want to make sure to file a non-receipt claim by about day 50-55 at the latest, even if tracking shows it's still in transit.

:tumble:
 
View attachment 174818

It's not perfect - I took some guesses. The 03050 looked to be the #25 Aufbau / Fahrerhaus field, but I don't know for sure. One field seems to be 000 And the field I marked as 1 can have other values too (not sure if that is which factory?). I couldn't find a real data plate for a W124 300D turbo, but I did find one for a W123 300D turbo and it had the model as 300D-T, so I used that.

View attachment 174815

It'll never be an authentic data plate - but I thought it was a fun thing to try and create. I used mb.vin to find a date to put into "production date" and then for the delivery date, I put the date when I personally bought the car (of course, putting my name/info too). 😂 The font on this one is slightly larger and I also noticed the plate was embossed upside down. But otherwise, it's a close match
All of the data plates have the 000 code in that place. Same thing with the "1" located there.

The 03050 code is the one shown on your data card, yes.

I have many of these plates, going back to one from a 300SEL 6.3. I'm attaching a photo of a plate from a 1988 420SEL, which I just happened to have close at hand here.

IMG_9067.jpeg

One of the dates on the plate is the actual date of the start of manufacture (when the FIN was first put into the production system) and is usually 3-4 days BEFORE the production date on the actual data card found in the ISPPI/EPC.

The second date is the purchase date by the customer.

They changed the printing on the factory paper data cards from the "dot matrix" in the 1980s to a more solid font by the time the E500E rolled around. Below is one of the reproductions that I create, using original MB lettering. Note that the #25 was not used on the E500Es.
data_card_Atlanta500E.jpg
 
Last edited:
Just so you know, that five-digit code may be the selling dealer code for US dealers. There is a page in the Wiki that has a partial listing of US dealer codes from the time the E500E was in market.

Many of the dealers have gone defunct or changed dbas / names / locations / owners since the 1990s. The listing in the Wiki is only partial, as it was very labor intensive to research and I never completely finished it.
Ah shit- I think you nailed it. Looking at the papers itself, it does appear to be the selling dealer code. I have no idea how to find what that would have been for this car - the 03050 was a guess on my part.

Awesome that you did start to capture the dealers though! 🙂 Here's a link to that wiki page for anyone wanting to check it out

Full picture of the data card insert - which shows the different fields
1696293321905.png
 
Last edited:
I've got a couple or three of those data card inserts as well.

I believe they stopped using the data plates as of the end of W126 production, in the 1991 model year, though it may have been earlier as of 1989 or 1990 on the W126. I believe it would have been earlier for other chassis, such as 1989 for the R107, 1989 or 1990 for the W124, and likely same for the W201.

My very first MB was a 1992 300TE wagon, which was a Starmark car, and it DID NOT come with the metal plate. I believe 1989 may have been the last model year for the plates on the US-spec W124/W201.

When they moved from the clear owner's manual pouches to the black "real" leather ones, they did away with the metal plates. The clear plastic owner's manual pouches had a special pocket on the rear for the metal plates. There was no place in the leather pouches for the metal plates.

Also, in case folks didn't know, MB moved in the US for the 1993 model year, from a "real" leather pouch to a fake leather owner's manual pouch. The real leather ones were definitely used for 1991 and 1992, and possibly as early as 1990.
 
Got some good work done 🙂

First was a video I made about how to rekey the center console boxes. I made this last week and got it uploaded onto YouTube on Friday:

If you've rekeyed a house lock before, it's pretty similar. If there's interest, I can write a HOWTO on this with lots of pictures.


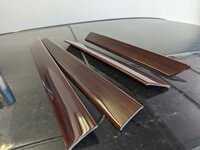
Last week I had also got the remainder of the refinished Zebrano wood. I was only missing the wood panels for each door. I took off the door panels one by one and got these new wood inserts on. They look amazing! 😍 The new wood all around really freshens up the car
PXL_20231007_210125258.jpgPXL_20231007_212721687.jpgPXL_20231007_224805516.jpg


Small update - and yeah, it's a bit silly since this car only has 143hp 😂 I bought the AMG part numbers for the pedals and swapped those out 🙂
170-300-00-04 - accelerator
170-290-01-82 - brake pedal
203-430-00-84 - emergency brake

They look great and also have a good grip. My old pedals were disgusting and slippery. The brake pedal and emergency brake pedals are a straight swap. You have to pull the pedal cover off the accelerator and then do some trimming with side cutters until the AMG pedal cover slipped over the W124 pedal nicely. Quick, easy, and rewarding. No more shoes slipping off the pedals! 🙂
PXL_20231007_205933728.jpg

The last job I took on was replacing the struts/shocks and strut mounts. Shout out to @Alphasud40 for selling me the parts for a super fair price a while back ($200 for 2x struts, 2x bump stop / dust covers, 2x ball joints and he threw in 2 aftermarket strut mounts). I sold the aftermarket strut mounts included and used that money towards two Mercedes-Benz branded strut mounts (124-320-14-44-64).

The struts/shocks are both Bilstein B4 (22-001856) struts and were new in box! This is my first time doing this type of job - so I consulted the FSM (32-0100). Got the car up on jack stands, took the wheel off.

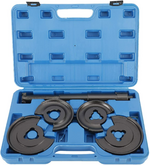
I bought a cheap spring compressor a while back which looks similar to the MB tool, so I tried to give that a shot. The manual recommends trying to fit 8 coils in-between the plates. The kit is ~$50 on eBay and looks like this:
1696831912637.png

The smaller plates were the ones to use (bigger ones I think for R129 or W126). However, the plates themselves did not fit very well between the coils (only about 15mm of clearance). I should have taken a picture... I had to use a 4 pound hammer to bash them into place. Once they were in place, I fed the long compressing arm through the bottom. It wasn't even close to being at the correct angle to engage with the slots in the top plate. I probably could have lined it up if I slid a jack under the control arm and jacked it up so the arm is going through straight... but I didn't feel comfortable continuing. Springs can kill you 😱 I felt like either I made a mistake or this kit is just garbage; not sure which (but leaning towards kit being trash). Getting the plates out was a bit of a challenge, I had to chisel them out. Packed up the blue briefcase and set that aside.

@geraniumtr if you're still following along - maybe you can share some pics of the tool you have? I'm curious if there would still be a problem getting the plates through the coils (and back out).

With no spring compressor and the car still in the air with the wheel off, I just got a bottle jack and set it under the control arm 🤷. I jacked it up enough to see the control arm start to go up just a hair.

Next, I used a 22mm impact wrench to take off the top nut/washer on top of the strut mount. That came off super easy. I used the impact wrench w/ 19mm to take off the three bolts for the strut/shock. The top one you need to counter hold with a combo wrench. After getting that top bolt out, you can go in the car, turn the wheel all the way left... go outside, remove one of the lower bolts from the strut. Back to the car, turn the wheel all the way right, remove the last lower bolt. Then back in the car to line the wheel up straight.

At this point, you can give the spindle some tapping and it'll fall forward. You can hook it or move it out of the way (just don't let it dangle by the brake line). You can remove the shock at this point. Mine were both in HORRIBLE shape. You can compress them both by hand and it would stay there. Sometimes, it would creep up a few millimeters and then stop. The bump stop was melted to the metal too. Bigtime blown out.

With the shock out, you can easily swap out the strut mount. Three 13mm bolts on top and it'll drop right out. Mine were extremely cracked - very poor shape.
PXL_20231008_202924969.jpgPXL_20231008_202908733.jpg

It was a little tricky getting things back together. You need to swap over the plastic piece on the old shock (it has clips for holding the ABS sensor and brake wear sensor). There are two tabs you push down and then slide the piece around until it falls off; then put onto the new shock. You can then put the new bump stop on before guiding it through the strut mount. Once it's peeking through the strut mount, I put a washer/nut on the top and hand threaded it just slightly to hold it in place.

Next, you can push the shock up and then try to slide the spindle back into the top notch on the strut. It can take some strength and coordination to get that in place! If you can get the spindle piece back into the notch but the bolt holes don't exactly line up, you can slide a wrench under the shock and use it like a lever to move the shock around until you can feed the long top bolt through. I secured that top bolt in place, counter holding the nut with a combo wrench and zipping together with an impact wrench. I feel a bit bad for ignoring the torque spec, but I did verify it was impossible for me to tighten up by hand (aka gutentight!).

Once that's locked in, you can get the two lower bolts/washers that sit up against the spindle. For the lower portion, the strut itself has a hole to let a positioning notch (on the spindle) go through - super important to have that locked in before you tighten those two remaining bolts. I did those by hand first - then got in car, turned steering wheel again, used impact to secure, repeat. I used the gutentight torque spec for these too 😂

With that connected again, I released the pressure on the bottle jack and set it aside, and put the wheel back on.

Once the car was back on the ground, I got the 22mm nut/washer on top of the strut secured and took it for a spin (speeding up over some speedbumps).

Wow, what an improvement! There are still problems with the steering linkage (those are coming up soon) and my ball joints are blown out... but it feels great when going over bumps or doing a sharp turn.

That's about it for this weekend... Up next, I think it'll be some final steering components and then alignment. Going to try and get these done before the end of the year:
  • 2x ball joints
  • steering drag link
  • steering damper
  • 2x tie rods
  • idler arm bushing kit
  • alignment 🙂
 
Last edited:
@bclifton,
Good show Brian! :thumbsup2: I did all of that front end work on my long gone 86-300E back in the 90s when I installed Eibach lowering springs and Koni Red adjustable shocks. In fact I did the shocks twice. I spent a lot of time under that car. Eibach assured me the MB shocks would work great with their springs so I purchased 4 brand new stock MB Shocks from Mercedes. The car road like a “Buckboard” so I changed the fronts again to the Koni Adjustable Reds and sold the brand new MB shocks for 1/2 price $75.00. That was a real bummer.😕

Also to note I compressed the springs with the wrong compressors. They were outside clamps. The compressed springs were like working with “Live Hand Grenades”. One slip and :kapow:

BTW, I never really liked the ride after lowering it. The car looked very kool and handled a lot better but it took a lot of work to get it that way which included changing my 17” tires from 225/50-17s to 215/50-17s to get a little more height on the sidewalls.

Anyway, I kept the car another year and sold it. Then I made another mistake by buying a 98-Caddy STS. It road worse than the lowered 300E and it was stock. What was I thinking?:doh:
 
Last edited:
Yes I've been following along with some of your jobs. I purchased a used Klann spring compressor: model KL 0021 with MB star logo and part # 000 589 46 31. In other words the factory tool. Plates fit without much difficulty. Never had to hammer them into position.

Personally I would not have done the job with a bottle jack as you did but I think the sway bar prevents the control arm from dropping too far. Dave or Gerry may know better.


Regards,

Peter
 
I wonder if the aftermarket plates are thicker than the Klann plates...

:scratchchin:
 
Was the spring unloaded (wheel/lower control arm hanging some) when you were installing the plates and compression arm? If not, that would explain the issues you had using the tool.
This is a good question - I tried to keep the control arm where it naturally wants to go. Since this is before taking the strut off (and the front end is up in the air), I would think it's in the correct time/place to install the compression plates

When the strut was disconnected (from the control arm), I didn't take any chances. I used the bottle jack and honestly I put the floor jack under the rear of the control arm too to help secure it. I am scared about the springs! 😱 Don't want it moving at all when strut disconnected.

Three years ago today (9 Oct 2020), I had to cut up a 1986 300SDL that I scrapped. I got it for $100 with no engine or drive train and no title. After getting all the parts out of it, I got the sawsall and quartered it. Places won't take it without a title - but the metal recyclers will take the pieces
IMG_0935.JPEGIMG_1038.JPEGIMG_1019.JPEG

At the time I cut this up, I hadn't worked with springs before and I didn't watch any videos / reference any tech manuals. When I went to remove the springs, that's when I found out how much tension they're under! The first one I did, I wasn't sure what to expect... there were creaking sounds as the bolt got loose and I was ducking out of the way. The spring flew out, about 2 or 3 feet to my left, and it traveled a good 6 or 7 feet. I almost needed a change of underwear after that! For the other 3, I found a safe (safer at least) way to remove the springs. For the metal alone, I got $117 which paid for the car but took some time to process 😂
 
Last edited:
You are wise to be concerned about the energy of the spring and the danger. I use an aftermarket copy of the Kline tool and have found that the control arm position is important. From memory, the sway bar should be removed from both control arms, the control arm should be lowered in a controlled fashion using a jack only to the point where there is ample room to install the plates as far apart as possible. It may then be necessary to raise the control arm some which will align and straighten the spring to insert the compression screw.

I believe I have done the job with the sway bar in place as a safety measure. One can also leave the strut in place as a safety measure removing it only after the spring has been compressed. I try to work from forward of the wheel opening for added safety.
 
This is a good question - I tried to keep the control arm where it naturally wants to go. Since this is before taking the strut off (and the front end is up in the air), I would think it's in the correct time/place to install the compression plates

When the strut was disconnected (from the control arm), I didn't take any chances. I used the bottle jack and honestly I put the floor jack under the rear of the control arm too to help secure it. I am scared about the springs! 😱 Don't want it moving at all when strut disconnected.

Three years ago today (9 Oct 2020), I had to cut up a 1986 300SDL that I scrapped. I got it for $100 with no engine or drive train and no title. After getting all the parts out of it, I got the sawsall and quartered it. Places won't take it without a title - but the metal recyclers will take the pieces
View attachment 175335View attachment 175336View attachment 175337

At the time I cut this up, I hadn't worked with springs before and I didn't watch any videos / reference any tech manuals. When I went to remove the springs, that's when I found out how much tension they're under! The first one I did, I wasn't sure what to expect... there were creaking sounds as the bolt got loose and I was ducking out of the way. The spring flew out, about 2 or 3 feet to my left, and it traveled a good 6 or 7 feet. I almost needed a change of underwear after that! For the other 3, I found a safe (safer at least) way to remove the springs. For the metal alone, I got $117 which paid for the car but took some time to process 😂
At my first shop I was servicing struts on an Audi 5000. Our pneumatic spring compressor did not have shoes to fit the large diameter so doing the 5000 was risky. Well the spring popped out and thumped me in the chest. Fortunately it just gave me a bruising. The shop owner took the hint and bought a new tool.
 
Another weekend warrior update!

No progress on the car itself - I still have the ball joints and all the steering linkage components to replace. The car is such a pleasure to drive - really enjoying it. I did start having an issue where the radio turns on and off intermittently. It's rare - but happens at least once a day. The antenna stays up, nothing else is affected. I did see SRS light flicker at times - so it might be an underpowered alternator. Battery has a healthy 12.5 volts when car is off though

I did finally get the ballast resistor used for the electric fan. This is part number 000-158-25-45 and I had ordered NOS from someone in Latvia. It's in beautiful shape - got this added to my parts stash. Not bad for $32 shipped - but it did take ~40 days to arrive.
PXL_20231020_233123275.jpg

Most of my time went to the #20 head I picked up a while back (603-016-20-01 from a 1995 S350). I had already sat down with brake parts cleaner and got the outside wiped down. Today, I got a simple valve spring compression tool from Harbor Freight and used it to take all the valves (and associated parts) out.

Things were mostly uneventful. With each valve... when the tool broke the keepers free from the retaining plate, there was a loud pop before the plate broke loose and the spring properly compressed. I cleaned all the parts with brake parts cleaner and bagged it up - labeling the bags with cylinder number and valve type.

Now is the fun part - trying to figure out what parts to order 🤔 I also need to find a decent machine shop here in the Phoenix area that can help get this head back into good shape (fill the pittings, shave it, etc).

Here are some of the part numbers I've discovered - will be updating this. It's a bit tricky trying to confirm part numbers... since I have the #20 head from an S350. Part numbers seem to be different than the parts in my current #14 head. Not that Revolution Parts is a source of truth for fitment!. Prices I'm looking up from MB of Naperville

Part numberPart descriptionNotesPrice (each)Status
601-050-08-25

INA (OEM) part number 420 0001 10
Lifters12 neededNLA
Aftermarket (INA): $24.21
25 Oct: Ordered via MB of Naperville
27 Oct: Lifters are NLA 😭Removed from order. Will hunt down NOS or aftermarket INA ones (OEM).

27 Oct: bought two sets of 8x NOS INA parts from a UK seller- $387.33 shipped including taxes.

✅2 Nov: Parts received! Have 16 lifters on-hand now.
102-053-00-26Keepers2 per valve; 24 neededNLA
Aftermarket (TRW): $1.19
21 Nov: Ordered 6 spares. I'm sure some will go flying when this goes back together.
✅ 30 Nov: Received parts
601-053-19-01Intake valve6 needed$56.2425 Oct: Ordered via MB of Naperville
✅21 Nov: Received parts!
601-050-23-27

601-050-28-27-80 should also work
Exhaust valve6 neededNLA
Aftermarket (SM Motorenteile): $8
24 Oct:
Ordered via AutohausAZ

25 Oct: AutohausAZ canceled as they are now NLA 😭
Ordered 5 aftermarket by "Intervalves" from eBay seller ($50 each). Also bought a set of 6 "Intervalves" branded from a sketchy looking site "coolfith.shop" ($56.03 for 6; only place I could find more). We'll see what happens 🤷

27 Oct: "coolfith.shop" was a scam site; opened a PayPal case, got my money back. Was worth a shot. Just need one more valve...

3 Nov: Got 5 of the 6 in; 6th one is by SM Motorenteile, got from a person on eBay for $12 shipped. It's a different style though

✅6 Nov: got 5 more matching SM Motorenteile valves, so I have a nice identical set of 6. $8 each plus $10 shipping.
601-053-03-25Spring retainer (top)12 needed$4.6321 Nov: whoops; ordered 6 on accident (mixed up part number for keepers). Will order 6 more...
24 Nov: Ordered 6 more via MB of Naperville
601-053-03-20Valve spring12 needed$5.3725 Oct: Ordered via MB of Naperville
✅21 Nov: received parts!
103-053-08-25Spring retainer (bottom)12 needed$4.8124 Nov: Ordered via MB of Naperville
103-050-00-58Valve stem kitIncludes all parts neededNLA
Bought NOS for $74.83
16 Oct: Ordered via MB of Naperville
26 Oct: 603-050-02-67 is NLA. Ordered 103-050-00-58 which came up as a cross reference and may be available.

6 Nov: MB of Naperville cancelled. Bought from a Latvian eBay seller oe245
603-990-01-10
???
Head bolts26 needed??
6039900110S available as kit on AutohausAZ
$51.99 for kit21 Nov: Ordered kit through Autohaus AZ
✅30 Nov: Received parts
603-010-85-20Head gasket set (head gasket, intake gasket, crush washers for prechamber, heat shields, etc)Not sure if this is correct for #20 head - but it's correct for #14 head$68.08✅ 24 Sep: Ordered via MB of Naperville and received part

I captured a video on YouTube of the process so far 🙂 You can see it's a pretty ghetto setup - I think I would ask the machine shop if they can install the new parts once I hand it over. I'd really like to use genuine MB parts for everything if possible.

 
Last edited:
You only need new head bolts if the old ones are damaged or stretched, see the FSM for length specs. Most of the time they can be re-used, but new ones are cheap insurance.

AFAIK all the valves are NLA... hopefully the old ones can be re-used.

Lifters used to be available aftermarket at a reasonable price, but the OEM INA appear NLA, dammit! There are Chinese Febi available but I'd only use those if desperate. Contact your favorite dealer to check inventory on the OE lifters, there is no result found at MBCC (link) which is a bad sign... and the price is $47 each, so 12 will be $564. Just be thankful you don't have an M119 with 32 lifters!

:apl:
 
A bit of a mess in the shed - but parts for the head rebuild are starting to arrive!

  • I got the 6x injectors refurbished by my friend Al - they're popping like they should at 135bar and nozzles are in great shape. One needed a shim to fix a small leak.

  • I have 5 of 6 exhaust valves in- these are by Intervalves Tech. I couldn't find a 6th by them, but I did find a 6th by SM Motorenteile which should be in today.

  • I got 16 INA hydraulic lifters in- saturated in oil 😂 They look great!

Lots more on the way - including some special tools! It's just a waiting game at this point. Rebuilding this head will be a longer term thing anyways- it's not needed now. The only thing I NEED to do is replace the ball joints and steering linkages, When you get up to speed, you can feel the car swerve a bit because of the slop on those points 🙁 Just need to find time to set aside to tackle that in one go.

PXL_20231103_171341117.jpg
 
Awesome! Where did you find the new INA lifters? I wonder if any are left available.
 
Awesome! Where did you find the new INA lifters? I wonder if any are left available.
Here's the seller where I got the INA lifters... looks like they have a lot left 🙂

Pretty fair price IMO and they shipped from the UK to my door (AZ, USA) in like 2 days after order was processed. They sent the standard "Please confirm by sending your VIN, etc" on Monday, I just replied back "1995 S350D - just send it please" 😂, and got it in my hands Thursday
 
Bummer they are only sold in lots of 8, although I kinda get it for packaging purposes.

:jono:
 

Who has viewed this thread (Total: 5) View details

Who has watched this thread (Total: 6) View details

Back
Top