• Hi Guest !

    Welcome to the 500Eboard forum.

    Since its founding in late 2008, 500Eboard has become the leading resource on the Internet for all things related to the Mercedes-Benz 500E and E500. In recent years, we have also expanded to include the 400E and E420 models, which are directly related to the 500E/E500.

    We invite you to browse and take advantage of the information and resources here on the site. If you find helpful information, please register for full membership, and you'll find even more resources available. Feel free to ask questions, and make liberal use of the "Search" function to find answers.

    We hope you will become an active contributor to the community!

    Sincerely,
    500Eboard Management

Exhaust Crossover Pipe Removal

Maui

Zivil Ingenieur
Member
I'm in the middle of installing a FGS valve body. I was able to get the pan off with the exhaust crossover pipe in place but getting the pan back with the pan gasket in place is not possible. I can loosen up the lower bolts on the crossover pipe but the upper bolts are making me nervous. I'm scared to death they are going to break if I torque on them. If they break I would be forced to remove the entire exhaust manifold to remove them. I can get masterblaster on one of them but I don't see a good way to soak down the bolt closest to the block with masterblaster.

Everything is back together except the pan.

Any suggestions? Experience with these bolts? Thanks.
 
Ken,

You can easily get all four bolts to the cross-over pipe from below. They are pretty strong. It's scarier when you haven't done it before, than it actually is in reality. I have done this several times and it's no big deal - just slightly intimidating the first time.

Not a bad idea to soak the bolts in PB Blaster, or WD40 at a minimum.

Also, the last time I changed my transmission fluid and filter I had ordered new bolts from MB, and replaced the rusted originals with the new MB bolts. It's a prudent thing to do and they are not expensive.

Hope this helps.

Cheers,
Gerry
 
The bolts at the manifold SHOULD come off without incident. Coat the threads with anti-seize when re-installing and tighten them evenly. Get all 4 snug (2 at manifold, 2 at main pipe) and wiggle the crossover pipe around to make sure everything is seated evenly, THEN tighten it up. If you hear any exhaust leaks afterwards, loosen all 4, wiggle some more, tighten, repeat as necessary.

If you do happen to break off a bolt at the manifold, you would not need to remove the manifold for repairs... the nut is pressed into the manifold, and AFAIK it can be pushed out from below. For the record, I've never had one of these bolts break, and I always remove the crossover pipe when dropping the trans pan. The clearance is too tight otherwise. I know some folks have been able to remove the pan with the pipe in place with zero hassle, but my personal experience has been the opposite on every 034/036 I've worked on.

:mushroom1:
 
Make sure the extension straw is on your lubricant's spray button. Then stick it right up in there as far as you can & soak the bolts down. Let it set for a while to do its job before removal. I used half inch drive ratchet with extension to provide the muscle to break the connections loose.

I had similar concerns at first, but they were unfounded. The bolts came out. I cleaned them up on the wire wheel. They were in reusable condition. I used never-seize on the threads before re-installation.
 
I got it. I've had lots of exhaust bolts break before and I did not want that to happen.
 
If you do happen to break off a bolt at the manifold, you would not need to remove the manifold for repairs... the nut is pressed into the manifold, and AFAIK it can be pushed out from below.

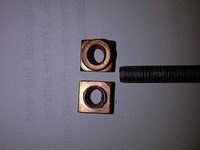
I can speak from experience and say that I did have the bolt on the driver's side manifold snap off as I was trying to get it out. Like GSXR said, you can push it out through the bottom with a hammer and 3/8" extension. The nut will come out through the top. That's the easy part. The harder part is getting the new nut to sit on top of the detent in the manifold while you try to hold the pipe up there and thread the replacement bolt into the nut.

When mine broke, I just used a regular 3" long bolt and I ended up having to install it in reverse (head on top/nut on bottom). It is much easier to thread it this way.

I ordered the replacement bolt and copper nut, but to this day I have still not been able to get the nut to sit in the manifold up there and thread the bolt from beneath. I even tried to super glue it but just ended up gluing my fingers together. That was at least three years ago and it's still fine with the makeshift nut and bolt.
 

Attachments

  • CollectorNut.jpg
    CollectorNut.jpg
    35.7 KB · Views: 22
  • ExhaustPipeNut1.jpg
    ExhaustPipeNut1.jpg
    338.3 KB · Views: 20
  • ExhaustPipeNut2.jpg
    ExhaustPipeNut2.jpg
    322.4 KB · Views: 20
Last edited:
As usual this site comes through with excellent information.

I had to stop and watch the Packers, but everything is buttoned up now. The car definitely feels better out of the gate.

I need a lift. Two days of laying in transmission fluid makes for a great weekend. Thanks goodness for Race ramps.
 
Thanks goodness for Race ramps.
Indeed

:stormy:


And Ken, just be HAPPY that your .036 crossover pipe isn't a US-spec 560 M117 crossover pipe. Anyone who has ever worked on one of those, knows that the .036 crossover is a piece of cake ;)
 
Indeed

And Ken, just be HAPPY that your .036 crossover pipe isn't a US-spec 560 M117 crossover pipe. Anyone who has ever worked on one of those, knows that the .036 crossover is a piece of cake ;)

I guess I'm a little gun shy from working on US cars and breaking lots of exhaust bolts. I soaked them good and took it real easy. I did not know they were held in with copper nuts. I assumed threaded cast iron which would be the kiss of death with the heat these motors put out.
 
I guess I'm a little gun shy from working on US cars and breaking lots of exhaust bolts. I soaked them good and took it real easy. I did not know they were held in with copper nuts. I assumed threaded cast iron which would be the kiss of death with the heat these motors put out.
Those German engineers think of [almost] everything!!

:jono:
 
As usual this site comes through with excellent information.

I had to stop and watch the Packers, but everything is buttoned up now. The car definitely feels better out of the gate.

I need a lift. Two days of laying in transmission fluid makes for a great weekend. Thanks goodness for Race ramps.

Congrats on your accomplishment! Looking forward to your assessment of whether or not adding the FGS was worth 2 days laying in ATF!
 
I don't know if it is my imagination or not but it seems like the car is more responsive since changing the valve body. It feels like it accelerates better even at speed without down shifting. I would like it to hold first a little longer. I shifts at about 7 mph on take off.
 
I ordered the replacement bolt and copper nut, but to this day I have still not been able to get the nut to sit in the manifold up there and thread the bolt from beneath. I even tried to super glue it but just ended up gluing my fingers together. That was at least three years ago and it's still fine with the makeshift nut and bolt.

Jon,

You need the MB tool to draw in the new nut. Think of it as a reverse press.

Should be in the FSM. Dave, don't you have one of these?;)

I know the Colonel has used this tool.

Part# 103-589-0139-00
 

Attachments

  • IMG_1659.JPG
    IMG_1659.JPG
    3.3 MB · Views: 20
  • nut tool.PNG
    nut tool.PNG
    16.2 KB · Views: 14
Here's WIS intel


.
 

Attachments

  • nut tool 2.PNG
    nut tool 2.PNG
    11.4 KB · Views: 12
  • nut tool 3.PNG
    nut tool 3.PNG
    5.2 KB · Views: 12
  • nut tool 4.PNG
    nut tool 4.PNG
    21 KB · Views: 12
Clark, have you actually used this tool with the manifold in place on the M119? The problem of holding the top of the nut while trying to thread the bolt in from below, whether it be the tool or the actual bolt, would still seem to exist. I couldn't even get a new factory nut and bolt to thread even after I worked it over with that silver anti-seize thread compound.
 
Yes, several times.

The tool is quite different then the bolt. It's made for this repair.
 
Jon,

You need the MB tool to draw in the new nut. Think of it as a reverse press.

Should be in the FSM. Dave, don't you have one of these?;)

I know the Colonel has used this tool.

Part# 103-589-0139-00

Sure have. I may still have my own. I'll have to look....
 
Here's the entire doc that Vader excerpted above....
 

Attachments

  • Screenshot 2014-12-09 22.51.35.jpg
    Screenshot 2014-12-09 22.51.35.jpg
    198.6 KB · Views: 18
Now that I look at the diagram, I can see that it would be much easier to get the tool threaded into the copper nut and then pressed into the manifold when the crossover pipe isn't connected below it. Then, once the nut is pressed in, there is no need to get your hand on top and hold it to thread the bolt.

I was unable to see the position of the nut in the manifold because it's on top and out-of-view; but looking at the replacement nut and bolt, it will only thread one way, because the other side of the nut is oval-shaped (unless there's some secret MB tech legerdemain for this one). It is counter-intuitive because you would think that the serrated end of the nut would go into the manifold facing down.
 

Attachments

  • Cross Over Pipe Nut & Bolt 1.jpg
    Cross Over Pipe Nut & Bolt 1.jpg
    111.7 KB · Views: 14
  • Cross Over Pipe Nut & Bolt 2.jpg
    Cross Over Pipe Nut & Bolt 2.jpg
    135.6 KB · Views: 15

Who has viewed this thread (Total: 1) View details

Who has watched this thread (Total: 1) View details

Back
Top