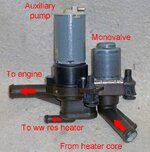

Recently, my wife started complaining of hot air coming out of the side vents of her 1995 E320 wagon, when she had the air conditioning cranked on, while (as appropriate) cold air was coming out of the center vents. Some research and deduction indicated that the heater valve (some incorrectly call this the "monovalve") was defective. Now, the 124.034 (400E/E420) and 124.036 (500E/E500) use the "earlier" W124 heater valve/monovalve design, but the non-V-8 W124s went to an updated, integrated design around the 1991/1992 model year.
Let's have a quick sidebar for you .034/.036 owners...... The "older" design as used in the E500E uses a separately mounted solenoid (monovalve) and auxiliary coolant pump (which keeps hot coolant circulating through the heat exchanger during times of low RPM, such as idle, to keep hot air flowing through the ACC system when the water pump isn't spun up). Because this is a separate, two-element unit, mounted in two different places (different sides of the CAN box on the 036) it tends to be a blessing and a curse. A blessing because generally only one of the elements goes bad at a time, and both are available separately. A curse because they are more difficult to get at due to their proximity to the CAN box. The fact that the elements are available separately means that they are also cheaper.
So, back to the task at hand ... 1995 E320 wagon. The heater valve on this car is an integrated unit that contains the aux coolant pump and monovalve mounted on a single base, with four individual hose connections. What's nice about this is that everything is VERY accessible (including three of the four hose connections) and the base mounts to the car with three rubber plugs, which simply press into place both on the base plate and onto slots in the car.
I ordered the part from parts.com, which was $207.00 (from nearly $300 MB list price) on Monday, and it arrived at my house on Friday morning. And I only had a 7.9% shipping charge, with some other small MB parts included in two separate packages. So tonight I decided to tackle the task of installing the valve. It took under one hour to do.
Here is the list of items required to do the job:
Here's the procedure:
First, a couple of views of the area where you'll be working:

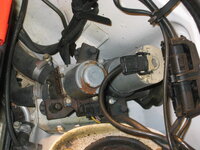
Next, disconnect the two electrical connectors. They just pinch and slide off....
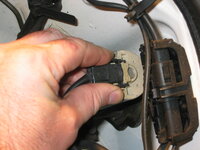

Then, we get sorta crafty. What you need to do is to remove the coolant expansion tank cap. Then, carefully place your piece of Saran Wrap into the top of the tank's opening and replace the cap (carefully). This creates a vacuum in the system so that it's much more difficult for the coolant to spill out of the hoses, once you loosen and remove them from the valve. You'll lose a bit of coolant, but not nearly as much as you would if the vacuum were not present.
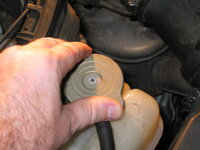
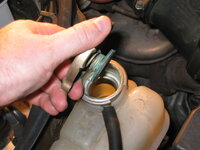

After that's done, it's time to loosen the four hose clamps that attach the valve to the cooling circuit. Before you do that, wad up some paper towels or rags, and force them underneath the hoses and the valve itself. This will catch most all of the coolant that comes out of the ends of the hoses once you loosen and pull them off of the valve.
Two of the hoses are easy to get at. The third one is right on the other side of the inner firewall and also very easy to get at (on the engine side of the firewall).
The fourth hose is UNDER the one that goes through the firewall. It's best to loosen the other three hoses and the rubber plugs that hold the valve to the car; these actions free up the valve enough to turn a bit, so that its clamp is exposed to get a bite with your screwdriver. Once the clamps are loosened, and the three rubber plugs are pushed out of their slots, CAREFULLY remove the valve from the car by lifting it directly upward.

Here is a shot of the area with the valve removed. You can see a couple of the slots where the rubber plugs slide into that mount the base of the valve assembly to the car.

Then, it's time to unbox the new valve.


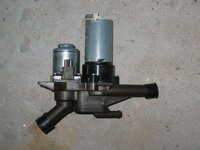

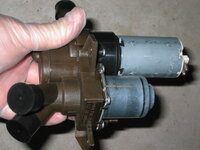
And, a view of the new (left) and old (right) valves, side by side:
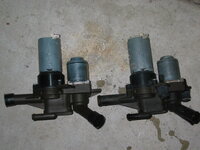
Installation is exactly the reverse of removal. You will need to transplant the three rubber plugs from the base of the old valve to the holes in the base of the new plug. A very small flat-blade screwdriver is helpful for pressing the rubber flange of the plugs through the holes in the base of the old valve, and a pair of needle-nose pliers is helpful to pull the plugs up and through the holes in the base of the new valve.
Here's a photo of the new valve installed:

Lastly, tighten up the hose clamps after reattaching the hoses, and uncap the expansion tank to remove the Saran Wrap. Start the car and test for leaks at the four hose connections. Then check the ACC system in A/C mode to ensure that the solenoid is closing the valve and keeping hot coolant out of the dashboard system, so that cool air circulates out of the side vents once again. If any coolant leaked out (it should probably leak about a half-cup or so) replace it with new coolant while you have the cap off to remove the Saran Wrap.

If everything checks out, give yourself a pat on the back for a job well done, and have a beer.
Cheers,
Gerry
Let's have a quick sidebar for you .034/.036 owners...... The "older" design as used in the E500E uses a separately mounted solenoid (monovalve) and auxiliary coolant pump (which keeps hot coolant circulating through the heat exchanger during times of low RPM, such as idle, to keep hot air flowing through the ACC system when the water pump isn't spun up). Because this is a separate, two-element unit, mounted in two different places (different sides of the CAN box on the 036) it tends to be a blessing and a curse. A blessing because generally only one of the elements goes bad at a time, and both are available separately. A curse because they are more difficult to get at due to their proximity to the CAN box. The fact that the elements are available separately means that they are also cheaper.
So, back to the task at hand ... 1995 E320 wagon. The heater valve on this car is an integrated unit that contains the aux coolant pump and monovalve mounted on a single base, with four individual hose connections. What's nice about this is that everything is VERY accessible (including three of the four hose connections) and the base mounts to the car with three rubber plugs, which simply press into place both on the base plate and onto slots in the car.
I ordered the part from parts.com, which was $207.00 (from nearly $300 MB list price) on Monday, and it arrived at my house on Friday morning. And I only had a 7.9% shipping charge, with some other small MB parts included in two separate packages. So tonight I decided to tackle the task of installing the valve. It took under one hour to do.
Here is the list of items required to do the job:
- a roll of paper towels or a supply of 3-4 rags (to soak up coolant that spills from the hoses)
- a piece of Saran Wrap
- a long, flat blade screwdriver (for undoing hose clamps)
- a pair of needle nose pliers and/or a small flat-blade screwdriver (for removing & installing the rubber mounting plugs)
- a supply of coolant (to replace coolant if any is spilled)
Here's the procedure:
First, a couple of views of the area where you'll be working:
Next, disconnect the two electrical connectors. They just pinch and slide off....
Then, we get sorta crafty. What you need to do is to remove the coolant expansion tank cap. Then, carefully place your piece of Saran Wrap into the top of the tank's opening and replace the cap (carefully). This creates a vacuum in the system so that it's much more difficult for the coolant to spill out of the hoses, once you loosen and remove them from the valve. You'll lose a bit of coolant, but not nearly as much as you would if the vacuum were not present.
After that's done, it's time to loosen the four hose clamps that attach the valve to the cooling circuit. Before you do that, wad up some paper towels or rags, and force them underneath the hoses and the valve itself. This will catch most all of the coolant that comes out of the ends of the hoses once you loosen and pull them off of the valve.
Two of the hoses are easy to get at. The third one is right on the other side of the inner firewall and also very easy to get at (on the engine side of the firewall).
The fourth hose is UNDER the one that goes through the firewall. It's best to loosen the other three hoses and the rubber plugs that hold the valve to the car; these actions free up the valve enough to turn a bit, so that its clamp is exposed to get a bite with your screwdriver. Once the clamps are loosened, and the three rubber plugs are pushed out of their slots, CAREFULLY remove the valve from the car by lifting it directly upward.
Here is a shot of the area with the valve removed. You can see a couple of the slots where the rubber plugs slide into that mount the base of the valve assembly to the car.
Then, it's time to unbox the new valve.
And, a view of the new (left) and old (right) valves, side by side:
Installation is exactly the reverse of removal. You will need to transplant the three rubber plugs from the base of the old valve to the holes in the base of the new plug. A very small flat-blade screwdriver is helpful for pressing the rubber flange of the plugs through the holes in the base of the old valve, and a pair of needle-nose pliers is helpful to pull the plugs up and through the holes in the base of the new valve.
Here's a photo of the new valve installed:
Lastly, tighten up the hose clamps after reattaching the hoses, and uncap the expansion tank to remove the Saran Wrap. Start the car and test for leaks at the four hose connections. Then check the ACC system in A/C mode to ensure that the solenoid is closing the valve and keeping hot coolant out of the dashboard system, so that cool air circulates out of the side vents once again. If any coolant leaked out (it should probably leak about a half-cup or so) replace it with new coolant while you have the cap off to remove the Saran Wrap.
If everything checks out, give yourself a pat on the back for a job well done, and have a beer.
Cheers,
Gerry