• Hi Guest !

    Welcome to the 500Eboard forum.

    Since its founding in late 2008, 500Eboard has become the leading resource on the Internet for all things related to the Mercedes-Benz 500E and E500. In recent years, we have also expanded to include the 400E and E420 models, which are directly related to the 500E/E500.

    We invite you to browse and take advantage of the information and resources here on the site. If you find helpful information, please register for full membership, and you'll find even more resources available. Feel free to ask questions, and make liberal use of the "Search" function to find answers.

    We hope you will become an active contributor to the community!

    Sincerely,
    500Eboard Management

OWNER TimL

TimL

E500E **Meister**
Member
Been on this board for a couple of years now and thought it’s time to start an owner’s thread.

A bit of background: I’m originally from Frankfurt but been living in the States for ten years now. After graduating I worked for Mercedes for a couple of years and then I had a chance to work in the U.S. for Recaro. When I got to the States I bought a used C43 AMG.
104971-c41d0ee6b81b4b4e5446414f562b69fe.jpg104966-6de57d2ac21a439925b145b0317caaae.jpg104969-f109889244d76bfb6ccb33153bcf6625.jpg104970-17ca7e6521516d1ded773129420f41d8.jpg

While it was a good car in great condition, it felt underwhelming, as it didn’t really live up to the performance expectation I had in my head when I bought it, so I sold it on after a few years.

After that I made a huge mistake and bought a used Golf VR6, a car that proved to be a bottomless maintenance pit that again didn’t really live up to the performance expectations that I had for it.
104685-936d80acd951dac56ea34037d0a612cd.jpg104686-2c42c2bb3bc7771112a1e3b6333723a5.jpg

So, somewhat disillusioned, I decided to try an American car and bought a new Mustang with the Coyote engine and Track Pack, a car that I massively enjoyed, as it was great fun to progressively upgrade, as well as as dirt cheap to maintain. I ended up driving that car longer than any other car I ever owned.
104687-d855d3fa2faacf85e96fa8ef4d07e8f6.jpg104691-5e38bd73ea2e777b0ac44db3c5486ed8.jpg104692-38e0a448e0bec2901805f359c3ce9e3f.jpg104694-2b0d314c5e441c3d2cf86a193a06964a.jpg

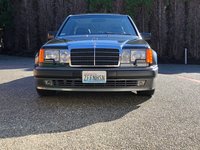
My dad had an E500 when they came out and ever since then these cars held a real fascination for me, so when I came across old pictures of my dad’s Blauschwarzen E500 in 2017, I decided it was time to finally press the button and get a 124.036.
104697-7f313537812fab0eae3278f425769d9b.jpg

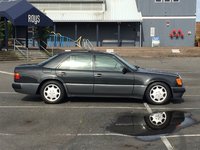
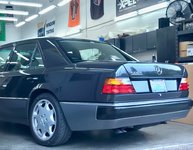
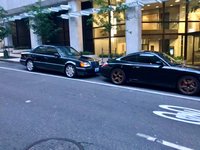
I knew I wanted a 92, ideally in Perlmuttgrau in good condition and with black interior, so I started to search for a car in fall of 2017. Sometime in 2018 I gave up on finding a pearl gray car and thereby widened the search quite a bit. In spring of 2018 I found an accident free, one owner, 87k mile car in California:

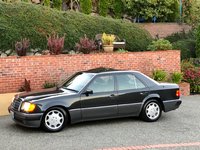
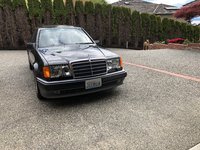
SOLD - FS: 1992 500E, Pearl Black/Black, 88kmi, $34k (Encinatas, CA) | Cars for Sale - 500E / E500 ONLY

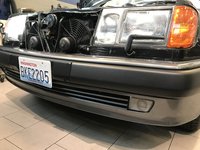
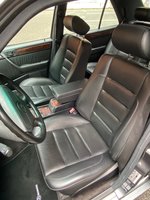
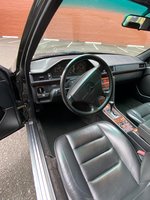
After scouring over the ad, I skyped with the owner, an elderly Canadian lady who was living with her daughter and her daughter’s family in Encinitas. After the Skype chat I decided to go take a look at the car in person, so I flew out to Southern California to check it out. The car came with a good amount of MB receipts and had been taken care of pretty well. No rust, great interior condition and completely original state had me convinced pretty quickly, although it was clear that some things would need attention, both cosmetically, as well as mechanically, if I wanted to get it to the condition that I envisioned for the car, but I was prepared to invest time and money into the car, once I had figured out if this car could live up to the memories I had of these cars (unlike the C43 and the VR6).

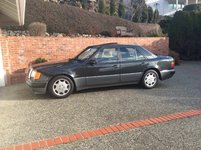
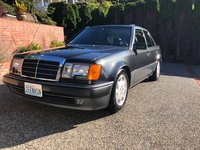
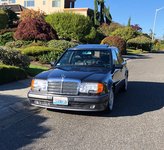
So I bought this Canadian delivered car that same day and drove it back home to Seattle, which made for a very nice road trip that was truly enjoyable and mechanically uneventful.
104720-1af1523168ffad127bcef9110a10c311.jpg104719-58b3fe7533419409675be48b11b2dba9.jpg104721-9cdb84ca50dc71a971a04e6ea8faaa0a.jpg

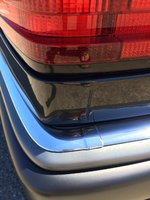
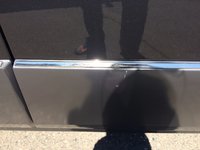
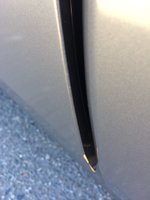
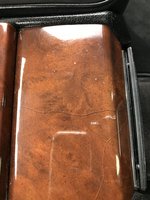
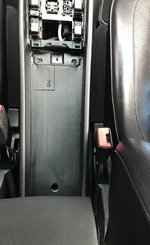
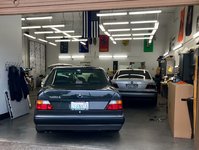
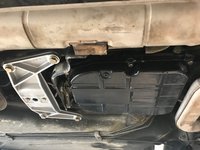
Driving the car every day for a few weeks and having gotten it detailed, as well as thoroughly cleaned on the underside, I was enamored with the car and convinced it was a solid basis, so I decided to go all in and start a loooooong punch list that I wanted to work through in stages. Partially because I wanted to keep driving and not give it up to the shop for one long block of time and partially to avoid antagonizing my wife who would question the soundness of buying a car only to turn around and immediately put in the same amount as the purchase price for repairs. So chunking it was the way to go.

874B2A44-E2EA-4C6D-B914-ACCD52C3D2B2.jpeg974F6737-781F-42F2-9B55-6912F067AC4B.jpegE76F380E-55D8-4BE0-8119-9039765DA7CC.jpeg0D0FDADF-0643-445D-8F14-75D4794D7AC6.jpegDABDC2ED-2055-4555-86CF-DC2FB21C3479.jpeg419BC572-3364-4B8B-9612-C4DD8F6C416C.jpeg01E9FF7C-C0D1-45FA-A94D-B7951A3D9885.jpeg8E908854-5CDE-403B-A7EB-5281FBDEF4FE.jpegA586B268-D28F-4B25-8CC7-14FD4C74BCB0.jpegE6F3FDE8-24B7-40AF-A50E-73460AFB2E36.jpeg34757345-0CE5-42D4-A2D3-2491DC57B629.jpeg27526B29-AE01-4458-BA18-27085EB3FD71.jpeg56660F31-0C38-46B2-89E0-6B7645CD631D.jpeg60F29457-1D7F-4D6B-9453-1851D3EA08BF.jpeg2719722E-4C53-469F-9AC7-BDE7BDC54418.jpegCD27F4A5-FCD5-4075-A853-41A1558A015C.jpeg72996869-2BA2-44D1-9E39-4453AAA48788.jpeg8CD1D677-D536-43E3-B51B-770C55C353C4.jpegC4B9C052-2511-4528-BF0C-B28FC8E167B2.jpegD607C90D-145A-49B3-BE2E-3708C5D07F49.jpegBACF5797-52A1-46DC-B717-2505AAAB547B.jpeg41CC491A-F1E8-4207-B126-429C6BAD3CDB.jpegE9CEB7CE-D2FC-4F32-A5D4-68491E84918A.jpeg0FC15581-F0EC-4696-83DC-A1742122A490.jpeg
 

Attachments

  • 104720-1af1523168ffad127bcef9110a10c311.jpg
    104720-1af1523168ffad127bcef9110a10c311.jpg
    5 KB · Views: 39
  • 104719-58b3fe7533419409675be48b11b2dba9.jpg
    104719-58b3fe7533419409675be48b11b2dba9.jpg
    5.7 KB · Views: 64
Last edited:
Thanks for so many pictures. Why did you want a specifically 1992 car?
 
I like the square look of the pre-facelift cars and wanted a car with the WOT enrichment, so it had to be a car up to 1992.

A German that likes pre-facelift US headlights! That's pretty unique. I have grown to like square headlights on my car too. With darker euro ambers, especially
 
A German that likes pre-facelift US headlights! That's pretty unique. I have grown to like square headlights on my car too. With darker euro ambers, especially
It came with pretty weathered U.S. headlight lenses, so I replaced them with brand new U.S. lenses and lens doors (luckily, just before they went NLA), Euro ambers and new U.S. wiper arms and had them on the car for a little- I liked the look, but last year I ended up switching to Euro headlights and wipers. However, I put the U.S. headlights, lenses and wipers back in storage, in case I ever want to go back to the U.S. OEM look.
 

Attachments

  • B486BF0E-EAA1-4EAA-A271-DE9B8685F728.jpeg
    B486BF0E-EAA1-4EAA-A271-DE9B8685F728.jpeg
    1.1 MB · Views: 78
  • 8A362626-DD53-4810-A287-AA693D7B8158.jpeg
    8A362626-DD53-4810-A287-AA693D7B8158.jpeg
    599.7 KB · Views: 74
Last edited:
I knew I wanted a 92, ideally in Perlmuttgrau ......

so I decided to go all in and start a loooooong punch list that I wanted to work through in stages. Partially because I wanted to keep driving and not give it up to the shop for one long block of time and partially to avoid antagonizing my wife who would question the soundness of buying a car only to turn around and immediately put in the same amount as the purchase price for repairs. So chunking it was the way to go.
Thank you for sharing all this!

a) If a perlmttgrau car ever shows up we will have to fight each other to buy it. This of course only after I finish fighting @RicardoD for the very same opportunity to buy the same car. Of course after vanquishing @RicardoD, I must warn you that I will be in a particularly victorious mood and I will be particularly difficult to defeat. Or I might just be overly confident and prove to be an unworthy opponent. 🤣

b) I am quite familiar with your reticence at spousal antagonization and applaud your strategy at avoiding her judgement of your decision making abilities!

c) It would be most interesting to hear you compare / contrast your experience at driving and operating the C43 vs the 500E!
 
I’ve been taking the car only to Steve Geyer at Mercedes in Lynwood ever since I got the car. The only exception being the brakes which I had done at an Independent shop, as MB wouldn’t install non–MB brake discs and pads (slotted discitalia discs and ceramic discitalia pads, as well as BF Goodrich stainless steel brake lines). Brakes were the first item on the punch list, as some of the pad material had baked in on the discs, making the whole car vibrate when braking from higher speeds.

So after the brakes the first stop at MB was to get the following items done:

Replace driver seat height adjustment motor on LH side
Repair taillight electrical malfunction (flickering brake light and blinker)
Replace throttle body
Replace all fuses with new copper fuses
Install new oil filter housing
Install new chain tensioner
Install new air pump check valve
Install new summer tires on brand new OEM 16x8 8-hole wheels (old ones were curbed)
Install new cross members on rear suspension (left hand side was broken)
Install new front sway bar bushings
Alignment
Replace fuel pump check valves, seals and filters
Replace rear view mirror trim panels (left and right hand) as existing had broken plastic tabs
Replace outside mirror rubber triangles on both sides as the rubber was hard and fading in color
Replace shifter bushings
Replace timing chains
Replace all timing chain guides
Replace upper and lower wiring harness
Replace engine mounts
Replace gear box bushings
Replace peeling passenger side door pocket (luckily before it went NLA)
Replace B column covers (leather was peeling off)- Steve had some in his part stash and sold them to me
Replace main interior dome light (again Steve had a functioning used one as they are NLA)
Install new armrest on driver and passenger side (old ones were slightly too glossy from use for my liking)
Installed original NOS sportline steering wheel (existing was again too glossy from use for my liking)
Replaced instrument shroud due to scratches on original glass (Steve- again- had a great condition used one- they are NLA)
Replace fog lights (originals were stone chipped and sandblasted)
Replace headlight doors and main lights (originals weathered and sandblasted)
Replace headlight wiper arms (faded and stone chipped)
Repaint covers underneath headlamps (stone chips)
Repaint front bumper in alto gray (scuffed lip on the right hand side)
Replace bumper inserts front and rear with new inserts (luckily before they went NLA)
Replace turn signal lamps with Euro ambers turn signals
Replace taillight lenses with new Hella lenses, before they went NLA (originals ever so slightly discolored)
Replace trunk handle (original was slightly faded)
Performed 90k mile service
Lube/grease doors and sunroof
Replace grill insert and grill chrome crossbars (faded and sandblasted)
Service transmission and rear differential

With those items done, I started to enjoy the car even more, as it started looking decent and riding better too (no engine or shifter rattle, awesome, steady idle and nice power delivery)

Note that some of the pictures show the before and after of parts (e.g. engine mounts, transmission bushing, headlights, etc). Haven’t figured out how to place the pictures within the body of the text so they make a bit more sense....
 

Attachments

  • F27EAD77-8F20-4CF2-B547-7685B052BBA1.jpeg
    F27EAD77-8F20-4CF2-B547-7685B052BBA1.jpeg
    473 KB · Views: 51
  • A2FFCE67-5793-495B-8E5B-3B3AEFF77CD9.jpeg
    A2FFCE67-5793-495B-8E5B-3B3AEFF77CD9.jpeg
    554.1 KB · Views: 50
  • 51F1EAAD-DC91-4353-A66E-16C421C2A737.jpeg
    51F1EAAD-DC91-4353-A66E-16C421C2A737.jpeg
    2.8 MB · Views: 53
  • D3543B45-4F73-41F2-B831-F14E3F78D701.jpeg
    D3543B45-4F73-41F2-B831-F14E3F78D701.jpeg
    2.2 MB · Views: 53
  • 2C1E542E-03C4-4C2C-96A1-4288E5A514C3.jpeg
    2C1E542E-03C4-4C2C-96A1-4288E5A514C3.jpeg
    2.5 MB · Views: 48
  • 889FCA34-79A1-497B-B0E5-979BE854688D.jpeg
    889FCA34-79A1-497B-B0E5-979BE854688D.jpeg
    2.7 MB · Views: 42
  • E83EC58A-A282-4D06-BC99-3D0F6098D578.jpeg
    E83EC58A-A282-4D06-BC99-3D0F6098D578.jpeg
    2.2 MB · Views: 47
  • FF26D628-29B7-42B1-98CE-FA8E241FCF0D.jpeg
    FF26D628-29B7-42B1-98CE-FA8E241FCF0D.jpeg
    2.8 MB · Views: 49
  • 6FA35CD8-D978-478B-8C0E-980C7CBC95F8.jpeg
    6FA35CD8-D978-478B-8C0E-980C7CBC95F8.jpeg
    2.3 MB · Views: 51
  • 104C2163-56B1-4BE5-AB4C-65BD6D803681.jpeg
    104C2163-56B1-4BE5-AB4C-65BD6D803681.jpeg
    2.3 MB · Views: 45
  • D91229AB-545A-4E35-82B9-27F0D054850C.jpeg
    D91229AB-545A-4E35-82B9-27F0D054850C.jpeg
    2 MB · Views: 46
  • FBDCE2EE-DAB1-4533-87BE-ED9C7F6C467F.jpeg
    FBDCE2EE-DAB1-4533-87BE-ED9C7F6C467F.jpeg
    2.1 MB · Views: 44
  • 4EDE9236-2AB9-48D2-8DF9-34AABE9739D2.jpeg
    4EDE9236-2AB9-48D2-8DF9-34AABE9739D2.jpeg
    1.4 MB · Views: 45
  • 28190355-83FB-4772-BE5A-47F7EB89F30F.jpeg
    28190355-83FB-4772-BE5A-47F7EB89F30F.jpeg
    1.1 MB · Views: 44
  • C9AA0ECA-EE33-49BF-8B9A-81F2546CDCD5.jpeg
    C9AA0ECA-EE33-49BF-8B9A-81F2546CDCD5.jpeg
    1.6 MB · Views: 42
  • DBE6DCBF-757B-4D1D-8CB4-0C805C0AB310.jpeg
    DBE6DCBF-757B-4D1D-8CB4-0C805C0AB310.jpeg
    941 KB · Views: 48
  • AF4048C4-9C26-409F-AC36-B8BB14E73A48.jpeg
    AF4048C4-9C26-409F-AC36-B8BB14E73A48.jpeg
    1.2 MB · Views: 43
  • A63E2FF6-F36E-4294-B8F5-4A22DC2312AB.jpeg
    A63E2FF6-F36E-4294-B8F5-4A22DC2312AB.jpeg
    1.2 MB · Views: 46
  • 06ED6415-F13B-4720-B748-698C6E1BCF79.jpeg
    06ED6415-F13B-4720-B748-698C6E1BCF79.jpeg
    1.6 MB · Views: 48
  • F5FDD90D-6CE2-4F8F-A177-D2730544999D.jpeg
    F5FDD90D-6CE2-4F8F-A177-D2730544999D.jpeg
    2.9 MB · Views: 48
  • 46B96CC0-50BC-4BA5-B339-6420DEE6390C.jpeg
    46B96CC0-50BC-4BA5-B339-6420DEE6390C.jpeg
    2.1 MB · Views: 46
  • 74A78351-22FA-4CE0-9020-5EC30CD793C2.jpeg
    74A78351-22FA-4CE0-9020-5EC30CD793C2.jpeg
    1.6 MB · Views: 43
  • 769818F2-81D4-4A2A-8388-75A4C48BE8EA.jpeg
    769818F2-81D4-4A2A-8388-75A4C48BE8EA.jpeg
    2.2 MB · Views: 41
  • 390EE786-6BB6-4773-B672-CDA376718807.jpeg
    390EE786-6BB6-4773-B672-CDA376718807.jpeg
    141.3 KB · Views: 45
  • 88134B38-F0DC-4994-ACB1-A19D8076BA7A.jpeg
    88134B38-F0DC-4994-ACB1-A19D8076BA7A.jpeg
    2 MB · Views: 47
  • 365532C6-6EA2-49A5-88F0-1845655797B4.jpeg
    365532C6-6EA2-49A5-88F0-1845655797B4.jpeg
    1.8 MB · Views: 49
  • A7188ECF-869B-4A98-A27F-67E7D27A40B1.jpeg
    A7188ECF-869B-4A98-A27F-67E7D27A40B1.jpeg
    2.9 MB · Views: 46
  • BB1E7F8B-6430-404D-8667-81E1201CAA19.jpeg
    BB1E7F8B-6430-404D-8667-81E1201CAA19.jpeg
    2 MB · Views: 48
  • EC22A357-29EA-4DED-9CE1-B76FE47AD252.jpeg
    EC22A357-29EA-4DED-9CE1-B76FE47AD252.jpeg
    714.3 KB · Views: 41
  • 00B56AB7-1E71-4D4C-85E7-11B13AAF4B4F.jpeg
    00B56AB7-1E71-4D4C-85E7-11B13AAF4B4F.jpeg
    2.2 MB · Views: 39
  • 32F386B5-98FD-46D5-94F8-FCCDDF4B386C.jpeg
    32F386B5-98FD-46D5-94F8-FCCDDF4B386C.jpeg
    151.7 KB · Views: 40
  • 4CC5DEC0-C7F0-4529-8228-5DDF610DFB75.jpeg
    4CC5DEC0-C7F0-4529-8228-5DDF610DFB75.jpeg
    1.4 MB · Views: 57
Last edited:
Thank you for sharing all this!

a) If a perlmttgrau car ever shows up we will have to fight each other to buy it. This of course only after I finish fighting @RicardoD for the very same opportunity to buy the same car. Of course after vanquishing @RicardoD, I must warn you that I will be in a particularly victorious mood and I will be particularly difficult to defeat. Or I might just be overly confident and prove to be an unworthy opponent. 🤣

b) I am quite familiar with your reticence at spousal antagonization and applaud your strategy at avoiding her judgement of your decision making abilities!

c) It would be most interesting to hear you compare / contrast your experience at driving and operating the C43 vs the 500E!
One rare color per member Jlaa, so you’re already at your allotted limit 😉

No worries though, the one I have will cost me all the money I can muster for this idiotic hobby, so no danger of me buying another one of these, so it’ll be you and Ricardo duking it out 😄
 
Last edited:
After the initial go at my punch list I had the following done a few months later:

Replace all anodized trim pieces with new items (the originals had turned golden) - rear window stay-bars are the only missing item for now as they are NLA. Plan to have them anodized later this year.
Replace windshield (stone chipped and sand blasted)
Replace rear glass (original got destroyed when the trim pieces were removed)
Replace wiper arm and wiper arm cover (both were too faded for my liking)
Replace original “bread loaf” driver seat armrest with a used, newly covered flip top armrest
Replace shot flip top armrest damper with new group buy Stabilus damper (thanks again a777fan for making that happen!)
Replace U.S. headlights, wipers and wiper motors with new European wiper motors, wiper arms, wiper blades, headlights (new standard european headlights) and NOS 500E lenses
Install a set of refurbished 18“ RIAL Arc M800 and correct OEM lug bolts (had wheel curb rash repaired, paint chemically stripped and wheels then powder coated)
Install Bridgestone Potenza RE-71R tires

Overall the wheels, the trim pieces and the Euro lenses were something I was very much looking forward to and they truly made a huge difference for me in terms of the visual enjoyment I got out of the car, so while it required a lot of patience sourcing some of these, I’m glad I made these mods.
 

Attachments

  • 9B90828E-DCCC-457A-BC6D-201D923C53F7.jpeg
    9B90828E-DCCC-457A-BC6D-201D923C53F7.jpeg
    5.9 MB · Views: 52
  • 3CC71A5C-3B3F-4C86-BB2F-2AD086A88474.jpeg
    3CC71A5C-3B3F-4C86-BB2F-2AD086A88474.jpeg
    716.4 KB · Views: 47
  • 480A281D-3A9D-40AA-8006-E332BA5C2F7B.jpeg
    480A281D-3A9D-40AA-8006-E332BA5C2F7B.jpeg
    5.3 MB · Views: 45
  • 2AA199EF-EE57-4977-841C-FC4BA7676732.jpeg
    2AA199EF-EE57-4977-841C-FC4BA7676732.jpeg
    901.9 KB · Views: 44
  • 6D3C5220-F491-437A-BAA5-134A0C082B38.jpeg
    6D3C5220-F491-437A-BAA5-134A0C082B38.jpeg
    536.8 KB · Views: 40
  • EBF0F0BC-65FB-4CB6-9672-6EE5912500C9.jpeg
    EBF0F0BC-65FB-4CB6-9672-6EE5912500C9.jpeg
    1.3 MB · Views: 42
  • C90FCD32-D541-4B85-8263-A2670F63E608.jpeg
    C90FCD32-D541-4B85-8263-A2670F63E608.jpeg
    1.9 MB · Views: 46
  • 20D47AD9-5C04-4BB5-A209-4EEA9404A5D6.jpeg
    20D47AD9-5C04-4BB5-A209-4EEA9404A5D6.jpeg
    2.4 MB · Views: 51
  • FAF3F1F6-6421-4675-9C82-1A20CE24E5E5.jpeg
    FAF3F1F6-6421-4675-9C82-1A20CE24E5E5.jpeg
    1.4 MB · Views: 52
  • 971B1C1A-7469-4357-86C5-7A11BAC18E3A.jpeg
    971B1C1A-7469-4357-86C5-7A11BAC18E3A.jpeg
    1.1 MB · Views: 51
  • FC65B7BB-B9D0-4FD0-8BF6-DC56794174EC.jpeg
    FC65B7BB-B9D0-4FD0-8BF6-DC56794174EC.jpeg
    2.4 MB · Views: 52
  • F5299351-18ED-415B-BA61-FEA5B00165C4.jpeg
    F5299351-18ED-415B-BA61-FEA5B00165C4.jpeg
    2.6 MB · Views: 48
  • 35DCE7F6-00C2-4402-A75E-CD2671FB7696.jpeg
    35DCE7F6-00C2-4402-A75E-CD2671FB7696.jpeg
    524 KB · Views: 52
  • 00F032A4-65D1-423C-9B71-F4D5E83207F6.jpeg
    00F032A4-65D1-423C-9B71-F4D5E83207F6.jpeg
    4.3 MB · Views: 57
  • BE84B842-4944-4D44-B3C1-AA500221C843.jpeg
    BE84B842-4944-4D44-B3C1-AA500221C843.jpeg
    1.4 MB · Views: 49
Last edited:
So with the first two bigger repair and styling fixes done, I enjoyed driving the car a bit. I just avoid inclement weather and wintery/salted roads, but apart from that I try to drive my car a couple of times every week, as I just love the experience.

So several months passed before I went into fix number 3, which consisted of the following items:
Replace shocks all around
Replace rear spheres
Replace springs all around (I received the shorter OEM springs)
Replace spring pads (Pad 1 in the front, so the car sits fairly low for an OEM setup)
Replace steering damper
Replace idler arm
Replace drag links
Replace upper strut mounts
Replace front lower control arms
Replace antenna with used Hirschmann antenna (old antenna stuck in the down position). In the course of this MB broke the rear glass, so yet again a new rear glass had to be installed- annoying, because that took forever to arrive. At least they put in the same, correct 500E specific glass again)
Replace trunk stops

The components that were taken off the car were all original, so close to 30 years old. Considering their age, the components were ok, although the shocks and steering damper were totally shot. From a driving experience perspective, these repairs made a huge difference, as the car is less bouncy and way more planted and the steering is without any play, all of which makes the car a real joy to drive.
 

Attachments

  • 91A7F47F-7814-4802-88DE-D99D9BA7B496.jpeg
    91A7F47F-7814-4802-88DE-D99D9BA7B496.jpeg
    3.4 MB · Views: 31
  • E9C8337D-8616-4E89-85CF-063C63A91584.jpeg
    E9C8337D-8616-4E89-85CF-063C63A91584.jpeg
    2.8 MB · Views: 36
  • 3406C6D4-54FF-4CCE-A292-76ACF959FD42.jpeg
    3406C6D4-54FF-4CCE-A292-76ACF959FD42.jpeg
    3 MB · Views: 29
  • 398AD11A-8B53-4F44-8532-E87774D21EC5.jpeg
    398AD11A-8B53-4F44-8532-E87774D21EC5.jpeg
    2.6 MB · Views: 29
  • 6EB53783-FB33-43FB-902C-31CD80F94E2A.jpeg
    6EB53783-FB33-43FB-902C-31CD80F94E2A.jpeg
    1.2 MB · Views: 26
  • 5EE36D8F-FECE-4AC5-8764-7CB7722C4BB2.jpeg
    5EE36D8F-FECE-4AC5-8764-7CB7722C4BB2.jpeg
    638.1 KB · Views: 28
  • 4A6AC4BD-0BAB-4CE9-BF96-1753936E9DC0.jpeg
    4A6AC4BD-0BAB-4CE9-BF96-1753936E9DC0.jpeg
    1.7 MB · Views: 25
  • 570E1AA7-0808-43DB-8891-DC7E198D38AE.jpeg
    570E1AA7-0808-43DB-8891-DC7E198D38AE.jpeg
    1.2 MB · Views: 27
  • 614C03FB-C498-49EB-BFF0-91E1381715E9.jpeg
    614C03FB-C498-49EB-BFF0-91E1381715E9.jpeg
    1.9 MB · Views: 26
  • 9942F156-018C-44F6-8D12-C4E5E6E6D1D7.jpeg
    9942F156-018C-44F6-8D12-C4E5E6E6D1D7.jpeg
    4.9 MB · Views: 37
Last edited:
And that brings us to fix number 4 and pretty much to the present time:

Install remanufactured Tandem pump (had a very leaky LUK pump that I sent in and received a ZF pump back in return- excellent quality according to Steve Geyer)
Install remanufactured water pump (pump started leaking about 1k miles ago)
Install new thermostat, cap and coolant tank
Install used rear view mirror (JC220 sold me an excellent used one, as they are NLA- my original rear view mirror had hardened, unsightly yellow glue residue oozing out at the lower glass seam)
Install new Hood insulation pad (old one was brittle and starting to flake)- it’s an Autohauz pad that doesn’t have the silver turbo diesel patch and is of good quality)
Install right hand side bumper/fender gap cover that I had bought in Japan a while ago (OEM is NLA)- good fit and a good quality piece

In the meantime, I have gone back to the 16” OEM wheels, as their ride quality is significantly better than the 18” set up. In addition, I kind of like the classic, old school look of the small 16” wheels, so I will leave these on for a while before switching back to the RIALs again.

Plenty of things still left to do, but they are big ticket items, so it will be a while before I tackle them (e.g. Madeira wood refurbishment, transmission delay when reversing, those dreaded golden rear window stay-bars, etc.), so for now I just enjoy it in its current state and remain very glad I bought this car almost 2 years ago to the day (June 8). It’s now at 97k miles and I loved every single of the 10k miles I put on it!
 

Attachments

  • DB10555F-A7B9-4B1C-9045-2E1CC670B9E4.jpeg
    DB10555F-A7B9-4B1C-9045-2E1CC670B9E4.jpeg
    1.4 MB · Views: 41
  • 020E9EEA-23BE-4C53-97D2-61FC38D5B772.jpeg
    020E9EEA-23BE-4C53-97D2-61FC38D5B772.jpeg
    780.7 KB · Views: 38
  • 699308C8-BC8B-42EA-8DCC-E84856FFE017.jpeg
    699308C8-BC8B-42EA-8DCC-E84856FFE017.jpeg
    1.8 MB · Views: 36
  • 41569E7F-ACD2-4076-BDB8-21D25FEED341.jpeg
    41569E7F-ACD2-4076-BDB8-21D25FEED341.jpeg
    1.8 MB · Views: 39
Last edited:
Wow you have done sooooo much work!!!!! The car looks so fantastic with the euro lenses, ARCs, etc. May I ask - what Bridgestones did you have on the ARCs? Are they Potenza S04s? I am quite satisfied with the ride quality of the 18" S04s (these are a pretty compliant riding tire for their "performance level.") The tires you were using on the ARCs seem to have very very wide shoulders blocks .... not really sure what model Potenzas they are.

That said I will mention that I found F/R going from 30/31 to 34/34 lends a perceptible degradation in ride quality.
Thank you Jlaa, I appreciate it.

I have the RE71-R on the RIALs and like them tremendously for their grip and precision which I find to be even better than the Pilot Sport Cup I had on my Mustang, as they don’t require any warming up to generate crazy grip. But they are loud and stiff as heck and our streets in downtown Seattle are strewn with potholes, so maybe not the best choice. I heard the S04 strike a nice balance between grip and comfort, so I might try them when the RE-71 are done next year.

I knew it! They don't look like S04s at all! I will bet dollars to donuts that if you replace the RE71-Rs with S04s (or Michelins Pilot Sport 4 or PSS) that the ride quality will be MUCH more comfortable. :-)


NO WAIT --- I said that wrong. Ride quality will always be shit with 18" wheels and therefore you should sell those worthless piles of junk ARC wheels to me. :-) :-)
 
NO WAIT --- I said that wrong. Ride quality will always be shit with 18" wheels and therefore you should sell those worthless piles of junk ARC wheels to me. :) :)
Alas, I’m afraid they are too narrow and heavy for discerning Monoblock owners, let alone a NEEZ owner! 😉

By the way, I really like the NEEZ on your car- they look stunning!
 
Last edited:
Haven’t figured out how to place the pictures within the body of the text so they make a bit more sense....
This is exceedingly easy to do.

First, upload all photos that you want to have in the post, using the "Attach files" button.

Screen Shot 2020-06-04 at 7.19.42 AM.jpg

You should have a list of files at the bottom of your post, that looks like this (example from one of your previous posts).

Screen Shot 2020-06-04 at 7.20.36 AM.jpg


Next, once you have your photos uploaded, click on the "Insert all: THUMBNAIL" button. This will insert all of the images in-line into your post, at a point you specify with the cursor.

Screen Shot 2020-06-04 at 7.21.43 AM.jpg

The system will automatically force / default to thumbnails anyway, per admin setting. You can insert photos using the "Full image" button, and they will show in your editor/draft window as full sized images, but when the post is saved/posted, they will default to thumbnail size.

Your images will then be in the post window. You can then use the cursor to insert spaces / line breaks between the images, if you want to insert text between them.

This is what I do when I create my "HOW-TO" post updates. I upload all images to a blank draft post. Then, image by image, I go through them and add commentary, and then a few line breaks, and then more commentary for further images, and so on, until all of the images are exhausted (commented on or annotated).

If you just have ONE or A FEW images that you want to add in-line underneath or above some text, use the "Insert image" button in the tool-bar. This allows you to add single images (or, one at a time) in-line in the specific location in a post where you want it.

Screen Shot 2020-06-04 at 7.26.06 AM.jpg

Does that make sense?
 
This is exceedingly easy to do.

First, upload all photos that you want to have in the post, using the "Attach files" button.

View attachment 105073

You should have a list of files at the bottom of your post, that looks like this (example from one of your previous posts).

View attachment 105074


Next, once you have your photos uploaded, click on the "Insert all: THUMBNAIL" button. This will insert all of the images in-line into your post, at a point you specify with the cursor.

View attachment 105075

The system will automatically force / default to thumbnails anyway, per admin setting. You can insert photos using the "Full image" button, and they will show in your editor/draft window as full sized images, but when the post is saved/posted, they will default to thumbnail size.

Your images will then be in the post window. You can then use the cursor to insert spaces / line breaks between the images, if you want to insert text between them.

This is what I do when I create my "HOW-TO" post updates. I upload all images to a blank draft post. Then, image by image, I go through them and add commentary, and then a few line breaks, and then more commentary for further images, and so on, until all of the images are exhausted (commented on or annotated).

If you just have ONE or A FEW images that you want to add in-line underneath or above some text, use the "Insert image" button in the tool-bar. This allows you to add single images (or, one at a time) in-line in the specific location in a post where you want it.

View attachment 105076

Does that make sense?
Thank you Gerry, it absolutely does! Will rearrange pictures accordingly.
 
Not much punch list progress since the last post. Had the car detailed inside, outside and underside at Island Detail here in Seattle and am really pleased with how it turned out. No clear coat issues and no rust anywhere and that’s good news for a 28 year old car. Just got the car back from MB where the 97,500 mile service was completed. Outside of an oil and filter change and a brake fluid change not much else was done or needed to be done, as the car continues to run nicely. Hope it stays that way until I have all the parts together for the next few items on my punch list.

Enjoying running the original 8 whole wheels with their old school look, but the ride is significantly less sporty, so will likely go back to the Rials soon
 

Attachments

  • 6E80A4A4-4F0D-4301-8D9C-5AA5D7DF6EE4.jpeg
    6E80A4A4-4F0D-4301-8D9C-5AA5D7DF6EE4.jpeg
    1.1 MB · Views: 36
  • 64810A27-8D89-4D3D-98E7-0C26360304AB.jpeg
    64810A27-8D89-4D3D-98E7-0C26360304AB.jpeg
    1.7 MB · Views: 38
  • C1752A3E-8BDF-46FE-82A4-3767358E371D.jpeg
    C1752A3E-8BDF-46FE-82A4-3767358E371D.jpeg
    767.6 KB · Views: 34
Last edited:
I hope you are staying away from the CHOP area so that your car doesn’t come into any danger from anarchist protestors.

When I was in high school in 1984, I got a $13 ticket from the Seattle Police for jaywalking. As in riding my skateboard across 2nd Avenue not in a crosswalk.

Now the Seattle Police seemingly let anything happen in the city with no consequences. How times have changed very much in your city (and my former home town).
 
A couple of weeks ago I unfortunately I had an issue come up again where the car didn’t accept power when hot. That was combined with very rough idle and shaking, very similar to when I had to have caps and rotors replaced several months ago. So I took the car to Steve at MB about two weeks ago and after running the whole test gamut (fuel flow, crank position sensor, ignition wires, etc., etc.) they found a bunch of fluid behind the insulators. So they replaced caps, rotors and insulators again and pleasantly enough they did so under warranty 🎉🎉

While in the shop I also had them put in a new battery, as the old one was starting to balk at longer intervals between drives, so I wanted to address that before it became a real problem. Now the car is running very nicely again and accordingly I’m quite pleased, although I do wonder why the caps and rotors are just such a weak point on these engines. Makes me think the M113 might be the better engine after all....

Following that repair, I went ahead today and finally pressed the button on getting all the alto gray panels repainted (again in alto gray, as I really dig the two tone OEM look). Some of the panels started to show a bit of wear that was starting to annoy me every time I looked at the car. As part of this repaint, I will also replace the rear bumper cover, as it has some nicks, and, more importantly, some prior parking damage, which caused slightly crooked bumper cover corners, as well as broken brackets which the PO had glued back on, leading to a bit of a flimsy feel when you press the sides of the bumper. So I finally got to whip out my brand new OEM bumper cover that I had stashed away for the last year and a half and I am quite excited to get that installed, along with brand new bumper chrome trim for the front and rear bumper. Thought I might as well get new chrome trim, as otherwise 28 years worth of car wash scratches on the chrome might stick out like a sore thumb on newly painted panels. Anyway, long story short, I am excited to get this done, as this has been on my punch list from day one 🙂

I will post pictures once the job is complete
 

Attachments

  • 41F9C575-8F4D-47B8-B55A-7D1FF83C61AB.jpeg
    41F9C575-8F4D-47B8-B55A-7D1FF83C61AB.jpeg
    263.1 KB · Views: 36
  • 41D01088-C9EB-489F-B2A4-CA139DEAA181.jpeg
    41D01088-C9EB-489F-B2A4-CA139DEAA181.jpeg
    376 KB · Views: 34
  • 59E04B37-68F9-40B9-ADF0-233A6633558F.jpeg
    59E04B37-68F9-40B9-ADF0-233A6633558F.jpeg
    542.4 KB · Views: 32
  • 66B68756-48F1-471F-8F9B-A1DE936E00A4.jpeg
    66B68756-48F1-471F-8F9B-A1DE936E00A4.jpeg
    290.2 KB · Views: 28
  • AC734823-91E0-40D2-A734-36AF5711806B.jpeg
    AC734823-91E0-40D2-A734-36AF5711806B.jpeg
    312.7 KB · Views: 30
  • 9F32C269-9567-4996-BFEE-F3BABA5F6D40.jpeg
    9F32C269-9567-4996-BFEE-F3BABA5F6D40.jpeg
    375.2 KB · Views: 31
  • B486CA1F-34F3-4D23-AA92-46C3131F10AA.jpeg
    B486CA1F-34F3-4D23-AA92-46C3131F10AA.jpeg
    302.9 KB · Views: 34
  • C2679B6D-5016-4FE9-BCCD-B2ED62C57F2F.jpeg
    C2679B6D-5016-4FE9-BCCD-B2ED62C57F2F.jpeg
    336.7 KB · Views: 30
  • 68FBBE59-D74F-4632-86F9-5CB56DD4D02B.jpeg
    68FBBE59-D74F-4632-86F9-5CB56DD4D02B.jpeg
    238.9 KB · Views: 27
  • B3525DFD-C28C-471A-8A2A-37443B77595E.jpeg
    B3525DFD-C28C-471A-8A2A-37443B77595E.jpeg
    558 KB · Views: 29
  • 36371087-43A3-4542-9305-B8E25CD2A748.jpeg
    36371087-43A3-4542-9305-B8E25CD2A748.jpeg
    233.4 KB · Views: 27
  • 081115AD-2846-48A4-A228-D11CBB5547CB.jpeg
    081115AD-2846-48A4-A228-D11CBB5547CB.jpeg
    176.9 KB · Views: 26
  • 47601ADC-D2C8-43DA-B6EB-1B90CFCA24CB.jpeg
    47601ADC-D2C8-43DA-B6EB-1B90CFCA24CB.jpeg
    420.5 KB · Views: 28
  • 8A0122E9-4A15-44C3-9AA3-7765936B7BEF.jpeg
    8A0122E9-4A15-44C3-9AA3-7765936B7BEF.jpeg
    477.5 KB · Views: 33
Last edited:
The paint shop removed all panels yesterday, so I picked up my car to give the area underneath a thorough wash and wax, as well as an inspection for rust, before the newly painted panels are reinstalled.

Considering the age of the car, I was please to see that there wasn’t a lot of grime and, more importantly, that there was no rust anywhere. It’s great that west coast cars can go for 28 years and not have any rust, due to the mild weather and lack of road salt. Makes me wonder why the German used car market usually shuns 500E that are imported from the U.S. (ads pointing out that it’s “NOT A U.S. CAR!”, lower price points, etc.). I get it, we don’t have the additional oil cooler and only a single mode automatic, but that stuff can be retrofitted, while battling rust seems much more complex and involved. 🤔

Anyway, with everything cleaned and waxed (didn’t remove the original wax run-off remnants at the car jacks and the fender overlaps-it’s ugly but it does it’s job), the car is now back at the paint shop where I hope they will do a good job with the panels and bumper. Looking forward to seeing how the end result turns out.

On the rear sheet metal there was a bit of tape with a number scrawled on it and wondering whether that is original, I went through some old factory photos and found one that has the same kind of tape with number on it- whatever production was signifying with that, it seems to have been part of their process back then.

6E3C88B6-DDD5-45B0-92AB-C9BD55C778DD.jpegC586B1F6-0548-41CB-AC54-75B76220D020.jpegFAB2D034-3393-4F17-A1A2-8E5D6636272C.jpeg364CEE42-8640-40FC-8A34-081BDED6F276.jpeg4A192658-1EF3-42B9-901F-15E331DABE39.jpeg3C3E4C47-9FAB-4238-9544-77BD7A009497.jpegCF2CC636-BEE8-4397-AD6E-0BC9CEC24E19.jpeg235862E3-18DC-4822-933C-F33B12882CA4.jpeg35C5CE2C-6B10-4B3D-9AF6-BB27737A8427.jpeg50CDA4A4-9D45-4E00-9ADC-2240DF8F6144.jpeg0B8E2021-FA38-4569-997B-FBD2F7878D96.jpegBBDA06ED-60C6-41D3-92E0-385FA9FE95D9.jpegAD7572FC-5992-4459-8E30-0ECB7B97CFC1.jpeg1ACD3B1E-3807-426E-8ECA-1639637ACC63.jpegE6BAA4A4-8C1C-4870-9C35-2C38D09B78B8.jpeg4D870AF3-2455-4751-AB21-F888587FA9CE.jpeg40FA15AA-C3C4-4897-AF6C-3262B09495A0.jpeg190E2C79-5957-4FC1-95B2-721CA75D64F5.jpegC2D2CB82-20A7-4296-AFC6-023F5A36309E.jpeg61D00199-C900-4362-9F8E-55567DED0DBD.jpegE1C4E8C3-1366-4418-B951-36CDFDF9851E.jpeg262C4308-E848-461F-83D3-88209F75F862.jpegC3412690-48C7-4A5F-9301-24031B4BA0D8.jpeg
 

Attachments

  • FD88E104-489F-42E5-994B-9F117865D1BE.jpeg
    FD88E104-489F-42E5-994B-9F117865D1BE.jpeg
    97.7 KB · Views: 33
  • 6C48022C-B783-4070-B784-82F60F9C7730.png
    6C48022C-B783-4070-B784-82F60F9C7730.png
    5.2 MB · Views: 37
Last edited:
Makes me wonder why the German used car market usually shuns 500E that are imported from the U.S. (ads pointing out that it’s “NOT A U.S. CAR!”, lower price points, etc.). I get it, we don’t have the additional oil cooler and only a single mode automatic, but that stuff can be retrofitted, while battling rust seems much more complex and involved. 🤔
Some wise buyers overseas have figured this out, and poach rust-free US imports for this exact reason. Why there seems to be a lower value attached to US imports, I don't understand. A lot of European cars have serious rust issues. Much easier to repaint / repair a rust-free car, and usually far cheaper too.


Anyway, with everything cleaned and waxed, the car is now back at the paint shop where I hope they will do a good job with the panels and bumper. Looking forward to seeing how the end result turns out.
Car looks GREAT. Nice to see everything looking super clean behind the plastics!
 
The lower panels and bumpers are done now and I'm happy with it, as they did a quality job and managed to nail the matte satin finish of the alto gray parts very nicely. Unfortunately, however, the shop decided on their own volition to also paint the bumper inserts which I had put on the car shortly after I got it two years ago. These were one of the last sets available from MB before they became NLA about 18 months ago and were in perfect shape without a single scratch on them. So now, instead of their original matt anthracite color they are a glossy pitch black and I'm pretty upset with the whole thing, as they needlessly took a set of perfect NLA parts and ruined them with no real recourse to recover the mistake.......oh well, it is what it is now and I'll have to get used to it.

Fortunately they didn't mess up the new OEM rear bumper cover I had provided them with, so I jot that down as a win. As part of the new rear bumper I also decided to put on new OEM bumper chrome inserts front and rear, as well as a new OEM grille assembly (consisting of the chrome surround, the vertical and horizontal chrome bars and new plastic insert), so now the car looks pretty spotless when it comes to any of the main chrome parts and I'm determined to enjoy that for all two days that this will last before dust and road debris will again take its toll.

Since it was on my list from day one to convert the car to the RoW trunk lid, I was super happy to find @Jlaa 's post about the needed parts for such a modification (Rear License Plate Filler Panel - early w124.036 ? | Body Shop), so a big thanks to him for blazing the trail and documenting it!

When they took the faux trunk cover panel off, they discovered a bit of surface rust on the right hand top corner of the trunk lid, so I had them address the rust and repaint the entire trunk as part of it. I much prefer the look without the faux panel and am glad that I went ahead with the modification

Next up I will have to turn my attention to the interior (sagging headliner) but that will be sometime in winter. For now, I just want to enjoy the car a bit and plan to take a road trip to San Francisco along the coast.

5F0C3D96-143D-42EB-AC59-75B13552F7FE.jpeg960603E4-E7A7-4E62-A71F-A888E8B8B657.jpeg162B2CE7-D0D8-4EEA-A13B-5D8BD2F39447.jpeg87717762-E2B9-41FB-BA51-5A96594620BE.jpeg365E91F5-52B8-444D-A445-3DE35264BD2A.jpegA590F00F-9595-466F-8EE1-1C1DBE50FEC8.jpegE857378D-4EBE-48FF-BE06-0B6A2AE07E9C.jpegF8E361D9-597B-42DC-BBDC-9752FC20D8EE.jpeg58FF43AB-C4EA-47B4-9604-0839582762E5.jpeg59D00CD5-722D-4CAA-8507-12198EBB77ED.jpeg880B85BC-5FFD-4F62-ADFC-848E1ED393E1.jpeg108A7DD3-50F8-4573-9682-C311664B88FE.jpeg788B1F2C-7603-4849-8914-38F38B2FFB98.jpegBC268F69-324D-44CC-8BA3-3B042F89723B.jpeg12B998F9-E722-4CB1-88C7-FF8C1124EDFA.jpeg843BD55B-945C-418F-9E80-D9B74AC88F50.jpeg4C03936A-B604-4F1F-ABC6-0FF7A9C11231.jpeg
 
Last edited:
Looking excellent, even if the bumper inserts are ever so slightly too glossy. They are tough to notice; the rear heine is much more obvious and proper now!

If you plan a road trip to SF then perhaps we should do a small gathering!
 
Looking excellent, even if the bumper inserts are ever so slightly too glossy. They are tough to notice; the rear heine is much more obvious and proper now!

If you plan a road trip to SF then perhaps we should do a small gathering!
Thank you Jlaa - appreciate it and yes, a 500E and coffee type of thing would be fun!
 
I know I have gushed about them before, but I must again.

Those wheels. Absolutely love them.

I also agree with @Jlaa. While I know it won't help your inner OCD'er, rest assured, to the non-owner perfectionist, the bumper strips still look top notch.

Can you PM me the shop name? I'm in the market for some work on the 540... :)
 
With the weather turning bad up here, I decided to tackle a few things I had on my punch list, although this will be a bit of a longer process, due to multiple steps involved.
1) Mercedes Lynwood deinstalled all center console wood, including stowage box louvres in front and back. Shifter board and rear center console were faded and the clear coat had cracks. Sent the parts out to Madera which will refurbish the wood and cut two additional holes into the climate control panel
2) Bought new window switches and mirror control button for the center console, as the current ones are shiny from usage. MB only selling the left hand window buttons (front and back). Right hand side buttons are NLA, but I found some right hand NOS buttons in Europe to make it a full set
3) a777fan is a rockstar and has kindly agreed to build an ASR Off system for me, based on the wiring info that GvZ had so graciously provided a while ago. Bought a used ASR Off switch from an SL which will go into one of the holes that Madera is cutting. The other switch will be faux (got a used alarm switch from the SL, per gsxr’s recommendation) to fill out the other remaining hole that Madera is cutting. In the meantime a777fan is getting all the parts needed for the ASR Off system.

Cleaned the area underneath the center console which was filthy from decades of dust and now waiting for the wood parts to be finished and for a777fan to assemble the ASR kit.

If everything goes as planned, everything will be put on the car in November, including the new console switches. Until then it will look ugly, but that’s ok.

While the car was in the shop for the console stuff I had the driver side cushion replaced with an original Fehrer made passenger side cushion that I bought from 8899 in 2019 (SOLD - OEM Front Seat Bottom Cushions/Pads | Parts for Sale).

Seating comfort is so much better, as the cushion on my car had collapsed. Luckily I found a really good upholsterer in Everett. He managed to put the original leather covers back on without any damage to the covers and I was really happy with that, considering that these are 28 years old.

Bit by bit the car is coming together, but man, sometimes it feels a bit daunting to think how much effort it will still take to do all the remaining items on the list. Unfortunately the devil is in the details and the NLA situation just isn’t helping anything, but it is what it is. In the meantime, a big thank you to @a777fan and @gerryvz- really appreciate all the help and info on the ASR Off system!
 

Attachments

  • CAEC592E-B4B7-4E4C-AE14-A7F2E504432D.jpeg
    CAEC592E-B4B7-4E4C-AE14-A7F2E504432D.jpeg
    1.8 MB · Views: 48
  • 2F6AB7F0-E479-40A1-87DD-3091D4FDD362.jpeg
    2F6AB7F0-E479-40A1-87DD-3091D4FDD362.jpeg
    1.8 MB · Views: 46
  • 0F60ABAF-F64F-4AEA-8607-451BD4EA2110.jpeg
    0F60ABAF-F64F-4AEA-8607-451BD4EA2110.jpeg
    1.6 MB · Views: 41
  • CC112D42-CFFE-4155-97E5-6535CA5E8BEA.jpeg
    CC112D42-CFFE-4155-97E5-6535CA5E8BEA.jpeg
    3.4 MB · Views: 41
  • 53D42032-92B4-4F89-8E7B-3D4499C88BB5.jpeg
    53D42032-92B4-4F89-8E7B-3D4499C88BB5.jpeg
    1.9 MB · Views: 38
  • 02B2E792-7C74-4B0E-AB84-EC8733009E0F.jpeg
    02B2E792-7C74-4B0E-AB84-EC8733009E0F.jpeg
    2.3 MB · Views: 36
  • 87FB1ED7-7A05-4D38-82FA-0E17FACF6C63.jpeg
    87FB1ED7-7A05-4D38-82FA-0E17FACF6C63.jpeg
    1.9 MB · Views: 36
  • 7EA8F295-9717-459F-A27C-22D6BBF32FF3.jpeg
    7EA8F295-9717-459F-A27C-22D6BBF32FF3.jpeg
    2 MB · Views: 38
  • BBA534AD-783E-4454-995C-452218071A88.jpeg
    BBA534AD-783E-4454-995C-452218071A88.jpeg
    2.7 MB · Views: 35
  • 87BDBC3F-0856-4A11-8C76-FB76BE5C10B0.jpeg
    87BDBC3F-0856-4A11-8C76-FB76BE5C10B0.jpeg
    2.9 MB · Views: 31
  • 5A88C8E7-041A-4B26-A93F-E604888EFFB8.jpeg
    5A88C8E7-041A-4B26-A93F-E604888EFFB8.jpeg
    2.4 MB · Views: 29
  • CD8903BF-7607-4130-8CE4-94DD11CEFEA0.jpeg
    CD8903BF-7607-4130-8CE4-94DD11CEFEA0.jpeg
    2.3 MB · Views: 42
Last edited:
BTW since the interior is not assembled ..... have you retrofitted back the European headlight vacuum adjusters? Not very difficult .... high satisfaction to effort ratio.....

Also (sorry to pile on) .... but while you're at it, if you do that, go ahead and replace the headlight switch (as a preventative measure --- all the switch internal plastic bits get all broken up) and AS WELL replace the ignition lock tumbler (big time preventative maintenance .... before it seizes up)..... 👺
 
Last edited:
+1 on the headlight switch.

And plus eleventybillion on the new ignition lock tumbler. That is the FIRST spare part I buy after a new 124 shows up in my driveway, unless the PO has a record of recent replacement. $100 insurance prevents a very nasty job if the old tumbler seizes.

:sawzall:
 
Also (sorry to pile on) .... but while you're at it, if you do that, go ahead and replace the headlight switch (as a preventative measure --- all the switch internal plastic bits get all broken up) and AS WELL replace the ignition lock tumbler (big time preventative maintenance .... before it seizes up)..... 👺
No worries, you’re not piling on Jlaa, just pointing out valuable items. The headlight switch is brand new (had it put in 5 weeks ago, as the old one was “spinning”). I have all the surround panels, including a RoW light switch surround with the adjustable headlight switch, all items courtesy of 8899, who sold these to me about a year ago, but haven’t had them installed yet. Will add the lock tumbler to the list, when I have all these items put in- really appreciate the advice!

Went to a tint and paint protection place today to get some of the lower panel and rocker areas I had just repainted protected against stone chips. Crazy how much abuse these areas see. While there, I also had them put on a black foil on the rear window stay bars. These stay bars are NLA and I just cant find them anywhere. They stood out pretty bad in their weathered golden glory against all the the other black anodized trim on the car that I had replaced about a year ago, before it went NLA. The black foil turned out ok, though I plan to have those rear window stay bars anodized at some point to make it a proper fix.
 

Attachments

  • A7E917F7-7380-4C60-A5F0-36F6D1DE66CB.jpeg
    A7E917F7-7380-4C60-A5F0-36F6D1DE66CB.jpeg
    633.4 KB · Views: 61
  • C4DAFCCC-E947-4BA7-A526-A3F772BE0DF8.jpeg
    C4DAFCCC-E947-4BA7-A526-A3F772BE0DF8.jpeg
    666 KB · Views: 58
  • 8628A3AB-1EA5-44F2-900D-919A66258871.jpeg
    8628A3AB-1EA5-44F2-900D-919A66258871.jpeg
    1.9 MB · Views: 58
Last edited:
This thread reminds me that a) I should replace the (original) ignition lock tumbler, which is starting to show signs of failure, getting a little sticky in, say, 1 in every 100 cranks, and b) the headlight switch, which refuses to stay popped out in the front fog position.

Also: looking good @TimL, polishing up very nicely!
 
Received the refinished wood trim back from Madera. Turned out well, but for the money I would have expected the results to be perfect and there are some areas on the shifter panel that they could have done better in my opinion. Exciting part here is that they converted my climate control panel to a 9 hole board, so now the wood is ready to take on the button for the ASR Off system that I am very much looking forward to!
:jono:
 

Attachments

  • FE3E0EEE-E5A7-45D7-8FD0-A79ADB2A57A5.jpeg
    FE3E0EEE-E5A7-45D7-8FD0-A79ADB2A57A5.jpeg
    4 MB · Views: 61
  • DC60B225-C85B-46F8-A876-5E57CCFC098E.jpeg
    DC60B225-C85B-46F8-A876-5E57CCFC098E.jpeg
    2.7 MB · Views: 58
  • 4B57BD79-E7AC-441D-8280-8A52A4B266C9.jpeg
    4B57BD79-E7AC-441D-8280-8A52A4B266C9.jpeg
    2.6 MB · Views: 59
  • 2086C781-3B7B-45A6-9416-F391F899758E.jpeg
    2086C781-3B7B-45A6-9416-F391F899758E.jpeg
    4.4 MB · Views: 63
  • FA72509E-AA93-4409-947E-5B4BBDFDD6EA.jpeg
    FA72509E-AA93-4409-947E-5B4BBDFDD6EA.jpeg
    2.9 MB · Views: 66
I didnt see on the pictures any flaws, but I understand where you are coming from. I had my wood pieces reworked by the guy in San Diego, the cost was much more affordable and I was quite satisfied. What you posted looks great!
 
That looks pretty nice to me! Which hole is the cut hole? Is it the 6th one? I am asking WITHOUT looking at the picture of an OE part first ..... so I am purely guessing on the basis of visual differences of holes in the picture that you posted. I do not remember off the top of my head which position on the OE piece is hole-less.
 
That looks pretty nice to me! Which hole is the cut hole? Is it the 6th one? I am asking WITHOUT looking at the picture of an OE part first ..... so I am purely guessing on the basis of visual differences of holes in the picture that you posted. I do not remember off the top of my head which position on the OE piece is hole-less.
😄😄

It’s position 6 and 7 they added, Jlaa
 
Last edited:

Who has viewed this thread (Total: 2) View details

Back
Top