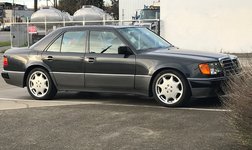
Navigation
Install the app
How to install the app on iOS
Follow along with the video below to see how to install our site as a web app on your home screen.
Note: This feature may not be available in some browsers.
More options
Style variation
-
Hi Guest !
Welcome to the 500Eboard forum.
Since its founding in late 2008, 500Eboard has become the leading resource on the Internet for all things related to the Mercedes-Benz 500E and E500. In recent years, we have also expanded to include the 400E and E420 models, which are directly related to the 500E/E500.
We invite you to browse and take advantage of the information and resources here on the site. If you find helpful information, please register for full membership, and you'll find even more resources available. Feel free to ask questions, and make liberal use of the "Search" function to find answers.
We hope you will become an active contributor to the community!
Sincerely,
500Eboard Management
You are using an out of date browser. It may not display this or other websites correctly.
You should upgrade or use an alternative browser.
You should upgrade or use an alternative browser.
OWNER TimL
- Thread starter TimL
- Start date
I didnt see on the pictures any flaws
I do 2 major one, but i don´t want to destroy good mood of TimL
Go for it Arkady- it is very likely I know about them already anyway.I do 2 major one, but i don´t want to destroy good mood of TimL
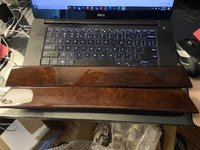
The whole wood restoration was only a function of the ASR Off project, so I didn’t really have my heart set on the wood refresh itself. It for sure looks much nicer than before, but it ain’t perfect and I don’t think I would go back to Madera if I ever have other wood trim in need of restoration.
Interesting... can you capture the imperfections on camera ? What other options do we have in USA for restoration, now that most all the wood is NLA?It for sure looks much nicer than before, but it ain’t perfect and I don’t think I would go back to Madera if I ever have other wood trim in need of restoration.

The shifter board cracks didn’t get fixed properly. Look at the long black line that starts below the hole of the fader and goes all the way to the end of the board...........disappointing.Interesting... can you capture the imperfections on camera ? What other options do we have in USA for restoration, now that most all the wood is NLA?
I’d try @nocfn ‘s guy or the guys in Germany wurzelholz thought the Germans are even more expensive than Madera, but maybe they at least would get it right
They told me initially that they offer re-veneering if needed. The cracks in the rear center console were much worse and that piece turned out perfectly, so I’m a bit surprised they didn’t properly fix the shifter board.Ah, now I see it! If the crack is in the veneer, I don't know if it's fixable... but I'm not a wood expert. @LWB250 ?
Maybe I’m nitpicking, but at a price of $1k for six pieces I’d have expected all cracks to be fixedI'm really surprised that Madera didn't re-veneer the piece. I would have thought they'd have done that with a crack in the veneer itself. This is the very first I've heard of disappointment in Madera since I first became aware of them 20 years ago.

Yeah totally - pls call them @TimL . Also, is it all Manny now or is Jeff Wayco still involved? Jeff would never have allowed that piece to pass quality control.Honestly, Tim, I would call them, and send the piece(s) back to them for a re-do. I am sure they will stand behind their work if you discuss with them why you are not happy and what specifically is not right.
You might be right, Gerry. I think I will give them a call on Monday to discuss and see what their thoughts are. It somehow doesn’t seem quite right to still have a visible line where the crack used to be and once you know where it is it’s difficult to unsee.Honestly, Tim, I would call them, and send the piece(s) back to them for a re-do. I am sure they will stand behind their work if you discuss with them why you are not happy and what specifically is not right.
I only dealt with Manny throughout the process.Yeah totally - pls call them @TimL . Also, is it all Manny now or is Jeff Wayco still involved? Jeff would never have allowed that piece to pass quality control.
Ah, now I see it! If the crack is in the veneer, I don't know if it's fixable... but I'm not a wood expert. @LWB250 ?
Nope. That and it will show up in the finish as well, most likely.
-D
Sure you do.Go for it Arkady- it is very likely I know about them already anyway.
I made same mistake, i didn´t change the wooden trim completely, and had same result- all corners are not sharp anymore ( button wholes) and wooden part of the small box is very uneven, cause it has to be cafrefully polished. It has to fit each other much closer, hope you know what i mean.
Example pic, sorry for zebrano.
Attachments
Sure you do.
I made same mistake, i didn´t change the wooden trim completely, and had same result- all corners are not sharp anymore ( button wholes) and wooden part of the small box is very uneven, cause it has to be cafrefully polished. It has to fit each other much closer, hope you know what i mean.
Example pic, sorry for zebrano.
Hi @036. I know what you mean about OE-sharp-flat edges (see two below pictures of my small-box-wooden-tambour-door prior to refinishing with sharp edges) vs rounded edges (see one picture below of post-Madera-with-Jeff-Wayco-in-Charge-refresh with rounded edges).
I think you must be much more of a stickler for originality than I in that regard. The rounded edges don't bother me.


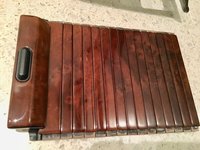
So @LWB250, you are saying there is no way the visible line from what used to be a crack is fixable? Would love to get your opinion before deciding if I reach out to them or not.Nope. That and it will show up in the finish as well, most likely.
-D
Last edited:
So @LWB250, you are saying there is no way the visible line from what used to be a crack is fixable? Would love to get your opinion before deciding if I reach out to them or not.
Tough to say without seeing it. In many cases, much depending on the type of finish and how it's applied, a crack or defect in the wood's surface will manifest itself in the finish, too.
As for the rounded edges on the tambour for the center console, I never figured out how Mercedes did that. I figured they finished the piece first, then used some sort of a saw or cutter to cut the pieces into strips. I don't know how else you could get an edge like that. If I recall the sides of the pieces are painted black, so it would be easy to take a piece the size of the tambour strips and with a very sharp edge (guillotine) cutter or blade cut it up into strips. After doing so you paint the edges then glue it onto the fabric to make the tambour.
I wish Drew Tibcken was still with us - he would know it was done.
-D
Thanks Dan, appreciate the info. I’m not worried about the stowage box piece, as I think that looks just fine. It’s the shifter panel that I’m not 100% happy with, so I guess I will reach out to Madera tomorrow and see what they think. If it can’t be done then I’ll just take it as it is. It’s maybe a bit of a nitpick anyway....Tough to say without seeing it. In many cases, much depending on the type of finish and how it's applied, a crack or defect in the wood's surface will manifest itself in the finish, too.
As for the rounded edges on the tambour for the center console, I never figured out how Mercedes did that. I figured they finished the piece first, then used some sort of a saw or cutter to cut the pieces into strips. I don't know how else you could get an edge like that. If I recall the sides of the pieces are painted black, so it would be easy to take a piece the size of the tambour strips and with a very sharp edge (guillotine) cutter or blade cut it up into strips. After doing so you paint the edges then glue it onto the fabric to make the tambour.
I wish Drew Tibcken was still with us - he would know it was done.
-D
Some very decent fall weather today, so I went for a lazy Sunday morning drive, grabbed a coffee at Pike Place and took a few pictures while out.
I just love driving this car.....maybe a little too much. Bought the car when it had 87k miles in June of 2018 and just past the 100k mile mark today
Enjoyed every single mile though and am looking forward to many more
I just love driving this car.....maybe a little too much. Bought the car when it had 87k miles in June of 2018 and just past the 100k mile mark today
Enjoyed every single mile though and am looking forward to many more
Attachments
Last edited:
I know what you mean. Driving this car imparts an immensely satisfying sense of operating fine machinery. It goes down the road in an extraordinarily regal manner that is lost on more modern cars ..... and yet it moves with equal alacrity as the modern stuff.Some very decent fall weather today, so I went for a lazy Sunday morning drive, grabbed a coffee at Pike Place and took a few pictures while out.
I just love driving this car.....maybe a little too much. Bought the car when it had 87k miles in June of 2018 and just past the 100k mile mark today
Enjoyed every single mile though and am looking forward to many more
Several things got done since the last post. @a777fan fabricated and installed the ASR Off functionality and once that was done, Steve Geyer reinstalled all the wood panels that Madera had refinished. Both turned out very nicely.
Steve also installed several other items that I had in storage for a while:
Steve also installed several other items that I had in storage for a while:
- New third brake light (as the previous one had some minor areas of molten plastic)
- NOS map light unit (NLA)
- New driver side leather door insert (NLA)
- Driver side door pocket (to replace the original delaminated one)
- New LH side window switches (RH side is unfortunately NLA and I couldn’t find them anywhere)
- New mirror adjustment switch
- New child lock window switch
- Trunk warning triangle
- New plastic trunk ledge cover
Attachments
-
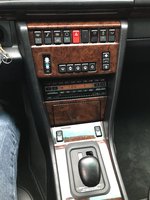 6438CAA0-1A71-4DC4-8DBC-6F18A1D5A9ED.jpeg1.5 MB · Views: 48
 -
 3C1A1697-CCE2-451D-8E08-255F44D9ACB6.jpeg1.6 MB · Views: 51
 -
 3E464CBC-6B15-4C10-9698-880F16FF7C86.jpeg1.6 MB · Views: 47
 -
 70131B4A-D7CC-44E2-BF51-7EEE2A9E8E71.jpeg1.7 MB · Views: 41
 -
 442BC4AD-5F3E-46C3-8A1A-43EF85A19CC4.jpeg3 MB · Views: 43
 -
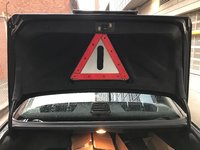 58449D01-BBF4-4505-98CB-8A16B20DE7BD.jpeg2.8 MB · Views: 39
 -
 175B92B8-F101-4DD5-8B3D-E5F533F0C836.jpeg3.1 MB · Views: 35
 -
 85A262C8-4434-4CDB-A508-598B4B85BFC5.jpeg1.7 MB · Views: 42
Yesterday the weather was decent, so I decided to put the RIALs back on and to go for drive afterwards to grab an outdoor, socially distanced, beer, staring at my parked car and pondering that while I had a bunch of things fixed over the last two years, there still remain a lot of items I’d like to get done. I’s a bit of a never ending story, but I enjoy the car, so I want to keep at it to get it to as proper a level as I can.
Next up are the following items:
-Install new blower motor (current motor squeaks)
- install new wiper motor (while in there)
- Install new wiper gears (while in there)
- install new washer reservoir and associated components
- install new hydraulic suspension reservoir
I have all the parts already, so now it’s just a matter of getting time with Steve Geyer in January.
It’s definitely slow going, but it is what it is.
Attachments
Last edited:
Yesterday the weather was decent, so I decided to put the RIALs back on and to go for drive afterwards to grab an outdoor, socially distanced, beer, staring at my parked car and pondering that while I had a bunch of things fixed the last two years, there still remain a lot of items I’d like to get done. I’s a bit of a never ending story, but I enjoy the car, so I want to keep at it to get it to as proper a level as I can.
Next up are the following items:
-Install new blower motor (current motor squeaks)
- install new wiper motor (while in there)
- Install new wiper gears (while in there)
- install new washer reservoir and associated components
- install new hydraulic suspension reservoir
I have all the parts already, so now it’s just a matter of getting time with Steve Geyer in January.
It’s definitely slow going, but it is what it is.
If you are installing a new blower motor, please
do not forget to change the regulator (transistor) at the same time! You don’t want to go back in there twice.
For the regulator, For my tastes I stay with MB or OEM. In my owners thread, I noted that I lucked out and found that the ACM I bought was a repackaged OE MB/Bosch regulator with the star scratched off.
For the blower assembly, also only buy MB or OEM Behr or “aftermarket” Behr/Hella Service.
BTW if I can change the blower motor, ANYONE can.
Last edited:
Thanks for the advice Jlaa! I will buy a regulator then to go in at the same time. Actually, your educational blower motor videos and hints helped me source an OEM/Bosch motor from the same source that you had purchased yours from a while agoIf you are installing a new blower motor, please
do not forget to change the regulator (transistor) at the same time! You don’t want to go back in there twice.
For the regulator, For my tastes I stay with MB or OEM. In my owners thread, I noted that I lucked out and found that the ACM I bought was a repackaged OE MB/Bosch regulator with the star scratched off.
For the blower assembly, also only buy MB or OEM Behr or “aftermarket” Behr/Hella Service.
BTW if I can change the blower motor, ANYONE can.
The part has been collecting dust on my shelf since your posting, but in Jan it will finally go in
The wiper electrical motor is a pretty rare failure, or at least I can't recall the last time someone had a bad one. The mechanism usually needs lubrication internally to speed things up, which is not easy as the gear mechanism cannot be easily disassembled. If Steve is doing the work, you'll be fine, but I'd consider it a semi-advanced DIY. Late style wipers (all but earliest facelift) are a different design and you can just pop the plastic cover off and lube everything. Can't do that on the early version with metal cover.- install new wiper motor (while in there)
- Install new wiper gears (while in there)
- install new washer reservoir and associated components
Also, keep in mind the new washer reservoir plastic part on the bottom is not the same shape as the original. This prevents it from seating in the same location, and will sit ~1/2" or so too tall, where the thumbscrew will bend down the tab on the rear. There are various ways to compensate, including just ignoring the difference and not tightening the thumbscrew completely. Search the forum for details & photos, I think it's been documented previously.

Expecting my new Compomotive wheels to arrive within the next few weeks, but getting stuff in and out of England is a bit more time consuming these days, due to Brexit. While waiting for the Compomotives, I had the RIAL Arc M800 refinished, as the clear coat was starting to crack on all the wheels. The wheel refurbishment place ventured to guess that the tire foam I use might not be compatible with powder coated surfaces  - no more tire foam for me then.
As the wheels were being refinished, I ordered a set of Michelin Pilot Sport 4s to replace the Bridgestone RE-71R. I wanted a softer and better mannered tire for the RIALs. I’ll stick the Bridgestones on the Compomotives once they arrive.
As the wheels were being refinished, I ordered a set of Michelin Pilot Sport 4s to replace the Bridgestone RE-71R. I wanted a softer and better mannered tire for the RIALs. I’ll stick the Bridgestones on the Compomotives once they arrive.
Attachments
Last edited:
Received my Compomotive wheels (18x8 ET35) earlier than expected and just put them on the car. Attached a few initial snapshots. I will have the center caps painted silver and plan to add old school DTM-style OZ stickers to it a bit later. Maybe spacers for the front, but will decide that once they've been on the car for a bit.
Attachments
-
 2E906473-A05A-4DA5-9CDF-51762E81FADB.jpeg2.8 MB · Views: 57
 -
 CB77F252-28B3-4552-AE6C-A5950F275382.jpeg2.5 MB · Views: 55
 -
 461767AC-A236-4644-9315-1CC99AB13F50.jpeg2.4 MB · Views: 35
 -
 B5FFBA56-10EB-48D8-97F4-2F84A3AB9431.jpeg3.4 MB · Views: 38
 -
 BBCC0BE6-85D9-4C21-9A47-B90A5CA69CB9.jpeg3.5 MB · Views: 37
 -
 93F3E144-23B8-4227-AC36-0E6EBBC090DE.jpeg2.8 MB · Views: 32
 -
 F7E80A0D-6D60-4BFE-9DB2-0650C761C22D.jpeg2.6 MB · Views: 32
 -
 43FF6B16-8504-44C8-8D34-AA866583B22B.jpeg3.6 MB · Views: 34
Last edited:
Thank you, Jon- I feel similarlyInteresting change Tim. I must say, I think I am partial to the Rials!
overall still looksAs usual!
It's been since the end of November that I had my car with Steve Geyer and in the meantime I've been collecting all the parts necessary for the next round of items on the To Do list (some of them have lingered, as I waited for all parts to arrive to avoid go backs):
On the outside
-Install NOS blower motor (current motor squeaks)
- Install new wiper motor
- Install new Bosch wiper gear
- Install new wiper motor transistor
- Install new washer reservoir and associated components
- Install NOS MB hydraulic suspension reservoir (did participate in the group buy, but afterwards found a NOS unit that includes the cap & dipstick)
- Install ROW headlight vacuum adjustment functionality
On the inside
- Install new lock tumbler
- Install new headlight switch and light knob
- Install used (but very good condition) plastic panels around steering column, steering column lock and headlight switch
- Install used (but decent condition) ROW lower dashboard cover (the one without the North American market bulge)
- De-install that infernal North American seat belt buzzer
- Install NOS cruise control switch
- Install NOS multi purpose steering column stalk
- Fix rear dome light
- Fix C pillar reading light on passenger side
- Install new seat controller left and right
- Install new seat control cover shroud - still missing the driver side though and can't find a NOS part that has the openings for the memory function
- Install new seat controller left and right
- Install NOS passenger side window switches (difficult to find these with correct passenger side diagram)
- Install new radio fader toggle switch
Install NOS headlight adjustment toggle switch
"Maybe" Items (not sure if I'm ready to mess with the door cards yet again):
- Install NOS seat control buttons (parts still stuck in shipping)
- Install NOS door handle plastic shrouds all around
- Install NOS door card shroud on driver side front door (took a year to find one, but currently still stuck in shipping)
- Install NOS burlwood door trim on front passenger door and driver door
- Install NOS seat belt latches/buckles all around front and back
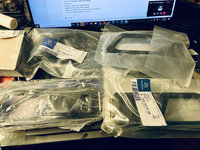
A bunch of the above is just related to plastic parts being either faded (seat belt buckles) or shiny from touch (steering column stalks, door card shroud, passenger side window switches, etc.), something which just bugs me every time I drive the car. Hoping to get all items not on the “maybe“ list done before the end of April if I can get a two-day appointment with Steve. We'll see.
I'll post some pictures of some of the parts a little later today.
Attachments
-
 943E1A54-82D7-44D1-AD19-A384002A6FC7.jpeg3.9 MB · Views: 22
 -
 8B8F6F67-B3CE-45E5-8C84-EF9160D5EC14.jpeg3.5 MB · Views: 22
 -
 0C82488E-E83C-4431-8155-627ACFC91688.jpeg3.3 MB · Views: 21
 -
 452AA33E-D05C-4D31-9B11-AE06D6523F16.jpeg3.1 MB · Views: 20
 -
 D0D4203C-18DC-4F7D-B953-A6ABD74E6379.jpeg2.9 MB · Views: 19
 -
 77093499-E6B9-44B6-A7FA-07BC2A194994.jpeg2.7 MB · Views: 21
Last edited:
Nice list, Tim! A few comments:
1) The new washer reservoir has the base shaped differently, and will sit ~1/2" higher than normal, which means the back flange bends when you tighten it down. Search the forum for details. You either live with it not seating properly, or modify the metal bracket on the body to adjust for the difference.
2) The seat belt buzzer can be defeated by separating a 2-pole connector below the driver seat, near the front. I do this on all of my 124's.
3) The headlights will probably require re-alignment after installing the vacuum level adjust.

Thank you for the heads up Dave! Yes, you had mentioned the washer reservoir in an earlier post (#78), so I will ask Steve to modify the bracket. The headlight adjustment might be the straw that breaks the camel's back!Nice list, Tim! A few comments:
1) The new washer reservoir has the base shaped differently, and will sit ~1/2" higher than normal, which means the back flange bends when you tighten it down. Search the forum for details. You either live with it not seating properly, or modify the metal bracket on the body to adjust for the difference.
2) The seat belt buzzer can be defeated by separating a 2-pole connector below the driver seat, near the front. I do this on all of my 124's.
3) The headlights will probably require re-alignment after installing the vacuum level adjust.

On the inside
- Install used (but decent condition) ROW lower dashboard cover (the one without North American market bulge)
- De-install that infernal North American seat belt buzzer
Awesome! I would love to hear how the non-bulge lower dashboard cover goes on --- like are there any hangups, or does it go on smoothly? I am not fond of the bloated NA units.
Nice list, Tim! A few comments:
2) The seat belt buzzer can be defeated by separating a 2-pole connector below the driver seat, near the front. I do this on all of my 124's.
What? Really? Do you have pics on w124perf anywhere on which 2-pole connector this is? I HATE the seatbelt buzzer.
It's easy. There are only 2 wires with a small 2-pole connector under the front seat. One has a bright red connecting housing - DO NOT disconnect this, it's for the SRS/airbag system.What? Really? Do you have pics on w124perf anywhere on which 2-pole connector this is? I HATE the seatbelt buzzer.
The other one has a black connector housing. Unplug it and voilà! No more buzzer. Should be located near the front of the driver seat towards the outside. Probably need to remove the carpet cover piece, and the connector may be clipped into a metal bracket - pop it out, disconnect, pop the one side back into the holder.

Unplug the black plug under driver’s seat only or both seats?
Driver seat only, AFAIK... don't think the passenger seat triggers the buzzer.Unplug the black plug under driver’s seat only or both seats?
If anyone does this, maybe try to snap a photo of the offending connector + location, we can create a new thread with the info...

I’ll do it this morningDriver seat only, AFAIK... don't think the passenger seat triggers the buzzer.
If anyone does this, maybe try to snap a photo of the offending connector + location, we can create a new thread with the info...
Good to see that there seem to be more people who strongly dislike this North American "safety feature"I’ll do it this morning
Last edited:
Wow Tim,
very nice work and lovely attention to the details!
very nice work and lovely attention to the details!
Thank you Merlin! Fingers crossed it actually all now happens and Steve has some time for this laundry list soonWow Tim,
very nice work and lovely attention to the details!
Driver seat only, AFAIK... don't think the passenger seat triggers the buzzer.
If anyone does this, maybe try to snap a photo of the offending connector + location, we can create a new thread with the info...

@gsxr --- is it this one? This is looking from the the rear of the seat. This connector has GRN + GRN-BLK on one site and BLU-BRN on the other side?
Note you can faintly see a red connector in this picture too.

Yup! Unplug that and see what happens.@gsxr --- is it this one? This is looking from the the rear of the seat. This connector has GRN + GRN-BLK on one site and BLU-BRN on the other side?

Awesome thank you! There are three "infernal-buzzer" modes that I am familiar with:Yup! Unplug that and see what happens.

- Key OFF, Door OPEN, Lights ON --> BUZZ
- Key ACC, Door OPEN --> BUZZ
- Key ON, Door CLOSED --> BUZZ ---> Unplugging the black two-wire connectors address this scenario.
Awesome thank you! There are three "infernal-buzzer" modes that I am familiar with:
- Key OFF, Door OPEN, Lights ON --> BUZZ --> You probably want this reminder, but the GraySwitch uprgade may help?
- Key ACC, Door OPEN --> BUZZ --> The GraySwitch™ upgrade cures this scenario.
- Key ON, Door CLOSED --> BUZZ ---> Unplugging the black two-wire connectors address this scenario.
I can't recall if the same buzzer is used for all three. I personally want the lights-on reminder, and don't mind the key-left-on reminder (since I can disable with the switch, if needed). The third one had the highest fingernails-on-chalkboard quotient for me.

Yes, GraySwitch™ works as a workaround for this. I keep wondering when my GraySwitch™ will wear out cuz I've used it so much.
- Key OFF, Door OPEN, Lights ON --> BUZZ --> You probably want this reminder, but the GraySwitch uprgade may help?
- Key ACC, Door OPEN --> BUZZ --> The GraySwitch™ upgrade cures this scenario.
- Key ON, Door CLOSED --> BUZZ ---> Unplugging the black two-wire connectors address this scenario.
I can't recall if the same buzzer is used for all three. I personally want the lights-on reminder, and don't mind the key-left-on reminder (since I can disable with the switch, if needed). The third one had the highest fingernails-on-chalkboard quotient for me.


