• Hi Guest !

    Welcome to the 500Eboard forum.

    Since its founding in late 2008, 500Eboard has become the leading resource on the Internet for all things related to the Mercedes-Benz 500E and E500. In recent years, we have also expanded to include the 400E and E420 models, which are directly related to the 500E/E500.

    We invite you to browse and take advantage of the information and resources here on the site. If you find helpful information, please register for full membership, and you'll find even more resources available. Feel free to ask questions, and make liberal use of the "Search" function to find answers.

    We hope you will become an active contributor to the community!

    Sincerely,
    500Eboard Management

OWNER Kubasz

kubasz

E500E Enthusiast
Member
Hello Everyone

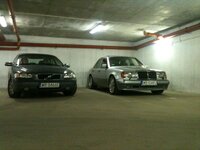
I would like to post some pictures of my car.
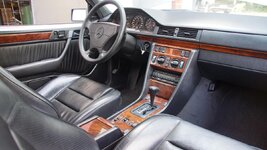
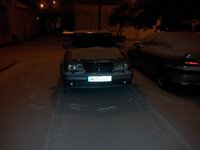
It's a 92 Euro 500E and i own it for 3 years now. It brings me a lot of joy but also a lot of headaches :P
I don't mean to show off or something, only to share my expireince with brabus mono III wheels. The set i have is polished 19" 9.5J one piece with Pzero rosso 255/35 all around. I was using them only for one season becouse i had fitment issues. Rear wheels are fine but in front i need to use 5mm spacers per side. That is necessary to make a wheel to spin free and avoid contact with brake caliper. But its not sufficient and at full turn of stering wheel tire is rubbing. Other minus is that this wheel is very big and on w124 it is a must to use very low profile tire and that leads to a risk of bending the rim. Despite all that i wrote 500E looks super nice with brabus mono 3 :)
And one more thing :P my wheels are '91 so are older than my car :)
But back to the pictures
 

Attachments

  • IMG_0095.JPG
    IMG_0095.JPG
    1 MB · Views: 95
  • IMG_0415.JPG
    IMG_0415.JPG
    974.7 KB · Views: 49
  • IMG_0468.JPG
    IMG_0468.JPG
    1.1 MB · Views: 71
  • IMG_0522.JPG
    IMG_0522.JPG
    1.1 MB · Views: 58
  • IMG_0525.JPG
    IMG_0525.JPG
    1.2 MB · Views: 63
  • IMG_0535.JPG
    IMG_0535.JPG
    1.5 MB · Views: 74
Re: Owner - Kubasz

Hello

Thank you Glen. :)

I forgot to post details so

VIN WDB1240361B803051

body 02545
engine 119974 12 005257
interior 271
lights HELLA
order_num 0-21417556
paint 744
transmission 722365 03 743974

291 AIRBAG FOR FRONT PASSENGER
300 Unknown
412 Unknown
540 ROLLER BLIND, ELECTRIC, FOR REAR WINDOW
570 FOLDING ARMREST, FRONT
620 AIR POLLUTION CONTROL
682 FIRE EXTINGUISHER
810 SOUND SYSTEM
744 DARK BLUE SOFT TOP FABRIC 5010
271 T.PHONE PRE-INSTALLN.COMPL.D-NET MOBILE ON TOWER

774 code is a mistake i suppose.
 
Re: Owner - Kubasz

Beautiful! Can you tell us what the offset is on the wheels (the "ET" number, something like 'ET25')...? This will usually be stamped on the back side of the wheel.

The 5mm spacer miiiight not be required with the later 320mm front brakes, I'm not sure. I know the early 300mm Brembo front calipers cause wheel clearance issues with several different wheels.

:deniro:
 
Re: Owner - Kubasz

I dont remember the ET but i checked it in google and what came out is that ET is 35. I will check it tommorow and then i will tell you for sure :)
I have standard brakes (dont know if those are brembo) and wheels will not spin w/o spacers.
 
Re: Owner - Kubasz

The 5mm spacer miiiight not be required with the later 320mm front brakes, I'm not sure. I know the early 300mm Brembo front calipers cause wheel clearance issues with several different wheels.
Yes that may be so, that is my intention to upgrade my '92 wich now has the ATE/ 300mm caliper and 4mm spacerplates. I think the 320mm calipers will clear as they are further from the center of the wheelhub. The et is 35mm on the 19x9.5 Monoblock III, I am running 245/35-19 same height as 225/55-16 up front.
 
Re: Owner - Kubasz

Very nice, indeed! Do you have to clean those wheels after each drive?

Though: Another car added to the "Tow-hole-missing" list :D
 
Re: Owner - Kubasz

Indeed great car, so as the weels. Personally, I think that those Brabus wheels are best option for 500E in parallel with BBS LM, beside MB stock ones.

We have to meet someday, as I see you live quite near form Warsaw\Białobrzegi :)

My regards
Grzegorz
 
Re: Owner - Kubasz

Other minus is that this wheel is very big and on w124 it is a must to use very low profile tire and that leads to a risk of bending the rim.

Awesome stance! Of course the bigger the rim the less rubber, therefore sacrifices have to be made i.e practicality! How's the ride? Bet you avoid those potholes like crazy.
 
Hello

Yes i clean them very often and need to choose the newest streets to make my way to target location :P
driving very slowly and sometimes like drunk even is totaly normal for me.
And about tow hook cover - i bought it allready but it is still not painted. I plan to buy a new front bumper shell (A1248851525) then paint it, paint new tow hook cover and bring the original look with black license plate stripe.
 
Hi guys

I took pictures of back side of the wheel. ET is 35mm and there is a very precise date of manufacturing i suppose 18.06.1991.
Some additional picture of my car before i parked it in garage for a long time. It still heve some last year dirt on it :(
 

Attachments

  • DSC00318m.jpg
    DSC00318m.jpg
    230.5 KB · Views: 43
  • DSC00531m.jpg
    DSC00531m.jpg
    370.3 KB · Views: 37
  • IMG_0816[1].JPG
    IMG_0816[1].JPG
    1.4 MB · Views: 15
  • IMG_0817[1].JPG
    IMG_0817[1].JPG
    1.4 MB · Views: 19
Beautiful. Especially with that tow-hole-cover :-P

So you want to keep it in the garage most of the time to keep it tidy? Not your daily ride, then, I take it?
 
:)
sorry to say it to you but I want to keep it, drive it and work on it. 2 weeks ago i took it for a spin and ended at the side of the road with no running condition. After cooling down time i started it and i get it to my garage. It ruined my weekend. I changed both caps and cap dust covers and it runs again but i lost some faith in my 500E and so do my wife. She is so against 500E in general that i can only see 036 when she is at work. It is now like a secret dating :P
 
She is so against 500E in general that i can only see 036 when she is at work. It is now like a secret dating :P
Man, sorry to hear that!

An 036 isn't a bad mistress to have ... certainly safer than other types !! I have the opposite problem -- I always have difficulty prying my E500 steering wheel out of my wife's tight grip after the (very) occasional times when I let her drive it. She is familiar with it because it's the same (even color interior) as her E320 wagon, but she loves the V-8 power on tap...
 
ehh these wifes :)
my wife says that "one and only merc that she would be satisfied with is a new G-class".
whaat? how the hell G is beter than 500E? i don't get it. :)
 
Oh my, you have some re-educating to do! My wife drove my car today for the first time, and even enjoyed it (though she still likes our W203 better, mine looks "too old").

Try my tactic: everytime she mentions a feature, respond with "well, Mercedes had that back in <insert year>" or "My 500E has that, too. Standard." :-P

whaat? how the hell G is beter than 500E? i don't get it
Ouch, that sounds like the very rare case of "practical wife"! Gotta admit, you can stash more bags with new clothes in a G-Class than in your 500E ;-)
 
Hello guys
Today i replaced very expensive part of my car ;). Its a 250D part and there is a bit different font but fits 500E perfectly. My trunk shines and my wife loves 500E now :)

Upper one is damaged 500E sticker, and bottom is prefacelifted berlin taxi ('88) 250D :P
 

Attachments

  • IMG_0897.jpg
    IMG_0897.jpg
    1 MB · Views: 28
Hello guys
Today i replaced very expensive part of my car ;). Its a 250D part and there is a bit different font but fits 500E perfectly. My trunk shines and my wife loves 500E now :)

Upper one is damaged 500E sticker, and bottom is prefacelifted berlin taxi ('88) 250D :P


New, shiney, in the trunk AND the colors of Poland !!!!
Not to mention it's from a wall era Diesel ("No more Trabants or Wartburgs, it's a Mercedes!")!!!

DO NOT drive the car around Centrum, never, your wife, practical that the dear lady is, will never understand the attraction this has on some babes, especially those from small towns in the Ukraine...

FWIW, I too have one of those PPW's (Practical Polish Wife's). Whenever I mention the 036 she becomes, how should I say this, "a little less angelic than usual."

Kind Regards,

Ron
 
Hello everyone

Today i tackled a simple job of changing an old leaky seal behind distributor cap. Manual says it can be done without taking whole engine apart and yes, it takes 10 minutes to complete this job. Nothing big but it gives peace of mind :) and took some amateur "artistic" photos :)
 

Attachments

  • DSC01491.JPG
    DSC01491.JPG
    129.4 KB · Views: 30
  • DSC01486m.JPG
    DSC01486m.JPG
    173.5 KB · Views: 34
  • DSC01477m.JPG
    DSC01477m.JPG
    198.6 KB · Views: 36
  • DSC01474m.JPG
    DSC01474m.JPG
    257.5 KB · Views: 26
  • DSC01476m.JPG
    DSC01476m.JPG
    124.4 KB · Views: 29
Are you SURE the seal behind the distributor was leaking...? On every one I've seen, the leak was actually coming from the cam solenoid, not the distributor seal. If the leak doesn't stop with the new seals, check the solenoids next...

:detective:
 
Hi Gsxr

I did not post a picture showing that area before cleaning but i post it now. I am 100% sure that this seal was bad.
 

Attachments

  • IMG_0797.JPG
    IMG_0797.JPG
    1.2 MB · Views: 25
Ah, yup... thanks for the photo. Definitely looks like a bad seal! Glad to hear it was an easy fix.

:banana2:
 
Hi Kubasz,

I had a lot of issues with the beautiful Brabus Monoblock III rims, but with a support from Bernard I have solved it.
The setup is 9.5x19 ET35 with 255/35/19 all around and the solution is 10mm custom spacers (no collision with center cap) with the M12 bolts with M14 ball, because this wheels were designed for W140 only.

proxy.php

proxy.php

proxy.php

proxy.php

proxy.php


And the result
proxy.php

proxy.php


Running well without any issues :-)

Gruss

Honza
 
Hello Honza

Your car looks fantastic with this wheels.
I was looking for wheel bolts (m12 thread and m14 ball) but no luck and for this season i decided to run standard 8-hole 16" with new sommer tires. But my set will stay with me and i will make use of it in future :)
 
For the Brabus topics just ask Bernard on high-quality-brakes@web.de and he will give you the offer. The price level is the same as by H&R and Co. so don't worry :-) He has got the spacers and the bolts as well, because of lots of experience with the Brabus cars. He owns a beatifull silver/red .036 Limited with 6.0L Brabus engine and some other Brabus features as well as couple of Brabus V12 high tuned machines :-)

I love the pre-facelift car in silver but there was no possibility to buy one 5 years ago in our country, because of the rights from government. But my car with the all story from 1994 is just a heart thing, witch I donť want to change :-)

The Brabus rims are well designed but in comparison to original EVO 2 very heavy, but I dinť found anyone to refurbish the special surface of them. I'm still searching and till it's over the Brabus Monoblock III will be mounted :-)
 
I do prefer prefacelit vesion with orange blinkers and black bumper stripe. It looks way better but E500 is still W124 V8 so i love it too :)
I would like to change colour combo to something more interesting (other than 199 or 744).
My brabus mono IIIs were polished at local shop where guys do only alloys. Wheels looked exelent when i picked them up but now after this winter they don't look so good. They need a lot of attention and cleaning.
 
Keep it original look! Colour you have now is really quite rare like for pre-facelift models.
 
Hello

I did not say but i sold my 500 2 weeks ago. But i still see it every day becouse my brother bought it from me and it spends nights in the same garage. I am now looking for another 500 for me but now i would like to buy one in a different color combo. Recently my mind went back in time becouse i found a '69 300SEL 6.3 listed for sale. Damn what a car :) It was complete and almost everything worked (only rear electric windows were not moving) but it needed full respray and leather restoration. I am still considering to buy or not to buy but my practical wife would rather like something for our first baby :P So my mind must go back again to early '90 :)
 
Stick with the flared fenders or you will regret it!

Yes it gets boring sometimes from seeing all the same colours (black/black & silver/black) but its THE 500E color.

Buying from next door I assume, What's you price range? mileage ?
 
I am still considering to buy or not to buy but my practical wife would rather like something for our first baby :P So my mind must go back again to early '90 :)

Dzien Dobry:

Ah yes, the Practical Polish Woman, I got one too, sometimes they can be SOOOOO annoying, like complaining about using the dishwasher for cleaning car parts or having a living room filled wire different colors of wire, go figure !!!!
Anyway, Asia and I will be in Poland for Wiglia, a week before and a week or two after, any chance of getting together for a mini 500 meet?
We will be staying around Plac Wilsona, but she was born in Warszawa and knows the city well.

Kind Regards,

Ron
 
Recently my mind went back in time becouse i found a '69 300SEL 6.3 listed for sale. Damn what a car :) It was complete and almost everything worked (only rear electric windows were not moving) but it needed full respray and leather restoration. I am still considering to buy or not to buy
As the prior owner of one of these cars, and the current owner of another one ... let me give you my best advice. DON"T DO IT!!! Don't buy a 6.3. Yes they have charm, and they have that certain period "fun to drive" factor. But they are NOT practical cars, and there is a reason why it has a "6.3" on the trunk, and it's not because of the displacement. It's because most of the parts on the car cost 6.3x more than a regular W108/109 chassis.....

Seriously, save yourself a lot of heartburn (and your bank account a lot of money) and get another 500E. You won't regret it. There is NO comparison between a 6.3 and a 500E. The 500E is 5x superior in EVERY way. Trust me on this, my friend.....

Cheers,
Gerry
 
Hello

19591 my price range is something around 12t Euro but if i buy something in any European country i need to pay 18.6% importing tax from car's value and this is the worst part. Milage for this price range is always close to 300tkm. But its not a problem if a car is accident free. But it must be a 91-93 year model.

Ron500E sure we can meet. Warsaw is not far away from my hometown so i will show up with my new 500E (if i buy one) or i can take my brother's 500E or my ML. Will see.

gerryvz Thank you for curing me of this idea (6.3) really good arguments with this multiplying factors 6.3x and 5x (very accurate) :)

PM SENT !
 
Hello everyone

As i was unable to find a nice 500E for too long i decided to make a move and i bought a M120 powered W140.
It is 93 model with 300kW motor and 4spd tranny. Very nice car, very comfortable and very smooth. There is something to do in it (trunk is not self closing and few other thing) but generally some minor stuff.
Today i returned from 1000km trip and car performed excellent.
I feel now a little bit like a traitor here :P but for my defence there is still a 036 in my garage :)
And i would still like to be a 500E member here :)
 

Attachments

  • IMG_1075.JPG
    IMG_1075.JPG
    1.1 MB · Views: 45
Hello guys

Brother sent me some photos of the 500 spending night outside :) shes doing fine with 306 tkm now on the odometer :) only thing that is inoperable is outside temperature sensor. Display works but shows some strange readings. Anyway good to see the 500 :)
 

Attachments

  • 20121224_024811.jpg
    20121224_024811.jpg
    1,002.4 KB · Views: 30
  • 20121224_024832.jpg
    20121224_024832.jpg
    1 MB · Views: 29
Last edited:
Hi Guys

So its been 15 years and exacly 30tkm worth of waiting to be back to this board again. I happily got my old 500 back though not everybody would be interested in this particular car. It has like a million dolla worth of deferred maintenance and it needs a lot of work and time invested to be even ready for the wheels to be bolted on.

FNZX0480.JPGMLCQ9577.JPG

After picking it up from my brothers hands i first noticed some issues with rear brakes leaking fluid. I decided to drop the subframe to do some honest brake lines replacement and the party started. Lots of rust started to appear in rear wheel arches and trunk side pockets. I started with the drivers side first so here it is: (pics of the battery side will be posted when i move to the right side of the trunk but it will not be pretty)

IMG_6114.jpgJDNY9174.JPGKICD4576.JPG

Up to this point i did the rear subframe rebuild and assembly


PELV6292.JPG

as well as the rear left side pocket repair panels

IMG_7597.jpgIMG_7599.jpgIMG_8139.jpgIMG_8140.jpg
IMG_8141.jpgIMG_8143.jpg

Some of this panels are already welded in

IMG_9802.jpgIMG_9812.jpgIMG_9872.jpgIMG_9874.jpgIMG_9875.jpg

I do small steps with this car as i dont have all that much time but hopefully i will have it ready on wheels the next year. I will drop pics from time to time as the work progressses.
 
Hi guys,

its been a while since i last posted anything and that was due to my recent sport activities which ended with a sprained right elbow and complete lack of any possibilities to continue with the 500E. During that time however i was able to do some computer work and i did model the knock sensor repair housing which turned out pretty good i think. Obviously its just a housing and it will not be water tight but since the sensors are quite hard to get to i hope no water can get where they are bolted on
AFLR3347.JPG FJZS4777.JPG GSEX8346.JPG

Im now 80% recovered so i did push the work further and i started with some welding training bc im a newbie to anything i do and share here in regard to bodywork. It took me some time to set up the welder right and get familiar with MIG brazing as i chose this way of joining metal parts. So with some struggling i fitted the inner side vertical "wall" and later welded in the floor panel. Eventually it went pretty good
IMG_9970.jpg IMG_9969.jpg IMG_9967.jpg IMG_9968.jpg

Over the weekend i proceeded to close the wheelwell side of the trunk pocket and this time it went really smooth and im very pleased. My only issue is i go too crazy with grinding the welds flat and MIG brazing is not meant to be 100% flat as it gets weak so i really have to fight myself.

IMG_0003.jpg IMG_0021.jpg IMG_0032.jpg IMG_0034.jpg

After applying the primer this side of the trunk it finally starts to make sense. I also painted the inner side matte black and prepared the felt that should be glued on the inside of this trunk pocket.
IMG_0057.jpg QTCT9194.JPG

Next stop i will atack all the rusty spots in the wheel well. Within the next two weeks i hope i will have it ready. Can not wait to have the car ready to drive as i already bought set of Brabus Mono3 set in 17" to celebrate 2026 season :spend:
 
Hi guys

some more work has been commited this week and altough it doesnt look like much, its quite a preparation to finally have the left side wheel well finished.
First, heres the rusty beginning:
IMG_6568.jpg
Initially i thought that its only the right hole that will require cutting and replacing but later after inspecting the "begind the scenes" it was clear that i have to go deeper
ASKL4791.JPG
So i then proceeded to do the replacement patch. I took quite a few YT lessons on shrinking and streching metal to shape it with hammer the way i wanted. Here i present the stages to make the bottom patch with two inspecting holes:
IMG_6612.jpgIMG_6614.jpgIMG_6615.jpg
And the "final" cut for the time was like such along with pressed recesses for rubber plugs:
IMG_6617.jpg
And now back to last week i finally welded that small reinforcement part. It looks simple but it took some adjusting of the depth of it to make sure it will be just behind the 2hole patch for proper spot welding
IMG_0080.jpgIMG_0082.jpg
All the area was then epoxy primed
IMG_0084.jpg
Last step was to have the final patch 100% fit with 1.5mm perimeter gap. From the cabin side there will be just two spot welds to make.
IMG_0097.jpg
And the whole perspective of the wheel well:
IMG_0090.jpg
I worry the most about the top most patch as there is not much to weld it to. Some creativity will be necessary to have this part sorted but thats for the end of the following week.
 
Hi guys,
after a long time im back with some progress. The end of the year is coming fast and i told myself that i need to have the metal works on the drivers side ready in 2025. Luckily theres not much left to accomplish that :deniro:

So chronologically i first did the C pillar preparation to accept the wheel whell top most patch by cutting out some of metal that was rust infected and welded in repair part. It was quite tricky as i only worked from the wheel well. I later discovered that after taking the antenna motor and sunroof motor assembly out i could ease the process a little bit.

IMG_0176.jpgIMG_0177.jpg

Later came the time for the top patch. It was easy to do the basic shape for the patch and with the afromentioned trunk equipment removed i could insert a sheet of metal to shield the external fender metal from cooking up from the weld heat exposure. I also had the middle patch ready i welded it in in one take with the top patch. All was then ground off flat and primed from the wheel well as well as from interiour inspection holes to protect the weld areas from rusting i hope. I dont have the pics of the interiour inspection holes but i will take some soon. And to think that there are inspection holes for those areas these cars rust in is amazing.

IMG_0212.jpgIMG_0247.jpgIMG_0249.jpg

Next was the stabiliser bar bracket and its supporting plate. I drilled it out bc i was suspicious there may be something going on and i wasnt mistaken. The bad part it this supporting plate is made oof 1.5mm thick metal. It no easy to form by hammer and dollys so i reused the bottom part and attached the vertical part only. I also added a little patch to reapir the holes i did after drilling the bar bracket.

IMG_0222.jpgIMG_0223.jpgIMG_0226.jpg

and then i checked the bracket to plate location, welding, priming and now i have to weld it in. As for the bracket i bought it as a aftermarket replacement part with a help from a friend in DE. Old bracket was very rusty and actually unreusable.

IMG_0220.jpgIMG_0221.jpgIMG_0228.jpgIMG_0229.jpg

In the meantime i also removed ,cleaned and welded in the brake hose metal bracket but it was a minor job so no picks. The bracket however is made of 2mm thick sheet metal so i felt confident to just grind the rust away as there was plenty of material. Its much less sturdy now but i guess its just a bracket/holder so maybe it wont break :peep:.

The very last job i took was to remove the rear chassis reinforcement plate that is riveted around the rear subframe mounting point. It had some rust outside and along the edge of the plate so i assumed there will be some inside and so it was. The left plate is held by 19 full steel rivets and after drilling out the heads, the butts go inside the chassis beam. I spend quite some time to magnet fish all the 19 butts from the beam.
So heres the plate with the rust on the inside.

IMG_0260.jpgIMG_0261.jpg

Old plate was 1.2mm thick in some places and in some it was 0.8 and in others i measured 1.0mm. I averaged it to 1.0 overall and did the replacement part using 1.0mm sheet metal. It wasnt hard to shape the plate itself but for correct hole drilling it was tricky at first. I used the 3axis laser again and got very good accuracy but i took a lot of time for checking the location, marking, drilling, checking, marking, drilling... for each of the 19 holes.

IMG_0284.jpgIMG_0285.jpgIMG_0265.jpgIMG_0275.jpgIMG_0276.jpg

So right now i need to weld in the stabiliser bar bracket with plate and prepare the reinforcement plate as well as some last rust cleaning around the area and priming everything. Im really looking to have this side ready in 2025. Next year is all about passenger side. At the end i will do the seams sealers and paint etc.

I wish all the board members Merry Christmas and happy ownership of the 400E and 500E cars. 🥳
 

Attachments

  • DWYS3024.jpg
    DWYS3024.jpg
    1.5 MB · Views: 6
Hi guys
some progress to report again. I "completed" the drivers side of the wheel well and trunk and moved over to the right side now. Things looked nasty but luckily there was just some surface rust and no structure issues.
IMG_6629.jpgIMG_6630.jpgIMG_6631.jpgIMG_6632.jpgWXEO7741.JPG

After cutting all that affected metal i realised its not really all that much.

IMG_0348.jpg

So the reconstruction work began with this bottom section first:

IMG_0336.jpgIMG_0315.jpgIMG_0318.jpgIMG_0319.jpgIMG_0320.jpgIMG_0324.jpg
IMG_0325.jpgIMG_0326.jpgIMG_0328.jpgIMG_0329.jpgIMG_0332.jpg

The outer "shell" was next:
IMG_0342.jpgIMG_0350.jpgIMG_0344.jpg
 

Attachments

  • IMG_0343.jpg
    IMG_0343.jpg
    1.4 MB · Views: 5
  • IMG_0317.jpg
    IMG_0317.jpg
    1.5 MB · Views: 6
After that i got ready for the final patch that will close this area but it really didnt work for the first time and i will have to do it again. Anyway heres some more pics of the process:

IMG_0362.jpgIMG_0365.jpgIMG_0371.jpgIMG_0382.jpgIMG_0385.jpg

I already welded it those ready to go parts

IMG_0390.jpgIMG_0391.jpgIMG_0407.jpg

and i riveted that chassis reinforcement

IMG_0408.jpg

i really thought i would have this wheel well ready by the end of january but thing go to slow :thumbsdown:
 
Thanks guys for the appreciation. I give my best but only bc its my car now. This is this once in a lifetime adventure and really i would not want to do this again. Im an electrician and thats the field i want to shine on. I offer wiring harness repairs and throttle body repairs as a side fun :thumbsup2:
 
Hi guys. Some work has been done so i update the status of my project.
Since the last update i decided to try again with the most lower patch in the wheel well area. I was not satisfied with the lower indentation arount the bigger hole. The round edge wasnt sharp enough. Second attempt luckily was what i was after.
IMG_0477.JPGIMG_0478.JPGIMG_0490.JPGIMG_0489.JPGIMG_0492.JPG

That was my final patch and its now welded in.
IMG_0511.JPG

Then i moved up and prepared next two patches. It wasnt hard as i already had the idea and tooling. The top most area really looked bad initially but after cutting all the rusty metal the internal metal was solid
IMG_0516.JPGIMG_0566.JPGIMG_0542.JPG

I dont have it welded yet as i had some problems with my welding mashine so i focused on making all the repair parts first.
With the wheel well "finished" i moved over to the most interesting portion of the project. I must digress now as long time ago i emailed Trabhan team if they are planing to make the trunk repair parts for w124 and as usuall with germans no reply was all i got. After a while i checked their website only to discover they did the left side pocket but it was too late as i already had my version welded in. Few weeks ago i noticed them on IG that they developed the right side as well and i was really eager to get it at first but after rethinking it i decided i want a consistent/simetrical repair and eventually i started getting myself ready for the big job.
For those interested this is their offer for left side and right side

So first is the horror of tomorrow (in the past during my brothers ownership R129 trunk floor has been used for repair but aparrently it was a quickie)
IMG_0567.JPGIMG_0575.JPGIMG_0576.JPGIMG_0577.JPGIMG_0578.JPGIMG_0581.JPGIMG_0579.JPG

What was left of the original battery compartment floor was this
IMG_E0582.JPGIMG_E0583.JPGIMG_E0584.JPG
The battery tray holder and some remnance of the floor itself all rusty to the point of no return.

After cutting all the rusty stuff i was left with some more rust to think about right in the corner. Exackly the same as was the left side.

IMG_0585.JPG
I started with the easy approach and did that battery tray holder.
IMG_E0590.JPGIMG_E0591.JPG
Then i downloaded every piece of foto documentary about all the channeling in the batt floor to make a CAD template. The rough cut template for the general sizeing of the floor patch was easy to do. For the start i left it with a lot more "meat" than necessary not to be left with lack of material in crucial areas.

IMG_0594.JPGIMG_0595.JPGIMG_0596.JPGIMG_0597.JPG

IMG_0602.JPGIMG_0600.JPGIMG_0599.JPG

Next it was just few hours on metal shrinker to get that bubble portion of the edge to meet the cut contour that was on the car and thats what i got

IMG_0628.JPGIMG_0633.JPGIMG_0642.JPGIMG_0653.JPGIMG_0643.JPGIMG_0652.JPG

With that ready i moved to the last major rusty spot. It was rather easy as all the patches were small and pretty simple

IMG_0641.JPGIMG_0661.JPGIMG_0663.JPGIMG_0666.JPGIMG_0702.JPGIMG_0705.JPGIMG_0714.JPGIMG_0711.JPGIMG_0704.JPG

Im now at this last portion of the puzzle. Not yet ready but at least i did the tape template for a good start
IMG_0717.JPG
 

Attachments

  • IMG_0664.JPG
    IMG_0664.JPG
    1.8 MB · Views: 6
  • IMG_0660.JPG
    IMG_0660.JPG
    1.9 MB · Views: 6
  • IMG_0713.JPG
    IMG_0713.JPG
    1.8 MB · Views: 5
  • IMG_0559.JPG
    IMG_0559.JPG
    2 MB · Views: 6
Last edited:

Who has watched this thread (Total: 2) View details

Back
Top