• Hi Guest !

    Welcome to the 500Eboard forum.

    Since its founding in late 2008, 500Eboard has become the leading resource on the Internet for all things related to the Mercedes-Benz 500E and E500. In recent years, we have also expanded to include the 400E and E420 models, which are directly related to the 500E/E500.

    We invite you to browse and take advantage of the information and resources here on the site. If you find helpful information, please register for full membership, and you'll find even more resources available. Feel free to ask questions, and make liberal use of the "Search" function to find answers.

    We hope you will become an active contributor to the community!

    Sincerely,
    500Eboard Management

OWNER asultan

the italian tuneup seems very scary as i rarely take the car above 4500 LOL but here we go I will report back signoré
That's half your problem! LOL! Redline is your friend, not the enemy. Besides, the M103 doesn't make much power below 4k...

:ROFLMAO:

:200.gif
 
Italian tune up day…. most stressed i’ve ever been on the highway. A myriad of liquimoly products in the system holding 4-4.5k (3rd gear) 70-80MPH on the highway for about an hour. will rinse and repeat with more liquimoly valve cleaner. @gsxr
IMG_1383.jpeg
 
How are those Lamin-X pieces doing on there?
@gerryvz they are crystal clear! thank you again for the second set! (dont mind the scuffed and slightly cracked front bumper hehe)

Appearance wise the ceramic coating from last summer has been great but, again dealing with swirling, will likely have to re-cut, polish, and ceramic the whole car again... woo hoo...
70579585643__BCEF84AD-8B83-45A2-A8D6-F6AD25F34733.JPG
 
Even though I know I have the correct plugs in order, I just had to know what plugs I previously installed as I couldn’t remember - and the dealer when I provided my VIN said yeah these are the right ones.

Turns out I have been running P/N: 0031593703

Which is a BERU 14-K9DUO - The hotter plug for “Low Compression applications”

WRONG WRONG WRONG!!

Happy to have made a triple order of P/N: 0031590603

Which is referenced as the BERU 14-K7DUO that I was never offered last summer until I provided the P/N.

Attached are photos of the plug, heavy carbon, no oil on threads or plug, light ashing at the tip, makes me think duh they’re too hot.

IMG_1395.jpegIMG_1394.jpegIMG_1397.jpegIMG_1398.jpeg
 
WOW! Glad you solved the mystery. Is the detonation/knock problem solved with the new plugs / correct heat range?

:klink:
 
WOW! Glad you solved the mystery. Is the detonation/knock problem solved with the new plugs / correct heat range?
@gsxr Still on order in germany, hopefully i’ll see them this week, I have two more sessions of 7gal fill ups and hot runs to complete with liquimoly valve clean.

The italian tune up was successful and the car doesn’t ping nearly as bad anymore with the additive, though I think I’ve ran my course on my swiss cheese muffler (it was never that bad but i think i got it so hot that it’s chalked now)

Another worry with colder plugs is heavier oil fouling (car likely/pretty expectedly at 215k needs valve guides and seals again las documented service of this was 110k) as I won’t be burning it as hot as I would with the 14 K9DUO’s, but this just means I have to finalize my vision for what engine build/overhaul route I want (despite buying a 104.992 long block, i’m liking the idea of keeping everything original again.)

Also now that I need a cat back, if anyone has a spare eisenmann race for the low 😎😳 lemme know…
 
I was watching Motor Trend TV this AM waiting for the start of the 24Hours of Le Mans race to start.

Anyway, a 1/2 hour show called Engine Masters came on and spent the whole show talking about fuel octanes increasing horsepower & torque. It seemed appropriate to show the results here. So here goes.

They set up a 6.3 liter Chevy crate engine on a dyno. The engine was stated to have 530HP / 498# Torque stock. They ran 5 types of fuel thru it starting with CA 87, CA 91, Sunoco 110 racing fuel, Sunoco 116 racing fuel and lastly E85

Results below
87 octane unleaded 539.4HP / 498.8#TQ
91 octane unleaded 539.6HP / 501.1#TQ
110 octane leaded 539.9HP / 499.1#TQ
116 octane leaded. 541.3HP / 497.4#TQ
E85 ethanol ———-551.5HP / 506.5#TQ

The testers only messed with the timing and fuel air mixtures to accommodate for knocking especially for the 87 octane fuel.
What was amazing to me was that except for the E85 the was almost exactly the same. The E85 needed more timing advance by 6 or 7 degrees.

Point being to me was that a stock engine is set up to run on a certain octane fuel and going above that octane will not increase horsepower or torque. The only significant horsepower and torque came from the E85.

As far as the torque figures they remained similar to the stock engines except for the E85.

Bottom line is to me is using the 94 octane fuel in the M119 is not going to help much if at all.

EDIT: This info can be googled by typing in “Engine Masters Octane” it’s on U-Tube
Corrected HP/TQ figures
 
Last edited:
Point being to me was that a stock engine is set up to run on a certain octane fuel and going above that octane will not increase horsepower or torque. The only significant horsepower and torque came from the E85.

Bottom line is to me is using the 94 octane fuel in the M119 is not going to help much if at all.
This is 1000% correct. Many years ago I experimented with high-octane race gas in the 500E for drag racing. TLDR: there was zero change in anything. Totally not worth it.

Oversimplifying, higher octane is needed for very high compression ratios or high boost pressure, as Terry said, engines built specifically to benefit from higher octane. Mercedes requires 91 octane for best performance on their engines through at least the 1990's but you won't gain anything with higher octane, at least on a stock engine.

:stickpoke:
 
I can confidently say via ass dyno and multimeter the car is singing finally. No dead spot on acceleration, no pinging, screams from high 2k on.

The culprit was the stock bridged R17/1 — A. in its standard form, and B. removed. I per factory bulletin of 7 different ohm values lowest to highest, used setting 7 which meant soldering an 8.6k resistor to replace the bridge wire from factory. Unfortunately didn’t have this resistor lying around so i bridged two separate resistors in parallel to reach an even 9k ohm… 400ohm… don’t think that’ll hurt anyone. From my understanding setting 7 is essentially tapping the EHA harder.. to smooth out poor idles and hesitation.

that + these colder spark plugs is gassssss

IMG_1615.jpeg IMG_1614.jpeg IMG_1616.jpeg
 
got fed up with the constant squeaking of metal on metal, and general looseness. removed the muffler lol, or it kinda removed itself, car also just sounds better now without it shrug 🤷‍♀️.

looking for any exhaust recs outside of the grailed eisenmann. probably a 2-1 collector, spun magnaflow cat, then 2x2.25” or 3” all the way back? to super sprint? borla? a cheaper eisenmann for an e36 m3?? will it fit?

so many questions.

IMG_1629.jpegIMG_1628.jpeg
 
Door card repair day.. so my theory is saturate the fibers with 2 part epoxy, wax paper and clamp with straight wood. Let’s see how this goes…you can see the warp on the board pre press which sucks - tape off mbtex to prevent leaky when pressy


IMG_1684.jpeg IMG_1685.jpegIMG_1686.jpeg
 
finally reached my wits end with not having properly working AC… full refresh in bound receiver drier, sensors, expansion valve, mono valve, condenser… everything but the compressor because i’m 93.8264% sure that’s not my issue.

looks like i snagged the last nissens condenser off of fcp for early models — while i’ve heard mixed reviews of nissens products primarily regarding fitment I think this should be fine as it’s just the condenser, ACM unit was $280 — feels good lol.

but shouts to @gerryvz how to thread from years ago on his compressor saga.. i can’t wait to floss mine and do some testing.


IMG_1700.jpegIMG_1701.png
 
Last edited:
it’s central locking pump time - finding some real wiring mysteries as I unfurl and cut the old electrical cloth tape away. grouped 12v hot and grouped grounds? this is normal or someone tried to bypass something in the past?

IMG_1710.jpegIMG_1711.jpegIMG_1712.jpeg
 
Those appear to be factory splices within the harness, which is not unusual... you'll find more if you slice open other harnesses.

:sawzall:
 
Those appear to be factory splices within the harness, which is not unusual... you'll find more if you slice open other harnesses.
Ok sick... that makes things alot easier to understand with the ETM then lol... if only I can get 5 minutes without torrential downpour now..

Edit: @gsxr turns out this is the X48 "distribution" block. Was expecting something more official lol - apparently also now the source of my problems with this system..
 
Last edited:
Some cool updates and, maybe poor engineering.

Central locking system is a success! Terminal X48 had corroded constant 12V, grounds got a healthy dose of deoxit and every door works flawlessly now. I also stole the 3 pole connector from the unplugged anti theft system to repair the driver doors 3-pole connector that crumbled (shitty early style heat molded clear acrylic?) Photos below:

IMG_1723.jpeg
IMG_1724.jpeg

Now for more door panel madness. Today we started with a classic reglue of peeling MB-Tex on the map pockets, followed by something that I hope will work.

As we all know the door pull attaches to the map pocket via two plastic tabs that are then locked in two place with serrated jaw clips, my tabs were broken so to the dremel we go. Flushed all old plastic rivets in preparation for size 7 coarse thread drywall screws, as well as grinding down the aforementioned plastic tabs, pics below.

Before:

IMG_1717.jpegIMG_1716.jpeg
IMG_1720.jpeg

After:
IMG_1721.jpegIMG_1719.jpegIMG_1718.jpeg

Next up was my engineering idea, some type of captive nut in the armrest with a bolt on the other side, I JB welded the “captive” nuts but im not so sure the foam is gonna bite hard enough- though hopefully it will cure just fine. Clamped the map pocket and armrest together - marked a few things with a paint pen and got to drilling a 1/4” pilot hole for the 5/16” nut to bite, widened the very top of the whole to allow the nut to “thread” in and then coated with glue.

Photos below:
IMG_1736.jpeg
IMG_1735.jpeg
IMG_1737.jpeg
IMG_1738.jpeg
IMG_1739.jpeg
IMG_1739.jpegIMG_1740.jpegIMG_1741.jpegIMG_1744.jpeg

Next I quickly installed my idea, and reclamped both pieces together using the paint marks from before, installed the bolts and am currently waiting for it to cure clamped. Hopefully this works. I drilled 5 holes, but only 3 really worked as expected the holes on the ends unfortunately had no bite, they were where the original plastic tabs lived. Likely would’ve had to hollow these areas out for it to work better.

IMG_1748.jpegIMG_1747.jpeg
 
If we need a reminder THIS is why you should never cheap out and buy Febi lol. Made in china, had my concerns after I installed them last summer, and as I’m working on the drivers window regulator, the captive nut shears off. Thankfully had a replacement good used MB original spare.

IMG_1751.jpeg
 
If we need a reminder THIS is why you should never cheap out and buy Febi lol. Made in china, had my concerns after I installed them last summer, and as I’m working on the drivers window regulator, the captive nut shears off. Thankfully had a replacement good used MB original spare.
Good thing you had a functional OE MB spare. I'm almost positive these door check straps were NLA from MB for a while, but appear to be available again.

These had been $15-$20 from discount dealers years ago, now $147 MSRP (!!) and over $100 from discount dealers!!! 5x-6x price increase.


:oldman:
I remember them being NLA at time of order, months later during install/doubt I checked and they were back but I just couldn’t justify $500 worth of check straps but - It’s clearly necessary seeing as the aftermarket disappoints once again :/
 
If we need a reminder THIS is why you should never cheap out and buy Febi lol. Made in china, had my concerns after I installed them last summer, and as I’m working on the drivers window regulator, the captive nut shears off. Thankfully had a replacement good used MB original spare.

View attachment 169678
And there are so many people out there (including not just one or two on this forum) who continue to insist that reboxed Chinese made Febi parts are just fine.

They may be just fine, but they will NEVER be just fine on my cars !!!
 
Final update for the day, this is also useful for everyone here - stop using spray or brush on adhesive for vapor barriers. Today I started using 3M P/N: 08611, this is what more modern cars use —it’s butyl ‘windshield’ stripping but again is what the Most euro (bmw, audi, mb) dealers use on their vapor barriers from my understanding.

aside from the mess, and waiting till it’s tacky — this also acts as an insulative bead to dampen sundry squeaks etc. curious to hear any naysayers

photos:

p.s. door panel repair was a complete success never felt more solid. Below are the screws I used and an example pilot hole drilled into an old plastic rivet.
IMG_1756.jpegIMG_1758.jpegIMG_1759.jpegIMG_1754.jpegIMG_1755.jpeg
 
Nice job with your door panel. Regarding the Nissans condenser… I installed one in my 94 E320 last summer. There was one minor fitment issue I ran across. When transferring the electric fans over one of the outside mounting flanges didn’t line up. Instead of sitting exterior to the fan flange it sat inside of it. It just meant installing the hardware in the opposite direction. Otherwise no problems. The 2 refrigerant pipes lined up fine.

You are right about the butyl adhesive. I see it in the MB dealer shop where I work ( I walk around the shop but work elsewhere). Also my 2016 Mini uses it.

Regards,

Peter
 
Preparing my 2-Year fluid service. Coolant, Brake Flush (Clutch bleed), and P/S flush. My G48 coolant looks super clean photo below, but a few years back i bought the citric acid mix and never used it.

Despite its cleanliness at the mileage i’d assume it won’t hurt? I know how much of a hassle all the flushing is but I don’t mind…

Tips tricks or suggestions are welcomed, as for the “special” t-stat they require for the flush per FSM… i’m just unplugging my monovalve and removing the T-stat.
 

Attachments

  • IMG_1980.jpeg
    IMG_1980.jpeg
    1.7 MB · Views: 2
Removing the t-stat doesn't help, as the Mercedes t-stat is not a simple flow control valve. As it opens it uncovers one port (allowing cool liquid from the radiator to enter), while simultaneously blocking another port to prevent hot liquid from recirculating. In general it's better to leave the thermostat in place. Or you can try to modify an old thermostat to the "forced fully open" position.

Then, lots of flushing... just don't put cool water into a hot or warm engine.

When all done you can probably let the G48 coolant go at least 5 years, if not 10-15 years, if your plastic expansion reservoir has the silica pack in it. Diesels and M119's have this, I forget if the M103 cars also do.
I assume drilling a 3mm hole in my old t-stat is the “fully open mod”?
 
I was watching Motor Trend TV this AM waiting for the start of the 24Hours of Le Mans race to start.

Anyway, a 1/2 hour show called Engine Masters came on and spent the whole show talking about fuel octanes increasing horsepower & torque. It seemed appropriate to show the results here. So here goes.

They set up a 6.3 liter Chevy crate engine on a dyno. The engine was stated to have 530HP / 498# Torque stock. They ran 5 types of fuel thru it starting with CA 87, CA 91, Sunoco 110 racing fuel, Sunoco 116 racing fuel and lastly E85

Results below
87 octane unleaded 539.4HP / 498.8#TQ
91 octane unleaded 539.6HP / 501.1#TQ
110 octane leaded 539.9HP / 499.1#TQ
116 octane leaded. 541.3HP / 497.4#TQ
E85 ethanol ———-551.5HP / 506.5#TQ

The testers only messed with the timing and fuel air mixtures to accommodate for knocking especially for the 87 octane fuel.
What was amazing to me was that except for the E85 the was almost exactly the same. The E85 needed more timing advance by 6 or 7 degrees.

Point being to me was that a stock engine is set up to run on a certain octane fuel and going above that octane will not increase horsepower or torque. The only significant horsepower and torque came from the E85.

As far as the torque figures they remained similar to the stock engines except for the E85.

Bottom line is to me is using the 94 octane fuel in the M119 is not going to help much if at all.

EDIT: This info can be googled by typing in “Engine Masters Octane” it’s on U-Tube
Corrected HP/TQ figures
Interesting info. I always thought that higher octane fuel in a low compression engine did not increase the power. We ran Sunoco 110/112 in my race
Boss Mustang, but it had a 11.5 to 1 compression motor & had to have high octane fuel. I tried E85 in my F150 flex fuel once: definite increase in power but horrible fuel mileage....lost about 3/4 miles to the gallon. The disadvantage was that you had to stop more frequently to fill up.
 
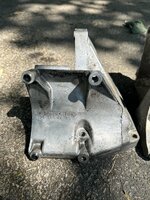
@gsxr Found this image on your site in the tools section. I see what you mean now my fault lol.. now to figure out how to fab this

View attachment 171533
@gsxr

5 min quick fix, pressure of the spring and dimple should hold this (now flattened) threaded plate, you can see how i compressed the spring to then fit the small dimpled plate as a shim, granted it’s not as open as the MB factory tool but i think it will do…

IMG_1981.jpeg

IMG_1982.jpegIMG_1983.jpeg
 
Where do I begin... I just got off the highway and an absolute catastrophe struck. Unfortunately the stuff of nightmares -- I was just about to post a HOW-TO thread on some work that I completed, and likely still will in a bit but for now I'll list the work I completed and the disaster that just went down.

Rewind to 2 weeks ago.

The whole reason I began this service was just to get a functioning A/C system by doing a complete refurbishment on all items in the engine bay.

Anyways:

After creating the necessary thermostat part above, I successfully flushed the engine using Citric Acid Flush, and proceeded to flush the engine with water draining the 19mm found on the block as well as flushing the rest of the system several times with water to ensure any deposits were gone. Below are photos of the coolant 'tub' post flush:

IMG_1986.JPG

Clear water flowing out:

IMG_1985.JPG

After the flush was complete, and now that the cooling system was empty, it was time to get disassembling -- radiator and condenser removed, fan clutch removed, and a replacement Bosch Monovalve P/N 1147412037 this unit was manufactured in France -- as well as an ACM expansion valve that came in. More on the expansion valve later.

A few hose clamps later and it was installed:

IMG_1988.JPGIMG_1991.JPG

Up next it was time to remove the tensioner that was damaged last summer during my service, photos below of the ear that broke off that holds the tensioning rod as well as how I keep track of bolts lol

IMG_2001.JPG
IMG_2002.JPG
IMG_2004.JPG

This is precisely where this project turned into a 'while I'm in here' which is a terribly dangerous place to go -- I realized now that I had all this space, and access while the belt was off I'd be a dumbass to 'refresh' the A/C system and not replace the compressor (that I later found out was in fact, original to the car). With the compressor removed I also had the bright idea to replace the waterpump because of again -- how much space I had, plus it was free as I got the last one from FCP so this one is on the house under their lifetime replacement guarantee. Next thing I know:

Water Pump and A/C Compressor Removed


IMG_4395.JPGIMG_2017.JPG

Now that I had all this space, I realized that I had seen an MMWA youtube video on upgrading the M103/Early M104 to an Automatic style tensioner, off to ebay we went. (I will complete a HOW-TO on this topic). But for now I'll keep it brief.

New A/C Compressor + PS Bracket, old on left new on right:

IMG_2056 2.JPGIMG_2053 2.JPG
IMG_2057.JPG

Now finally the expansion valve saga had arrived. The original unit I pulled off my car was an Egelhoff 323336, the ACM unit was also branded Egelhoff but with NO brass fitting on the bottom, plastic instead and was P/N Egelhoff 324636. Thankfully fleabay came to the rescue, (Rein is backordered) and I found an Egelhoff 323336S Branded in a Rein box.

Photos below left to right: Original unit installed in my car, ACM unit, Rein Unit:

IMG_2074.JPGIMG_2075.JPG


So So SO not fun to install behind a brake booster, but I loosened a Vacuum distributor, and the Hi-Pressure A/C line to be able to reach it, and assemble with new O-Rings lubricated with a touch of silicone grease.

IMG_2078.JPG

Valve cover gasket was cracked, replaced that, used MB Sealant P/N 003989982010, used the same sealant on the bolt that was previously used for the tensioner front bracket that passed through the oil galley on the fan bearing bracket. Dab of sealant on the halfmoon at the rear of the M103, as well as where the head meets the front cam cover:

IMG_2084.JPGIMG_2091.JPG
IMG_2092.JPG

IMG_2096.JPGIMG_2093.JPG
 
CONT:

Received the correct sparkplugs, surprisingly the world believes these are no longer manufactured? But here they are! Bosch H7DCO! P/N: 0031590603:

IMG_2100.JPG


Photos of my old fouled plugs, also why I replaced the VC Gasket:

CYL 1-3

IMG_2098.JPG

CYL 4-6

IMG_2099.JPG

Correct Compressor arrived:

Screenshot 2023-08-14 at 12.54.38 AM.png


New tensioner, pulley, and hardware from MB:

IMG_2115.JPGIMG_2123.JPG


New Laso waterpump in with new O-Ring (lubed) and mounting hardware (took a little under 20 minutes to install with all of this space to do the work lol, incredible.) :

IMG_2124.JPG

IMG_2126.JPG


TA DA!

71346589741__8ACE8B3A-8B74-43C6-9979-16B344CB6029.JPG


SPAL Fan and Condenser, Unpictured I soldered MB Pin Bushings to fit the factory harness.

IMG_2138.JPG


Did 2 Engine Oil Flushes until the Oil Looked like this verifying that the liquimoly flush chemicals were fully out of the system after the first run:

IMG_2149.JPG


There is a lot of other stuff that I don't feel like posting photos of, but also new t-stat, coolant expansion tank etc. I just really freshened the car up. G-48, the nice Liquimoly 20w-50 Oil for the oil change. Resprayed the airbox and valvecover in wrinkle black. New dipstick. New air filter. You know. The "works".

IMG_2151.JPG


Anyways fast forward I buttoned up the car two days ago, Bled coolant, topped up, verified no airlocking or overheating, again was in the middle of writing this HOW-TO article for the forum, and stepped out to have dinner with the homies.


Basically I was sure that I dotted my i's and crossed my t's.

On the way home tonight unfortunately -- I was on the highway and with light throttle I was hearing a very faint faint pinging, for some odd reason I didn't think much of it, for a few minutes that I was hearing it other than "Damn the car usually only pings when its super hot I wonder whats Happe---- FUCK!"

WHAT HAPPENED TO MY COOLANT BULB IN MY DASH?! ITS NOT WORKING! So much for a new level sensor lmao.

The temp needle was pinned to the heavens, I Immediately shut the car off, rolled off an exit, and pulled over. Hood up white smoke and I found the culprit immediately:

Screenshot 2023-08-14 at 1.10.03 AM.png


Coolant hose blew? there was not a drop of coolant anywhere in the system, the new SPAL had kicked on high as soon as I parked. Then and there I knew I was really fucked. Let the car cool down, had my wrenches and a gallon and a half of coolant, tried to wait for it to cool down (30 minutes) but got too antsy and poured coolant into the waterpump where the hose blew out -- and alot of it boiled out. It was NUCLEAR hot clearly.

Pulled the dipstick -- Clean

Oil cap -- Clean

Reservoir -- Clean.

Topped up at the reservoir with all the coolant I had left, reinstalled the hose, at this point its been an hour and the engine had really cooled off, coolant temp sensor was somewhere in the 60-70's.

Fired her up, bled throught the T-stat bleeder with heat on for 5 minutes. Car has an Awfully hard time starting up, finally chugs on, sounds like a tractor?!

Lifter *SOUNDING* tick going fucking bananas, and at that point I decided well if the engines fucked its fucked. Drove home post bleed and top up -- and it didnt overheat at all it actually maintained 79*C for the entire 20 minute drive home!

What really concerns me is the health of the engine and the sounds its making, awful awful tractor like noise, and what appears to be a pretty shuddery misfire when staring at the engine while it runs.

Im truly devastated after all this work something so stupid could happen to me and ruin this car, and potentially tank the engine for now. Not sure where to start looking tomorrow. Leakdown? Compression? Boroscope? I have no evidence of milkshake, or the other way around no oil in my coolant that I can see as of now. I don't think I melted the pistons because it wasnt starved of oil.

If anything an Internally leaking headgasket? But that would show signs of oil into coolant or coolant into oil ingress no?

Looking for guidance, and meditation -- all I could do when I initially saw the blown hose was crack up laughing before it really sank in lmao.
 

Attachments

  • IMG_2144.JPG
    IMG_2144.JPG
    1.6 MB · Views: 14
  • IMG_2151.JPG
    IMG_2151.JPG
    2.1 MB · Views: 8
  • IMG_2163.JPG
    IMG_2163.JPG
    1.8 MB · Views: 8
  • IMG_2166.JPG
    IMG_2166.JPG
    1.8 MB · Views: 8
  • IMG_2054.JPG
    IMG_2054.JPG
    2.4 MB · Views: 8
Last edited:
Oh noes. I'd start with a compression test (warm, if possible) and see what numbers you get.

:runexe:
My quick action turning off the motor and coasting may have saved things, but we'll see after a compression and leakdown test later today. Checked this AM still no oil in coolant, coolant in oil, or any leakage around the HG from visual inspection. Car still sounds like a diesel on startup with a bad misfire, pulling plugs later.

@gsxr is it possible to have a good HG and warped head? or would they both fail? perhaps a good head and internally leaking HG for 1 Cylinder?
 
It's great that fluids aren't mixing, but there could be either a failed HG between cylinder bores, or maybe a warped valve? Plug condition may help narrow down the affected cylinder(s). Compression test next, then maybe leakdown...

:detective:
 
Been there / done that with the overheating ☹️ I got super lucky in my case though. I had airlock and could have possibly seen bad temp readings. This is a good wake up call to check position 2 on ignition, make sure all the bulbs light up.

Compression test is a good idea- if you don't have the tools for that (or wanted additional information), you easily get a kit where you test for blown head gasket by looking for combustion gasses in the coolant (once it comes to temp or remove thermostat). Depending on how bad things are, you might be able to visually see bubbling in the expansion tank

Not sure what the best case scenario is here, but definitely crossing fingers for you! 🤞
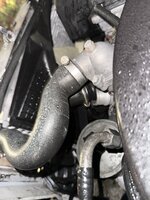
Thanks mane! My concern is that I may have had an airlock that didn’t immediately present itself, then under high heat and pressure forced a hose to blow off? Not sure if that’s a possible cause as to why it blew off in the first place but neither here nor there at this point… working it out now
 
As an FYI for future reference: After any cooling system work, or removing any hoses, it's always a good idea to pressure-test the system after refilling. Pump it to at least 15psi, or 20psi (1.4 bar) max, which is the cap rating. Any hoses which are not tight enough will show up quickly as a leak. This won't avoid an air pocket, but should avoid a hose popping off unexpectedly!

:duck:
 
Short update - from the top of the diagnostic list - figure out why the car is running on 5 and not hitting on all 6 cylinders before pulling plugs and performing a compression test/leakdown test.

CYL 6 plug wire shorting to ground! Not sure if it got so hot that maybe the internal insulation cooked? Kind of unheard of? But I just overnighted a new set of Beru wires will report back. If this resolves the ticking (heavy arcing) and misfire - then Ill move on to a compression test and leakdown -- and maybe just maybe I narrowly escaped death with this M103.

If thats the case this is one robust fucking engine lol.
 
Update #2: It was actually CYL 3 that was fully dead due to no spark (I mixed up the wires while tracing them back to the distributor cap), Beru spark plug wires arrived, fixed the misfire and tick tick arcing sound that I thought was valvetrain related.

Compression on cold engine test checked out all within 10% ranging from 130ish PSI at the lowest to 160ish at the highest. So compression is good... or kind of?

Here's what I need help with brainstorming, the car since the incident, on top of the misfire, had a hard time starting up (long startup time) until it would fire and turn over, and still seems a little low on power. No overheating happening, firing on all 6 CYL.

I don't have an air compressor so for now leak-down test is off the table until at least next week when I can grab or borrow one. But what could cause hard start/loss of power with a stable idle and compression within spec?

this is turning into a real head scratcher boys and girls. :blink:

SIDE NOTE: If anyone has an OM603.97X Crankshaft laying around... I have money for you :hugs:
 
130 low to 160 high on compression is about 19% difference, which is quite a bit. This translates into 9 bar / 11 bar, and the 2.0 bar difference exceeds the maximum allowed difference of 1.5 bar between highest and lowest. If lowest was a bit over 130 and highest was a bit under 160 you might just be at the limits of 1.5 bar difference. Was the compression test done with the engine hot, and did you crank it until the pressure stopped increasing?

I'm not sure about the hard start or loss of power. I'd lean towards the leakdown test next. Could also be the compression is abnormally low with a cold engine, which could cause the hard starting when cold?

:blink:
5 cranks each cylinder on a stone cold engine. Waiting on an air compressor from a friend for a leak down test -- Bad rings would show on a compression test, so would a bad HG? really troubled as to what else could've broken or caused a hard start issue smh
 

Who has viewed this thread (Total: 2) View details

Who has watched this thread (Total: 5) View details

Back
Top