Hi,
As a follow up to post #21 in this thread:
http://www.500eboard.com/forums/showthread.php?t=8230
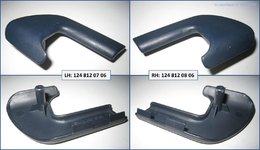
Here is some pics of those "C-covers" closing the ends on the rear electric sunblind assembly. Based on r44raven's research they are apparently NLA now. I haven't checked the EPC, so the PN may vary on colors - or they have an additional color code affix.
The covers are held in place by one round tab/pin just pressed in place. They sit quite good, and it is important to not bend when taking them off, which may break that tab/pin. If that pin breaks it is no easy fix and it is the only grip holding them in place! Just pry & pull gently straight outwards and you're good.

-a-
PS. These C-covers are pre-sold to member r44raven, at an estreme mark-up of course - I'll gonna be stone rich now!!
As a follow up to post #21 in this thread:
http://www.500eboard.com/forums/showthread.php?t=8230
Here is some pics of those "C-covers" closing the ends on the rear electric sunblind assembly. Based on r44raven's research they are apparently NLA now. I haven't checked the EPC, so the PN may vary on colors - or they have an additional color code affix.
The covers are held in place by one round tab/pin just pressed in place. They sit quite good, and it is important to not bend when taking them off, which may break that tab/pin. If that pin breaks it is no easy fix and it is the only grip holding them in place! Just pry & pull gently straight outwards and you're good.

-a-
PS. These C-covers are pre-sold to member r44raven, at an estreme mark-up of course - I'll gonna be stone rich now!!

Attachments
Last edited:


