• Hi Guest !

    Welcome to the 500Eboard forum.

    Since its founding in late 2008, 500Eboard has become the leading resource on the Internet for all things related to the Mercedes-Benz 500E and E500. In recent years, we have also expanded to include the 400E and E420 models, which are directly related to the 500E/E500.

    We invite you to browse and take advantage of the information and resources here on the site. If you find helpful information, please register for full membership, and you'll find even more resources available. Feel free to ask questions, and make liberal use of the "Search" function to find answers.

    We hope you will become an active contributor to the community!

    Sincerely,
    500Eboard Management

OWNER EDMB500

status so far

we’ve tested resistance on each function position and it seems every function of the stalk is making

here are the findings:

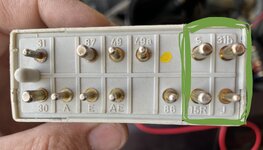
1+2 = high beam constant
2+11 = high beam flash
6+7 = left turn
7+8 = right turn
10+11 = screen wash
11+14 = intermittent wipe
11+12 = 1st position constant wipe
11+13 = 2nd position constant wipe

7 and 11 are power
9 and 12 earth

not sure if the findings are showing it is working the way it is meant to, but it seems to be

so, I’m thinking it might be the relay

what functions does that relay actually control?
 

Attachments

  • 22D39714-BFC9-4F9C-BBCB-1BEFF983EACD.jpeg
    22D39714-BFC9-4F9C-BBCB-1BEFF983EACD.jpeg
    3.5 MB · Views: 7
  • C013AE10-35C7-4E59-BD48-4C74E9AFB36F.jpeg
    C013AE10-35C7-4E59-BD48-4C74E9AFB36F.jpeg
    1.2 MB · Views: 7
I’ve taken the cover off the multifunction relay.
You can see the middle relay is clicking when the turn signals are engaged.
What I think is the wiper relay is the front most relay, it’s doing diddly squat
Thinking it might be the relay

but would that also explain why the headlight main beam flash is not working?
 
Happy new year to all

Seems I’m starting the new year off with some faulty catalytic converters. Car is experiencing the usual symptoms of faulty cats, but I think these ones are totally shot. I’ll remove the exhaust to check them but pretty sure they are degraded inside and are now causing serious flow restriction.

Are there any likely issues (apart from emissions) in omitting the cats in their entirety?
Happy new year Ed! Glad to see you've still got the car. We have a Dubai WhatsApp group now with a few owners so glad to add you to that.

You can decat your E500, it will be louder but a common mod for some owners. Should be OK with the resonator and backbox still in place.
 
Happy new year Ed! Glad to see you've still got the car. We have a Dubai WhatsApp group now with a few owners so glad to add you to that.

You can decat your E500, it will be louder but a common mod for some owners. Should be OK with the resonator and backbox still in place.
nice one. We might even meet up this year! Lol
Eazy! Good to see you here after an absence! Welcome back !!
Thanks Gerry, its been a funny old year. Someone had their finger on fast forward for most of it. Then suddenly it’s 2022
 
Last edited:
I haven’t resolved the issue with the windscreen wiper. Does anyone have a wiring diagram to identify which pin is for which function and to which pin there should be constant power?

The problem is as follows:

Wiper, headlamp wash, water jets and high beam flash wouldn’t work at all.
Wiper Motor etc all checked and fine.
Hazard and re demister all fine.
Replaced the multifunction relay.
Still same problem.
Replaced all fuses with new ones and now the wiper works in position 2 and 3 (not in intermittent) but cannot turn it off using stalk, just keeps going until turn ignition off.

The relays all seem to be triggering correctly with their respective function except not being able to turn off the wiper and no intermittent setting.

If the relay is only slightly inserted to its holder, I can turn wiper on and off using stalk (intermittent still doesn’t work) but other functions - hazards etc - don’t work

Insert the relay fully and back to the original problem. Everything else functions but cannot turn wiper off.

I’ve tested the power to pins with ignition off and on. I think I’ve narrowed down the following:

Wiper appears to be connected to following - relay holder pins noted first and corresponding relay pins second:
13/15R - ignition on = constant power
14/S - can’t get any reading from this at any ignition position or wiper position, don’t know what it does but light be the wash jet function as i forgot to check that
15/J - ignition on and intermittent wiper position = power to pin (moving wiper position to 2 or 3 drops power from this pin (intermittent wiper setting not working)
16/31b - ignition on = constant power in all wiper positions

So I removed the relay totally, and with the ignition on, the wiper can still be operated. No intermittent but it will turn off using the stalk but it doesn’t return to it start position, just stops dead - all very weird

Something tells me to think that pin 13/15R should be the constant power to the wiper and that there should not be constant power to pin 16/3b - I’m wondering if this constant power to 16/3b is whats stopping me from being able to turn off the wiper

I’m now shooting in the dark without a wiring diagram I think
 

Attachments

  • 7E96E4B6-278D-489E-A33B-CB0630FE27D7.jpeg
    7E96E4B6-278D-489E-A33B-CB0630FE27D7.jpeg
    436.8 KB · Views: 4
  • 014C9A0D-6276-4547-B249-1B15B04FD4AF.jpeg
    014C9A0D-6276-4547-B249-1B15B04FD4AF.jpeg
    771.6 KB · Views: 4
  • 3B195CBD-6A2E-49CC-BC04-FE5CD7009F58.jpeg
    3B195CBD-6A2E-49CC-BC04-FE5CD7009F58.jpeg
    795 KB · Views: 4
Last edited:
I should add to this that if I wiggle the relay in the barely inserted position, you can see the wiper relay clicking on and off and the relay pins make contact with the relay holder - this is when ignition is on but wiper stalk in off position

And also there is constant power to the windscreen jet wash motors so these will now also stay on - had to remove the plug so they’d stop
 
Have you replaced the combination switch yet? If not... that's the most likely problem, if swapping the relay made no change.

Schematics / diagrams are located here:

https://freescruz.com/.priv/W124/Index/Groups/24ElectTrbleShting.htm
I haven’t swapped it yet. I’ll have to buy a new one and have it shipped to do so as no used or new parts available here so trying to discount anything else first.

When I removed the combo switch previously and bench tested it with meter it all seem to function - described few posts up - but of course there could still be an issue with it.

So from the schematics, What is bugging me is that 13/15R is the hot wire (with ignition on) and no other wire should be constantly hot (with ignition on) but on mine both 13/15R and 16/31b are constantly hot (with ignition on).

Combo switch position I - intermittent setting and controls relay 15/J - when mine is in position I power goes to this pin but the wiper doesn’t move

Combo switch position II and III - controls relay pin 14/S which controls relay pin 16/31b. So to me, I don’t understand why I have no power reading at pin 14/S in any combo switch position but have constant power at 16/31b. Doesn’t seem right.

I was wondering if anyone has ever checked theirs and knows if this is right or wrong
 
I would say all the info you’ve supplied since the “replace the combo switch” suggestions one year ago seem to me to confirm it’s the combo switch.

The 320 I bought several years ago came with an unneeded new URO combo switch.
It ended up installed in a 420, and thus far has functioned as well as OEM.

I could come up with a good used OEM one if it made your life much simpler…
Yeah, can’t believe it’s been a year.

Brother, I really appreciate your offer of the oem one. PM me and we can make arrangements. I can use my US shop n ship address, Thank you
 
Guys, something has happened to the control of the passenger door mirror. I think a gear or something has broken inside as the glass is now flappy, motor still operates, but glass will now not move.

Can I access the mechanism by popping the glass out of the housing? Just found video on how to pop out the glass - manually press glass to expose outer edge and pop up with plastic pry bar (trim removal tool) - sound correct?

Is the internal mechanism serviceable or replaceable?

Thanks
 
Last edited:
I would buy a used mirror and replace the whole thing (maybe keep your cover and rubber boot). Standard 124 item.
 
Can I access the mechanism by popping the glass out of the housing? Just found video on how to pop out the glass - manually press glass to expose outer edge and pop up with plastic pry bar (trim removal tool) - sound correct?

Is the internal mechanism serviceable or replaceable?
The glass pops out easily as you describe. You can view the internals and see if you can figure out what's wrong. It's a simple mechanism.

The painted covers can be swapped, so if you replace it, look for a replacement with both a good boot AND good glass, then transfer over your painted covers.
 
@EDMB500, Ed to remove the mirror assembly you only have to remove the inside triangle to access 3 nuts and the electrical connector.

NOTE! BE CAREFUL REMOVING THE TRIANGLE! THE PLASTIC TABS BREAK EASILY. Especially the one about half way up the back side (side facing towards back of car)

Amazon sells interior removal tools that may help but no promises.

Check my thread in “INTERIOR TOPICS”
on DEC 12, 21. I got a lot of help and suggestions from others here.

PS: I still broke off on tab but was able to successfully repair it.
 
Last edited:
I popped the glass off to see what was wrong. Most of the plastic clips had snapped but were thankfully still in place

I’ve temporarily Repaired them with epoxy. The glass part no is shown there so I’ll see if I can find a replacement glass, failing that a full mirror.
 

Attachments

  • 93F84867-CC8E-47A6-8C2C-E3C09FA6D66A.jpeg
    93F84867-CC8E-47A6-8C2C-E3C09FA6D66A.jpeg
    848.6 KB · Views: 7
@EDMB500, Ed to remove the mirror assembly you only have to remove the inside triangle to access 3 nuts and the electrical connector.

NOTE! BE CAREFUL REMOVING THE TRIANGLE! THE PLASTIC TABS BREAK EASILY. Especially the one about half way up the back side (side facing towards back of car)

Amazon sells interior removal tools that may help but no promises.

Check my thread in “INTERIOR TOPICS”
on DEC 12, 21. I got a lot of help and suggestions from others here.

PS: I still broke off on tab but was able to successfully repair it.
Thank you very much
 
The glass pops out easily as you describe. You can view the internals and see if you can figure out what's wrong. It's a simple mechanism.

The painted covers can be swapped, so if you replace it, look for a replacement with both a good boot AND good glass, then transfer over your painted covers.
Advice much appreciated
 
@EDMB500, Ed to remove the mirror assembly you only have to remove the inside triangle to access 3 nuts and the electrical connector.

NOTE! BE CAREFUL REMOVING THE TRIANGLE! THE PLASTIC TABS BREAK EASILY. Especially the one about half way up the back side (side facing towards back of car)

Amazon sells interior removal tools that may help but no promises.

Check my thread in “INTERIOR TOPICS”
on DEC 12, 21. I got a lot of help and suggestions from others here.

PS: I still broke off on tab but was able to successfully repair it.
And to add insult to injury, these triangles are NLA
 
Had the cats removed and replaced with S/S pipes. She is now running nicely. The cats were blocked - internals partially cracked and had shifted. A slight increase in sound but thankfully not very noticeable. Great to get her back on the road

Gonna now DIY some minor service work.

Ordered the new OEM combo switch and seals etc for the PS reservoir - should have been here but the courier company have messed up. The joys….Hopefully this switch fixes the wiper function.
 
New plugs today. I think it was the originals still in there, had the star logo and Germany. Reading previous post here, I gapped them to between 1.0 and 1.1mm.

Stripped off the distributer caps to check them. And give a little light sanding.
 

Attachments

  • E8702CB5-C9A6-448E-9E48-6BE506DC0BEB.jpeg
    E8702CB5-C9A6-448E-9E48-6BE506DC0BEB.jpeg
    609 KB · Views: 7
  • 74D571D7-2DC5-4C01-A8DE-F5F74517C375.jpeg
    74D571D7-2DC5-4C01-A8DE-F5F74517C375.jpeg
    3.2 MB · Views: 5
  • 515B451C-8EC2-4964-B8F6-912141E17E0D.jpeg
    515B451C-8EC2-4964-B8F6-912141E17E0D.jpeg
    1.2 MB · Views: 7
  • 682F11F8-141D-42AC-9A8B-F33EEA9A2E5E.jpeg
    682F11F8-141D-42AC-9A8B-F33EEA9A2E5E.jpeg
    1.6 MB · Views: 7
Last edited:
The old plugs look good. Minimal wear on the center electrode. Maybe about 20kmi / 30kkm on them...?

Bosch Star logo made in Germany were still available up to maybe 5 years ago, before MB switched suppliers to Beru/France.
 
The old plugs look good. Minimal wear on the center electrode. Maybe about 20kmi / 30kkm on them...?

Bosch Star logo made in Germany were still available up to maybe 5 years ago, before MB switched suppliers to Beru/France
I honestly wouldn’t know Dave. I’ve only done about 1000kms since having the 500.
It’s possible they were changed years ago in Japan as the previous owner imported the car here and never used it. It sat there next to another four E500s in his garage.
I put in the new plugs as I had them sitting there. Kept the old ones anyway. These new ones say Russia so I’m having a vodka tonight instead of my usual malt or bourbon, although the beer has remained Germanic
 
Have run into an issue with the drivers side distributor - the rotor bracket came loose and has messed up the cap

The locator pin on the cam shaft is undamaged but the recess in the bracket is mashed up so I need a new one

The Bosch part number on it is 1230328036 which I can’t find anywhere but I am finding 1230328037 both on the tutorials here and on the parts supplier websites. Can anyone advise if these are the same? They look it but I am unsure - photo of mine included

PS it was like this when I took the cap off - the other side was perfect as per previous photos
 

Attachments

  • 157B0B0D-4517-4528-8E6B-D6EEAAC439D8.jpeg
    157B0B0D-4517-4528-8E6B-D6EEAAC439D8.jpeg
    824.4 KB · Views: 9
The Mercedes part number for the rotor bracket is 119-158-06-40. Ignore the Bosch numbers. Get a used one if you can't locate new (appears NLA from MB). Only the very early engines had the "bad" design bracket. There's photos on the forum showing both side by side.

This is why I apply a dab of blue threadlock to the single bolt that holds that bracket to the cam. You are lucky the pin wasn't damaged, it is a PITA to extract a broken one. A bit of threadlock on the rotor bolts doesn't hurt either, I've seen those bolts back out as well, and can destroy all the plastic parts.
Thanks Dave, much appreciated. I was gonna follow those exact guidelines after reading all the discussions on here.
 
In other news, replacing the combo switch with a brand new MB unit has resolved all the issues. Full functionality has been restored. Well, almost. The drivers side head light wiper has jammed in the up position. The motor sounds like it’s wanting to run but nothing happening to the arm so I’ll need to check it out. Always something…..
 
In other news, replacing the combo switch with a brand new MB unit has resolved all the issues. Full functionality has been restored. Well, almost. The drivers side head light wiper has jammed in the up position. The motor sounds like it’s wanting to run but nothing happening to the arm so I’ll need to check it out. Always something…..
Good to hear, so you can now bring your E500 and show it off at one of our coffee meets...
 
Almost there……just need to sort this distributor asap
Rotor brackets for the new style of rotor arm are indeed NLA,I got a used set off eBay in the end. Let me know if you need the part numbers as you’ll need the updated brackets for the latest style of rotor arm. Worst case scenario you can modify the rotor to fit but it’s not recommended.
 
Chasing down another new issue that’s just shown it’s ugly head

When accelerating foot mashed to the floor wide open throttle kickdown, there is a uniform hesitation/mis/pulse at pretty much exactly 110kmph - happens every time. It can also sometimes continue right up to around 140kmph - it feels like a pulsing, like if you were running and someone was yanking you back over and over

Doesn’t seem to really happen below that 110 mark

If accelerating without full throttle kicking down, it doesn’t do it. It just accelerates smoothly the full way

Any pointers would be appreciated

There is also another new issue. When leaving the car to idle, after 5 to 10 mins, the car starts reving up/dying on it own - I’ve attached a video

MAF was unplugged but seemed to make no difference

Again, any pointers would be really appreciated

When the car is being used on the road, other that wide open throttle issue, she is running perfectly.
 

Attachments

@EDMB500, Sounds to me like fuel starvation. I had a similar problem on a Toyota a long time ago. I was in the middle of the Arizona desert on a Sunday when it started to act like it was running out of gas and slow down just to turn around and pickup speed for a while and then slow down again. This went on for about a hour with nothing in sight. Finally I saw a closed gas station where I stopped to investigate.

It turned out to be a clogged fuel filter. Only thru the Grace of God did I find the problem. I removed the filter and replaced with a piece of plastic tubing I found on the ground Whew! I was so lucky to find that plastic tubing it saved the day.

It ran fine without the filter until I got to a auto parts store in Winslow, Arizona where I got a new fuel filter.

If you haven’t changed it or have a record of it being done you should give it a try. It just might solve your problem.:)

Good Luck
Nice work there Terry, some proper MacGyver-esque skills hard at work

I had the fuel pumps and filters changed when I bought the car as there was a leak from the high pressure line but as it hadn’t been used much prior to me buying it, and then me not really using it all that often either, the new filter could easily have picked up something

Thanks for the pointers. I’m going to check the fuel system and pull codes shortly.

Hope yours is running like a dream
 
In other news, my delivery of leatherique rejuvenation and prestine clean arrived so I’ve spent the day lathering on the rejuvenation oil. Excited to see the results. At least I’ll be able to sit in super soft leather (hopefully) even if I can’t give it WOT for now.

While I was waiting for the first coat of it to soak in I finally got round to re-welding the rear fender on my 2001 softail bobber.
 

Attachments

  • 2EBEFB79-38D1-4DBA-AACA-1D3FDB35A2BE.jpeg
    2EBEFB79-38D1-4DBA-AACA-1D3FDB35A2BE.jpeg
    367.9 KB · Views: 13
Just be sure you do not scrub those seats too hard. Use cotton towels to get the pristine clean grime off, rinsing in clean water regularly. If you think it is clean, give it a few more hours and damp wipe more dirt off with clean towel. When the dirt stops, then rejuvenate. Keep the rejuvenator on there (I use my hands and really work it in) in a warm car in the sun for as long as you can.
 
Just be sure you do not scrub those seats too hard. Use cotton towels to get the pristine clean grime off, rinsing in clean water regularly. If you think it is clean, give it a few more hours and damp wipe more dirt off with clean towel. When the dirt stops, then rejuvenate. Keep the rejuvenator on there (I use my hands and really work it in) in a warm car in the sun for as long as you can.
Nice one, thanks for the pointers

I’ve followed the recommended steps. I cleaned up any lose debris from the seats and interior generally - I used a vacuum gently and then compressed air to blow out all dust etc.

Then I’ve applied the rejuvenator with applicator pad/rubbed in with hands - and sat the car in the sun, watching for it showing dry patches which indicate it has soaked in. Then reapplied the rejuvenator to keep it all a uniform ‘wet’ looks.

I started on Wednesday and so far have gone through approx 24oz of the rejuvenator. I knew the seats/leather were dry - they just didn’t feel like they should - but I am surprised to have used this much - I’ve not lathered it on so that’s it’s soaking through to the seat cushioning, I’ve been very careful - so it’s telling me the leather really needed fed.

Gonna leave it on there in the sun and monitor for the next 2 days - I think Sunday i need to do the clean up as back to work Monday

Couple of progress photos - sorry for the iPhone flash which has kinda washed out a bit but you can see the areas where the rejuvenator has been sucked in


Attachments

  • 63006164-ADE5-457F-B93F-7D81B7BF4CE5.jpeg
    63006164-ADE5-457F-B93F-7D81B7BF4CE5.jpeg
    116.7 KB · Views: 12
  • 5A934ADC-9DFF-4A58-A759-D72FE91D9379.jpeg
    5A934ADC-9DFF-4A58-A759-D72FE91D9379.jpeg
    125.4 KB · Views: 12
  • DF733471-F925-4E90-B5A5-174D0E434451.jpeg
    DF733471-F925-4E90-B5A5-174D0E434451.jpeg
    99.3 KB · Views: 12
  • 7DA18254-EC43-471C-A247-B807EB9816E7.jpeg
    7DA18254-EC43-471C-A247-B807EB9816E7.jpeg
    112.1 KB · Views: 11
  • A315F157-E0D1-4C96-8F1F-72380840CC40.jpeg
    A315F157-E0D1-4C96-8F1F-72380840CC40.jpeg
    98.9 KB · Views: 12
  • 3B653707-B53D-4A71-A8A4-D0FBEBCB40FF.jpeg
    3B653707-B53D-4A71-A8A4-D0FBEBCB40FF.jpeg
    78 KB · Views: 12
  • AA719758-B656-4A40-9606-8ADE3F259452.jpeg
    AA719758-B656-4A40-9606-8ADE3F259452.jpeg
    105.3 KB · Views: 12
Last edited:
Another top up application today and continued bake in the sun

The arm rests in particular are soaking this stuff up rapid and are becoming noticeably softer. I wouldn’t say the front seats feel softer yet but the rear seats bottoms are beginning to.

The leather pockets on the backs of the front seats are also soaking up the rejuvenator very quickly and today the steering wheel started to do the same which it hadn’t done the day before. I can only assume that the longer this stays on the softer the leather will get and perhaps more absorbent (?)

Anyway, that’s 28oz of the rejuvenator used thus far. I only have 4oz remaining and at this rate it’s gonna need more than that so another order is being placed.

Some update photos
 

Attachments

  • 74353F6A-F139-43FF-9FE7-587D127D69FC.jpeg
    74353F6A-F139-43FF-9FE7-587D127D69FC.jpeg
    107.7 KB · Views: 9
  • 7C1A1E37-92CF-4BCA-9FA2-CB72896BC4E1.jpeg
    7C1A1E37-92CF-4BCA-9FA2-CB72896BC4E1.jpeg
    141.4 KB · Views: 10
  • B8995599-1675-44A6-AB17-61F0A2A70505.jpeg
    B8995599-1675-44A6-AB17-61F0A2A70505.jpeg
    80.2 KB · Views: 10
  • 5D3D2F25-B8A9-4118-B973-69CC4C800468.jpeg
    5D3D2F25-B8A9-4118-B973-69CC4C800468.jpeg
    111.6 KB · Views: 10
  • 04B11C40-0F5E-4C3C-8526-78E2BD74C333.jpeg
    04B11C40-0F5E-4C3C-8526-78E2BD74C333.jpeg
    105 KB · Views: 9
  • 3B7DF2E4-CBB4-43B5-895C-DB6BB505D905.jpeg
    3B7DF2E4-CBB4-43B5-895C-DB6BB505D905.jpeg
    108.1 KB · Views: 9
  • 7BBBEA97-FD00-4059-B0B7-0FA66B3C867A.jpeg
    7BBBEA97-FD00-4059-B0B7-0FA66B3C867A.jpeg
    124.2 KB · Views: 10
  • 85F24766-AB80-4D36-B110-0A84F1692ED9.jpeg
    85F24766-AB80-4D36-B110-0A84F1692ED9.jpeg
    104.7 KB · Views: 10
  • E0D896DD-5F0B-486E-9894-781C0576D638.jpeg
    E0D896DD-5F0B-486E-9894-781C0576D638.jpeg
    108.2 KB · Views: 10
  • 1F2DC011-B023-4077-B1DE-565466EAE41F.jpeg
    1F2DC011-B023-4077-B1DE-565466EAE41F.jpeg
    78.3 KB · Views: 9
Yup... I buy gallon jugs. I think the quarts might be ok for maintenance treatments after the resurrection is complete, but that first time, they might soak up quite a bit - especially if doing front & rear seats.

:spend:
 
Yup... I buy gallon jugs. I think the quarts might be ok for maintenance treatments after the resurrection is complete, but that first time, they might soak up quite a bit - especially if doing front & rear seats.
That’s good to know Dave, I thought perhaps I was at risk of over applying. Thank you
 
Guys has anyone got a spare kick down actuator or can source one that they’d be willing to ship to me in dubai? I can buy online but they want $200 just for shipping!

Part no A1402700573
Also need 1 x 0009871145 and 1 x 0169970448 to go with the actuator
 
Gents, the car was sitting for a period of time, roughly 5 months, while we took out the transmission and replaced the oil pump.

Now that she is back running, the brakes are very weak. Peddle goes to floor with little resistance and the braking is very slow i.e. almost non existent and not safe. What are the chances that the master cylinder has shat itself?

Or from your experience, should we be looking elsewhere for the problem? Is it likely or even possible air has got into the system (we’ve done no brake work recently and the brakes were spot on prior to removing the transmission)
 
First verify the reservoir is full in all chambers - use a flashlight. If not, you may have a leak - check all hard lines, hoses, and calipers.

If there's no visible leak, then yep... most likely the M/C. You could dry bleeding the system before replacing the M/C but that might be a waste of time?

:klink:
 
First verify the reservoir is full in all chambers - use a flashlight. If not, you may have a leak - check all hard lines, hoses, and calipers.

If theres no visible leak, then yep... most likely the M/C. You could dry bleeding the system before replacing the M/C but that might be a waste of time?
Thank you. The reservoir seemed full and we couldn’t see a leak but will check again

For the M/C, i have the part no as A0054307101 but cannot source one using this original code. is there a replacement code or an M/C from another model that will fit?
 
For the M/C, i have the part no as A0054307101 but cannot source one using this original code. is there a replacement code or an M/C from another model that will fit?
A0054307101 is for late Euro-spec E500. Appears to still be available from MB, but expensive. Is your car Euro-spec, with engine oil cooler?

The M/C for USA/Japan cars appears available new aftermarket from Ate, or as a rebuilt unit from the dealer, for a lot less $$$.

The two types are not interchangeable though. Need to see which one is specified in the EPC for your specific VIN.
 
Hope everyone is well

So recently we’ve replaced the distributors, rotors, manifold seals, vacuum lines, had the transmission out and fitted a new oil pump etc.

Unfortunately the intermittent loss of power under acceleration at various points and the hunting at idle remained.

We unplugged the MAF (again) and all of those symptoms stopped - the car is running great with the MAF unplugged. (We tried unplugging the MAF prior to all the vacuum and ignition works but the same issues remained).

So now it looks like the MAF is shitting itself.

Can anyone advise if there is a home remedy for correcting the MAF or if you have a good contact to have them rebuilt?

It’s been great to be back behind the wheel. I forgot how much fun and power the car has.
 
The MAF can't be DIY repaired. I don't know anywhere that rebuilds them either. Best option is to buy a good used one. Most sellers don't test them, and often don't even know how to proper test them. "Came off a running car" isn't helpful, I mean, your car is "running" with a bad MAF. If buying off eBay, at least make sure there is a good return policy.

The car should run even better with a good MAF installed, btw. Might not hurt to reset LH adaptation after the MAF replacement too.

:3gears:
 

Who has viewed this thread (Total: 2) View details

Who has watched this thread (Total: 2) View details

Back
Top