• Hi Guest !

    Welcome to the 500Eboard forum.

    Since its founding in late 2008, 500Eboard has become the leading resource on the Internet for all things related to the Mercedes-Benz 500E and E500. In recent years, we have also expanded to include the 400E and E420 models, which are directly related to the 500E/E500.

    We invite you to browse and take advantage of the information and resources here on the site. If you find helpful information, please register for full membership, and you'll find even more resources available. Feel free to ask questions, and make liberal use of the "Search" function to find answers.

    We hope you will become an active contributor to the community!

    Sincerely,
    500Eboard Management

HOW-TO: Upgrade Alternator from 110Amp to 150Amp

DerFuror

500E Terminus Illuminatus
Member
Upgrading the stock 110Amp alternator with a 150Amp alternator from a 2001 ML55 provides an additional 40 amperes worth of potential current supply for the 500E electrical system’s consumption.

Background:
I’ve finally gotten around to replacing my stock 110Amp Bosch alternator with the 150Amp Bosch version from a 2001 ML55.

My used ML55 150A alternator bench-tested OK, but I also wanted to verify the condition of its voltage regulator brushes prior to any installation.

The 150A VR brushes still had decent life left but I opted to start fresh with a new OE replacement VR (Bosch 1 197 311 213) because I’m treating this upgrade as a “one & done” type of project that I don’t plan on revisiting. I’ll replace the 110A alternator's VR with the former 150A VR. The 110A VR will be trashed because its brushes are worn. Afterward, I’ll keep the 110A alternator in storage as a backup.

VR_Comparo.jpg

Poly v-belt removal is a prerequisite of alternator replacement, so I’m also using this opportunity to replace the 6 rib poly v-belt. The current v-belt is over 7 years old & upon closer scrutiny displays fine-checking throughout. I’ll keep this old belt in the car tool bag for a while as an emergency backup.

Vbelt.jpg

The Bottom Line: Consider replacing the voltage regulator prior to, & replacing the poly v-belt after alternator installation.

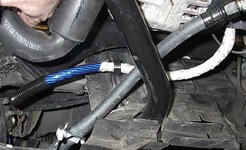
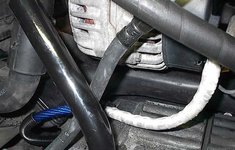
Alternator replacement also provides the opportunity to inspect the condition of many other important collateral items such as the lower wiring harness, transmission & SLS tubing/hoses, oil level sensor, oil pressure sensor, fluid leak sources, etc. I am taking advantage of this opportunity.

Part Numbers:
110A alternator: Bosch 0 123 545 004 (009 154 19 02)
150A alternator: Bosch 0 123 520 012 (010 154 83 02)

Alternator_007.jpg

Compatibility:
The 150A alternator is a direct fit into the existing 500E alternator brackets.
Both alternators use the same Bosch 1 197 311 213 voltage regulator (p/n 002 154 85 06). The voltage regulator should be inspected/replaced prior to the installation of any used Bosch alternator.

Upgrade_002.jpg

Both alternators are classified by the FSM as “compact” type & are nearly dimensionally identical, with only a few slight & non-critical differences.

  • Length: 150A is 3/16” (4.75mm) longer on the voltage regulator end.

Upgrade_003.jpg


  • Terminal Location: When mounted in bracket, the 150A configuration provides better service access to D+ terminal than the 110A. B+ terminal locations are the same.

Upgrade_001.jpg


  • Pulley Diameter:

  • 150A: 55mm nominal OD (50mm groove OD).
  • 110A: 49mm nominal OD (44mm groove OD).

Alternator_010.jpg


  • Pulley nut size for both: 22mm hex

To maintain the originally intended rotational characteristics of the 500E’s belt drive system, I replaced the 150A pulley with the 110A pulley.

Reference:
FSM 15-5760-B Removing and Installing Regulator (see HOW-TO)

FSM 15-5700 Removing and Installing Poly V-belt Pulley

Tools:
Bench Vice or flat stable work surface
Pneumatic Impact Wrench
22mm Impact Socket
Pipe Strap Wrench
Large Channel Lock Pliers
Torque Wrench
Old Poly V-belt

The FSM specifies, “Use serrated bit (10mm) with reversing ratchet for holding the shaft”. I improvised an alternative method to perform this task, because, although I have the serrated bit (aka T50 torx bit) to hold the shaft, I didn’t have the required pass-thru socket tool to hold the shaft while simultaneously removing the pulley nut surrounding it. I used common shop tools & items on hand in the garage.

Pulley_Nut.jpg

Procedure:
Pulley Nut Removal:

  • Mount the alternator horizontally in a bench vise or on a stable flat surface.
  • Use the Pneumatic Impact Wrench fitted with the 22mm (7/8”) Impact Socket to remove the pulley nut (the nut comes off easily without the need of a pipe strap wrench to hold the pulley).

Pulley_Removal.jpg


  • Pull the pulley straight off the shaft (should come off by hand).

Pulley Nut Installation:

  • Squarely seat the replacement pulley on shaft by hand.
  • Finger-tighten the nut onto the shaft
  • Tighten the pipe strap wrench around the pulley in the counter-direction of nut installation (have the strap wrench handle rest against a solid surface).
  • Use the Pneumatic Impact Wrench to further tighten (but not over-torque) the nut onto the shaft using 2 – 3 short bursts (similar technique as lug nuts onto wheel rims).

The Pneumatic Impact Wrench torque is stronger than the frictional resistance of the pipe strap wrench. Stop applying the Pneumatic Impact Wrench when the pulley eventually starts rotating within the pipe strap.


  • Remove the pipe strap wrench, and then protect the pulley grooves with old poly v-belt or similar material.
  • Carefully fit the jaws of a large set of Channel Lock Pliers around the old belt material in the counter-direction of nut rotation & hold handles down against a solid surface (the material protects the pulley grooves from the Pliers jaws).
  • Fit the 22mm Socket onto the Torque Wrench & incrementally final torque the nut to 80 Nm (60ft lb).

Pulley_Install.jpg

The alternator is now ready for installation. Install the alternator into the car using this additional HOW-TO.
 
Looks great! FYI - per the label ratings, the stock alternator only puts out 60A at idle rpm, while the big boy puts out 90A. That's a substantial increase - 50%. This is the primary benefit to the upgrade, IMO. You'll rarely need over 110A peak output, but will often need more than 60A at idle...

:shocking:
 
In what car is the 150A alternator fitted?i mean..is it only fitted in the ML 55?
Seems like a very nice upgrade,,,quite expensive i guess though...
 
Last edited:
Looks great! FYI - per the label ratings, the stock alternator only puts out 60A at idle rpm, while the big boy puts out 90A. That's a substantial increase - 50%. This is the primary benefit to the upgrade, IMO. You'll rarely need over 110A peak output, but will often need more than 60A at idle...

:shocking:

Another thing....when putting on the smaller diameter pulley..will it actually produce AS much current as it would with the bigger pulley?
 
Is there enough belt slack to use the 50mm pulley or is the 44mm an absolute necessity?
 
The smaller pulley will generate more current at lower RPM's. The alternator provides peak current at approximately 2000 engine RPM. Details are in the Intro manuals.

Glen, I'm pretty sure the 44 or 50 mm pulleys could be easily interchanged, the belt tensioner should have more than enough ability to adjust for the difference.

The 143A and 150A alternators were used on various engines/chassis in the late 1990's and to about USA model year 2000/2001. Afterwards, the design changed and I don't believe the 2002-up units are backwards compatible. If the connections on on the back side don't look EXACTLY like the photos above (one large B+ terminal, one small D+ terminal)... I wouldn't try to install it.

:shocking:
 
The reason I asked is because the larger alternator is already rated at 90A at idle with the 50mm pulley. Seems like more than plenty so the extra output at idle with the 44mm pulley is mostly not needed.
 
AH! Got it. You are right, Glen, the smaller pulley will actually boost idle output a smidge.

:jelmerian:
 
i checked for prices here in Norway..and ...for now..TOOOO expensive for my wallet..my price through where i work,(discount) i have to pay 720 dollars..and that is even trading in my OLD alternator
 
In USA it's fairly easy to source a used one for $50-$100 USD, then pop in a new voltage regulator. New or rebuilt is $$$$$!

:spend:
 
In USA it's fairly easy to source a used one for $50-$100 USD, then pop in a new voltage regulator. New or rebuilt is $$$$$!

:spend:

i think i would prefer putting in a rebuilt or new one..if i actually went down that route and replacing the alternator.
but the thing that would" kill" the good price you mention..i guess will be the shipping cost
And the aspect of NOT knowing the condition of the alternator ,is a big aspect for me.

but ill keep it in mind..and see if i can find one at some point :)
 
I’ve been giving this upgrade some thought – I have tried to find a 150 Amp alternator from salvage yards but can’t find one that looks identical. Some W220 150amp ones ‘Look’ similar but the vent on the rear of the casing bulges out a little I think that might be a problem.


I do have a really good Alternator Pro refurbishment place near me so I would have them rebuild whatever used unit I would buy with new Regulator, Slip Rings & Bearings.


My car has the Oil Cooler lines snaking in behind the Alternator - has anyone done this upgrade with a car with a factory Oil Cooler fitted?

IMG_0711.JPG
 
Last edited:
Well I sprung for a Bosch factory reconditioned 150Amp alternator - I do hope it clears the Oil Cooler line but if the difference is only circa 5mm in length then it should.

But - do I really need to fit the smaller pulley from the old alternator? I am afraid I will void my new alternator warranty by swapping pulleys- but not even sure if it's a necessity to swap to the smaller pulley.

If the 150amp unit puts out 90 Amp at idle over the stock 60 Amp then that's more than enough without boosting it up by fitting the smaller pulley as well?
 
Whats the lastest consensus can we leave the 150A pulley on ?
thanks

I fitted my original 8 rib pulley onto the 150Amp alternator due to it having a later 6 rib belt pulley on it. No issues with the install and it did clear the Oil pipes too
 
I have a 94 so I can use the ML pulley?
if so what would I gain or lose?
thanks
Compare both pulleys. If they are only a few mm different, you can use whichever is convenient. The more important thing is to confirm the offset is the same, which it should be (making the belt line up properly).

:tumble:
 
Ok cool will shop now for an alternator
btw so many bearing with similar numbers from skf the the 2nd part of the numbers are differnt
anyone have the definite bearing number with letters at the end?
thanks
 
I can't help with the bearing question, but if the alternator spins quiet & smooth, I'd leave the bearings alone.

Make sure the alternator you buy looks like the ones shown in the photos, with one large (B+) terminal, and one small (D+) terminal. I think 2001 is the latest year that works. After that, the VR changed and I don't think the 2002+ alternators are compatible with our older systems.

:shocking:
 
Inquiring minds (mine) want to know --- is there any drawback to using the 150 amp alternator? Increased heat? greater parasitic loss? Something else?

thank you.
 
Inquiring minds (mine) want to know --- is there any drawback to using the 150 amp alternator? Increased heat? greater parasitic loss? Something else?
You can feel the heavier internal rotating parts when you spin them by hand, 110A/120A vs 143A/150A. So there is a little more parasitic loss, but not enough that you'd ever notice with the V8 engine. For normal street use, IMO the advantages outweigh the minor disadvantages (size, weight, parasites).

Although not required, adding an extra wire from the B+ terminal up to the main distribution block will help reduce voltage drop under heavy electrical loads. I added a separate 4-gauge wire, in parallel with the stock cable that is part of the starter harness. This is overkill unless you have large auxiliary electrical loads such as monster stereo amplifiers in the trunk, and/or megawatt halogen headlight bulbs (six 100w bulbs will pull over 40A at 14v). Pics attached of my 4-ga wire, this car has both a 1000w five-channel trunk amp, and also the mono headlight bulbs with relays, so I felt the upgrade was worth the effort. With everything stock, I'd skip adding the extra wire.

:jono:
 

Attachments

  • alternator_wire1.jpg
    alternator_wire1.jpg
    71.1 KB · Views: 31
  • alternator_wire2.jpg
    alternator_wire2.jpg
    63.3 KB · Views: 29
  • alternator_wire3.jpg
    alternator_wire3.jpg
    65.6 KB · Views: 29
You can feel the heavier internal rotating parts when you spin them by hand, 110A/120A vs 143A/150A. So there is a little more parasitic loss, but not enough that you'd ever notice with the V8 engine. For normal street use, IMO the advantages outweigh the minor disadvantages (size, weight, parasites).

Thanks! OK, I'll hoard the 150 Amp alternator for the day me OE 110 Amp one goes bad. I don't have any additional amps / megawatt halogen bulbs.
 
Whats the lastest consensus can we leave the 150A pulley on ?
thanks

If the pulley is on, leave it on. Replacing is extra work. No big affect either way, but verify, match & use the pulley with the same belt groove count of your existing serpentine belt.
 
I tried this on my car- and I had harness interference problems. The 150A could never be clocked to match the 110A exactly. But it may work for most factory cars and without oil cooler option. I'd consider adding one of those modern pulley clutches over the 6 rib steel one. They are not expensive from INA and eliminate the shock loads from shut down... easier on the belt, tensioner, etc. Most of the used alternators, it seems like the rear bearing is noisy and it's super cheap/easy to replace while you are in there doing a new Regulator. Front is a bit trickier and only have Bosch or China brg alternatives.

I did a write up here on rebuilding mine.
 
I tried this on my car- and I had harness interference problems. The 150A could never be clocked to match the 110A exactly. But it may work for most factory cars and without oil cooler option.
There are different 143A and 150A versions, with the terminals in slightly different locations... and possibly some that may offer different locations compared to re-clocking only. In other words, it MIGHT be that re-clocking a particular part number to all 4 positions wouldn't clear, but re-clocking a different part number alternator might work on the same car. I've never had enough different alternators to compare side by side and get photos.

Without the factory oil cooler, there are no clearance problems with a 150A on M119/500E. With the oil cooler, Joe confirmed back in post #17 that it worked on his 500E.

Joe, any chance you have the part number of the 150A unit you installed?

:detective:
 
Joe, any chance you have the part number of the 150A unit you installed?

:detective:

I do not recall the part number Dave. But I am quite sure I ordered what was advised on this thread in post #1. I do still have pictures of the unit I bought:

IMG_1977.JPG IMG_1978.JPG

Installed - it's tight but does clear the "Yuro" 124.036 oil cooler pipes

IMG_2046.JPG

IIRC wiring access on the alternator was improved VS the original unit. IE: The terminal clocking was better for getting a wrench onto
 
remember I have headers to contend with and a factory oil cooler. There is very very little room for the harness to move. My 150 amp (or maybe it was a 143) just won't work well.
 
Joe has the factory oil cooler too (see his photo in post #29). Do the headers really affect the harness routing that much? You may need to route the wire different than stock, and/or bend the 90° end connector to make it clear everything.

:apl:
 
Affect the path?

The path to not rub on a motor mount etc is very close. You'll notice that when R&R the starter, that there is noticeably less room to get the wiring on/off the starter. Compared to my 034 the harness routing is harder. Granted, I realize where the 036 and 034 come through the bulkhead are different..


I'd just suggest to anyone doing the conversion, to make sure harness have room to without rubbing on the motor mount etc... I have a big stereo and though the upgrade would be goodness since a use alternator was cheap compared to reman. Instead, I rebuilt mine...
 
....

Part Numbers:
110A alternator: Bosch 0 123 545 004 (009 154 19 02)
150A alternator: Bosch 0 123 520 012 (010 154 83 02)

View attachment 44274
I had a hard time finding BOSCH branded new 0 123 520 012. (150 amp alternator). So, I did a little more digging.....
I believe this is also known as BOSCH AL0785X Remanufactured Alternator:


BTW for posterity's sake ---- one might wonder why the 2002 ML500 alternator is rated at 90 amps @ idle vs 60 amps @ idle for the w124 E500E's alternator (a 50% increase! .....

The answer might be because the 2002 ML500 used an electric engine fan - part number 163-500-03-93. Looking at this part from various pictures on ebay, it was rated @ 850W @ 13V .... as opposed to the w124.036's mechanical fan.

1706161994625.png
 
Last edited:
I had a hard time finding BOSCH branded new 0 123 520 012. (150 amp alternator). So, I did a little more digging.....
I believe this is also known as BOSCH AL0785X Remanufactured Alternator:
Yup! Mercedes 010-154-83-02 is Bosch aftermarket AL0785X, per this PDF:. Looks like I need to update the Bosch 10-digit numbers, apparently there are 2 different sets...

1706193088964.png
 
Yup! Mercedes 010-154-83-02 is Bosch aftermarket AL0785X, per this PDF:. Looks like I need to update the Bosch 10-digit numbers, apparently there are 2 different sets...

View attachment 182879
Thanks! So to be pedantic- AL0768X looks different from AL0785X ….. 768X has the extra blade terminal so stock with the 785X correct?
 

Attachments

  • IMG_2224.png
    IMG_2224.png
    1,018.3 KB · Views: 9
  • IMG_2225.png
    IMG_2225.png
    1.5 MB · Views: 9
Thanks! So to be pedantic- AL0768X looks different from AL0785X ….. 768X has the extra blade terminal so stock with the 785X correct?
It looks that way, yes. However, the extra blade terminal would not be used. I'm curious what that is for. Electrically, the 768 should be fine.

Note the rear of the 768 has a bulge, which could cause clearance issues depending on the clocking, and if you have an oil cooler installed. It would be interesting to open up the 768 and see what's under the cover. Might just be different venting vs the flat-back/vented 785?

:detective:
 
Back
Top