• Hi Guest !

    Welcome to the 500Eboard forum.

    Since its founding in late 2008, 500Eboard has become the leading resource on the Internet for all things related to the Mercedes-Benz 500E and E500. In recent years, we have also expanded to include the 400E and E420 models, which are directly related to the 500E/E500.

    We invite you to browse and take advantage of the information and resources here on the site. If you find helpful information, please register for full membership, and you'll find even more resources available. Feel free to ask questions, and make liberal use of the "Search" function to find answers.

    We hope you will become an active contributor to the community!

    Sincerely,
    500Eboard Management

M119 Cylinder Head Gasket and Timing Tips

JC220

🇮🇪 Resto Jedi 🔧OCD Zinc Plating Type
Member
Having just been rebuilding my replacement S500 m119 motor I wanted to add some tips and insight for others in the future.

Unfortunately I do not have time for a "How To" - these are more of pointers and experience that will be of use for anyone taking this job on or considering what is involved. It may encompass alot of areas but bear with me it will all be relevant.

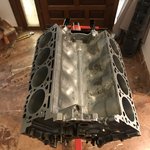
Firstly, why take the heads off?

I took them off this motor as when I was in the middle of replacing the valve stem oil seals in situ I encountered problems with valves leaking so much air I could not complete the work. The motor was already out and on a trolley so best time to get stuck now than encounter any issues AFTER the used motor would be installed in the car.

Head gasket failure on a m119 is rare from what I have read and dont take this job lightly unless you are experienced level DIYr and dont plan on needing the car any time soon! There are many items which should be/ must be replaced when completing this task. Such as;
  1. Timing chain, chain tensioner and all slide rails (left lower rail is only accessible by removal of the timing cover. Banana rail has a pin which allows it to be removed up and out with the timing cover on)
  2. Valve job
  3. 4x O ring seals behind the timing cover itself
  4. Radial oil seals in upper timing covers
  5. Cam magnet reseal or replacement (very common m119 oil leak)
  6. Ignition insulator cups (another m119 weak point)
  7. Crankshaft front and rear main oil seals
  8. Valve stem oil seals. Mine were hard as plastic and not making any sort of effective seal anymore. My experience is DO NOT attempt to replace valve stem oil seals on an m119 with the heads still on the block. Dont even think about trying it in the car at all since you will not be able to compress the valves. It is simply much, much too time consuming and taking the heads off and letting a machine shop do it is my preference.
  9. Head gaskets themselves obviously. They do degrade with age mine were delaminating and rusting when removed. Still serviceable but who knows for how long they are after all nearly 30 years old by now
  10. Oil separator valve and funnel
  11. Oiler tube seal rings and upgrade to metal version tubes if it doesn't already have it
  12. Intake manifold rubber gaskets and seal rings which can age harden and crack
  13. All PCV breather hoses, rubber tubes, and Tecalan (plastic) tubing
  14. Water pump & thermostat
  15. Consider late style belt tensioner upgrade (for early engines with manual tensioner)
  16. Oil pickup tube if timing cover comes off and the Oil Sender O ring.
  17. Suggest updated oil check valve also (for early engines)
(Yes, cam cover gaskets etc too I am concentrating on the heads and timing. This is not a comprehensive list)

Next will be tips on the heads themselves once removed.
 
Last edited:
More posts to come over the next few days so bear with me. All info will be here and it should be worth waiting for. WIS docs will be linked as appropriate and again, do give me some time to complete my rambles :scratchchin:

I will pick up from installing the timing cover and heads through to timing up the engine. Anyone can take a motor apart after all - it's getting to back together correctly without re-doing tasks multiple times that's more difficult!
 
Timing Cover:

Taking the timing cover off is in involved job. What complicates it somewhat is that the Oil Pump must be removed before the timing cover will come off. This means the upper sump pan really needs to come off for access. For these reasons it's better to have the motor out for this depth of work.

With the upper sump pan off, the Oil pump is held by 3x bolts one of which also clamps the oil pump drive chain tensioner which is simply a U shaped spring bracket. The tricky part next is that the Oil Pump drive chain remains around the nose of the crank so you can't pull the timing cover straight out. Instead, you have to wriggle the timing cover in a downwards and outwards direction and get it clear of the oil pump drive chain.

Now you have access for 2x things only possible when the timing cover is off:
  • The large chain slider rail seen on the right of the photo below.
  • The ability to install a 1x piece IWIS timing chain like I did. Highly advisable since you don't then have to buy a chain crimp tool and worry about the "weakest" link ever coming apart. Instead you have a one piece factory manufactured chain which I prefer.
Note the left side "banana" shaped slide rail can be withdrawn upwards without pulling the timing cover. But this is opportune to renew it now too with full ready access.

20191027_195908.jpg

I cleaned up the timing cover using my ultrasonic cleaner and also fitted a new oil pump slide rail for good measure. There are 4x O rings which require renewal per my photo below:

20191027_195419.jpg

You should hold these in place with some RTV. This prevents them from falling out of place whilst installing the cover again. I have read of other members finding an O Ring after buttoning the whole thing up so don't forget to glue all 4x.

Now place the upper idler sprocket, new slide rails & timing chain into place and zip tie the chain as needed to stop it falling down. The banana rail pin goes in AFTER the rail is set in place. Don't try to force the rail on over the pin. Rail first, then knock the pin home. Use the specified sealant on the timing cover per WIS and set into place taking care to direct the oil pump drive chain into place.

The mistake I made here was not checking the timing chain could still move on the upper idler pulley. It got pinched so I had to take the cover off again. So before putting the bolts in do always make sure the timing chain can move freely and you will be good. Note that WIS lists all the bolt dimensions should you lose track of where they came from. Re-install the Oil Pump and Upper sump pan etc.

20191027_210020.jpg

Next part will be the cylinder heads.

I also upgraded to the late style tensioner and crank pulley at this same time. The late style crank pulley allows waterpump removal without taking the damper off. Note it needs a different centre bolt than the early style. If you want to change from 8 rib to 6 rib later belt tensioner do make sure your timing cover has the boss that you can tap as needed.

Note that for the new Oil Sender O ring installation it won't go in with the crank set at 45 BTDC. So change that seal ring now too before proceeding.
 

Attachments

Last edited:
Joe, how large is your ultrasonic cleaner!? Make/model? I apparently need one of those!

:woot:

My brother loaned me his 30L Ebay one Dave. It is not big enough to take the cover or cam covers for example in one go fully submerged. So not strictly per manual you can dunk one half first then after 30mins or so turn the part around and do the other half. Works a charm for me! Larger cleaners are ££££
 
Brilliant write up for pointers! I'm rebuilding a 119.972 from a 1995 SL500. I have run into a supply issue, the exhaust valves are not available through aftermarket or mercedes! I'll consider importing if there is a supply available stateside?
 
Hi. Please keep us posted your comments are very helpful. I am doing the same thing plus main and conrod bearings.

Where did you get the valve spring compressor from and what type is it?

My head and block are covered in old head gasket that is very hard to remove. Did you get your heads or block skimmed or decked to clean / flatten them or did you just do a basic clean yourself?

Did you remove just the rear crankshaft seal or the whole metal cover that it fits into. I am a bit concerned about getting the correct liquid gasket for the rear cover so it holds the oil pressure from the main oil gallery that runs the length of the engine. The manual advises not to remove this cover but you have to to remove the main bearing cap. Just wondering what you did.

Any advice on how much liquid gasket to use on the timing chain cover?

What year does the later crankshaft pulley start that allows easy water pump removal. What shall I ask the parts guy for?

Careful with your Alusil aluminum cylinder bores they are ultra delicate. No sandpaper or anything remotely abrasive or corrosive. No lip removal.
 

Attachments

  • IMG_4259.JPG
    IMG_4259.JPG
    1.1 MB · Views: 28
Apologies for the delay there are a couple more posts coming on this thread in the coming days to finish it out!

I use a Sykes Pickavant Valve Spring compressor just like the one below.

https://www.ebay.co.uk/itm/Sykes-Valve-Spring-Compressor-for-Multivalve-Engine-0395000/310109731525

I cleaned the heads surfaces and block decks with a razor blade, scotchpad and brake cleaner myself. The Machine shop checked the heads and did not want to skim them as it was not required (More on that to come)

Note that I left the bottom end in my motor alone. But I did renew the rear crank radial seal and had the cover off. I used “The Right Stuff” gasket as suggested on the board before.

I did use the same sealant on the timing cover but MB suggest Anaerobic sealant IIRC so do check WIS on what MB advise on and decide yourself. I just applied a thin smear and assembled the cover no need to go nuts with the sealant.

Correct on the bores – easy does it and no strong solvents either.

Ref the late style waterpump pulley you require the late style crank pulley AND the solid one piece centre bolt. Note that the late style crank is 6 rib belt so if your m119 is an earlier 8 rib engine you may have to change all pulleys so not so easy as it first appears! Not sure of the part numbers but EPC should easily turn it up for the pulley and bolt. But really if going that route it would be most cost effective to salvage all 6 rib parts from another used motor and use the better belt tensioner too.
 
Sorry for the late reply. I’m still at it slowly but surely trying not to make mistakes.

Very helpful knowing that you didn’t skim the head. I think these heads straighten themselves out when you bolt them down so not necessary to skim them unless you have a previous existing known problem. Very easy for a machinist to mess a skim up so best avoided unless absolutely necessary. I am collecting a piece of glass today (flat surface) that I will glue sandpaper on and give the head a light resurface just to remove what’s left of the old gasket.

Thanks for the o ring sender reminder which I had forgotten about.

Very hard to get main crankshaft bearings and valve guides for this engine now both original or aftermarket. You might see them listed but forget it when you try and order them. I am being forced to use a main centre bearing from Mercedes that is 0.01mm too small because this is the only bearing I can find worldwide! The only main centre bearing available now is standard size code blue and that’s it! Regrind sizes are no longer available.
Shocking considering how many of theses engines they made. So don’t remove your crankshaft unless absolutely necessary!! It cost 2000 euros (with 18.5% discount) for Conrod bearings, crankshaft bearings and valve guides from Mercedes. I had to ask for 4 dealers before said they were available at
all.

I don’t suppose you remember which permatex gasket type you used for the rear cover as there are several on offer?

I am not going to change the piston rings because they are chrome and harder than the cylinder bores so very unlikely to wear. They also cost lots. I am worried about new ones seating properly. I am going to use a basic (no friction inhibitors) 30sae non synthetic oil to run the engine in to help re seat the old rings in the Alusil bores). They always used to use a special oil to run these engines in for the first 500 miles 25 years ago.. Special oil is still available from most oil companies just for running engines in..

Did you finish yours?
 

Attachments

  • 267DBB83-E33F-4A15-A4B9-68F0A48A8F51.png
    267DBB83-E33F-4A15-A4B9-68F0A48A8F51.png
    3.6 MB · Views: 22
Sorry for the late reply. I’m still at it slowly but surely trying not to make mistakes.

Very helpful knowing that you didn’t skim the head. I think these heads straighten themselves out when you bolt them down so not necessary to skim them unless you have a previous existing known problem. Very easy for a machinist to mess a skim up so best avoided unless absolutely necessary. I am collecting a piece of glass today (flat surface) that I will glue sandpaper on and give the head a light resurface just to remove what’s left of the old gasket.

Thanks for the o ring sender reminder which I had forgotten about.

Very hard to get main crankshaft bearings and valve guides for this engine now both original or aftermarket. You might see them listed but forget it when you try and order them. I am being forced to use a main centre bearing from Mercedes that is 0.01mm too small because this is the only bearing I can find worldwide! The only main centre bearing available now is standard size code blue and that’s it! Regrind sizes are no longer available.
Shocking considering how many of theses engines they made. So don’t remove your crankshaft unless absolutely necessary!! It cost 2000 euros (with 18.5% discount) for Conrod bearings, crankshaft bearings and valve guides from Mercedes. I had to ask for 4 dealers before said they were available at
all.

I don’t suppose you remember which permatex gasket type you used for the rear cover as there are several on offer?

I am not going to change the piston rings because they are chrome and harder than the cylinder bores so very unlikely to wear. They also cost lots. I am worried about new ones seating properly. I am going to use a basic (no friction inhibitors) 30sae non synthetic oil to run the engine in to help re seat the old rings in the Alusil bores). They always used to use a special oil to run these engines in for the first 500 miles 25 years ago.. Special oil is still available from most oil companies just for running engines in..

Did you finish yours?

Ref the head - note that I had mine checked for flatness by my machine shop who gave it the all clear. You must check the head flatness using a engineer's straight edge and feeler gauges per spec in FSM. (Don't rely on bolts to pull a potentially warped head flat that doesn't work)

Have you tried Autodoc for the bearings? They show stock on several sizes from reputable brands at a fraction of your costs above. I didn't touch the bottom end in this m119 and it is now running fantastic!

Autodoc would do the valve guides too. However, most machine shops can have your original guides lined with Bronze (IIRC) which also can be precisely suited to your valve stems. (Possibly worn) This is typically more cost effective too VS buying new guides. Do have a machine shop check your valve guides first, they may not require replacement as was the case with mine. And of course it goes without saying to install new valve stem oil seals!!

I used Permatex "The Right Stuff" black engine sealant on the rear cover. Fully synthetic oil, 6 months later and not a drip.
 
Last edited:

Who has viewed this thread (Total: 3) View details

Who has watched this thread (Total: 1) View details

Back
Top