Navigation
Install the app
How to install the app on iOS
Follow along with the video below to see how to install our site as a web app on your home screen.
Note: This feature may not be available in some browsers.
More options
Style variation
-
Hi Guest !
Welcome to the 500Eboard forum.
Since its founding in late 2008, 500Eboard has become the leading resource on the Internet for all things related to the Mercedes-Benz 500E and E500. In recent years, we have also expanded to include the 400E and E420 models, which are directly related to the 500E/E500.
We invite you to browse and take advantage of the information and resources here on the site. If you find helpful information, please register for full membership, and you'll find even more resources available. Feel free to ask questions, and make liberal use of the "Search" function to find answers.
We hope you will become an active contributor to the community!
Sincerely,
500Eboard Management
You are using an out of date browser. It may not display this or other websites correctly.
You should upgrade or use an alternative browser.
You should upgrade or use an alternative browser.
OWNER MikeinTampa
- Thread starter MikeinTampa
- Start date
Re: Hurricane Irma
Just a quick update, picked up the 930 from the shop on Friday and had it transported to the new house as a precaution. Both girls are tucked in and ready to ride out the storm. Looks like the storm is weakening a little as it's entering Ft. Myers but it's definitely headed directly for Tampa. As for the family, I didn't feel comfortable riding out the storm with my 2yr old son so decided to play it safe and evacuate to ease my anxiety. We headed out early Saturday morning and took a nice road trip a bit out west to Jackson Mississippi. I was not able to get either house boarded up so we're hoping for the best. If there's any damage I'm hoping it's minimal..


Just a quick update, picked up the 930 from the shop on Friday and had it transported to the new house as a precaution. Both girls are tucked in and ready to ride out the storm. Looks like the storm is weakening a little as it's entering Ft. Myers but it's definitely headed directly for Tampa. As for the family, I didn't feel comfortable riding out the storm with my 2yr old son so decided to play it safe and evacuate to ease my anxiety. We headed out early Saturday morning and took a nice road trip a bit out west to Jackson Mississippi. I was not able to get either house boarded up so we're hoping for the best. If there's any damage I'm hoping it's minimal..


Attachments
Any updates here fellas?
I'm keeping in touch with my neighbor.. so far just a lot of wind and rain but nothing too extreme. Power is cutting off and on. Must be off again because I can not access my cameras.
Re: Hurricane Irma
UPDATE: We were very fortunate that the storm shifted to the east of Tampa and we got the weaker side of it, as it was weakening. Mostly some trees down and power outages in my area. New neighbor texted me saying neighborhood is good, no damage but just lost power this morning so the house and cars must be ok. Heading back tomorrow, hoping traffic and fuel won't be a major issue. Looks like Tampa was extremely lucky, wish I could say the same for our lower counties.
UPDATE: We were very fortunate that the storm shifted to the east of Tampa and we got the weaker side of it, as it was weakening. Mostly some trees down and power outages in my area. New neighbor texted me saying neighborhood is good, no damage but just lost power this morning so the house and cars must be ok. Heading back tomorrow, hoping traffic and fuel won't be a major issue. Looks like Tampa was extremely lucky, wish I could say the same for our lower counties.
New shift knob finally came in yesterday from Jerry at formymercedes.com. The factory messed up and sent him a smooth leather knob instead of the perforated leather. I ended up having to wait over 8 weeks to get it but it was well worth the wait. I installed it today and I'm very happy with it.
Attachments
Good Looking "Lady" and Yes, Tampa Area was very Lucky with "Irma".. keep us updated on your Cars!
And Hello from Weeki Wachee
Are you next Time @ Reeves - Cars & Coffee?
Thank you and hello! I went to Weeki Wachee a few weeks ago. I love the river! I live only 5 minutes from reeves so I will most likely go to the next cars and coffee gathering.

Very nice cars you have !, love that silver on the 124. Congrats !
Thank you!
Got a box of ignition parts from AutohausAZ. I'm going to be replacing the distributor caps, dust caps, rotors, and rotor adapters hopefully some time today. New plugs will come next and maybe the cables as well depending on how they look. The car has a slightly rough idle and when I start the car when it's hot the engine jerks a few times like a bad misfire and as I drive it stays fine for the most part other than a slight shake at idle and low idle rpms (500-550?). Hopefully these parts will help as I removed the old caps and rotors to inspect last week and they did look a bit rough especially around the center of the rotors. Will post pics of the old parts after I remove them again. Any tips or tricks when it comes to changing these parts? Is it good to use dielectric grease on any part of the distributor cap inside or out and/or rotor? Or is it best to leave everything dry?


I see Uro parts in that box... PLEASE do not use those! Or any Uro parts, for that matter. You should not need to change the rotor brackets anyway. The Bosch stuff is good to go. Click here for a list of who is naughty and who is nice.
No need for dielectric grease is needed anywhere except maybe a tiny amount to help the wire boots slide on to the cap. I don't use any grease but that's just me. Main trick is when removing the old rotors to never use a ball-end 3mm driver to avoid rounding off the socket-head bolts. I like to use a SMALL amount of blue Loc-Tite on the single center bolt that holds the rotor bracket to the cam sprocket, and on the 3 small bolts which attach the rotor to the bracket. No need for anything on the cap bolts. Make sure to number the plug wires before removal, or move 1 wire at a time, to avoid getting the sequence wrong.

No need for dielectric grease is needed anywhere except maybe a tiny amount to help the wire boots slide on to the cap. I don't use any grease but that's just me. Main trick is when removing the old rotors to never use a ball-end 3mm driver to avoid rounding off the socket-head bolts. I like to use a SMALL amount of blue Loc-Tite on the single center bolt that holds the rotor bracket to the cam sprocket, and on the 3 small bolts which attach the rotor to the bracket. No need for anything on the cap bolts. Make sure to number the plug wires before removal, or move 1 wire at a time, to avoid getting the sequence wrong.

Ugh! Yeah, that is misleading. I believe the only rotor brackets affected were phased out of production before the first 500E rolled into USA. I've never seen or even heard of the old/bad rotor bracket out in the wild...Thanks Dave, appreciate the info. As always. The only reason I ordered the brackets is because of the fact that they make it look like you need them in the description next to the rotor. (See photo)

Ugh! Yeah, that is misleading. I believe the only rotor brackets affected were phased out of production before the first 500E rolled into USA. I've never seen or even heard of the old/bad rotor bracket out in the wild...

Thanks, I will check the old brackets as well and make sure they're not URO's either.
I had a little bit of time today so I got all of the old ignition parts off. The rotor brackets on the car appear to be original parts so I will not be replacing them. I took some pics of the old ignition parts showing the condition they are in. I also noticed oil inside the driver's side distributor cap, after removing the dust cap I could clearly see where the oil is leaking from. Is this common and is it a easy fix? Old ignition parts are all Bremi. (pics below)


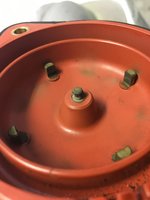


Here are some pics of the new Bosch parts:


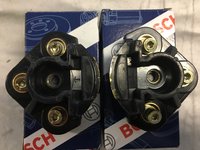
Here are some comparison shots between the rotors. Bremi (left) and Bosch (right):

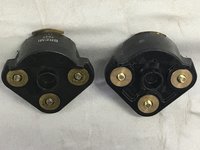
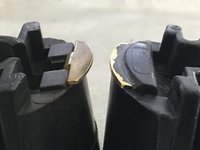
I should have some time tomorrow to get the new parts installed, hopefully will idle a bit smoother. Also, do all of the bosch rotors have the contact area painted on top? I noticed some loose paint which was flaking off easily with my finger nail so I took a piece of sandpaper and smoothed the loose edge bit. (Last photo above)


Here are some pics of the new Bosch parts:


Here are some comparison shots between the rotors. Bremi (left) and Bosch (right):


I should have some time tomorrow to get the new parts installed, hopefully will idle a bit smoother. Also, do all of the bosch rotors have the contact area painted on top? I noticed some loose paint which was flaking off easily with my finger nail so I took a piece of sandpaper and smoothed the loose edge bit. (Last photo above)
Last edited:
Make sure the oil leak is actually from the camshaft seal... oil can also collect on the bottom of the distributor cap from a leak at the cam advance solenoids, which is MUCH more common than the seal leaking behind the distributor insulator.
Got a photo of the leak?

Got a photo of the leak?

I see Uro parts in that box... PLEASE do not use those! Or any Uro parts, for that matter. You should not need to change the rotor brackets anyway. The Bosch stuff is good to go. Click here for a list of who is naughty and who is nice.
No need for dielectric grease is needed anywhere except maybe a tiny amount to help the wire boots slide on to the cap. I don't use any grease but that's just me. Main trick is when removing the old rotors to never use a ball-end 3mm driver to avoid rounding off the socket-head bolts. I like to use a SMALL amount of blue Loc-Tite on the single center bolt that holds the rotor bracket to the cam sprocket, and on the 3 small bolts which attach the rotor to the bracket. No need for anything on the cap bolts. Make sure to number the plug wires before removal, or move 1 wire at a time, to avoid getting the sequence wrong.

What? I like all that.
Also, a tiny dip of valve grinding compound or similar fluid/grease abrasive on the male allen socket along with some tapping of the socket into the bolt will ensure removal of the allens without rounding out. Obviously, you need to be careful with a good clean up if re-using the allen bolts, or anything else you contaminate with the abrasive...

Last edited:
Make sure the oil leak is actually from the camshaft seal... oil can also collect on the bottom of the distributor cap from a leak at the cam advance solenoids, which is MUCH more common than the seal leaking behind the distributor insulator.
Got a photo of the leak?

The CAS is actually dry on the drivers side, which is the side pictured with the oil leak. The CAS on the passenger side however does appear to have oil residue collecting all around it but the distributor parts were dry on that side.
What? I like all that.
Also, a tiny dip of valve grinding compound or similar fluid/grease abrasive on the male allen socket along with some tapping of the socket into the bolt will ensure removal of the allens without rounding out. Obviously, you need to be careful with a good clean up if re-using the allen bolts, or anything else you contaminate with the abrasive...

Luckily they all came out without any issues. The new parts came with all new bolts and the new Bosch rotors now have 4mm allen screws instead of 3mm which makes them a bit stronger.. I think.
Luckily they all came out without any issues. The new parts came with all new bolts and the new Bosch rotors now have 4mm allen screws instead of 3mm which makes them a bit stronger.. I think.
3mm is not the Standart Size on M5 Allen Screws.. 4mm is! 3mm is smaller and they used soft screws too.. I replaced them directly on any engine to standart ones
The CAS is actually dry on the drivers side, which is the side pictured with the oil leak. The CAS on the passenger side however does appear to have oil residue collecting all around it but the distributor parts were dry on that side.
Change CAS on both sides and reseal the cam advance solenoids, then your are safe for a long time! And way easier, if you have anyway everything out already..
Last edited:
WOW - seriously? Bosch finally figured out they screwed up and fixed something? 4mm socket heads is awesome. Just don't over-tighten (that's where the dab of blue threadlock is handy).Luckily they all came out without any issues. The new parts came with all new bolts and the new Bosch rotors now have 4mm allen screws instead of 3mm which makes them a bit stronger.. I think.

Change CAS on both sides and reseal the cam advance solenoids, then your are safe for a long time! And way easier, if you have anyway everything out already..
Post #24 in the thread below shows what was done less than 5 years ago. That would explain why the driver's side CAS is dry but don't know why the cam seal would be leaking. What's the method for repairing that cam seal?
http://www.500eboard.com/forums/showthread.php?t=3593
Unless there is a clear trail of wet oil coming down from the cam seal, they probably are not leaking.Post #24 in the thread below shows what was done less than 5 years ago. That would explain why the driver's side CAS is dry but don't know why the cam seal would be leaking. What's the method for repairing that cam seal?
http://www.500eboard.com/forums/showthread.php?t=3593
If they are leaking, it will look similar to the photos in post #1 at this thread - note the seal itself is wet and oily, as is everything else around the seal:
http://www.500eboard.com/forums/showthread.php?t=5897

Unless there is a clear trail of wet oil coming down from the cam seal, they probably are not leaking.
If they are leaking, it will look similar to the photos in post #1 at this thread - note the seal itself is wet and oily, as is everything else around the seal:
http://www.500eboard.com/forums/showthread.php?t=5897

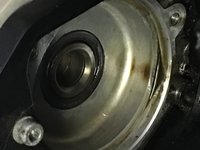
To me that's what it looks like. I had wiped off the area less than a week ago when I first removed the ignition parts to inspect. Drove the car a couple times and a week later this is what it looked like yesterday when I took all the parts out again.
Attachments
D'oh! Yeah... that does look like the seal is failing.To me that's what it looks like. I had wiped off the area less than a week ago when I first removed the ignition parts to inspect. Drove the car a couple times and a week later this is what it looked like yesterday when I took all the parts out again.
...The reason I like the R1C rotors is because I've been using them on my full size SUV for quite a few years.
I purchased a complete R1 Concepts package (drilled/slotted rotors + pads) for my daily driver SUV many years ago (I've been looking, but haven't found the receipt yet, so I can't confirm purchase date or provided brake pad material type...although I know the price was right). The rotors were manufactured in California. I think I purchased them via ebay. They are clean & look good. The fronts are still on my SUV. Rear left rotor somehow warped while hill driving under damp conditions (drove thru a big puddle after a long downhill). The rears were replaced with OE.
Overall, I've been happy with them, but after all these years of trial & error rotor/brake pad testing, I feel OE cast iron rotors & matching sintered pads provide the best/most responsive braking capability (although more dirty/heavy than alloy & ceramic combos).

I removed the camshaft seal today. Came off pretty easily without any major issues. The seal appears to be fairly new. It's a mystery to me why the drivers side is leaking and the pass side is dry. I do notice one little tiny detail. While I was looking at the cam with the seal out, it appears as if the cam may be just slightly out of center and may be a fraction of a mm off to the left side. Is that possible? It is a little more noticeable in person than in the photo below.


Only other thing I can think of is maybe cleaning up the cam surface with some fine grit sandpaper. It doesn't look very clean or shiny. As I mentioned earlier, the seal looked fairly new and I don't know what else would have caused the leak.. unless it wasn't installed properly. (Pics of old seal and cam surface below)
Attachments
Ordered new seals today from MB. I got 2 just in case, I should have them in the morning. Should I clean the cam surface with fine grit sandpaper before installing the new seal or is that not recommended?
Re: Tail lights
That could possibly be from the small flathead screwdriver I used to pry it out.
It looks like the seal may have some cracking at about 11 o'clock and again at top.
Drew
That could possibly be from the small flathead screwdriver I used to pry it out.
Mercedes dealer just called, the seals are ready to pick up. Hoping this won't be a persistent cam seal leak. Will be stopping by the hardware store as well to pick up a few washers and a bolt to make a homemade tool using a socket a fellow mechanic friend provided me. Will post some pics later when I get back to work on it. If anyone knows of any helpful tips when installing these cam seals feel free to chime in. Thanks
Luckily they all came out without any issues. The new parts came with all new bolts and the new Bosch rotors now have 4mm allen screws instead of 3mm which makes them a bit stronger.. I think.
CORRECTION: I was wrong about the allen screws on the new rotors. They appeared to be slightly larger and I thought they were 4mm but they are actually 3mm 8.8.
Thanks for confirming, Mike. I had found the same thing... the Bosch rotor Allen bolt socket heads are slightly larger than 3mm, but smaller than 4mm. I was never able to find any Allen wrench that fit tightly. Just make sure to never, ever use a ball-end wrench when torqeing down or breaking loose (ok for spinning them in/out though).CORRECTION: I was wrong about the allen screws on the new rotors. They appeared to be slightly larger and I thought they were 4mm but they are actually 3mm 8.8.
Interestingly, the factory OE/Genuine rotors are made by Doduco (also available reboxed as Beru brand) use an Allen bolt socket head that fits a 3mm wrench tightly.

Camshaft Seal Update
I installed the new seal on Saturday, installation was pretty straightforward and my home made tool worked excellent. I applied a little bit of grease on the inside surface of the seal and it slipped over the cam easily, then I sused the tool to slowly press the seal in.
View attachment 68570 View attachment 68574 View attachment 68571 View attachment 68572 View attachment 68573
After installing the seal I could see what may or may not be an issue. As I mentioned earlier, it appeared to me that the cam looked slightly off center. After I installed the seal it looked to me as if one side of the seal was pressing against the cam shaft slightly more than the other. I took a close up photo (below) which shows what I'm talking about. If you look closely, it appears as if theres a slightly larger gap on the cam surface on the right side. I hope this will not be the dreaded cam seal leak as I've seen others have before. I will drive the car a few more times this week and re-inspect the seal next Saturday.
View attachment 68575
Attachments
Last edited:
Mike, your home-made tool is awesome. What size socket did you use?
I hope it's just an optical illusion but it does appear the cam sprocket is off-center in the seal. If so, that is almost guaranteed to leak. The only explanation I can think of is that the dowels are missing between the front head cover and the cylinder head. See attached photos for the 2 dowel (roll pin) locations. Bad news is you have to pull the valve cover AND front cover to check this.

I hope it's just an optical illusion but it does appear the cam sprocket is off-center in the seal. If so, that is almost guaranteed to leak. The only explanation I can think of is that the dowels are missing between the front head cover and the cylinder head. See attached photos for the 2 dowel (roll pin) locations. Bad news is you have to pull the valve cover AND front cover to check this.
Attachments
Mike, your home-made tool is awesome. What size socket did you use?
I hope it's just an optical illusion but it does appear the cam sprocket is off-center in the seal. If so, that is almost guaranteed to leak. The only explanation I can think of is that the dowels are missing between the front head cover and the cylinder head. See attached photos for the 2 dowel (roll pin) locations. Bad news is you have to pull the valve cover AND front cover to check this.

1 3/16" socket. Appreciate the info about the front cover, hoping I won't have to go there.
CEL
My came on a couple of months ago. Since then, I have reset the codes about 3 or 4 times and it would come back on after driving the car a couple of times. The blinky light thingy in the engine compartment would blink 4 times. I purchased a new 02 sensor a couple of weeks ago but haven't installed it yet. The last time I reset the code was about 2 weeks ago and the CEL has NOT come back on since.. ?? What do 4 blinks mean? Should I install my new 02 sensor or save it for later?
My
 came on a couple of months ago. Since then, I have reset the codes about 3 or 4 times and it would come back on after driving the car a couple of times. The blinky light thingy in the engine compartment would blink 4 times. I purchased a new 02 sensor a couple of weeks ago but haven't installed it yet. The last time I reset the code was about 2 weeks ago and the CEL has NOT come back on since.. ?? What do 4 blinks mean? Should I install my new 02 sensor or save it for later?
The full code list is available in the PDF attached to the first post in this thread.
Anyway - code 4 is for the air/smog pump. If the pump is running at a cold start, check all the vacuum tubing from the engine, to the solenoid on the fender, and back to the air valve at the pump. None of this affects engine function or power, it's primarily affecting emissions after a cold start. The O2 sensor is probably fine, but if it's old a new one is always a good idea.

Anyway - code 4 is for the air/smog pump. If the pump is running at a cold start, check all the vacuum tubing from the engine, to the solenoid on the fender, and back to the air valve at the pump. None of this affects engine function or power, it's primarily affecting emissions after a cold start. The O2 sensor is probably fine, but if it's old a new one is always a good idea.


