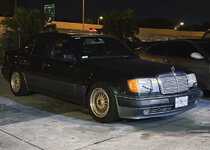
The mounts also look pretty cracked, sounds like a good time to just refresh and replaceBTW... you may want to look into some longer carriage bolts for the strut mounts. It looks like very few threads are holding that together!
Navigation
Install the app
How to install the app on iOS
Follow along with the video below to see how to install our site as a web app on your home screen.
Note: This feature may not be available in some browsers.
More options
Style variation
-
Hi Guest !
Welcome to the 500Eboard forum.
Since its founding in late 2008, 500Eboard has become the leading resource on the Internet for all things related to the Mercedes-Benz 500E and E500. In recent years, we have also expanded to include the 400E and E420 models, which are directly related to the 500E/E500.
We invite you to browse and take advantage of the information and resources here on the site. If you find helpful information, please register for full membership, and you'll find even more resources available. Feel free to ask questions, and make liberal use of the "Search" function to find answers.
We hope you will become an active contributor to the community!
Sincerely,
500Eboard Management
You are using an out of date browser. It may not display this or other websites correctly.
You should upgrade or use an alternative browser.
You should upgrade or use an alternative browser.
OWNER ArauzMotoring
- Thread starter ArauzMotoring
- Start date
Erick - how long did that shop have your car for? And, your bill probably was more than $8-$10,000?
I had such a subpar, embarrassingly bad experience with that very same shop (while your car was there) during the time Michel was working on mine also. Not sure how they remain in business but it seems that after spending so much time with the car and the presumably (and similar to mine - ridiculously) high bill, that these sorts of issues should have been addressed by them before giving you the car back?
If nothing else, they are consistent. They deceived me in work they were meant to do, lied to me on work they said they did, and billed me for unnecessary work - I’m sure I’m forgetting more creative ways to tell everyone they are shit, but you get the picture. And… despite having blown so much money (and time) with your car at that shop, as hard and difficult as it sounds, my advice is for you to quickly move on to someone else more honest.
I am sorry for the fact you went through tough times there. This car has been an embarrassing lesson for me. I was billed over 14k the first time and that was from me bringing my 500e with the engine in the car, albeit in pieces. So they essentially had to rebuild a puzzle for me. What grinds my gears is the fact that after the put the car together, the massive oil leak that ensued and the additional bill for 8k to have the heads removed, re done and new head gaskets installed..Erick - how long did that shop have your car for? And, your bill probably was more than $8-$10,000?
I had such a subpar, embarrassingly bad experience with that very same shop (while your car was there) during the time Michel was working on mine also. Not sure how they remain in business but it seems that after spending so much time with the car and the presumably (and similar to mine - ridiculously) high bill, that these sorts of issues should have been addressed by them before giving you the car back?
If nothing else, they are consistent. They deceived me in work they were meant to do, lied to me on work they said they did, and billed me for unnecessary work - I’m sure I’m forgetting more creative ways to tell everyone they are shit, but you get the picture. And… despite having blown so much money (and time) with your car at that shop, as hard and difficult as it sounds, my advice is for you to quickly move on to someone else more honest.
And now the reman alternator I hope to have ny trusted mechanic do some of the suspension work and intent on finding a more reasonable shop for the subframe mount bushings, diff install, perhaps going through with a fsg valve body swap.
Hey all!
About a year ago, my car started mis firing and I took it to the shop which fixed the car for me, they fixed an exhaust leak and diagnosed a heavily leaking camshaft solenoid..
I ended up previously having to buy a drivers side engine cover with a camshaft solenoid already installed- so I suspected it’s the passenger side one that’s leaking..
I finally got around to searching and I found the threads here about opening up my factory one and resealing it, but I figured I might as well get a new one.
I found the parts on pelican parts- and being pressed for time I figured I could get the armatures and the needed bolts for the new style magnet locally, but those are 10 days out…

My car has been sitting in a garage getting super dusty and im glad I’m finally able to fix it up again.
I need x2 #111-051-00-43-MBZ
And x2 #104-990-10-04-MBZ
I was also wondering what other gaskets I may need for my mechanic to have the ability to dive into this job once.. lol
About a year ago, my car started mis firing and I took it to the shop which fixed the car for me, they fixed an exhaust leak and diagnosed a heavily leaking camshaft solenoid..
I ended up previously having to buy a drivers side engine cover with a camshaft solenoid already installed- so I suspected it’s the passenger side one that’s leaking..
I finally got around to searching and I found the threads here about opening up my factory one and resealing it, but I figured I might as well get a new one.
I found the parts on pelican parts- and being pressed for time I figured I could get the armatures and the needed bolts for the new style magnet locally, but those are 10 days out…

My car has been sitting in a garage getting super dusty and im glad I’m finally able to fix it up again.
I need x2 #111-051-00-43-MBZ
And x2 #104-990-10-04-MBZ
I was also wondering what other gaskets I may need for my mechanic to have the ability to dive into this job once.. lol
The P/S reservoir has to come off to R&R the driver side cam solenoid, so you'll need that gasket. Mechanic will probably want a new O-ring for the pipe behind the reservoir too. If the short hose between reservoir and tandem pump is not new or recent, replace that at the same time - it's an incremental hour or so labor.
The front head covers do not have to come off, nor the valve covers, however it's NOT easy to hold the armature to allow torqueing the center bolt with the head covers in place. If your mechanic wants to remove both, add a few hours labor plus new OE valve cover gaskets.

The front head covers do not have to come off, nor the valve covers, however it's NOT easy to hold the armature to allow torqueing the center bolt with the head covers in place. If your mechanic wants to remove both, add a few hours labor plus new OE valve cover gaskets.

Thanks for that Dave!
My search based on your response led me to this thread which while I don’t think I need to do the whole R&R on the reservoir, I do want to get the aforementioned gaskets and hoses
Are they;
“Parts to order:
- 15mm ID hose 006-997-09-82 (however this comes up as $56 at mboempart.com!, I am ordering a meter of same part number Cohline hose for $15 at pelican parts.com
You only need a few inches of hose (Pelican part number: 006-997-09-82-M20)
- aluminum crush washer 007603-020100005-997-45-90
- gasket at base of reservoir tank 1294660180 (I use genuine Mercedes gasket, others have used the $4 generic version, MB gasket has addition rubber seal ring on perimeter).
GSXR edit: The Genuine gasket is $25-$30 from discount dealers. The low-cost aftermarket gaskets are now NLA. In a pinch, the old gasket can be re-used if undamaged. A tiny bit of Hylomar doesn't hurt on an old, or aftermarket/plain, gasket. If using a new OE/Genuine gasket, install it dry.
- reservoir return line O-ring: 1199970045” ?

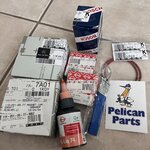
I received this stuff pretty quickly, now just to source the remaining parts so I can get my car towed.
I was also trying to figure out which set of wheel bolts to order for my BBS RS , stock bolts have an extended stud up top to fit at the edge of the factory wheels, I suspect these should fit?
Thanks again!
My search based on your response led me to this thread which while I don’t think I need to do the whole R&R on the reservoir, I do want to get the aforementioned gaskets and hoses
Are they;
“Parts to order:
- 15mm ID hose 006-997-09-82 (however this comes up as $56 at mboempart.com!, I am ordering a meter of same part number Cohline hose for $15 at pelican parts.com
You only need a few inches of hose (Pelican part number: 006-997-09-82-M20)
- aluminum crush washer 007603-020100
- gasket at base of reservoir tank 1294660180 (I use genuine Mercedes gasket, others have used the $4 generic version, MB gasket has addition rubber seal ring on perimeter).
GSXR edit: The Genuine gasket is $25-$30 from discount dealers. The low-cost aftermarket gaskets are now NLA. In a pinch, the old gasket can be re-used if undamaged. A tiny bit of Hylomar doesn't hurt on an old, or aftermarket/plain, gasket. If using a new OE/Genuine gasket, install it dry.
- reservoir return line O-ring: 1199970045” ?


I received this stuff pretty quickly, now just to source the remaining parts so I can get my car towed.
I was also trying to figure out which set of wheel bolts to order for my BBS RS , stock bolts have an extended stud up top to fit at the edge of the factory wheels, I suspect these should fit?
Mercedes Wheel Lug Bolt For Alloy Wheel Febi Bilstein 15655 000 990 48 07 4027816156550 000-990-48-07 000.990.48.07 0009904807 | Pelican Parts
Febi Bilstein Wheel Lug Bolt For Alloy Wheel. Call (310)626-8765. May Qualify For FREE SHIPPING. Parts# 000 990 48 07 000-990-48-07 000.990.48.07 0009904807 15655 4027816156550.
www.pelicanparts.com
Thanks again!
Last edited:
IIRC... it's not possible to remove the driver side cam magnet/solenoid with the PS reservoir in place. It's not difficult to remove though, just a bit messy and time consuming.Thanks for that David! My search based on your response led me to this thread which while I don’t think I need to do the whole R&R on the reservoir, I do want to get the aforementioned gaskets and hoses
Yup, those are the correct numbers, AFAIK.Are they;
“Parts to order:
- 15mm ID hose 006-997-09-82 ... You only need a few inches of hose (Pelican part number: 006-997-09-82-M20)
- aluminum crush washer 007603-020100005-997-45-90
- gasket at base of reservoir tank 1294660180
- reservoir return line O-ring: 1199970045” ?
For aftermarket wheels, first check if they require cone seat (most aftermarket use cone seat bolts), or OE-style ball seat. If ball seat, next is checking if they are R12 or R14 radius. You cannot interchange seat types. The bolts you list above are ball seat and may not work with the BBS wheels. If you need cone seat, I'd check out Otis Inc LA aftermarket offerings. I have some BBS RC wheels and these require cone seat bolts.I was also trying to figure out which set of wheel bolts to order for my BBS RS , stock bolts have an extended stud up top to fit at the edge of the factory wheels, I suspect these should fit?

My car has been down due to a badly leaking camshaft solenoid. Finally got the parts in and we are going with new oem plugs- however, the ones we removed had different numbers on the ceramic portion. New ones are the same?
Factory gap on the plugs are un even so we need to re gap them as well
I also bought a new one oil filter, and some fresh oil. (5w40)
Factory gap on the plugs are un even so we need to re gap them as well
I also bought a new one oil filter, and some fresh oil. (5w40)
Attachments
Gap each plug at 1.0-1.1mm
The plugs look correct for the application. They look like the correct and current French-made, factory, Beru plugs. The numbers on the ceramic portion of the plug don't matter a whit. What matters is the MB part number on the box, and the F8DC4 on the metal portion of the plug.
The oil is fine, although in your climate I'd prefer to see you use a 10W-40, 15W-40 or 20W-50 oil. 5W-40 is better for colder (more northern) climates, freezing/winter-time temperatures. Hopefully you also have a factory MB, Hengst, Mann or Mahle oil filter to go with that oil.
Thanks, Gerry!!Gap each plug at 1.0-1.1mm
The plugs look correct for the application. They look like the correct and current French-made, factory, Beru plugs. The numbers on the ceramic portion of the plug don't matter a whit. What matters is the MB part number on the box, and the F8DC4 on the metal portion of the plug.
The oil is fine, although in your climate I'd prefer to see you use a 10W-40, 15W-40 or 20W-50 oil. 5W-40 is better for colder (more northern) climates, freezing/winter-time temperatures. Hopefully you also have a factory MB, Hengst, Mann or Mahle oil filter to go with that oil.
Yes it’s an oem Mb oil filter!
The tech pulled the rotor, and the metal part behind it came out clean without un threading the bolt.
I’m going to swap my oil for vr1 racing 20-50 full synthetic oil.
Attachments
Last edited:

I guess the wheel bolts I got off eBay were too thick to even enter the 500E hub.
I had got them off eBay but the listing doesn’t state the physical dimensions of the lug bolt and I bought it cause they said it’ll work on the W124 lol
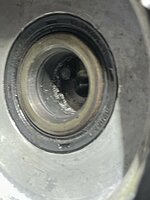
Here’s some metal shavings from motronix ignition system install two years ago. And my old cam magnets had a ton of sealant.
I algo had the center drag link replaced, along with two new accumulators and the rear H&R lowering springs installed.

The ride height adjustment thingy seems to be seized sadly.

Attachments
What wheels do you have? I prefer OE lug bolts and only use aftermarket if absolutely necessary. I'd also avoid eBay for those types of items where there's no specs, no brand name, and no COO.
What was the "motronix ignition system install"??
You can buy a new SLS turnbuckle (ride height adjustment thingy), 124-320-09-89, about $22 from discount dealers.
Looks like someone had used RTV on the cam solenoids previously? Only use anaerobic sealant when installing the new ones. And, don't forget the armature needs to be replaced if you are using the new-style (119- part number) solenoids.
I want to install these BBS RS I have with brand new tires they are 16x8 et 21What wheels do you have? I prefer OE lug bolts and only use aftermarket if absolutely necessary. I'd also avoid eBay for those types of items where there's no specs, no brand name, and no COO.
What was the "motronix ignition system install"??
You can buy a new SLS turnbuckle (ride height adjustment thingy), 124-320-09-89, about $22 from discount dealers.
Looks like someone had used RTV on the cam solenoids previously? Only use anaerobic sealant when installing the new ones. And, don't forget the armature needs to be replaced if you are using the new-style (119- part number) solenoids.
I believe they installed the new style armatures on both sides and I regretfully didn’t order new ignition components aside from a new ignition rotor (which I’m glad I got) so I placed an order for new distributor caps.
And what I meant by motronix ignition system install was that that was the shop that brought my car back to life - and I gave them brand new parts for the ignition system and it’s disheartening to find one of the components somehow either worked itself loose, or wasn’t torqued properly to begin with.
Edit* thanks for the PN for the turn buckle thingy! Haha
Attachments
Eeeek. Check the BBS wheels! These almost always use cone seat bolts, not ball seats. I have a set of BBS RC and those use cone seats with 28mm shank length.
After I had a rotor bracket bolt loosen and back out (destroying the cap, rotor, and locating pin)... I now apply a tiny dab of blue threadlock on the rotor bracket center bolt, and all three rotor bolts. If you buy new caps (Bosch only!), don't forget to add the extra vent slots before installing.

After I had a rotor bracket bolt loosen and back out (destroying the cap, rotor, and locating pin)... I now apply a tiny dab of blue threadlock on the rotor bracket center bolt, and all three rotor bolts. If you buy new caps (Bosch only!), don't forget to add the extra vent slots before installing.

That's an excellent weight for your climate, and the engine will appreciate the heavier oil.I’m going to swap my oil for vr1 racing 20-50 full synthetic oil.
Turns out the wheels are ball seat. The factory bolts fit perfectly so I guess the bolts I had previously ordered are m14 instead of m12

I’m happy with how the suspension is sitting now with the fixed accumulators! I would want to bring it down just a hair more to better match the drop on the front, but it looks a lot better than with the massive rake angle it had before.
The start up takes a few cranks and my friend suspects it’s due to the age of the dual fuel pumps.. I’ll probably get those some time soon.
I also ordered some proper lug studs I think should allow for the bbs center caps to fit!!
Wheel Accessories Parts Set of 20 Chrome 12x1.5 Lug Bolts Ball Seat (R12) 33mm Shank Length, M12 1.5 Thread, 17mm Hex Wheel Lug Bolts with Dual Hex Key (20, Chrome, M12x1.5)
Amazon.com
Attachments
Last edited:
Sounds good! You'll need to check how much the new lug bolts poke through the back of the wheel. There's no issue up front, but in the rear, there's a very small margin of error. If the bolts are too long on the rear wheels, they'll hit the parking brake mechanism. Test by turning the wheel by hand with the bolts snug... should turn freely. If not, you'll either need shorter lugs, or grind down what you have. Also make sure you have a minimum of 4-5 turns when threading in, and less isn't safe.


The lug bolts I picked up from Amazon were same shank length as one and they threaded in about 4-5 turns each. Super happy to finally have the center caps on, and the rear suspension working as it should!!

I also got the Bosch distributor caps (x2) and we intend to do the vent slots on them before installing them.

On another note, I have a CEL on, and I ordered the code reader off of eBay.
Also, we swapped out one of the fog light bulbs that I thought had died, i distinctly recall testing it while I was visiting the shop it both fog lights worked, however, at some point I saw that the passenger fog light wasn’t on, and then going to the back of the car i saw that the passenger side night time back lights weren’t on either- (brake lights and turn signals worked)
The cluster has a bad light warning when I turn on the lights and I noticed the rear passenger tail lamp has a few missing light bulbs so I need to figure out which ones to order.
Hope I can get to the bottom of these issues lol.

I also got the Bosch distributor caps (x2) and we intend to do the vent slots on them before installing them.

On another note, I have a CEL on, and I ordered the code reader off of eBay.
Also, we swapped out one of the fog light bulbs that I thought had died, i distinctly recall testing it while I was visiting the shop it both fog lights worked, however, at some point I saw that the passenger fog light wasn’t on, and then going to the back of the car i saw that the passenger side night time back lights weren’t on either- (brake lights and turn signals worked)
The cluster has a bad light warning when I turn on the lights and I noticed the rear passenger tail lamp has a few missing light bulbs so I need to figure out which ones to order.
Hope I can get to the bottom of these issues lol.
Attachments
Cold solder joints on the N7 Bulb Out Warning Relay can cause this issue. One of my foglights was intermittent ---- super frustrating ---- then I discovered that wiggling N7 back and forth cause the foglight to on/off/on/off ---- so I took out the N7, resoldered the joints, and now it works.Also, we swapped out one of the fog light bulbs that I thought had died, i distinctly recall testing it while I was visiting the shop it both fog lights worked, however, at some point I saw that the passenger fog light wasn’t on, and then going to the back of the car i saw that the passenger side night time back lights weren’t on either- (brake lights and turn signals worked)
Where is this N7 bulb out warning relay you speak of?Cold solder joints on the N7 Bulb Out Warning Relay can cause this issue. One of my foglights was intermittent ---- super frustrating ---- then I discovered that wiggling N7 back and forth cause the foglight to on/off/on/off ---- so I took out the N7, resoldered the joints, and now it works.
I was driving the car to an event and I noticed the AC vents were releasing mist that smelled off, to me..

I got the car towed, and came on here to search regarding what could be the cause of this and found it’s usually a hose that runs coolant from the back of the engine to the hvac heater core..

The new sls leveling turnbuckle
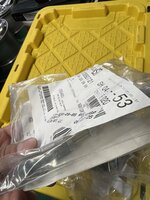
Oem front shock mounts (made in Turkey)

I also ordered two new Bosch fuel pumps

| Pin | System | Blinks | Diagnosis |
| 4 | LH-SFI (Engine Mgmt) | 8 | Intake Air Temp sensor fault – Possibly open or shorted; check MAF-integrated sensor |
| 5 | EA/CC/ISC (Throttle Control) | — | No codes – Normal. System likely functioning well after Don Roden’s ETA rebuild |
| 6 | EZL/AKR (Ignition/Knock) | 11 | Knock sensor fault or wiring issue |
| 7 | Knock Sensor (LH mirror) | 5 | Confirms possible detonation or sensor fault (mirrors Pin 6) |
| 8 | ABS/ASR – RR Wheel Sensor | 5 | Right rear wheel speed sensor signal fault |
| 16 | System Ping | 1 | Normal diagnostic response |
| 17 | Transmission/Range Switch | 6, then 18 | Output speed sensor or neutral safety switch misalignment |
| 19 | ATA/Central Locking | 12, 19, 22 | Rear door actuator failure, voltage irregularity, possible overload |
| 30 | ABS/ASR | 3, 8, 3 | Front wheel sensor fault and ABS hydraulic system fault (pump/valve) |
| All others | Various (Unused/Not Equipped) | — | No response – normal for your configuration |
Spent some time trying out my break out box and blink code light reader. I was typing into gpt as I was going and asked it to be a master Mercedes Benz tech and double check against codes
So do i apparently LOL
The hose was changed and the car was at my friends shop - he drove it around a bit and the coolant leak was solved or so it seemed.
One day I picked the car up to drive it to work, and admittedly, I did an Italian tune up and drove it to a Whole Foods market maybe 5 miles away and when I got back to my car I noticed a big puddle of water / coolant under the passenger side area behind the front tire..
I got to work, let the car cool down and at night started the engine and put some coolant in the reservoir, drove back to the shop and the light didn’t turn on again, and there wasn’t a noticeable puddle under the car- I do drive with AC though, and I notice after driving the car will drip some what looks like condensation on the ground- which I attribute to the AC being ran.
Fast forward to yesterday, I took the car for a drive to work so I can attend a meet later on in the day and my car drove nicely.


Funny enough, in the parking spot I chose - there was green coolant on the ground from another car- and my cars temperature was solid so I felt vindicated thinking maybe the system was over filled and that it somehow purged itself at Whole Foods- I went back to work for the evening, and after starting the car to go home again I noticed the coolant level light had turned on again and I turned the car off, let it cool down a bit before adding more coolant.
I drove home and parked and started checking where the leak was coming from but it’s hard to tell. I didn’t need to refill to drop it off back at my friends shop, but man I could’ve sworn I had changed all the coolant hoses.. lol
I took some videos that I may clip together to put on YouTube if it’ll help but it’s mostly looking under the car trying to see where the puddle is in relation to the car.
I noticed this on the hood pad and figure it couldn’t be some coolant ?
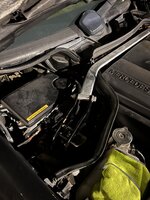

I’m still waiting for my friends work load to lighten up so he can install the rear sls turn buckle and adjust the ride height, but now he needs to add pressure test to see which of the hoses is leaking.
I also want to do the needed distributor cap slot mod, and figure out why my interior dash back lighting doesn’t turn on with the lights.. lol
I also bought some tail light bulbs ala wiki suggestion but one of the bulbs wouldn’t enter correctly and I saw the two prongs weren’t perfectly on each side - so I need to see if I can return them.. lol
And one of the light bulbs was lose in the slot and I realized that one of parts that would give it tension on the back/bottom was missing.
I also need to be better at reading the pdf in the diagnostics section to see why this morning my asr light turned on.. the pedal was not really responsive until about 1/4th down - idle was high and choppy at about 1000rpm - and the abs light didn’t turn on- although my cel is on..
Thanks for reading!!
One day I picked the car up to drive it to work, and admittedly, I did an Italian tune up and drove it to a Whole Foods market maybe 5 miles away and when I got back to my car I noticed a big puddle of water / coolant under the passenger side area behind the front tire..
I got to work, let the car cool down and at night started the engine and put some coolant in the reservoir, drove back to the shop and the light didn’t turn on again, and there wasn’t a noticeable puddle under the car- I do drive with AC though, and I notice after driving the car will drip some what looks like condensation on the ground- which I attribute to the AC being ran.
Fast forward to yesterday, I took the car for a drive to work so I can attend a meet later on in the day and my car drove nicely.


Funny enough, in the parking spot I chose - there was green coolant on the ground from another car- and my cars temperature was solid so I felt vindicated thinking maybe the system was over filled and that it somehow purged itself at Whole Foods- I went back to work for the evening, and after starting the car to go home again I noticed the coolant level light had turned on again and I turned the car off, let it cool down a bit before adding more coolant.
I drove home and parked and started checking where the leak was coming from but it’s hard to tell. I didn’t need to refill to drop it off back at my friends shop, but man I could’ve sworn I had changed all the coolant hoses.. lol
I took some videos that I may clip together to put on YouTube if it’ll help but it’s mostly looking under the car trying to see where the puddle is in relation to the car.
I noticed this on the hood pad and figure it couldn’t be some coolant ?


I’m still waiting for my friends work load to lighten up so he can install the rear sls turn buckle and adjust the ride height, but now he needs to add pressure test to see which of the hoses is leaking.
I also want to do the needed distributor cap slot mod, and figure out why my interior dash back lighting doesn’t turn on with the lights.. lol
I also bought some tail light bulbs ala wiki suggestion but one of the bulbs wouldn’t enter correctly and I saw the two prongs weren’t perfectly on each side - so I need to see if I can return them.. lol
And one of the light bulbs was lose in the slot and I realized that one of parts that would give it tension on the back/bottom was missing.
I also need to be better at reading the pdf in the diagnostics section to see why this morning my asr light turned on.. the pedal was not really responsive until about 1/4th down - idle was high and choppy at about 1000rpm - and the abs light didn’t turn on- although my cel is on..
Thanks for reading!!
That's limp mode. It will clear when you restart the car, but yes, you need to pull codes from pin #7 and get an idea what's causing limp mode.I also need to be better at reading the pdf in the diagnostics section to see why this morning my asr light turned on.. the pedal was not really responsive until about 1/4th down - idle was high and choppy at about 1000rpm - and the abs light didn’t turn on- although my cel is on..

Yes, I did restart the car more than once and the light stayed on. I will see when I get a chance to check the codes again- I also need to figure out how to clear the codes using my breaker box and light counter blip box..That's limp mode. It will clear when you restart the car, but yes, you need to pull codes from pin #7 and get an idea what's causing limp mode.
I’m really hoping it’s not the eta seeing as how I had Don Roden rebuild it for me! lol
Thanks for chiming in!!
Never trust Google for part numbers!  However in this case, Google is correct. All pre-facelift cars (500E) would use 000-141-79-25.
BTW, your photo is of the MAF, which sits on top of the ETA. Check the rubber boot that connects the two pieces. If it's old, it will be fossilized and need replacement. About $25 for a new one last time I checked. The rubber should be soft and pliable. Re-use the old clamps.

BTW, your photo is of the MAF, which sits on top of the ETA. Check the rubber boot that connects the two pieces. If it's old, it will be fossilized and need replacement. About $25 for a new one last time I checked. The rubber should be soft and pliable. Re-use the old clamps.

Thanks, Dave!Never trust Google for part numbers!However in this case, Google is correct. All pre-facelift cars (500E) would use 000-141-79-25.
BTW, your photo is of the MAF, which sits on top of the ETA. Check the rubber boot that connects the two pieces. If it's old, it will be fossilized and need replacement. About $25 for a new one last time I checked. The rubber should be soft and pliable. Re-use the old clamps.
I just realized that that part number stamped did bring up the MAF and the mesh screen on mine is sadly bent out of shape…
Edit I found this page

000 141 79 25 — Beckmann Technologies Mercedes Benz Parts
Re-manufactured 0001417925 Mercedes-Benz throttle actuator made by Beckmann Technologies! Want to learn more about our actuator reman process? Click here !
Also , the Beckmann page doesn’t have my PN listed but they have one real close to it lol
- 000 141 74 25
- 000 141 75 25
- 000 141 76 25
- 000 141 78 25
- 000 141 87 25
- 000 141 88 25
- 000 141 89 25
The usual guy who answers the phone isn’t there till Monday so I have some time to figure it out lol
Your MAF screen doesn't look too bad in the photo, but I can't see the whole thing. Often these are ripped or otherwise seriously damaged.I just realized that that part number stamped did bring up the MAF and the mesh screen on mine is sadly bent out of shape…
You can buy a new screen from MB, p/n 000-090-01-45, $41 MSRP, ~$30 from discount dealers.

In this post here I found that I had ordered a new one maybe four years ago.. haha hopefully it’s still relatively fresh considering I’ve driven the car maybe 6 months maybe hahahBTW, your photo is of the MAF, which sits on top of the ETA. Check the rubber boot that connects the two pieces. If it's old, it will be fossilized and need replacement. About $25 for a new one last time I checked. The rubber should be soft and pliable. Re-use the old clamps.


I picked up this ETA from eBay- from a local person of all places - who actually had it in stock.
No affiliation but his ratings seem pretty good so I’m hoping this one will last longer than my rebuilt one..

The mechanic sent me this picture:
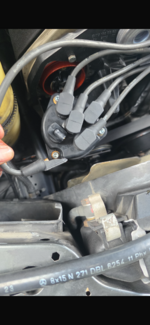
I guess the Beru wires don’t like being pushed in and pulled out more than a few times?
I shopped around and found I bought them in summer 2021 from partsgeek for about $206
I called to see if they have lifetime warranty like fcp does but they don’t.. so I spent $100 more to get that warranty. Hopefully won’t have to use it for a while.. lol.
I also bought new Bosch rotors and new cam shaft seals. I pointed my guy to the distributor cap slot tutorial- so hopefully he can do that for me as well.
Other things being fixed are the :
Passenger side window.
The coolant leak from the passenger side firewall area.
Excited to drive this car again!!
Yikes. Someone got hamfisted with that wire. The boots "stick" to the cap tightly, you must twist them loose first, then gently pry off from the opening of the boot (by the cap surface). If you pull hard on the outer end of the boot, they could be damaged, as shown here. Still, I'm surprised to see that drastic of a break unless the mechanic used pliers or something - which is user error, not a defective component.


You might find a 3D printed copy, maybe. Just glue the cover in place with a new bulb installed.Having a hard time finding just the back cover for the third brake light :/

@ArauzMotoring, I think I have a black NOS cover somewhere in my remaining parts stash. Let me go look during this week and get back to you


