• Hi Guest !

    Welcome to the 500Eboard forum.

    Since its founding in late 2008, 500Eboard has become the leading resource on the Internet for all things related to the Mercedes-Benz 500E and E500. In recent years, we have also expanded to include the 400E and E420 models, which are directly related to the 500E/E500.

    We invite you to browse and take advantage of the information and resources here on the site. If you find helpful information, please register for full membership, and you'll find even more resources available. Feel free to ask questions, and make liberal use of the "Search" function to find answers.

    We hope you will become an active contributor to the community!

    Sincerely,
    500Eboard Management

Headlamp aim adjustment

bing

E500E **Meister**
Member
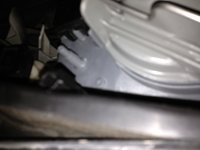
I noticed that my headlights don't seem to aim correctly. Not sure if there's a thread on this, and I've not checked in the manual, can anyone advise "how to" please? The Headlamp level switch in the console is working fine as up and down, but I may need to adjust the lamps separately i.e right side to aim lower. I seem to remember that adjustments can be done from behind the units?

Thanks
Bing
 
There is a aiming chart for headlights. You can use a wall or a garage door as long as the approach to it is straight and level. Aiming adjustments are done via the black turn knobs behind the units, correct.

You can access the document that details this here:
http://www.w124-zone.com/downloads/MB CD/W124/w124CD2/Program/Chassis/82-1130.pdf

Or I have attached it. However I don't know if there are differences for UK-spec cars (right hand drive) and US/Euro (LHD) cars.

Cheers,
Gerry
 

Attachments

Thanks Gerry.! Though I have replaced the lens' for left hand traffic I'm not sure if the aim is correct. Now i need to find an aiming chart for left hand traffic (UK driving).

In theory, or my guess, it should just be the opposite as the US/Euro cars. Basically, Right hand drive cars for left hand traffic, the left headlight aims higher than the right to prevent dazzle on incoming cars. So I would guess the same applies to right hand traffic - the right headlight aims higher? I'm probably just being finicky here as I haven't been flashed by incoming cars, yet, to complain being dazzled.
 
Gerry to the rescue with DIY instructions. While my new Euro headlights are much brighter (a $3 flashlight is brighter), they are not aimed properly. I'll fix them this evening. Thanks Gerry.
 
Gerry to the rescue with DIY instructions. While my new Euro headlights are much brighter (a $3 flashlight is brighter), they are not aimed properly. I'll fix them this evening. Thanks Gerry.
The Euros are designed to have the vacuum leveling system installed, which raises the beam to normal position with full vacuum applied, and lowers them drastically with no vacuum. If you're not using the vacuum system (most people don't bother, myself included) then yes, you need to adjust them significantly upward.

:124:
 
Thanks Dave. No vacuum on my car. Out of the box, they are actually adjusted too high and too far to the left. Not too far off, but just a lot of wasted light.

These are the brightest non-HID lights that I have experienced. So much better.

I should be getting similar light out of my '95 E300D, right? If so, I think that I will upgrade those bulbs to the Osram 70/65.
 
You should be getting similar, but not identical, light out of your E300D. The Osram 70/65's will definitely help. Very strange yours are too high out of the box. I've always had to raise them.

:blink:
 
Out of the box, they are actually adjusted too high and too far to the left. Not too far off, but just a lot of wasted light.
I don't believe the Euro lights have a lateral adjustment, just a vertical one. Are you maybe referring to the light pattern the Euro lights throw.

I also had to adjust my Euro lights upwards when I first got them, you might be the first person who needs to point them down.
 
Btw, I was chatting with Daniel Stern and he brought up one item about the Euro lights that I wanted run it by y'all. He mentioned that some Hella lights were made for the right side of the road countries and that the light pattern would be different and he mentioned that it would also apply to the 036 Hella Euro lights we have installed. Is this an actual fact?
 
Maybe Tom Hanson likes to turn knobs! I have two adjustment knobs on my headlights (one was hard to find). Not sure what they do yet as I need to test them in the dark. And I could be wrong as my test drive on with the new bulbs was short and in a well-lighted neighborhood.

Thanks for the comment on the E300D, I'll eventually order some more Osrams.
 
Btw, I was chatting with Daniel Stern and he brought up one item about the Euro lights that I wanted run it by y'all. He mentioned that some Hella lights were made for the right side of the road countries and that the light pattern would be different and he mentioned that it would also apply to the 036 Hella Euro lights we have installed. Is this an actual fact?

Yes. In RHD markets, the light pattern cuts up on the left as opposed to how ours cut up on the right. This is to keep from blinding on coming traffic.
 
Vookster, yes, definitely. I think bing alluded to it earlier in this thread. Applies to 036 lights as well -- I have learned since 2011 that there are indeed two versions even of the 036 lamps !!
 
Maybe Tom Hanson likes to turn knobs! I have two adjustment knobs on my headlights (one was hard to find). Not sure what they do yet as I need to test them in the dark.
One knob is for the headlights and one knob is for the high beams, both adjust the height only.
 
One knob is for the headlights and one knob is for the high beams, both adjust the height only.
There are actually three total knobs. One for main beam up/down, one for main beam side to side, and a third knob for the auxiliary high beam up/down.

:mushroom1: :mushroom1: :mushroom1:
 
There are actually three total knobs. One for main beam up/down, one for main beam side to side, and a third knob for the auxiliary high beam up/down.

:mushroom1: :mushroom1: :mushroom1:
Where is the side to side knob? Do you have a pic from the back? I could swear I didn't see a third knob...
 
Where is the side to side knob? Do you have a pic from the back? I could swear I didn't see a third knob...
The third one is hidden pretty well. Here's a photo of the back side of a different light, but the layout is the same on all Euro-style 124 lights including the 036:

proxy.php
 
I stand corrected, I do see the third knob and it's a bitch to turn/adjust comparred to the other two. I've never adjusted the third knob for side to side movement when I got my lights, they seemed to be set straight. Is there a guideline for side adjustments?
 

Attachments

  • image.jpg
    image.jpg
    1.3 MB · Views: 24
I adjusted my lights today. Gerry, thanks for the instructions.

My my euro headlights were, in fact, too low. And there are three adjustment knobs. Just like everyone said!

Can't wait to drive in the dark to see the improvement!
 
The third one is hidden pretty well. Here's a photo of the back side of a different light, but the layout is the same on all Euro-style 124 lights including the 036:

proxy.php

Hi Gang,

So with the euro headlights, I think I figured out that the center knob adjusts up/down, and the inboard knob adjusts the hi-beam-pencils. How does the outboard knob work? Is it supposed to control L/R somehow?

The outboard knob on my driver's side acts very goofy. Turning one way doesn't seem to do anything. Turning the other way seems to make the headlight go DOWN (but not side to side) which then requires me to use the middle adjuster to bring the beam back up.

Note that I do have the vacuum adjusters hooked up and the vacuum adjustment works fine. Does anyone have a picture that shows a closeup of how the adjustment mechanism works? (Like, is there some worm gear / roller thing that is not engaging, or is something broken and I'm SOL?)

Thanks.
 
Yes, the outer knob should adjust laterally (left / right). It's possible the knob is not connected properly inside the light. Do you have the same problem with both headlamps?

See PDF in in post #2 for details on adjustment.

:tumble:
 
Hi Gang,

So with the euro headlights, I think I figured out that the center knob adjusts up/down, and the inboard knob adjusts the hi-beam-pencils. How does the outboard knob work? Is it supposed to control L/R somehow?

The outboard knob on my driver's side acts very goofy. Turning one way doesn't seem to do anything. Turning the other way seems to make the headlight go DOWN (but not side to side) which then requires me to use the middle adjuster to bring the beam back up.

Note that I do have the vacuum adjusters hooked up and the vacuum adjustment works fine. Does anyone have a picture that shows a closeup of how the adjustment mechanism works? (Like, is there some worm gear / roller thing that is not engaging, or is something broken and I'm SOL?)

Thanks.

Correct the outboard – right most knob in that picture adjusts the Left / Right aim. You may need to use the up down along with this when making small adjustments. Are you aligning the headlamps yourself? It is possible to align them at home – I’ve done it myself.

Some tips before beginning-


  • Check / adjust tyre pressures
  • Half Fill with Fuel
  • Set the headlamp aim / vacuum dial to position 0 (Where equipped)
  • If you are thinking of upgrading bulbs etc do that before adjusting
  • Have someone of your approx weight sit in the driver’s seat when adjusting the lamps

Be sure to adjust not only the height but also the aim of the lamps. Based on your location / local laws you can get a beam pattern diagram and very accurately set the beam yourself. You need to measure the headlamps etc and place tape on a wall. I do my own cars at home and they are always spot on when tested by the machine a MOT time. Having the beam set correctly is the best headlamp ‘upgrade’ you can do!

As I said before I will do a DIY on this..... but for now there are some good resources out there to describe what I am talking about-

http://www.popularmechanics.com/cars/how-to/a257/1347221/

IMG_1875.JPG IMG_1879.JPG


Correct the outboard – right most knob in that picture adjusts the Left / Right aim. You may need to use the up down along with this when making small adjustments. Are you aligning the headlamps yourself? It is possible to align them at home – I’ve done it myself.

Be sure to adjust not only the height but also the aim of the lamps. Based on your location / local laws you can get a beam pattern diagram and very accurately set the beam yourself. You need to measure the headlamps etc and place tape on a wall. I do my own cars at home and they are always spot on when tested by the machine a MOT time. Having the beam set correctly is the best headlamp ‘upgrade’ you can do!

JC, you have a dedicated headlamp aiming area set up??

Beyond awesome my friend.


Sent from my iPhone using Tapatalk
 
JC, you have a dedicated headlamp aiming area set up??

Beyond awesome my friend.


Sent from my iPhone using Tapatalk

Not quite :)- although my flat driveway and white wall is ideal as such! There is a way of measuring and marking the wall (Black electrical tape) to allow for the % drop there should be in the beam pitch. And the markings are measured and placed for the left / right Aim of the headlamps. The Hood Star is perfect for this purpose. The tape is set up just when the aim is to take place then taken off. It needs set with precision and based on exactly where the car has been parked. (Note my beams are pointed for LH Traffic. I got one of the last pair of now NLA E500 MB LH Lamps)


I started aligning my w124’s myself because garages weren’t really setting them right. They got them ‘about right’ for the test and that’s about it – also never setting the aim as the car would not fail MOT for lamp aim. (Whereas it will fail for pitch as that could blind oncoming cars) Both should be set but garages around here are lazy and the test centers do not enforce the Aim issue – but it IS a test criteria also.
 
Correct the outboard – right most knob in that picture adjusts the Left / Right aim. You may need to use the up down along with this when making small adjustments. Are you aligning the headlamps yourself? It is possible to align them at home – I’ve done it myself.

Some tips before beginning-


  • Check / adjust tyre pressures
  • Half Fill with Fuel
  • Set the headlamp aim / vacuum dial to position 0 (Where equipped)
  • If you are thinking of upgrading bulbs etc do that before adjusting
  • Have someone of your approx weight sit in the driver’s seat when adjusting the lamps

Be sure to adjust not only the height but also the aim of the lamps. Based on your location / local laws you can get a beam pattern diagram and very accurately set the beam yourself. You need to measure the headlamps etc and place tape on a wall. I do my own cars at home and they are always spot on when tested by the machine a MOT time. Having the beam set correctly is the best headlamp ‘upgrade’ you can do!

As I said before I will do a DIY on this..... but for now there are some good resources out there to describe what I am talking about-

How to Adjust Your Headlights
View attachment 48734 View attachment 48736
Thanks @JC220. 5 years on ---- I adjusted my headlights properly with your popular mechanics link. One of my headlights was out of whack laterally, and the other was out of whack vertically. I believe this was from my 2017 experiments with LEDs where I was adjusting the headlights every which way to compensate for those 2017 LEDs with suboptimal pattern characteristics.

To put this here for posterity @dionphaneuf :

MIDDLE KNOB
CW = up
CCW = down

OUTBOARD KNOB
CW = left
CCW = right


For whatever reason I had to rotate the outboard knob a lot to see a difference.

IMG_8289.jpeg IMG_8288.jpeg IMG_8291.jpeg

As a 2022 update, I tried some passive cooled 4500K LEDs. These are very hard to find --- only one option is available among the thousands of listings of LEDs for 4500K color (the widely available 6000K color does not agree with my eyes) that is also passively cooled (I am not a fan of decreasing MTBF with a fan, and cringe at the potential for having to clean up shrapnel / melting in case of cooling fan bearing failure)

I liked the color of the 4500K H4 LEDs and the output of the H4 LEDs very much ... but.... unfortunately they tripped my bulb-out-warning light in my Euro-spec Stribel N7 relay. :-( ebay link for these LEDs So I put those LEDs back on the shelf....

And ... wouldn't you know it ---- compare the results below:

Generic LED vs. China Osram 70:65 - 2.jpeg Generic LED vs. China Osram 70:65 - 1.jpeg

Can you notice the difference? Neither can I!!! Note that the color is the same between the halogen and LED b/c of auto white balance, but the exposure settings are the same.

Indeed now in 2022 I'm still using Halogens. In fact, I'm using Osram 70/65 halogens, which are slightly overwattage compared to ECE/DOT approved "normal" 60/55 halogens.

ebay
Aliexpress (actually much less costly)

I am using China-sourced Osram 70/65 halogens .... which I understand are made for markets in Asia which are not as tightly regulated as western markets - for ex India, China, Phillipines, etc. This is why there are no ECE nor DOT markings on these bulbs.

IMG_7899.jpeg IMG_7900.jpeg IMG_7902.jpeg IMG_7904.jpeg IMG_7905.jpeg IMG_7906.jpeg IMG_7907.jpeg IMG_7908.jpeg IMG_7909.jpeg IMG_7910.jpeg IMG_7911.jpeg IMG_7914.jpeg IMG_7917.jpeg IMG_7918.jpeg IMG_7919.jpeg IMG_7920.jpeg IMG_7921.jpeg IMG_7924.jpeg IMG_7925.jpeg IMG_7927.jpeg IMG_7928.jpeg

Note verification of overwattage as compared with German 60/55 Osrams.

IMG_7529.jpeg IMG_7530.jpeg

IMG_7912.jpeg IMG_7913.jpeg
IMG_7915.jpeg IMG_7916.jpeg
 
Last edited:
Jlaa - that is very nice of you to share. Now what has piqued my response in fairness, is your shelf system. Would you do the same again or would you come up with another system.. Why or why not.....
 
Jlaa - that is very nice of you to share. Now what has piqued my response in fairness, is your shelf system. Would you do the same again or would you come up with another system.. Why or why not.....
HAHAHa. That shelf "system" is just that generic cheap HD "system" where you screw the vertical "standards" into the studs, which then allows you to put wire shelves anywhere up/down along the "standards." I then further customized it by building 4" high "trays" using MDF, bolted to each wire shelf ......... because I live in earthquake country. I don't want stuff falling off the shelves.
 
Back
Top