On this day last year I took a flight over to England & drove my new to me 500E home. This was the first of many stops for ‘gas!’

The car has came a
long way from the condition it was in when I bought it. It’s been an expensive but enjoyable first year of ownership – and thanks to the help on this board I’ve learned alot about the 500E. It’s a very different animal than any other w124 IMO in terms of complexity, cost of parts / repairs but also enjoyment.
What follows is a list of the work done to date which I had prepared for the car to be valued. (For insurance renewal) It is not yet fully complete nor exhaustive but gives a flavour of what has been done to this 500E in the past year.
Interior-
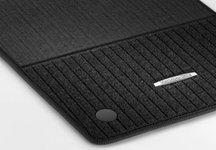
New custom made carpets to match original Mercedes items (NLA from Mercedes)
New Genuine Mercedes AMG Stainless Pedal covers
Speedometer conversion dial fitted for MPH / NI MOT testing
Leather cleaned & conditioned
Replacement rear Parcel shelf (re-covered in Black Alcantara)
B Pillar covers re-covered in Black Alcantara
Front headlining trim panel replaced
All new dash illumination bulbs
Replacement Sony Stereo (USB) with remote control
Replacement power seat adjustment switches – both front seats
New Gloria 1kg Fire Extinguisher – seat mounted as factory
New replacement Headlamp Switch
Steering wheel contact ring repaired & SRS brush set replaced with new Mercedes part
Driver’s seat power headrest adjustment repaired
Replacement wiring loom to boot lid
Mercedes Stainless Steel upgrade cill plates
Upgrade walnut shift knob
New Blower motor fan motor
A/C system re-gassed & professionally serviced (Fully functional)
All new German Copper / Ceramic fuses fitted
Duo heater valve stripped & re-built
Sunroof mechanism was stripped & rebuilt with all new Mercedes felt pads + Glietpaste.
100% of all interior electrics fully functional;
- Electric Sunroof
- Air Conditioning / Climate Control
- Electric adjustable seats
- Heated seats
- Rear screen de-mister
- Electric power adjustable mirrors
- Cruise Control
- Electric rear blind
- Electric windows front & rear
- Electric rear headrests
Security-
Toad Thatcham Category 1 Alarm & dual Immobiliser installed
Central locking serviced & repaired – 100% functional by key & remote fob
Exterior-
New pair of Genuine Mercedes E500 UK Specification headlamps + adjust aim
The Genuine BBS CH 18 Inch alloy wheels were professionally refurbished & new Genuine BBS centre caps fitted. 20x new wheel bolts.
New Genuine Mercedes Chrome Grill & insert
New Genuine Mercedes rear boot chrome handle
4x New Y Rated Tyres fitted
Original un-used spare wheel, jack, spare fuses & tool kit in boot
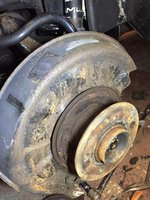
New rear brake discs, parking brake shoes & Pads
All new Hel Stainless Steel braided Brake Hoses
Front brakes are upgraded 320mm E500 specification
Original Catalysts removed, cleaned & protected with new VHT paint before re-fitting
Exhaust downpipes wrapped with Titanium insulation bandage
New Fox Germany Stainless Steel replacement Cat back exhaust system (Original Catalysts retained unaltered)
All new exhaust hangers, seals & bolts
New Hirschmann power antenna & Mercedes grommets
New replacement Bosch twin horns
New Chrome Genuine Mercedes boot lid handle
New Genuine Mercedes E500 badge
Headlamp wipers re-painted & fully functional
New front corner indicator units
All new Osram original quality exterior bulbs fitted – OE specification
Later E500 facelift style boot lid & bonnet fitted
New numberplates & frames front & rear
All paintwork professionally colour sanded & buffed July 2016
Bonnet, front fenders & Roof Professionally re-painted (Existing stone chips) March 2017
Mechanical-
New Genuine Mercedes Engine upper Wiring Harness
New Genuine Mercedes Engine lower Wiring Harness
New Genuine Mercedes Radiator Cap
New Genuine Mercedes diagnostic socket housing + pins
New Genuine Mercedes Coolant hoses & clamps
New Genuine Mercedes Thermostat, housing & Hepu waterpump + sundries
New Genuine Mercedes Oil Pickup tube (Updated / revised part)
New Genuine Mercedes Oil check valve (Updated / revised part)
New Genuine Mercedes Air pump delete pulley
New Genuine Mercedes Cam cover gaskets (x2) + new crush washers
New Genuine Mercedes Spark Plugs (x8)
New Genuine Mercedes sump gasket & Oil filter housing seals
New Genuine Mercedes Oil Level Sender O-Rings
New Genuine Mercedes Oil strainer screen
New Genuine Mercedes Power Steering S Hose, clamps + heat shield tubing
New Genuine Mercedes upper Timing chain slide rails (x2)
New Genuine Mercedes Oil Filter housing steel seal washers
New Genuine Mercedes Air intake hoses (x2)
New Genuine Mercedes Crankshaft Oil Seal
New Genuine Mercedes shift linkage bushings installed
New Genuine Mercedes brake reservoir seals (x2)
New Bosch 02 Sensor
New Genuine Walbro GSL392 Fuel Pump + new Fuel hoses.
New Bosch Distributer Caps (x2)
New Genuine Mercedes suppressor O Ring seals (x2)
New Bosch Rotor Arms (x2)
New Bremi Ignition leads set (8x leads + 2 King leads)
New genuine INA belt tensioner & pulley
New 150Amp Alternator
New A/C push fans (x2)
New Mishimoto 12 Inch electric cooling fans (x2)
New Mishimoto adjustable cooling fan controller + temp probe
Recent replacement 900Amp Battery
LH Module Eprom Chip upgraded
Camshaft magnets disassembled & re-sealed (x2)
Tandem Pump rebuilt with Genuine Mercedes seal kit
Replacement Base Module
All engine bay bolts, brackets & pulleys removed & professionally re zinc-plated
Throttle linkage lubricated & Bowden cable adjusted
Recent Nissens replacement radiator
EZL ignition module removed & thermal Heat Sink paste renewed
Suspension-
New Genuine Mercedes inner + outer front ARB Bushes (x4)
New Wiechers Germany Strut brace
New replacement spring perch pads front & rear (x4)
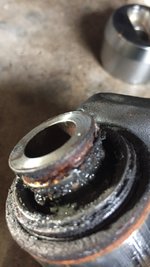
New Genuine Corteco Germany Suspension Spheres (x2) + sundries
New Lemforder rear outer lower LCA bushes (x2)
New Meyle HD front shock mounts (x2)
SLS pump rebuilt + system flushed with new fluid
New Genuine Mercedes SLS reservoir Filter + Dipstick
This 500E was fitted with Genuine AMG E60 Suspension at some point prior to me purchasing the car-
HWA-124-320-15-30 - AMG E60 front strut (x2)
HWA-124-320-03-13 - AMG E60 rear SLS hydroleg (x2)
HWA 124 321 04 04 – AMG E60 Front Springs (x2)
HWA 124 324 04 04 – AMG E60 Rear Springs (x2)
These E60 AMG parts are very rare & no longer available from Mercedes. Assuming they were still available to purchase the price to replace would be £5k+
General Servicing-
New Genuine Mercedes transmission Filter, Pan gasket + sundries
Transmission fluid service with Fuchs TITAN ATF 4000 Multifunctional Automatic Transmission Fluid
New Genuine Mercedes Oil filter - Shell Helix HX7 10W-40 Synthetic Technology Oil
Coolant drain down & re-fill with 50/50 mix of Comma G-05 Coolant + Distilled Water
New Mann PS Filter + Flush / refill with Fuchs Titan PSF.
Brake fluid drained, flushed, re-filled & bled with ATE Fluid.
New K&N direct replacement panel Air Filters (x2)
New Mahle Fuel Filter
Final Drive oil drained & re-filled with Fuchs TITAN Gear Hyp 90 Hypoid Gear Oil GL5 80w-90
New Goodyear Gatorback 8PK2465 Serpentine belt
SLS LHM fluid flush, new filter & refill
(A couple of the items were already done by the PO – but listed for the Insurance company. Such as the facelift update & Chrome cill covers etc) I have alot more work planned this year also! Mostly underneath the car at this point.
")


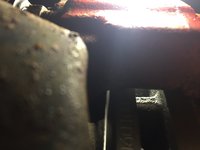
 Thus it also had to be drilled out.