Wanted to share a happy success story here - special thanks to
@asultan.
He sent me his gen 1 lock assembly and I got it taken apart, cleaned, and rebuilt with new wafers/tumblers. Everything lubricated! $50 USD
Here's a little bit of "how the sausage is made"
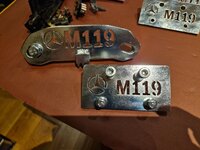
Parts as I received them. Door handle is broken, I had a spare one I sold too (also $50 USD).
Notice the rod is already disconnected from the cylinder. There's supposed to be a drift pin / spring pin / etc (whatever name is) that holds it into place.
In this case, it had fallen out. You can see it bent on top of the keychain in the picture below.

First step is to take the cylinder out. If the rod wasn't disconnected, you can use a punch tool to pop that drift pin out. Then, with the key inserted, you can twist and remove the lock cylinder. This one was super dirty! I sprayed it with some teflon spray just to clean it up a bit. Several of the wafters were bent. All of them were VERY dirty. Like actual gritty dirt on them which makes it hard for them to move up and down along with the springs.

With the cylinder removed, you can inspect the internals. This is a sensitive part and luckily this is in good shape.
Basically, there is a spring loaded piece at the end and a ball bearing inside. This can fall out and it's a MAJOR pain in the ass to fix.
The Gen 2 (1990+) locks don't seem to have this extra spring loaded bit in there. Or if they do, I didn't notice it.
I sprayed this good over the sink with teflon spray and then used Q-tips to clean all the dirt out. Repeated the spray with teflon, etc.
Once this is clean, you can pack the inside with some MB sunroof grease (Gleitpaste!)

Here's the old tumblers for reference. You can see the dirt caked on and they've lost material from friction. Some of the springs were also in bad shape. I set those aside and replaced with some clean springs i had ready to go. I usually take the old ones and clean them in an ultrasonic cleaner - then put the ones in good shape into the repair kit. The cylinder assembly itself I cleaned out by spraying liberally with teflon spray and wiping down until the towels I dried it with were nice and clean.

Matching the tumblers up was fairly easy - the full size pieces do have a left or right. In this case, they were all lefts. I take these out one by one starting with the ones at the end of the key (on the left) and then remove one at a time as the key is withdrawn. I'll draw a picture on paper of the cylinder and write the numbers down for which goes where.
When putting the new tumbler / wafer pieces into the cylinder, I put the spring in first and then just apply a small amount of gleitpaste on the sides of each tumbler. Once they're all in, you can hold all of them down and then gently wiggle key through the keyway and once the key fully seats, everything should be nice and flush. I greased this assembled cylinder up with gleitpaste also.

This next part is tricky. You need to put the cylinder back in, paying attention to which side the ball bearing goes on (not pictured here; but one side of the cylinder has an indent for where it fits). Once you put that in, you can push the key pretty far in but not all the way. There's a little "inspection window" at the top of the lock which you'll need to pay attention to. You can use a curved pick tool like the one pictured to press a special piece they include at the end. This special piece (2nd picture) is the closest to the keyway and has a spring on each side. When replacing this you want to grease it up too. But as you turn the key, this is what you press down with the pick tool. Once the key is turned fully horizontal, the keyway will go flush with the lock assembly. You can then turn the key back vertical and remove the key.


The last major step is to put the rod back onto the end of the cylinder. This is a critical step. The rod not only physically turns inside the door handle (locking or unlocking), but the drift pin / spring pin that secures it to the cylinder keeps the cylinder from falling out. In this case, the drift pin was bent severely. I was able to bend it back and get it in very snugly, clamping it down with a set of Knipex pliers. It's not going anywhere!
Also critical in this step - the alignment of the spring on the rod. Our cars are old enough that this spring might even be broken - I have extras. But notice how the rod goes back on. As you turn the key, the spring will apply tension and makes the key want to go back to the original position. If you haven't noticed this before, try it on your car. This is a super nice touch by Mercedes-Benz. You don't need the spring working - but when it's in good working shape, the car feels extra special.

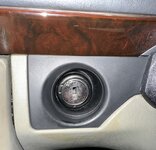
The final product - newly rebuilt lock assembly and good condition used door handle with rubber gaskets.
@asultan was amazing and included an already paid postage for this - so I just put it carefully back into the box and slapped the new stick on it. $100 USD total.


Thanks for reading!