Postby Glen on Thu Dec 04, 2008 1:23 am
I first read a review of the 500E in 1991 and was immediately impressed and knew that one day I would own one. At the time, I lusted after a 190E 2.3-16 but it took me another 5 years before I would buy one of those. And oddly enough, shortly before I found my 16V, I stumbled upon a 5-speed 300E so for almost 6 years I was lucky to own both a rare 300E with a manual and a 5-speed 16V.
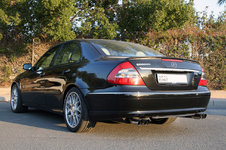
Early in 2000, I began looking seriously for a 500E and it took me almost a year and half before I found exactly what I was looking for. The 300E and 16V are both long gone now, replaced by my Brilliant Silver on black '94 500E (E500). After almost 8 years of ownership, I still smile every time the garage door goes up!
Mods:
Debadged
Bergwerks FGS with Sport and Security options
Euro headlight housings with functional levelling control, stock U.S. lenses
Front license tag delete panel
R129 SL strut mounts
1 bump spring pads with stock coils in front
3 bump spring pads with one coil removed from stock rear springs
Speedtek adjustable rear camber arms
W210T aluminum thrust arms (to be installed soon)
Porsche CDR-210/Becker BE-2282 CD head unit
RENNtech Monolite, 1-piece forged wheels; F:18 x 8.5, R: 18 x 9.5
When I first bought the car, it came with chrome plated stock 16" wheels.

I then upgraded to OZ Classe 18 x 8 and 18 x 9 wheels.

Then one day, I found a set of RENNtech Monolites, 18 x 8.5 and 18 x 9.5")
And this is how the car looks now.


Glen Tokuhara
A few cars...
===================================
Postby szvook on Thu Dec 04, 2008 1:58 am
That exterior color was my original choice for the car?. just could not wait for one. Very nice car!
Steve
1992 Pearl Black 500E (build 6/92)
===================================
Postby battlecat714 on Thu Dec 04, 2008 5:54 am
Awesome car Glen, great color choice too!
Jorge
1994|040|W124.036|E500
===================================
Postby T-500 on Thu Dec 04, 2008 7:06 am
I always wondered what wheels you were running - nice!
T-500
===================================
Postby Glen on Tue Dec 09, 2008 9:24 pm
Here's a shot of my Porsche CDR-210/Becker BE2282 in-dash CD headunit.

===================================
Postby Glen on Tue Dec 09, 2008 9:38 pm
To gain additional front suspension travel, I installed R129 SL upper strut mounts. If you do this, replace the bump stops and it would be a good idea to cut your old ones down to 1 inch and add them in addition to the new ones. If you don't, on full compression, the tires will contact the upper wheel house.

===================================
Postby need2speed on Thu Dec 11, 2008 12:25 am
Glen wrote:Here's a shot of my Porsche CDR-210/Becker BE2282 in-dash CD headunit.
Name dropper... :yeah: That is a very sanitary installation!
need2speed
500E500 owners motto: "Lead, follow, or better yet, get out of the way."
===================================
Postby Glen on Thu Dec 11, 2008 4:21 am
need2speed wrote:
Glen wrote:Here's a shot of my Porsche CDR-210/Becker BE2282 in-dash CD headunit.
Name dropper... :yeah: That is a very sanitary installation!
Thanks!
It's all plug'n'play. The CDR-210 has the same rear connectors and pin-out as the '94 MB head unit with the exception of the CD changer which has a different connector and pin-out.
===================================
Postby need2speed on Thu Dec 11, 2008 3:19 pm
Was there an available adapter for the CD plug or did you wire your own?
need2speed
500E500 owners motto: "Lead, follow, or better yet, get out of the way."
===================================
Postby Glen on Thu Dec 11, 2008 5:08 pm
No adapter that I know and I didn't connect the CD changer...so no changer for me at the moment.
===================================
Postby gerryvz on Thu Dec 11, 2008 7:09 pm
I purchased an off the shelf iPod adapter cable for the stock 1994 radio that plugs into the CD changer plug on the back. Seamless and works great -- I think the cable was like $30ish. Charges the iPod as well as allowing it to play.
I am sure that same thing is either avaialble or could be easily engineered for the Becker system that Glen has.
Might even want to check with Becker North America to see if they have such a beast -- I'll bet they do. Google Becker of North America and when you call their 800 number ask for Ed Ebel or Jaime Kopchinski.
Cheers,
Gerry
===================================
Postby Glen on Sat Jan 03, 2009 4:26 pm
December 31, 2008
Another beautiful SoCal day!
===================================
Postby gerryvz on Sun Jan 04, 2009 3:56 am
Yes it was 81 degrees here in Houston today and I gave the E500 a bath, which it welcomed. And topped up the windshield washer and antifreeze fluids.
Cheers,
Gerry
===================================
Postby need2speed on Mon Jan 05, 2009 1:34 am
Gerry, looks like you left Portland just in time...the weather really sucks!
need2speed
500E500 owners motto: "Lead, follow, or better yet, get out of the way."
===================================
Postby gerryvz on Mon Jan 05, 2009 5:33 am
Yeah, Portland has definitely been walloped in the past month by more snow than I can ever remember having in the 13 years we lived there. There were a couple of times when we had perhaps 6-8 inches, but not really more than that. I think it was the winter of 2003-2004 that it snowed pretty good and things were socked in for a good week - I worked from home for an entire week because I couldn't get to work.
In Seattle, where I grew up, they seem to have had more than I ever remember too (according to my parents) though I remember a number of years in the 1970s and 1980s where there was perhaps 12-14 inches, but it never lasted for more than a few days.
Believe me, I've not envied being in Portland this winter, one iota. The new owners of our house in PDX e-mailed us photos of the house and yard. Yikes !
Cheers,
Gerry
===================================
Postby Glen on Wed Jan 21, 2009 3:32 am
Finally had some time so I lowered the back to level out the car. Replaced 3-bump spring pads with 1-bump...
1bumpallaround_2.jpg
===================================
Postby need2speed on Wed Jan 21, 2009 4:12 am
Looks tight! I also ended up with 2 bump front and 1 bump rear pads for level.
need2speed
500E500 owners motto: "Lead, follow, or better yet, get out of the way."
===================================
Postby 124036-009 on Wed Jan 21, 2009 9:12 am
Maybe someone could do some writing about those bump pads with pics, part# and measurements in the Wiki?
That would be very nice!
Jack
Volkswagen Golf/Rabbit Mk1 1,6D Aut. '83 220kkm / Mercedes-Benz E500 Limited '94 83kkm
===================================
Postby UberE500 on Wed Jan 21, 2009 4:47 pm
Glen - Did you adjust the SLS linkage?
Your new ride height looks perfect with those wheels!!
UberE500
===================================
Postby gsxr on Wed Jan 21, 2009 5:08 pm
124036-009 wrote:Maybe someone could do some writing about those bump pads with pics, part# and measurements in the Wiki?
It's already in the FSM (click here), and the part numbers are in the EPC. I never did understand the fascination with swapping pads around though.
===================================
Postby Glen on Wed Jan 21, 2009 5:13 pm
UberE500 wrote:Glen - Did you adjust the SLS linkage?
Your new ride height looks perfect with those wheels!!
Thanks. No, I didn't need to adjust the SLS this time. In the past, I've had the car lower and did have to adjust it but this time, the change in spring pads brought it down just enough.
===================================
Postby Glen on Wed Jan 21, 2009 5:16 pm
gsxr wrote:
124036-009 wrote:Maybe someone could do some writing about those bump pads with pics, part# and measurements in the Wiki?
It's already in the FSM (click here http://www.w124performance.com/service/ ... 0-0300.pdf), and the part numbers are in the EPC. I never did understand the fascination with swapping pads around though.
Swapping spring pads lets you fine tune ride height. It's why MB created the pad system in the first place...to adjust height based on options a particular car has. So, changing pads is an easy way to accomplish minor ride height changes.
===================================
Postby maggot on Wed Jan 21, 2009 5:28 pm
Car looks fantastic.........especially on those Renntech rims. Out of curiosity, can you tell me what the Mercedes logo on the front wing is please ?
maggot
===================================
Postby Glen on Wed Jan 21, 2009 6:04 pm
maggot wrote:Car looks fantastic.........especially on those Renntech rims. Out of curiosity, can you tell me what the Mercedes logo on the front wing is please ?
When I bought my car, it had custom vinyl pin strip with the vinyl Star on the front fenders (wings). I removed the pin stripe but left the Star.

===================================
Postby gsxr on Wed Jan 21, 2009 6:09 pm
Glen wrote:To gain additional front suspension travel, I installed R129 SL upper strut mounts. If you do this, replace the bump stops and it would be a good idea to cut your old ones down to 1 inch and add them in addition to the new ones. If you don't, on full compression, the tires will contact the upper wheel house.
Glen, I don't quite understand the concept behind the R129 strut mounts... could you elaborate?
BTW - I love the Monolites!!

Dave M.
Boise, ID
1995 E420 (W.I.P.)
1994 E500 (Q-ship)
1993 300D (Sportline)
1987 300D (Sportline Stage 2)
1987 300D (R.I.P)
Click here for my website photos, documents, and movies.
===================================
Postby Glen on Wed Jan 21, 2009 6:33 pm
gsxr wrote:
Glen wrote:To gain additional front suspension travel, I installed R129 SL upper strut mounts. If you do this, replace the bump stops and it would be a good idea to cut your old ones down to 1 inch and add them in addition to the new ones. If you don't, on full compression, the tires will contact the upper wheel house.
Glen, I don't quite understand the concept behind the R129 strut mounts... could you elaborate?
BTW - I love the Monolites!!
It started out as an experiment on my part. The front of my car is about 5/8" lower than stock, accomplished by changing out spring pads. The R129 upper strut mounts secure the strut about an inch higher than W124 mounts. In effect, any travel lost due to lowering is recovered. Plus, in addition to travel, it puts the strut piston closer to the internal spring buffers, ie. closer to stock even though the car is lowered. The caveat is that the added travel can cause the tire to hit the upper wheel house on full compression.
===================================
Postby gsxr on Wed Jan 21, 2009 7:19 pm
Glen wrote:It started out as an experiment on my part. The front of my car is about 5/8" lower than stock, accomplished by changing out spring pads. The R129 upper strut mounts secure the strut about an inch higher than W124 mounts. In effect, any travel lost due to lowering is recovered. Plus, in addition to travel, it puts the strut piston closer to the internal spring buffers, ie. closer to stock even though the car is lowered. The caveat is that the added travel can cause the tire to hit the upper wheel house on full compression.
OK - I sort of understand now. Interesting concept! Basically it's a way to try and compensate for lowering the car, while still retaining some of the performance of the internal rebound springs (since the functionality is reduced when the car is lowered with stock 500E struts). This also will limit the wheel extension, at full droop/sag the wheel will not be as far away from the fender.
As you mentioned, the strut shaft stop buffer will need to be effectively lengthened, to prevent the tire rubbing things it shouldn't when fully compressed. The AMG strut spacer (http://www.w124performance.com/images/W ... miter1.jpg)would be the ideal method (it adds 20mm). You can also use the stop buffer from early AMG cars (p/n 129-323-06-44), which is as firm as the 500E stop buffer, but 5mm longer. Click here (http://www.w124performance.com/images/W ... strut4.jpg) to see what I mean, the photo shows the 75mm "medium" firmness buffer, I would use the 75mm "hard" buffer. The standard 500E buffer is 70mm and "hard" firmness. (FYI, there are soft, medium, and hard variations in a total of 4 different lengths. I have this data in a spreadsheet, and I got one each of the 6 different buffers, I just need to take a photo and add it to my website!)
===================================
Postby Glen on Wed Jan 21, 2009 7:25 pm
Thanks for the part number for those AMG buffers!
===================================
Postby need2speed on Wed Jan 21, 2009 8:37 pm
Glen wrote:Swapping spring pads lets you fine tune ride height. It's why MB created the pad system in the first place...to adjust height based on options a particular car has.
I read ??somewhere?? that the pads allowed the factory to adjust to minimum headlight height requirements which, as you suggest, changes with vehicle weight/options.
need2speed
500E500 owners motto: "Lead, follow, or better yet, get out of the way."
User avatar
need2speed
===================================
Postby Lexluther on Fri Jan 30, 2009 7:41 pm
Glen wrote:To gain additional front suspension travel, I installed R129 SL upper strut mounts. If you do this, replace the bump stops and it would be a good idea to cut your old ones down to 1 inch and add them in addition to the new ones. If you don't, on full compression, the tires will contact the upper wheel house.
Hi Glen got a question: If you replace the strut mounts with R129 you gain suspension travel but if you bottom out and have to add an additional 1" bump stop doesn't this negate any gains you may have?
Lexluther
===================================
Postby Glen on Fri Jan 30, 2009 8:51 pm
Yes and no. Our bump stops are made of micro cellular urethane and engineered to provide a progressive squish upon compression. So, there is extra travel in the suspension but as you point out, some of it is limited by the extra bump stop material.
On the other hand, there is another benefit to using the R129 mounts. As you probably know, stock 500E struts have internal spring buffers that work in the rebound direction. At stock height, this marginally helps the car resist body roll. When you lower a 500E, the new ride height position moves the strut piston further away from the rebound buffers so you may feel as though the car leans more on initial turn-in. With the R129 mounts, the strut pistion is closer to the buffers, in my case, actually a bit closer than stock.
Now, don't take this too far. The buffers don't make that much of a difference but I believe it's noticeable. It's probably more effective to install larger sway bars but every little bit helps.
===================================
Postby omegabenz on Fri Jan 30, 2009 10:45 pm
Glen wrote:As you probably know, stock 500E struts have internal spring buffers that work in the rebound direction. At stock height, this marginally helps the car resist body roll. When you lower a 500E, the new ride height position moves the strut piston further away from the rebound buffers so you may feel as though the car leans more on initial turn-in.
Now if the SL mounts were a lot stiffer than the stock 500E mounts, then you'd really have a great combo, but they are not. Something more rigid would definately help with initial turn-in response. Such as RDMTEK mounts. RDMTEK mounts could mount higher in w124s and R129s, but in w201s they barely clear as it is. So we wanted them to work in all three chassis, and that is why they are that height.
http://www.rdmtek.com/Shock_Towers.html (scroll down for more info on height)
Neil was talking about spraying urethane into motor mounts and tranny mounts, maybe you could do this with your SL mounts to stiffen them up.
I dont have the link anymore of what Neil was doing.
===================================
Postby Alpina on Sat Jan 31, 2009 7:48 am
Extreme clean and good looking
Sveinbj?rn Hrafnsson
ALPINA BITURBO 346@507
E30 CABRIO S38B38
Alpina
I first read a review of the 500E in 1991 and was immediately impressed and knew that one day I would own one. At the time, I lusted after a 190E 2.3-16 but it took me another 5 years before I would buy one of those. And oddly enough, shortly before I found my 16V, I stumbled upon a 5-speed 300E so for almost 6 years I was lucky to own both a rare 300E with a manual and a 5-speed 16V.
Early in 2000, I began looking seriously for a 500E and it took me almost a year and half before I found exactly what I was looking for. The 300E and 16V are both long gone now, replaced by my Brilliant Silver on black '94 500E (E500). After almost 8 years of ownership, I still smile every time the garage door goes up!
Mods:
Debadged
Bergwerks FGS with Sport and Security options
Euro headlight housings with functional levelling control, stock U.S. lenses
Front license tag delete panel
R129 SL strut mounts
1 bump spring pads with stock coils in front
3 bump spring pads with one coil removed from stock rear springs
Speedtek adjustable rear camber arms
W210T aluminum thrust arms (to be installed soon)
Porsche CDR-210/Becker BE-2282 CD head unit
RENNtech Monolite, 1-piece forged wheels; F:18 x 8.5, R: 18 x 9.5
When I first bought the car, it came with chrome plated stock 16" wheels.
I then upgraded to OZ Classe 18 x 8 and 18 x 9 wheels.
Then one day, I found a set of RENNtech Monolites, 18 x 8.5 and 18 x 9.5
And this is how the car looks now.
Glen Tokuhara
A few cars...
===================================
Postby szvook on Thu Dec 04, 2008 1:58 am
That exterior color was my original choice for the car?. just could not wait for one. Very nice car!
Steve
1992 Pearl Black 500E (build 6/92)
===================================
Postby battlecat714 on Thu Dec 04, 2008 5:54 am
Awesome car Glen, great color choice too!
Jorge
1994|040|W124.036|E500
===================================
Postby T-500 on Thu Dec 04, 2008 7:06 am
I always wondered what wheels you were running - nice!
T-500
===================================
Postby Glen on Tue Dec 09, 2008 9:24 pm
Here's a shot of my Porsche CDR-210/Becker BE2282 in-dash CD headunit.
===================================
Postby Glen on Tue Dec 09, 2008 9:38 pm
To gain additional front suspension travel, I installed R129 SL upper strut mounts. If you do this, replace the bump stops and it would be a good idea to cut your old ones down to 1 inch and add them in addition to the new ones. If you don't, on full compression, the tires will contact the upper wheel house.
===================================
Postby need2speed on Thu Dec 11, 2008 12:25 am
Glen wrote:Here's a shot of my Porsche CDR-210/Becker BE2282 in-dash CD headunit.
Name dropper... :yeah: That is a very sanitary installation!
need2speed
500E500 owners motto: "Lead, follow, or better yet, get out of the way."
===================================
Postby Glen on Thu Dec 11, 2008 4:21 am
need2speed wrote:
Glen wrote:Here's a shot of my Porsche CDR-210/Becker BE2282 in-dash CD headunit.
Name dropper... :yeah: That is a very sanitary installation!
Thanks!
It's all plug'n'play. The CDR-210 has the same rear connectors and pin-out as the '94 MB head unit with the exception of the CD changer which has a different connector and pin-out.
===================================
Postby need2speed on Thu Dec 11, 2008 3:19 pm
Was there an available adapter for the CD plug or did you wire your own?
need2speed
500E500 owners motto: "Lead, follow, or better yet, get out of the way."
===================================
Postby Glen on Thu Dec 11, 2008 5:08 pm
No adapter that I know and I didn't connect the CD changer...so no changer for me at the moment.
===================================
Postby gerryvz on Thu Dec 11, 2008 7:09 pm
I purchased an off the shelf iPod adapter cable for the stock 1994 radio that plugs into the CD changer plug on the back. Seamless and works great -- I think the cable was like $30ish. Charges the iPod as well as allowing it to play.
I am sure that same thing is either avaialble or could be easily engineered for the Becker system that Glen has.
Might even want to check with Becker North America to see if they have such a beast -- I'll bet they do. Google Becker of North America and when you call their 800 number ask for Ed Ebel or Jaime Kopchinski.
Cheers,
Gerry
===================================
Postby Glen on Sat Jan 03, 2009 4:26 pm
December 31, 2008
Another beautiful SoCal day!
===================================
Postby gerryvz on Sun Jan 04, 2009 3:56 am
Yes it was 81 degrees here in Houston today and I gave the E500 a bath, which it welcomed. And topped up the windshield washer and antifreeze fluids.
Cheers,
Gerry
===================================
Postby need2speed on Mon Jan 05, 2009 1:34 am
Gerry, looks like you left Portland just in time...the weather really sucks!
need2speed
500E500 owners motto: "Lead, follow, or better yet, get out of the way."
===================================
Postby gerryvz on Mon Jan 05, 2009 5:33 am
Yeah, Portland has definitely been walloped in the past month by more snow than I can ever remember having in the 13 years we lived there. There were a couple of times when we had perhaps 6-8 inches, but not really more than that. I think it was the winter of 2003-2004 that it snowed pretty good and things were socked in for a good week - I worked from home for an entire week because I couldn't get to work.
In Seattle, where I grew up, they seem to have had more than I ever remember too (according to my parents) though I remember a number of years in the 1970s and 1980s where there was perhaps 12-14 inches, but it never lasted for more than a few days.
Believe me, I've not envied being in Portland this winter, one iota. The new owners of our house in PDX e-mailed us photos of the house and yard. Yikes !
Cheers,
Gerry
===================================
Postby Glen on Wed Jan 21, 2009 3:32 am
Finally had some time so I lowered the back to level out the car. Replaced 3-bump spring pads with 1-bump...
1bumpallaround_2.jpg
===================================
Postby need2speed on Wed Jan 21, 2009 4:12 am
Looks tight! I also ended up with 2 bump front and 1 bump rear pads for level.
need2speed
500E500 owners motto: "Lead, follow, or better yet, get out of the way."
===================================
Postby 124036-009 on Wed Jan 21, 2009 9:12 am
Maybe someone could do some writing about those bump pads with pics, part# and measurements in the Wiki?
That would be very nice!
Jack
Volkswagen Golf/Rabbit Mk1 1,6D Aut. '83 220kkm / Mercedes-Benz E500 Limited '94 83kkm
===================================
Postby UberE500 on Wed Jan 21, 2009 4:47 pm
Glen - Did you adjust the SLS linkage?
Your new ride height looks perfect with those wheels!!
UberE500
===================================
Postby gsxr on Wed Jan 21, 2009 5:08 pm
124036-009 wrote:Maybe someone could do some writing about those bump pads with pics, part# and measurements in the Wiki?
It's already in the FSM (click here), and the part numbers are in the EPC. I never did understand the fascination with swapping pads around though.
===================================
Postby Glen on Wed Jan 21, 2009 5:13 pm
UberE500 wrote:Glen - Did you adjust the SLS linkage?
Your new ride height looks perfect with those wheels!!
Thanks. No, I didn't need to adjust the SLS this time. In the past, I've had the car lower and did have to adjust it but this time, the change in spring pads brought it down just enough.
===================================
Postby Glen on Wed Jan 21, 2009 5:16 pm
gsxr wrote:
124036-009 wrote:Maybe someone could do some writing about those bump pads with pics, part# and measurements in the Wiki?
It's already in the FSM (click here http://www.w124performance.com/service/ ... 0-0300.pdf), and the part numbers are in the EPC. I never did understand the fascination with swapping pads around though.
Swapping spring pads lets you fine tune ride height. It's why MB created the pad system in the first place...to adjust height based on options a particular car has. So, changing pads is an easy way to accomplish minor ride height changes.
===================================
Postby maggot on Wed Jan 21, 2009 5:28 pm
Car looks fantastic.........especially on those Renntech rims. Out of curiosity, can you tell me what the Mercedes logo on the front wing is please ?
maggot
===================================
Postby Glen on Wed Jan 21, 2009 6:04 pm
maggot wrote:Car looks fantastic.........especially on those Renntech rims. Out of curiosity, can you tell me what the Mercedes logo on the front wing is please ?
When I bought my car, it had custom vinyl pin strip with the vinyl Star on the front fenders (wings). I removed the pin stripe but left the Star.
===================================
Postby gsxr on Wed Jan 21, 2009 6:09 pm
Glen wrote:To gain additional front suspension travel, I installed R129 SL upper strut mounts. If you do this, replace the bump stops and it would be a good idea to cut your old ones down to 1 inch and add them in addition to the new ones. If you don't, on full compression, the tires will contact the upper wheel house.
Glen, I don't quite understand the concept behind the R129 strut mounts... could you elaborate?
BTW - I love the Monolites!!
Dave M.
Boise, ID
1995 E420 (W.I.P.)
1994 E500 (Q-ship)
1993 300D (Sportline)
1987 300D (Sportline Stage 2)
1987 300D (R.I.P)
Click here for my website photos, documents, and movies.
===================================
Postby Glen on Wed Jan 21, 2009 6:33 pm
gsxr wrote:
Glen wrote:To gain additional front suspension travel, I installed R129 SL upper strut mounts. If you do this, replace the bump stops and it would be a good idea to cut your old ones down to 1 inch and add them in addition to the new ones. If you don't, on full compression, the tires will contact the upper wheel house.
Glen, I don't quite understand the concept behind the R129 strut mounts... could you elaborate?
BTW - I love the Monolites!!
It started out as an experiment on my part. The front of my car is about 5/8" lower than stock, accomplished by changing out spring pads. The R129 upper strut mounts secure the strut about an inch higher than W124 mounts. In effect, any travel lost due to lowering is recovered. Plus, in addition to travel, it puts the strut piston closer to the internal spring buffers, ie. closer to stock even though the car is lowered. The caveat is that the added travel can cause the tire to hit the upper wheel house on full compression.
===================================
Postby gsxr on Wed Jan 21, 2009 7:19 pm
Glen wrote:It started out as an experiment on my part. The front of my car is about 5/8" lower than stock, accomplished by changing out spring pads. The R129 upper strut mounts secure the strut about an inch higher than W124 mounts. In effect, any travel lost due to lowering is recovered. Plus, in addition to travel, it puts the strut piston closer to the internal spring buffers, ie. closer to stock even though the car is lowered. The caveat is that the added travel can cause the tire to hit the upper wheel house on full compression.
OK - I sort of understand now. Interesting concept! Basically it's a way to try and compensate for lowering the car, while still retaining some of the performance of the internal rebound springs (since the functionality is reduced when the car is lowered with stock 500E struts). This also will limit the wheel extension, at full droop/sag the wheel will not be as far away from the fender.
As you mentioned, the strut shaft stop buffer will need to be effectively lengthened, to prevent the tire rubbing things it shouldn't when fully compressed. The AMG strut spacer (http://www.w124performance.com/images/W ... miter1.jpg)would be the ideal method (it adds 20mm). You can also use the stop buffer from early AMG cars (p/n 129-323-06-44), which is as firm as the 500E stop buffer, but 5mm longer. Click here (http://www.w124performance.com/images/W ... strut4.jpg) to see what I mean, the photo shows the 75mm "medium" firmness buffer, I would use the 75mm "hard" buffer. The standard 500E buffer is 70mm and "hard" firmness. (FYI, there are soft, medium, and hard variations in a total of 4 different lengths. I have this data in a spreadsheet, and I got one each of the 6 different buffers, I just need to take a photo and add it to my website!)
===================================
Postby Glen on Wed Jan 21, 2009 7:25 pm
Thanks for the part number for those AMG buffers!
===================================
Postby need2speed on Wed Jan 21, 2009 8:37 pm
Glen wrote:Swapping spring pads lets you fine tune ride height. It's why MB created the pad system in the first place...to adjust height based on options a particular car has.
I read ??somewhere?? that the pads allowed the factory to adjust to minimum headlight height requirements which, as you suggest, changes with vehicle weight/options.
need2speed
500E500 owners motto: "Lead, follow, or better yet, get out of the way."
User avatar
need2speed
===================================
Postby Lexluther on Fri Jan 30, 2009 7:41 pm
Glen wrote:To gain additional front suspension travel, I installed R129 SL upper strut mounts. If you do this, replace the bump stops and it would be a good idea to cut your old ones down to 1 inch and add them in addition to the new ones. If you don't, on full compression, the tires will contact the upper wheel house.
Hi Glen got a question: If you replace the strut mounts with R129 you gain suspension travel but if you bottom out and have to add an additional 1" bump stop doesn't this negate any gains you may have?
Lexluther
===================================
Postby Glen on Fri Jan 30, 2009 8:51 pm
Yes and no. Our bump stops are made of micro cellular urethane and engineered to provide a progressive squish upon compression. So, there is extra travel in the suspension but as you point out, some of it is limited by the extra bump stop material.
On the other hand, there is another benefit to using the R129 mounts. As you probably know, stock 500E struts have internal spring buffers that work in the rebound direction. At stock height, this marginally helps the car resist body roll. When you lower a 500E, the new ride height position moves the strut piston further away from the rebound buffers so you may feel as though the car leans more on initial turn-in. With the R129 mounts, the strut pistion is closer to the buffers, in my case, actually a bit closer than stock.
Now, don't take this too far. The buffers don't make that much of a difference but I believe it's noticeable. It's probably more effective to install larger sway bars but every little bit helps.
===================================
Postby omegabenz on Fri Jan 30, 2009 10:45 pm
Glen wrote:As you probably know, stock 500E struts have internal spring buffers that work in the rebound direction. At stock height, this marginally helps the car resist body roll. When you lower a 500E, the new ride height position moves the strut piston further away from the rebound buffers so you may feel as though the car leans more on initial turn-in.
Now if the SL mounts were a lot stiffer than the stock 500E mounts, then you'd really have a great combo, but they are not. Something more rigid would definately help with initial turn-in response. Such as RDMTEK mounts. RDMTEK mounts could mount higher in w124s and R129s, but in w201s they barely clear as it is. So we wanted them to work in all three chassis, and that is why they are that height.
http://www.rdmtek.com/Shock_Towers.html (scroll down for more info on height)
Neil was talking about spraying urethane into motor mounts and tranny mounts, maybe you could do this with your SL mounts to stiffen them up.
I dont have the link anymore of what Neil was doing.
===================================
Postby Alpina on Sat Jan 31, 2009 7:48 am
Extreme clean and good looking
Sveinbj?rn Hrafnsson
ALPINA BITURBO 346@507
E30 CABRIO S38B38
Alpina


")

 As always your car looks awesome. That silver is a great color.


 the spoiler


