• Hi Guest !

    Welcome to the 500Eboard forum.

    Since its founding in late 2008, 500Eboard has become the leading resource on the Internet for all things related to the Mercedes-Benz 500E and E500. In recent years, we have also expanded to include the 400E and E420 models, which are directly related to the 500E/E500.

    We invite you to browse and take advantage of the information and resources here on the site. If you find helpful information, please register for full membership, and you'll find even more resources available. Feel free to ask questions, and make liberal use of the "Search" function to find answers.

    We hope you will become an active contributor to the community!

    Sincerely,
    500Eboard Management

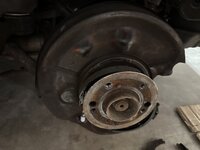
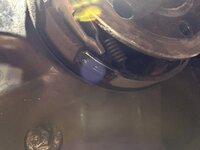
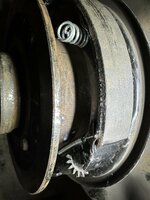
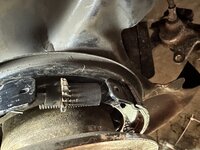
Parking brakes shoes

4451533

E500E Enthusiast
Member
Any tips how to change the brakes show in the rear wheels?

Any special tools?
 

Attachments

  • IMG_2138.jpeg
    IMG_2138.jpeg
    1.1 MB · Views: 6
  • IMG_2137.jpeg
    IMG_2137.jpeg
    1.3 MB · Views: 7
Follow the FSM procedure. These shoes rarely need replacement, because they don't wear out unless you drive with the parking brake engaged.

Some generic special tools, for the weird springs, can be helpful. There are some generic drum brake tool kits that may have useful items. You can use pliers and screwdrivers instead, but it will take longer and increase donations to the swear jar.

:duck:
 
Follow the FSM procedure. These shoes rarely need replacement, because they dont wear out unless you drive with the parking brake engaged.

Some generic special tools, for the weird springs, can be helpful. There are some generic drum brake tool kits that may have useful items. You can use pliers and screwdrivers instead, but it will take longer and increase donations to the swear jar.

:duck:
Do you have the FSM pdf?

Any tools pics for reference ?
 
Look at these:

Drum Brake Spring Pliers Kit, 3 Piece

The spring pliers are your best friend when it comes time to get the spring(s) hooked back into the shoes. I think. I haven't done parking brake shoes in a long, long, time. Buy the brake kit from the dealer and you'll be pleased with everything it includes.

Dan
 
Here's a discussion on the tools for the rear brake shoes.
 
@gsxr,
Dave can you post that 42 Brake System for
@Whitemamba23. I’m sure he could use it.
I don’t know do it on my I-Phone.
Click / tap on the link in my previous post, scroll down a bit... then click/tap on the desired procedure. I think 42-0530 is what he's looking for?

:scratchchin:
 
Thanks. I succeeded to install the first shoe but I cant link the bottom spring to the second shoe.

This is the hardest job in this car …
 
the shoes have been replaced.. but now the rotor cant be installed

It looks that the shoes are out of the diamter of the rotor

When I press the parking brakes there is nothing on this side.

Any idea?
 

Attachments

  • IMG_2151.jpeg
    IMG_2151.jpeg
    2.1 MB · Views: 11
  • IMG_2153.jpeg
    IMG_2153.jpeg
    3.7 MB · Views: 10
  • IMG_2152.jpeg
    IMG_2152.jpeg
    1.9 MB · Views: 10
Assuming the adjuster is fully retracted and the cable is released... how far off are we talking here? Maybe 1mm away from fitting, or a large amount?
 
Does the cable have an adjustment on a W124? If so, lengthen the cable a bit. You may also have to do both sides and retract both adjusters.
 
Last edited:
The adjuster in the driveshaft erea lchecked. The right side cable tight and the left one slack. It can be that the cable disconnected from the brake module ? I cant see it unless I remove shoes again 😟😟😟😟😟😟
 
Sounds like an adjustment issue of some sort, and/or the shoes not seated properly... I'd double check everything.

Identical issue on driver & passenger side, btw? Or only one side?
 
Sounds like an adjustment issue of some sort, and/or the shoes not seated properly... Id double check everything.

Identical issue on driver & passenger side, btw? Or only one side?
Have not started the other side
 
Review sections 4261 & 42-0520 thru 42-0540 again. It appears to me you only have 3 adjustment points. Screw 89 on main cable and brake adjuster 105 on each wheel. 105 should be able to remove any slack from the main cable to the wheels. I think?
 
Tried evertything
 

Attachments

  • IMG_2160.jpeg
    IMG_2160.jpeg
    1.7 MB · Views: 7
  • IMG_2155.jpeg
    IMG_2155.jpeg
    1.9 MB · Views: 7
  • IMG_2154.jpeg
    IMG_2154.jpeg
    2 MB · Views: 6
  • IMG_2153.jpeg
    IMG_2153.jpeg
    3.7 MB · Views: 6
  • IMG_2151.jpeg
    IMG_2151.jpeg
    2.1 MB · Views: 6
  • IMG_2150.jpeg
    IMG_2150.jpeg
    2.5 MB · Views: 7
Basic, but worth checking.

Have you compared the old shoes to the new, for exact circumference and design?
Is there a ridge on the outside of the drum? If so, check to make sure the ridge is not accumulated rust/debris.
Have you checked that all cable ferrules are seated properly, and the actual foot lever is completely released?
If you have not started the opposite side, I would do so. It may provide insight.
 
You should be able to ascertain whether the shoes are completely reduced to their smallest physical circumference. If so, and there is no accumulated rust on the lip of the drum, this would indicate improper manufacturing tolerances. This could be shoe material thickness or casting intolerance where metal portion of shoe contacts adjuster or opposite end. I'm doubtful, however you seem to be close to this explanation.

Obviously, things should not be this tight, and even if you get the drum on you may have issues with brakes dragging. Is there any significant ridge on the drum?

Right side cable should not be tight with P. brake released. I would inspect the opposite brake.
 
Use FSM 42-0228 (Checking, Removal & Installation of Brake Discs on Rear Axle) & FSM 42-0530 (Removal & Installation of Parking Brake Shoes) for procedural guidance. Not every step is necessary.

The Harbor Freight drum brake tool kit will not work for E500E parking brake shoe replacement. It is meant for actual drum brake shoes as found on older vehicles. These shoe types are greater in size. The HF tools are too big to fit any access hole for star adjusting or installing/removing the retaining springs. The pliers are also light duty & under heavy use will fail at the pivot point (I “consumed” a pair during a period of time when my Snap-ons were MIA. I have since found the 50 year old Snap-on pliers & they are still going strong).
Drum Brake Tools.jpg

The proper tools can make all the difference in a happy, timely job completion. I do not have either MB special tools 116 589 62 00 or 112 589 09 61 00. I discovered that pliers with a 0.25”(6.35mm) jaw width did a very good job in quickly removing/installing retaining springs (107).
IMG_5577.jpg
IMG_5578.jpg
IMG_5573.jpg

Regarding retaining spring (107) installation, I used a paint pen to draw a line across the coils identifying the location of the hooked end. This lets me know while compressing/turning the spring when it is properly seated at 90 degrees within its slot.
IMG_5570.jpg
Once the shoes were installed, I grabbed the entire assembly with my hands & manhandled it a bit to make sure the components were fully seated & secure.
 
I would recommend Uncle Kent's tool set for doing the parking brake job. It definitely takes the "dread" factor out of doing this, and actually works quite well.


I don't believe the factory tool for this is even available from MB anymore.
 
Interesting. I've had one of these tools in my box for years and didn't know what it was. At my age I have replaced many shoe-in-drum brakes and always just made do with pliers and levers which would frequently result in crawling around the garage looking for springs that had jettisoned.
 

Who has viewed this thread (Total: 1) View details

Who has watched this thread (Total: 3) View details

Back
Top