• Hi Guest !

    Welcome to the 500Eboard forum.

    Since its founding in late 2008, 500Eboard has become the leading resource on the Internet for all things related to the Mercedes-Benz 500E and E500. In recent years, we have also expanded to include the 400E and E420 models, which are directly related to the 500E/E500.

    We invite you to browse and take advantage of the information and resources here on the site. If you find helpful information, please register for full membership, and you'll find even more resources available. Feel free to ask questions, and make liberal use of the "Search" function to find answers.

    We hope you will become an active contributor to the community!

    Sincerely,
    500Eboard Management

PWNER - gerryvz

I have had other priorities over the past couple of years car-wise. But now that the SEC is alive and kicking, I'm going to put some time into focusing on the passenger side seatbelt presenter (will lift the door sill and examine and trace the wiring), and diagnosing the ABS light. Should be pretty easy to remove the front wheels and clean the magnetic pickups. I believe that may be the problem. I need to install that fuel line, too.

Back glass will be a project for another day. I got a new MB seal some time back from @nocfn for that project.

Next month is 19 years owning my 560SEC. I bought it in 2002 from Robert Fenton, and have put more than 100,000 miles on it since I got it.
 
Thanks for the tip, Roy! I'll jack up the front on each side and take a look. Hopefully it's that simple.....
 
Thanks for the tip, Roy! I'll jack up the front on each side and take a look. Hopefully it's that simple.....
There might be some rust in the round bore the sensor sits in. That combined with the o-ring that is on the sensor itself may impede the removal of the sensor. Pulling it out while wiggling may do the trick.

If not, the only alternative you have is to remove the rotor with the hub (caliper and brake pads removed too) and that will expose the sensor at the other end too (the magnetic tip end). You can clean its magnetic tip while installed, or you can push it out with a socket. On my 560SEC I was not able to remove them, only on my 420SEL. Good luck.
 
Gerry we added a Covered outdoor living area by extending the roofline over the existing pool
Deck. Gave us 18x30 living space we use daily - never regretted the project.
 
First, here's a photo of the Luger, immediately before commencing disassembly. Before you begin, you need to triple-check that the pistol is not loaded, both by removing and visually inspecting the magazine to ensure that contains no bullets; and also to cycle the pistol's toggle upward and back, to expose the firing chamber. You want to make sure there are no bullets in the chamber, or in the magazine. As mentioned, do both of these checks three times to make sure.
120308-13545179ca7a980e3ecfdc653799fc5f.jpg
@gerryvz - I enjoyed stumbling on to this thread sharing some of your small arms arsenal and especially seeing your 1914 Erfurt Luger. Interesting and news to me on the .30 caliber rifling and thought I'd share my 1913 Erfurt, 9mm for your info...This was a gift to my dad from his good friend Howard Levis, who was a manufacturing gunsmith affiliated with Winchester, Browning, Savage and others in the '40's through 60's and this is the first pistol I ever shot as a youngster. I agree that it is a superbly built, light, accurate and reliable weapon. Now that I bring it out from the safe I should take it to the range for a good workout. So here are a few pic's and in particular wanted to show the holster which I assume is almost 110 years old as well. Nice Leather. Also it is a numbers matching gun with the exception of the tear down lever. It do not think it is especially rare or expensive but is a great shooter.

IMG_0325.jpeg IMG_0329.jpegIMG_0331.jpegIMG_0330.jpegIMG_0332.jpegIMG_0333.jpeg
 
Did a lot more work today to bring the SEC back from 26 months of rest.

First, I vacuumed all of the small leaves that were in the sides under the hood and the fuse box area. Wasn't bad, but there were some leaves and detritus down there that I was able to pretty much suck all out.

Next, I took the shop vac and sucked up all of the cob webs that had built up under the car.

Then I removed each front wheel (jacked up each side of the car) and removed and checked the ABS wheel sensors. Both were in pretty good condition with little to no iron filings on them. However, the wiring and sheathing is old, and cracked, and in need of replacement. These cables are still available, but are not cheap. Nevertheless, I believe that I will order a pair.

While I had the lug bolts off the car, I ran over each one with a wire wheel (there was a slight bit of surface rust on many of them) and then clear-coated them with some automotive clear-coat paint - two coats. We'll see how that holds up, but the lugs look much nicer. I need to do the same with the rears, and will try to tackle that over the weekend when I have some time.

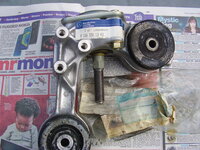
What is more concerning is that I saw that the brake support rod bushings on both sides are TOAST. Everything else looked in pretty decent condition with the front suspension, but those brake support bushings are going to have to be replaced. I guess that means a complete dog-bone removal and refurbishment. It's been 19+ years, so I can't complain about this. Needless to say, will be good fodder for a future HOW-TO.

I cleaned off the engine and the engine compartment. It was quite dusty from the car's slumber under the car cover, but it cleaned up nicely. I'll go over everything again a second and then a third time, but it's looking fairly clean. It's hard to believe that it's been 11+ years and about 65,000 miles since I pulled the heads and redid the top end of the engine.

The most nagging issue that happened not long before I stopped driving the car, was an ABS light that would come on not long after starting the car and driving a little ways. The ABS pump was sort of freaking out, and then it would just stop and the ABS light would come on. This is why I checked the ABS wheel sensors - I thought that they might be clogged with iron filings (they weren't).

The next step in the ABS system diagnosis was to check the two relays on the top of the pump, underneath the plastic cover. I happened to have a spare pump from a wrecking yard, because the pump is shared with my G-wagen. I cannibalized the two relays and installed them, and drove the car for a three-mile test drive before dinner. No ABS light. I'm not quite ready to call this one solved, but it is looking promising.

A lot more to do, but the next thing I will tackle is the wiring for the passenger side seatbelt presenter. I believe this wiring was compromised when the body shop put the door sill plate and everything back together after the accident repair. I did a fair bit of diagnosis of the mechanism itself, and have 2-3 spare arms for that side, as well as 3-4 spare relays. Nothing changed when I swapped out parts, so I believe that a wire may be shorted between the door switch and the rear window area. So I will attack that issue next.

Lots more to do, including the rear suspension, which I need to finish the removal and installation of. I have all of the parts needed and will try to get to this in the coming couple of weeks.

:update: Problem is confirmed solved. Took another 10-mile test drive and the ABS pump fired off in the driveway as I started moving, as it is supposed to. Glad it was an easy fix. Glad I had the spare pump to donate the relays. I am going to have to get another pair or two on the next couple of ABS pumps I find.
 
Last edited:
It is your turn for relay issues Honch! That guide rod mount is intersting. I did the job, and it wasnt so bad. My dog bushes were replaced with MB not long after I got the car so they were ok. I used a ratchet strap to get it close and marked the threads perfectly. Hunter Machine at MB The Woodlands had me off just a bit.
 
However, the wiring and sheathing is old, and cracked, and in need of replacement. These cables are still available, but are not cheap. Nevertheless, I believe that I will order a pair.
IIRC the cables come wired on the sensors. The cables would not be expensive, is the sensor that is attached to it that is. A small repair might also be in order for a while.

IMG_20200409_023813.jpg


I guess that means a complete dog-bone removal and refurbishment. It's been 19+ years, so I can't complain about this. Needless to say, will be good fodder for a future HOW-TO.
I am assuming you are referring to the big threaded ball joint that the rod gets connected to. If yes, then after the replacement you will have to have an alignment done. Because of what, instead of getting them off and refurbishing them, you can use a different strategy (have a refurbished set of dog-bones ready to go):
a) Get yourself two dog-bones in very good condition; those two big bushings last a long time, so it shouldn't be hard to find a pair in very good condition. Have the new ball joints installed on the bench and do a swap of dog-bones. That would take half a day.
b) Get yourself a set of dog-bones and take your time to clean them, install all new parts on them (bushings and threaded ball joints), paint them (if desired) and then swap.

I chose option b and did the swap in half a day. I was in no rush and decided to do the job completely, so I got all parts new (big rubber bushings too). I did that on both cars I have.

IMG_20200803_221629.jpgIMG_20200804_222954.jpgIMG_20200805_233611.jpg

Glad I had the spare pump to donate the relays. I am going to have to get another pair or two on the next couple of ABS pumps I find.
Do you please have the relays PNs, or the installed location? If it happened to you, it can happen to others and I am interested in getting a spare set.
 
Last edited:
Yes. You need to use a small Torx bit to remove the plastic cap from on top of the ABS pump.

There is a silver ice cube relay, and a black plastic covered BOSCH ice cube relay under the cap. The ice cube relay IS NOT the same as the ones in the fuse box. It is specific to the ABS pump, and has six prongs. The silver ice cube relays in the fuse box only have five prongs.

The part number for the ABS silver ice cube relay is 001 542 67 19. $45 list price; ~$33 discounted
The part number for the black ABS ice cube relay (Bosch part number; no MB part number on it) is 0 332 002 171. I believe the MB part number is 001 542 65 19, MB list price $66, discounted ~$50.
 
@gerryvz - I enjoyed stumbling on to this thread sharing some of your small arms arsenal and especially seeing your 1914 Erfurt Luger. Interesting and news to me on the .30 caliber rifling and thought I'd share my 1913 Erfurt, 9mm for your info...This was a gift to my dad from his good friend Howard Levis, who was a manufacturing gunsmith affiliated with Winchester, Browning, Savage and others in the '40's through 60's and this is the first pistol I ever shot as a youngster. I agree that it is a superbly built, light, accurate and reliable weapon. Now that I bring it out from the safe I should take it to the range for a good workout. So here are a few pic's and in particular wanted to show the holster which I assume is almost 110 years old as well. Nice Leather. Also it is a numbers matching gun with the exception of the tear down lever. It do not think it is especially rare or expensive but is a great shooter.

View attachment 136296 View attachment 136293View attachment 136295View attachment 136294View attachment 136297View attachment 136298
Very very nice, and thank you for sharing !!

The .30 Luger (.30 Parabellum) actually preceded the 9mm Parabellum round, and the 9mm was developed from the .30 Luger by removing the "necked down" area on the brass case and adding slightly more powder and a larger projectile. The Swiss Army was actually the first to adopt the Luger, and they adopted the .30 caliber. The .30 and 9mm both fit in the same Luger magazine.

I wish I'd have gotten a holster and spare magazine, but as far as I know my grandfather never had them. I recently purchased a nice, authentic reproduction of a Luger holster with a 1916 date stamp on the back, as well as a reproduction Luger takedown tool, and a spare magazine with wooden grip at the bottom.

.30 Luger rounds are only made by Fiocchi and Prvi Partizan, so while they are available, they are not common, nor are they cheap like 9mm rounds are. Typically they run $1.50-2.00 per round, in boxes of 50. Fiocchi makes two variants -- one with a soft tip (lead) and one with a full metal round. My Luger doesn't like the lead-tipped rounds and about 40% of the time they will not feed, because the soft lead hangs up on the corner of the chamber when trying to feed in. The full metal rounds feed perfectly, 100% of the time.

Cheers,
Gerry
 
Would this be any use to you Gerry ? I bought it for mine but ended up getting my originals
rebuilt and I just dont see me needing it now, it is quite heavy so shipping might be expensive.
£100 (what I paid originaly) plus shipping at cost. Part no is A126 330 1343
Graeme Johnson
 

Attachments

  • P4100245.JPG
    P4100245.JPG
    676.8 KB · Views: 10
I've cleaved this thread off on the 126board.com for 126-related stuff, but I thought you guys would be interested in my latest resto project. The hood badges for the 107 and 126 models have gone NLA over the past 18-24 months. Which is not horrible, because the ones they've been selling for the past 10-15 years have been utter CRAP, with a blue anodized paint around the Mercedes-Benz words and wreath.

This blue anodization wears off with ANY exposure to sun or weather, usually within 18-24 months -- completely gone. The current badge I have, I replaced 2.5 years ago with a new one. And the car has been under a car cover ever since, and the badge is STILL completely faded. And that was after I put SIX coats of clear-coat paint on it immediately before I installed it. Didn't do a whit of good.

The older badges had "real" blue paint that did fade, but took many years to do so.

So, I've taken on a project to painstakingly restore the three spare hood badges I've got, two of which are faded, and one of which is a slightly faded "original MB" badge with still fairly strong blue paint.

In the photos below, you can see the badge I'm painstakingly painting by hand, with blue enamel paint. The lower part of the badge is the anodized blue part that fades. This is done totally by hand with an extremely fine brush made from the hair of a special species of Canadian squirrels (no joke -- this is 100% true) and a blue enamel paint that is made especially for trim applications. This is about 20 minutes' worth of work. The badge will received TWO coats of the blue enamel paint, and then some coats of clear. Then I'll do the faded badge that is on the car right now.
BF9FC7DA-9BC1-4D95-A0F7-980F8009E610.jpeg 09557AF9-0629-4C4B-B25E-C5D20CABF101.jpeg 228658C0-87BF-45F8-BB20-2122394E1423.jpeg

The other photo is the moderately faded but "real" MB blue painted badge that they used to sell 20-25 years ago before they cheapened them with the blue anodization.
2B9388CB-DF1F-42D7-88D0-54520D088CBE.jpeg

And, a comparison of the in-process badge with the "real" old MB painted badge.
C6BD6369-FFC5-41BE-85BF-2FA0794D0668.jpeg 500444F5-5C88-4529-AA2E-23D13678BBB7.jpeg
 
Is there any clear coating with high enough UV protection / SPF to make the weak new blue last longer?
 
Looks great!

Tedious work to do it right, done this many many years ago on W201, wanted the background to be black, to go with black on black theme and powdercoated grill frame. Results are rewarding for sure!
 
Congrats! Hope you're able to enjor the Holiday Season as well.

I'd love to know what blue enamel paint you're using, and what brush. My cars needs a new badge and while I do like the patina, the overall vibe I'm going for is factory fresh so it needs updating. Porsche has the same issue as Benz, the 'new' badges are waaaay worse than the ones that came from the factory 20+ years ago and fade in a year or two, so the choice is either cycle through every few years, find a mint one online off a low mileage car that sat in a garage, or repaint yourself. Disappointing to see these great Marques let such a part so critical to their image be cheapened, tho I'm sure paint regs play no small role.
More info about all that here.

 
Congrats! Hope you're able to enjor the Holiday Season as well.

I'd love to know what blue enamel paint you're using, and what brush. My cars needs a new badge and while I do like the patina, the overall vibe I'm going for is factory fresh so it needs updating. Porsche has the same issue as Benz, the 'new' badges are waaaay worse than the ones that came from the factory 20+ years ago and fade in a year or two, so the choice is either cycle through every few years, find a mint one online off a low mileage car that sat in a garage, or repaint yourself. Disappointing to see these great Marques let such a part so critical to their image be cheapened, tho I'm sure paint regs play no small role.
Or you search for a NOS badge. They were identical on the w201, so that helps in locating one (after my brand new badge started to fade after two hand washes of my car - ridiculous).

I managed to find one on ebay-kleinanzeigen.de Took me about a month of searching but very much worth it, as the old stuff is crafted to such a superior quality standard. It's been on the car for more than 6 months, had plenty of hand washing and looks like it came out of the box
 

Attachments

  • [500Eboard] E60FC4D1-C848-48B6-87F6-948346E7599B (1).jpeg
    [500Eboard] E60FC4D1-C848-48B6-87F6-948346E7599B (1).jpeg
    1.6 MB · Views: 6
Last edited:
Installed the new Bluetooth-enabled BE 1480, which I had sent into Becker for both a refirb and Bloot install.

Took all of 5 minutes, and it immediately paired up with my iPhone.

Works swimmingly. Also tried the cassette mechanism (also working well), and the radio overall sounds much better than it did before. The @Jlaa would be very proud.

Well worth the $300 to get the radio gone through and the Bluetooth installed.

Inaugural song on Bluetooth: Goin' Crazy by David Lee Roth

Inaurural song on cassette: Makes No Sense at All by Hüsker Dü

Definitely made me flip my wig!

C0DF0C7E-490B-4C8F-AF31-ABDDB30C8D3B.jpeg 5F077661-805D-43B8-A466-4DD8E9A8D6C1.jpeg 2C83E7F6-EA5C-4D98-8CDB-DDA22EDEABFD.jpeg 3F44ADB4-9F72-498D-9CD6-77FB39453579.jpeg 8085AE58-6979-4B15-AE1E-26F7943B6A3C.jpeg 009A38E0-A80C-4717-BA4F-27C59A972E92.jpeg
 
I have a new technique for painting the hood badges that takes about 20 minutes, rather than two hours.

The job is divided up into two parts.

1) "Flood zone" where the MERCEDES-BENZ lettering and laurel wreaths are at with the blue enamel paint. Paint the whole channel/area. If you get a little on the edges that border the zone, that is fine.

2) Let the paint dry for 24 hours.

3) With a razor blade, carefully scrape the raised surfaces with the edge of the blade -- the tops of the letters and laurel/wreaths, and the border edges if you got any paint on the raised border edges.

It will take about 5-10 minutes to paint the zone, and another 5-10 minutes to scrape the dried paint off of the raised surfaces.

And it will come out looking just like this.

2E720740-BA86-458B-AD22-9780C980D122.jpeg F14A0322-5AA0-40E6-BEF7-8911147E01F7.jpeg
 
A good approach, Gerry, however, I do the "flood" approach and then use a cot swab that's been "spun" to remove any filaments to carefully wipe off any paint that's gotten to the lettering or laurels. I also use acrylic enamels that are common in craft stores, which makes it easy to match the original paint colors.

I do the same with the white sections of the tristar as well.

Dan
 
I found if you lightly scrape the lettering/laurels with the blade in a VERTICAL orientation (not angled), there will be no damage or scraping to the soft aluminum. It will just scrape (flake) off the enamel paint. The paint I used is a body enamel paint used for pinstriping, so I think it may be better than Testor's or Tamiya model enamel paint.
 
Installed the new Bluetooth-enabled BE 1480, which I had sent into Becker for both a refirb and Bloot install.

Took all of 5 minutes, and it immediately paired up with my iPhone.

Works swimmingly. Also tried the cassette mechanism (also working well), and the radio overall sounds much better than it did before. The @Jlaa would be very proud.

Well worth the $300 to get the radio gone through and the Bluetooth installed.

Inaugural song on Bluetooth: Goin' Crazy by David Lee Roth

Inaurural song on cassette: Makes No Sense at All by Hüsker Dü

Definitely made me flip my wig!

View attachment 141380 View attachment 141381 View attachment 141382 View attachment 141383 View attachment 141384 View attachment 141385
By the way, following up on this - the Bluetooth mod is really seamless and works EXCELLENTLY. I have to say that the stock SEC radio system sounds MUCH BETTER than the stock system as used in the later E500 models with the BE 1492 radios.

One other thing -- Becker does offer the same Bloot modification for the BE 1492 (facelift) radio models, as well as the 1992-1993 500E BE 1432 two-piece radios, if you want to retain your stock radio for appearance. There is no outward indication that Bloot has been installed in the radio, and no loss of radio functionality.

For my BE 1480 with the Bloot mod, you just switch it to "AM radio" mode via the push-button preset, and that activates Bloot mode if your phone is paired with it. If your phone is NOT paired, AM works as normal. FM and cassette (remember those?) mode work as stock. I actually have been listening to some cassettes, for @Jlaa/old-time sake.
Awesome! There is no better radio that fits the character of our cars than the OE ”volume bar” style Beckers - in all fheir inscrutable complex glory!
 
I found if you lightly scrape the lettering/laurels with the blade in a VERTICAL orientation (not angled), there will be no damage or scraping to the soft aluminum. It will just scrape (flake) off the enamel paint. The paint I used is a body enamel paint used for pinstriping, so I think it may be better than Testor's or Tamiya model enamel paint.
I’ve had good luck with these plastic razor blades

FOSHIO Plastic Razor Blade Scraper Include 2PCS Scraper Tool and 100PCS Blades for Gasket Remover, Labels Decal and Adhesive Remover for Windows and Glass https://www.amazon.com/dp/B076BBW1W...abc_0BWSJ60E2J87G8VR5SGD?_encoding=UTF8&psc=1
 
Congrats on your 2000th post, @LWB250! We need you to buy another 124 project and add more neat content to the forum.

:jono:

View attachment 141793
Thanks!

Yeah, I don't see that happening in the near future, unfortunately. Focusing on living in multiple locations and minimizing clutter. That and I don't have space for a project right now. The third garage slot in Flagstaff is being used by a friend of my son's, but if that opened up I would considering it. After I finish weatherizing the garage and setting up a heater/furnace so I can work in it year 'round, of course. I have to admit I've seriously considered a Porsche 944 as my next project car...

Dan
 
Awww, c'mon Dan, you know you need to experience an 036 IRL! Bucket list item, right?

:jono:
 

Who has viewed this thread (Total: 7) View details

Back
Top