• Hi Guest !

    Welcome to the 500Eboard forum.

    Since its founding in late 2008, 500Eboard has become the leading resource on the Internet for all things related to the Mercedes-Benz 500E and E500. In recent years, we have also expanded to include the 400E and E420 models, which are directly related to the 500E/E500.

    We invite you to browse and take advantage of the information and resources here on the site. If you find helpful information, please register for full membership, and you'll find even more resources available. Feel free to ask questions, and make liberal use of the "Search" function to find answers.

    We hope you will become an active contributor to the community!

    Sincerely,
    500Eboard Management

Woodwork, do you hate it?

Mish_Mish

E500E Enthusiast
Member
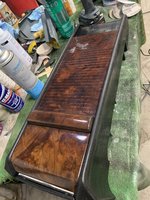
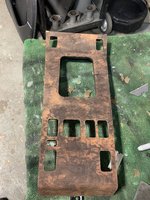
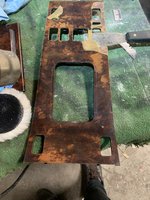
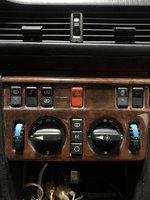
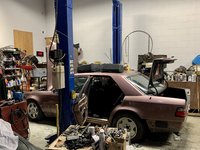
After careful consideration and due to multiple reasons (mostly money), I have decided to tend to my wood personally.
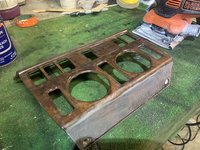
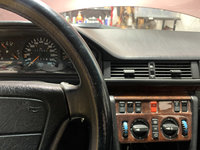
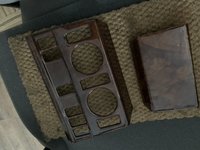
I had some screwdriver damage and age related cracking on the center console pieces.

Step one and two are done:

- sanding down and stripping the original coating (as much and as thin as possible) was not easy. Material MB used is extremely durable and does not dissolve. I tried to not run through the veneer with sandpaper but ended up with couple of little nicks that I had to touch up.
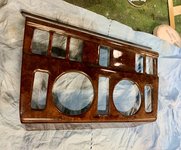
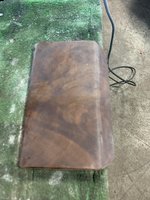
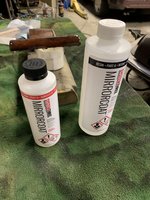
- applying epoxy new coating, at the local woodwork store, I picked the most robust epoxy coating I could find.

So far it set nicely, with no splits of fisheyes.
I am sure there will be constructive criticism and I am open to it, pics are attached.

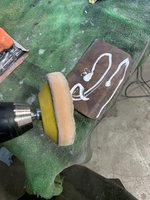
P.S. Step three will be sanding off imperfections (another layer if needed) and buffing.
 

Attachments

  • IMG_2641.JPG
    IMG_2641.JPG
    1.9 MB · Views: 44
  • IMG_2642.JPG
    IMG_2642.JPG
    1.9 MB · Views: 45
  • IMG_2643.JPG
    IMG_2643.JPG
    1.7 MB · Views: 44
  • IMG_2644.JPG
    IMG_2644.JPG
    1.8 MB · Views: 42
  • IMG_2646.JPG
    IMG_2646.JPG
    4.2 MB · Views: 41
  • IMG_2647.JPG
    IMG_2647.JPG
    4.1 MB · Views: 41
  • IMG_2648.JPG
    IMG_2648.JPG
    4.2 MB · Views: 39
  • IMG_2649.JPG
    IMG_2649.JPG
    3.9 MB · Views: 37
  • IMG_2650.JPG
    IMG_2650.JPG
    1.7 MB · Views: 38
  • IMG_2741.JPG
    IMG_2741.JPG
    4.3 MB · Views: 40
  • IMG_2426.JPG
    IMG_2426.JPG
    1.3 MB · Views: 40
  • IMG_2430.JPG
    IMG_2430.JPG
    807.4 KB · Views: 39
  • IMG_2593.JPG
    IMG_2593.JPG
    2.5 MB · Views: 38
  • IMG_2594.JPG
    IMG_2594.JPG
    1.7 MB · Views: 44
I've tried sanding through the factory finish on scrap pieces in the past but wasn't able to do it successfully. And like you, I couldn't find a chemical stripper that removed it. I'll have to try sanding again someday...
 
I've tried sanding through the factory finish on scrap pieces in the past but wasn't able to do it successfully. And like you, I couldn't find a chemical stripper that removed it. I'll have to try sanding again someday...
I left a thing layer of original coating in some areas, it was so damn strong that I figured it was safer to leave it than risk a hole in the veneer. Under new coat it is all blended with my tiny repairs and sharpie drawing where screwdriver did the damage.
 
Looks good, if the wood veneer itself is not damaged (mechanical, water) it should be possible to have good results.

Did you sand all the way down to the wood or leave a thin layer of clear coat?
Old crack marks still visible from under the new clear?
 
I believe it was JC220 that did this work and has a DIY. If I remember correctly He removed the epoxy finish with heat and a putty knife. Your results look good in the pictures.

drew
 
Looks good, if the wood veneer itself is not damaged (mechanical, water) it should be possible to have good results.

Did you sand all the way down to the wood or leave a thin layer of clear coat?
Old crack marks still visible from under the new clear?
I left thin layer here and there, that stuff is rock solid. Thin layer of original stuff has perfect transparency, so I cannot see where it was. Old cracking is not visible, this coating is thick and floats / cures over it.
 
I think the original coating is polyester resin, it definitely smells like it when I did some sanding.
I'm currently attempting to repair some cracks and leaving most of the original coating, I'll have to wait and see how it turns out.
 
I think the original coating is polyester resin, it definitely smells like it when I did some sanding.
I'm currently attempting to repair some cracks and leaving most of the original coating, I'll have to wait and see how it turns out.
I am waiting on the 72 hours of setting, before I can sand and hopefully buff it. One thing for sure, this material is not splitting over the cracks like other lacquers do, it flows over solid.
 
I've always wondered if the holes in the woodwork was punched using dies after the woodwork was finished. I speak as a very experienced furniture builder that is quite familiar with any number of finishing methods. I say this because anywhere there is an opening on a piece of Mercedes woodwork the edge of the finished opening is square. As you can see in the photos here the finish is rounded around the openings, as it's rolling off the edges as it dries.

They also painted or sealed the edges of the openings, too. They used a black or gray finish to do this.

Dan
 
ended up with couple of little nicks that I had to touch up.
What did you use to touch up the nicks?

I have never done it before, so a lot of fear is also part of the process
What was your preparation process like, YouTube videos, forums, something else? I'm asking because I have never done it before too, but would like to one day.

What grit sandpaper did you use?

Thanks
 
What did you use to touch up the nicks?


What was your preparation process like, YouTube videos, forums, something else? I'm asking because I have never done it before too, but would like to one day.

What grit sandpaper did you use?

Thanks
To touch up the nicks in the veneer I used a mix of black and brown enamel, applied with the tip of the wooden sliver. in one place I used a black sharpie, thick clear coating covers all like it was never there.

To prep I used 320 grit paper to remove the old lacquer (very gently), then 1000 grit. after the new coating set I used 320 again (to level the surface flat) and then 1000 grit, after that $18 3M headlight buffing kit and 3M rubbing compound, grade 5.
 
So I am back after 72 hours and coating is set 100% firm. climate console is the first one tried and here are the early results.
 

Attachments

  • IMG_2775.JPG
    IMG_2775.JPG
    3.2 MB · Views: 30
  • IMG_2776.JPG
    IMG_2776.JPG
    3.4 MB · Views: 15
  • IMG_2777.JPG
    IMG_2777.JPG
    4 MB · Views: 13
  • IMG_2778.JPG
    IMG_2778.JPG
    1.8 MB · Views: 15
  • IMG_2779.JPG
    IMG_2779.JPG
    2 MB · Views: 14
  • IMG_2780.JPG
    IMG_2780.JPG
    3.5 MB · Views: 14
  • IMG_2781.JPG
    IMG_2781.JPG
    3.9 MB · Views: 13
  • IMG_2782.JPG
    IMG_2782.JPG
    3.2 MB · Views: 16
  • IMG_2783.JPG
    IMG_2783.JPG
    3.9 MB · Views: 18
  • IMG_2784.JPG
    IMG_2784.JPG
    1.5 MB · Views: 29
  • IMG_E2785.JPG
    IMG_E2785.JPG
    3.1 MB · Views: 30
Nice work. I think if you do some final work to buff that out (polish it) beyond what you've done, to increase the shine, it will look quite stunning. Though the last photo looks really excellent!
 
Nice work. I think if you do some final work to buff that out (polish it) beyond what you've done, to increase the shine, it will look quite stunning. Though the last photo looks really excellent!
I did more sanding and buffing, plus the fur wheel in the end. I think it is more than adequate for the mildly classic stature of my investment. Moving on to the other pieces. Will post further pics ad it get's put back in the car.
 

Attachments

  • a2EAJwn1Ge9CMIedeQhyIj1zV14-1920.jpg
    a2EAJwn1Ge9CMIedeQhyIj1zV14-1920.jpg
    770.2 KB · Views: 18
Rest of the parts, for now.
 

Attachments

  • IMG_2786.JPG
    IMG_2786.JPG
    1.6 MB · Views: 11
  • IMG_2790.JPG
    IMG_2790.JPG
    1.2 MB · Views: 9
  • IMG_2791.JPG
    IMG_2791.JPG
    2.1 MB · Views: 10
  • IMG_2792.JPG
    IMG_2792.JPG
    1.8 MB · Views: 10
  • IMG_2793.JPG
    IMG_2793.JPG
    1.9 MB · Views: 10
  • IMG_2794.JPG
    IMG_2794.JPG
    1.5 MB · Views: 7
  • IMG_2795.JPG
    IMG_2795.JPG
    1.5 MB · Views: 9
  • IMG_2796.JPG
    IMG_2796.JPG
    2 MB · Views: 9
  • IMG_2797.JPG
    IMG_2797.JPG
    1.8 MB · Views: 11
  • IMG_2798.JPG
    IMG_2798.JPG
    2 MB · Views: 12
Switching to the ski slope, as they call it in Jaguar community. Luckily it is much easier to remove clear coating off of that part with heat gun and sharp putty knife. Tomorrow I will apply epoxy and leave it to cure over the weekend.
 

Attachments

  • IMG_2914.JPG
    IMG_2914.JPG
    2 MB · Views: 16
  • IMG_2913.JPG
    IMG_2913.JPG
    2.4 MB · Views: 12
  • IMG_2910.JPG
    IMG_2910.JPG
    2.1 MB · Views: 16
  • IMG_2909.JPG
    IMG_2909.JPG
    2.1 MB · Views: 16
More progress, climate console looks better without gash in the middle but definitely will be considered for re-working as my skill grows.
Ski slope is now a step closer to beauty.
 

Attachments

  • IMG_2957.JPG
    IMG_2957.JPG
    1.8 MB · Views: 18
  • IMG_2958.JPG
    IMG_2958.JPG
    1.5 MB · Views: 17
  • IMG_E2969.JPG
    IMG_E2969.JPG
    4.3 MB · Views: 19
  • IMG_E2970.JPG
    IMG_E2970.JPG
    3.4 MB · Views: 19

Who has viewed this thread (Total: 1) View details

Who has watched this thread (Total: 2) View details

Back
Top