• Hi Guest !

    Welcome to the 500Eboard forum.

    Since its founding in late 2008, 500Eboard has become the leading resource on the Internet for all things related to the Mercedes-Benz 500E and E500. In recent years, we have also expanded to include the 400E and E420 models, which are directly related to the 500E/E500.

    We invite you to browse and take advantage of the information and resources here on the site. If you find helpful information, please register for full membership, and you'll find even more resources available. Feel free to ask questions, and make liberal use of the "Search" function to find answers.

    We hope you will become an active contributor to the community!

    Sincerely,
    500Eboard Management

1992 400SE No Start.

Juan Jose Velez

Member
New Member
Hi you all,


I just bought this 400SE with a no start issue. The usual process to erase codes and read new ones with a “Home Brew LED counter code reader” was performed. It only output a DTC “4” at PIN #4 in 38-pin test port. Besides that, no other DTC shows up from PIN #17 (DI) or PIN#8 (BM).

Wondering why no pinout cable exist at PIN#19 (DM) in the 38-pin test port. Thus, no PIN#19 DM reading was possible .

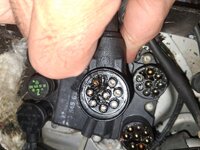
MAF Sensor connector pinout test results:

  • PIN#1 continuity to GROUND.
  • PIN#4 continuity to PIN#23 LH SFI ECU.
  • 12 volts when IGNITION ON.
  • PIN#2 continuity to PIN#34 LH SFI ECU.
  • PIN#3 continuity to PIN#37 LH SFI ECU.
  • PIN#5 continuity to PIN#17 LH SFI ECU.

Troubleshoot Test performed:

  • Continuity test from MAF sensor connector to LH ECU connector with successful results.
  • Compression test with an average of 150 psi at all 8 cylinders.
  • Smoke Test for Vacuum Leaks (no vacuum leaks at all).
  • Test Crankshaft Position Sensor resistance (839 ohms).
  • Test Fuel Pressure regulator, 54 psi at rest. 46 psi with vacuum applied.
  • New Fuel PUMP and Filter have been installed.
  • New Spark plugs, Cables and Coils have been installed.
Do CamShaft sensors have to do with this issue?

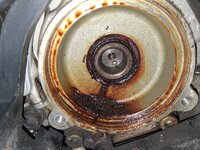
Apart , some Brittle in the Knock Sensor cable shows exposing the shielding wire which has contibnuity to GROUND.

Please any help would be appreciated.

Regards JJVV
 
Last edited by a moderator:
Pin #19 (DM) is only present on USA models with Check Engine Light. And, this may not be present on some early 1992 models. If there's no socket in position #19, most likely your car does not have the DM nor CEL.

It's possible that a no-start condition may have zero fault codes available. A bad MAF will not prevent the engine from starting. A bad CKP will cause a no-start condition, but your tested ok at 839 ohms, assuming you are testing the rear CKP which connects to the EZL (not the front CKP which goes to the 9-pin diagnostic port by the ABS pump).

Next test: Squirt some starting fluid down the MAF. See if the engine fires and dies. If so, your problem is lack of fuel delivery. If there is still no change / no fire with starting fluid, you have no ignition.

Welcome to the forum!

:welcome4:
 
Hi , thanks for your prompt response.

I took out all the spark plugs connected and lined up and grounded it in order. While cranking I saw a synchronized bright yellowish spark at them.

Really the engine has a rough start, but only by 10 seconds. Afterwards, no start issue arouses, a heavy not burned gasoline smell and spark plugs with a black carbon deposit.

It points to an Ignition problem or a too rich fuel ratio at the spraying injectors.

No distributor rotors or caps have been replaced. Just cleaned and revised for cracks.
 
OK - this is different from a "no start". It starts but runs bad. :rugby:

If you have confirmed spark at all 8 plugs, but the plugs are fuel-fouled after the rough start, it seems like there's an injection problem.

Do you have another LH module to swap in for testing? Doesn't have to be from a 4.2L, it just needs to be from any M119 with LH-SFI. There are a dozen or more different part numbers.

:detective:
 
Hi , yesss...! , I found one in the trunk with an older firmware, seems to be the car's original. The former owner has swap a LH-SFI with a newer version firmware. But apparently no luck with the swap.

Also another Base Module was found in the trunk.

I will try the swap to the originals older version.

Thanks

JJVV
 
No luck with older version LH-SFI.

I'll start checking harness to injectors , seems they keep open.

BTW , the injectors were overhauled by cleaning and checking volume testing at an specialzed shop.
 
Forgot to ask: Has the engine wiring harness been replaced on this car? If not... that needs to be done before anything else.

:shocking:
 
I did the Starting Fluid thing down the MAF , with the Fuel PUMP fuse disconnected.

It starts and keep with a rough idle by around the ten(10) seconds with a ticking valves lifters sound . Seems long time not running.

Then try with Starting Fluid and Fuel PUMP fuse connected didn't work at all. Seems it gets totally flooded.

The upper harness is the original factory cable assembly. But cables are not brittle nor seems plastic deteriorated.

Read about a lower engine harness , do it must be checked too?

I saw several Youtube about DIY harness rebuilt , do it is a good option?

A new or good used upper engine harness is too expensive , How much could it cost?
 
I did the Starting Fluid thing down the MAF , with the Fuel PUMP fuse disconnected.

It starts and keep with a rough idle by around the ten(10) seconds with a ticking valves lifters sound . Seems long time not running.

Then try with Starting Fluid and Fuel PUMP fuse connected didn't work at all. Seems it gets totally flooded.
That is odd. If the spark plugs are wet after this, it does seem to be flooding the engine with fuel. The rough idle on starting fluid alone could be due to wet plugs not firing. It should run smoothly on starting fluid (only for a few seconds) if all 8 plugs are firing. You can keep the engine running longer (few seconds) by adding short bursts of starting fluid, but there's not much point in doing that.


The upper harness is the original factory cable assembly. But cables are not brittle nor seems plastic deteriorated.
Look for a date code on the harness tag. If it's original from 1992, it is bad and must be replaced. The insulation crumbles and flakes off the copper conductors, causing them to short against each other. If the wire insulation is brightly colored and looks perfect, the harness has already been replaced in the past, but this will have a newer date code (after about 1998 or so).


Read about a lower engine harness , do it must be checked too?
The lower harness is probably original and in need of replacement, but this only goes to the starter, alternator, and oil pressure/level sensors. It won't affect engine operation and cannot cause fuel injection problems.


I saw several Youtube about DIY harness rebuilt , do it is a good option?
If you hare handy with electrical repairs, and can source wire with the proper high-temperature insulation, you can definitely DIY rebuild the lower. Kurth sells a repair harness here.

The upper is more difficult, don't mess with that. Just buy a complete used late datecode harness (or buy new, they are available, but not cheap). The 1993-95 harness may be interchangeable, and a brand new 93-95 upper harness is <$700 from discount dealers.


A new or good used upper engine harness is too expensive , How much could it cost?
The 1992 USA upper engine harness is A1405409505 and still available new, but is $1200 from discount dealers. There are several good used late-datecode harness on eBay available for under $400, click here. Double check the part number on your old harness tag. It's not worth attempting a DIY repair when you can get a good one under $400.

:spend:
 
Good Morning You All ,

I check the Factory Date of the upper engine harness , it was made by June , 21th 1996. The car's factory date is "October 1991" , thus, it seems it was replaced. I see the cables in good conditon.

Besides , I'm seeing like a brownish sticky syrupy material like molasses in the harness connectors of the Upper Engine Harness rectangular connector and the EZL round 8 pin connectors. Do I have to clean it?

Nevertheless , I,m going back to ignition troubleshoot. Even with the Starting Fluid Test and FUEL PUMP OFF , it is not running smoothly. It has like a poor spark or not spark issue at some cylinders.

Thanks

JJVV
 
I check the Factory Date of the upper engine harness , it was made by June , 21th 1996. The car's factory date is "October 1991" , thus, it seems it was replaced. I see the cables in good conditon.
That's a good sign. You can confirm by looking at the insulation exposed near the fuel injectors and intake cam solenoids. If the colored insulation is not cracked, the harness is fine.


Besides , I'm seeing like a brownish sticky syrupy material like molasses in the harness connectors of the Upper Engine Harness rectangular connector and the EZL round 8 pin connectors. Do I have to clean it?
Probably not, but can you post a photo? There isn't usually any goop in these areas.


Nevertheless , I,m going back to ignition troubleshoot. Even with the Starting Fluid Test and FUEL PUMP OFF , it is not running smoothly. It has like a poor spark or not spark issue at some cylinders.
You mentioned new plugs, wires, and coils. Have you pulled both caps & rotors for inspection? Also need to pull the rotor bracket and check the back side of the insulator, and verify the oil seal back there isn't leaking.

:klink:
 
Hi , Attached images of the Goop at the EZL Round 8 pins connectors.

About the CAPs', those test 1.01 Kilo Ohms at every plugs connector pins inner vs. outer , Coil Connector 1.216 Kilo Ohms inner vs. outer.

Rotors barely can take the resistance , I'll wire brush the inner center copper / bronze notch. It is not a bright and shinny copper / bronze color, it is dark opaque blackish color.

one of the CAP rotor was wrire brush. I test 1.01 Kilo Ohms center notch vs. outer copper/bronze edge.

Do the goopy sludge at the EZL connectors must be cleaned ?

What could I use to clean it?
 

Attachments

  • 1000001674.jpg
    1000001674.jpg
    2.7 MB · Views: 7
  • 1000001675.jpg
    1000001675.jpg
    2.1 MB · Views: 7
Last edited:
Oh wow. That is NOT normal. Remove all the goop from those EZL connectors. Everything should be dry. Almost looks like someone put grease in there on purpose? Why? Not sure how to clean it, other than using toothpicks and Q-tips with solvent.

The cap/rotor terminals don't need to be super clean, 20kV will blow right through any oxidation. How old are the caps? Is there any evidence of carbon tracking on the caps? Did you check the cam seals behind the rotor bracket? Any sign of engine oil at the lower edge of the cap? They should be dry.

:shocking:
 
Even, in the Upper Engine Retangular Harness Connector has the same sludge goop.

I'll try alcohol first , if it not work , then acetone.

About the cam seal behind the rotor bracket , an image is attached.

Do this have to do with the Ignition issue?
 

Attachments

  • 1000001676.jpg
    1000001676.jpg
    3.3 MB · Views: 9
Yikes. That's quite the oil leak. And yes, this can cause ignition problems. Replace both seals... they are not expensive, but the job isn't easy. The seals must be inserted perfectly even / parallel to the surface. Search the forum for more information on this job.

:duck:
 
@Juan Jose Velez,
Juan, I wouldn’t use any acetone or lacquer thinner for cleaning plastic parts. It will eat in to the plastic and painted surfaces. If you can get kerosene it’s a great cleaner for cleaning oil and grease and is harmless to plastic or paint. Also a basic paint thinner but make sure it has no bad additives in the mix.
 
Looks like someone got carried away with the di-electric tune-up grease. When you replace the cam seals make sure you clean up the oil residue underneath which could be causing the no-start issue. I use 3M Scotch-Brite pads with a degreaser like CRC brake parts cleaner (in the red can). I’ve never seen a cam seal leak that bad.
 
Hi , thanks for your comments and hints.

The goopy thing was carefully cleaned with acetone. The EZL connectors now are clean and shinny , both sides. The same in the Upper Engine Harness Rectangular connector.

But, still happens the rough idle until it stall and dies.

Testing for spark at the # 6 SPARK PLUG removed, plugged and grounded. It generates a nice Blue Spark.

But I notice while the engine trying to stay smoothly idle... from the #6 plug port, it sprays an increasing cloud of fuel until it slightly became dropplets of fuel. When dropplets starts to spraying out , the engine starts to faint.

What events could trigger a fuel ultra-enrichment :
  • A/C switch on?
    • I remove the FAN relays because those turns-on automatically when Ignition On.
    • Read about a feature that turns on A/C when certain engine RPM ceiling was reach.
    • Then , the A/C switch must be check if it is turned on. Newly at 400SE , no knowledge about Switches in the Console.
  • Bad MAF sensor?
    • Connected or disconnected the same issue happens.
    • I'm getting just one error code, DTC #4 in PIN #4 38 pin port.
  • Bad Oxygen Sensors?
    • Suposedly OxigenSensor must first get sufficiently hot to start Fuel Lean/Rich control loop.
  • Vacuum Leak?
    • A Smoke Leak Test proof no vacuum leak.
    • Brake Booster was plugged.
    • EGR valve cleaned and tested. It close and open successfully when manually vacuum applied.
  • Fuel pressure Regulator?
    • It was successfully tested by manually applying direct vacuum to the fuel regulator and monitoring fuel pressure range.
  • LH-SFI ECU failing?
    • I test two of them , same result.
  • Power Steering , A/C or other 400SE gadget thats triggers an erroneous fuel enrichment?
  • Engine Upper Harness ?
    • it was replaced by a newer 1996 version.
  • Fuel Injectors ?
    • Seems to be the factory originals.
    • Those were cleaned and volume tested in a Diesel/Turbo/Injectors shop.

Meanwhile, I just thoroughly clean the oil leak from the RIGHT CAM Shaft seal until resolve the other engine stall issue. Left CAM seal is ok.
 
Last edited:
@Juan Jose Velez,
Juan, I wouldn’t use any acetone or lacquer thinner for cleaning plastic parts. It will eat in to the plastic and painted surfaces. If you can get kerosene it’s a great cleaner for cleaning oil and grease and is harmless to plastic or paint. Also a basic paint thinner but make sure it has no bad additives in the mix.
Thanks Terry , yess I carefully use basic paint thinner.
 
Looks like someone got carried away with the di-electric tune-up grease. When you replace the cam seals make sure you clean up the oil residue underneath which could be causing the no-start issue. I use 3M Scotch-Brite pads with a degreaser like CRC brake parts cleaner (in the red can). I’ve never seen a cam seal leak that bad.
Thanks Emery , yes , seems former owner trying a Magic Trick to fix the No-Start / Rough Idle / Stalling Issue put some di-electric goopy grease.
I already clean the oil leak using degreaser and a little plastic brush. It works fine.
 
What events could trigger a fuel ultra-enrichment :
  • A/C switch on?
    • I remove the FAN relays because those turns-on automatically when Ignition On.
    • Read about a feature that turns on A/C when certain engine RPM ceiling was reach.
    • Then , the A/C switch must be check if it is turned on. Newly at 400SE , no knowledge about Switches in the Console.
AC on vs off should not affect fuel mixture.


  • Bad MAF sensor?
    • Connected or disconnected the same issue happens.
If there is no change with the MAF disconnected, it's unlikely the MAF is at fault, however...


    • I'm getting just one error code, DTC #4 in PIN #4 38 pin port.
Pin 4 (LH) code #4 is "Voltage at hot wire MAF sensor (B2/2) insufficient or too high, or open circuit in ground wire at hot wire MAF sensor". If you clear this code and it keeps recurring (with MAF connected), something isn't right. However you would need live data to view both the actual airflow readings in kg/hr, and also view the adaptation values to see if they are pegged at the limit.


  • Bad Oxygen Sensors?
    • Suposedly OxigenSensor must first get sufficiently hot to start Fuel Lean/Rich control loop.
Correct, the mixture is fixed / open loop until the engine reaches operating temp, the O2 sensor should not affect mixture at a cold start and during the early warmup phase.


  • Vacuum Leak?
    • A Smoke Leak Test proof no vacuum leak.
    • Brake Booster was plugged.
    • EGR valve cleaned and tested. It close and open successfully when manually vacuum applied.
Smoke test is good. Make sure the purge (MOT) valve is not stuck open, this will cause an "invisible", large vacuum leak.


  • Fuel pressure Regulator?
    • It was successfully tested by manually applying direct vacuum to the fuel regulator and monitoring fuel pressure range.
Monitor fuel pressure at the rail with the engine running, but it's unlikely to have enough effect to kill the engine.


  • LH-SFI ECU failing?
    • I test two of them , same result.
2 different modules would be unlikely to have the same issue.


  • Power Steering , A/C or other 400SE gadget thats triggers an erroneous fuel enrichment?
  • Engine Upper Harness ?
    • it was replaced by a newer 1996 version.
  • Fuel Injectors ?
    • Seems to be the factory originals.
    • Those were cleaned and volume tested in a Diesel/Turbo/Injectors shop.
That all sounds ok.

Might be difficult to diagnose further without live data via HHT-Win on SDS, or with something like the Snap-On MT-2500 with appropriate software & cables.

:scratchchin:
 
Hi you all,

I read the thread "M119 runs poorly, wet spark plugs".

It has "more or less" same issue like me. But in my case "Wet Spark Plugs at Left Bank" , Fully black carbon stain deposits at Right Bank plugs.

What about the refurbished capacitors in the LH-SFI ecu ? Read at the said thread "M119 runs poorly, wet spark plugs".

What is the purpose of those capacitors?

Do it triggers, retards or any other effect on the ground signal to the Injectors ?

Do these capacitors drive Injectors per bank or a capacitor by each injector?

Regards

JJVV
 

Who has watched this thread (Total: 2) View details

Back
Top