Ok,
So I was looking for an option- I put a 143A out of a S500 in my car and it broke shortly after installation(new regulator and rear bearing installed). I got a second one and on inspection- no use putting it in the car. It has severe slip ring wear, both bearings are noisy. But I still had my original (120,000 miles) alternator which is 110A. Calling Tom Hanson @ classic center, looks like MB now wants $650ish for a factory rebuild. All the online stuff seems to indicate the black box Bosch (available at local auto stores) is rebuilt in Mexico with off-brand bearings and regulator. So that pushed me to DIY!
So, this leaves the obvious choice- rebuild mine.
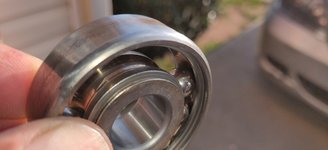
You have 2 or 3 choices in bearings. The economical choice would be VXB bearing.com which can sell you a front bearing (17X52X17) and a rear 6203 for about ~$20 + shipping. You can get the cheapest 6203 bearings are around a $1. You want ABEC 3 bearings which have a little extra clearance designed for electrical motors.
I decided to do hopefully better with purchase of bearings http://smithcoelectric.com/
Front Bosch replacement bearing is $39.95, rear I got a NTN for ~$6.
Brush/regulator I got a bosch from Autohaus az 1 197 311 213 for $27
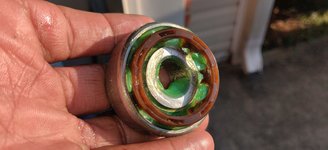
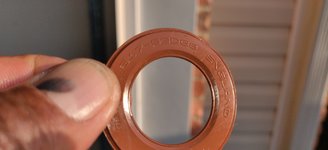
Smith's also can sell you a new pulley ($38) or a replacement slip ring ($8.95) if yours is severally worn. Some times you'll need the plastic sleeve which fits the rear bearing(got to make sure you got it in the correct place on assembly!).
I knew the history of this alternator- it worked when removed. If yours is DOA, you should consider steps a little more carefully. Online, it appears that mainly failure of the diode packs is due to shorting of leads from jump starting or I guess you could experience this with a lower harness.
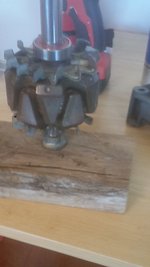
Disassembly:
Removed the main pulley (7/8 or 22 mm) with an impact wrench
Milwaukee cordless impact remove the 4 screws on the front. If you are not fully seated and straight- it WILL strip out the philips screw. Got 3 out of 4 removed. 4th, I drilled and tapped a Torx bit in to remove.
Rear of the alternator remove the next nuts for electrical wire attachments
remove rear cover- small hex or screws depending on model. Tabs pull out to allow removal of cover. Work it off with a screw driver or force.
remove regulator (2 #2 philips screws).
To make it easy- mark the housing halves.
Remove the 4 screws for the 2 halves. 8 mm works well.
Gently remove the back half. I put masking tape on the exposed wire to hopefully protect the coating. I cleaned and painted the exposed metal laminated plates.
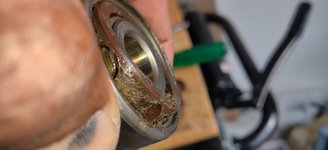
Now for the rear bearing- I used a cheap-o Cumins small 3 jaw puller. I've ground down the threads to prevent it from damaging the slip ring which is plastic.
To remove the rotor from the front housing. I supported the housing with 2 pieces of 2X4 and hit the top dead blow hammer. I put the nut back on flange out- to provide a hitting surface.
One hand underneath to prevent it from hitting the floor and breaking the slip ring.
Now To remove the front from the shaft- I used a screw driver to work the space off first. Then I ground down the Pittsburg bearing puller ($1.99 harbor freight onside) to fit behind. If there is corrosion on your shaft- might want to
hit it with 400# prior to using the puller.
Slip ring replacement- pretty easy. Desolder wires @ the bottom. Pull/break of old ring, clean. Make a small pressing piece with 3/4 inch schedule 40 pipe and a pipe cap (PVC). Get the length right so you press on the end and the flange which is closest to the fan. There is a tab cutout in the fan so you clock the slip ring correctly. Press on and re-solder wires.
I'll update this with more pictures on re-assembly!
Michael
So I was looking for an option- I put a 143A out of a S500 in my car and it broke shortly after installation(new regulator and rear bearing installed). I got a second one and on inspection- no use putting it in the car. It has severe slip ring wear, both bearings are noisy. But I still had my original (120,000 miles) alternator which is 110A. Calling Tom Hanson @ classic center, looks like MB now wants $650ish for a factory rebuild. All the online stuff seems to indicate the black box Bosch (available at local auto stores) is rebuilt in Mexico with off-brand bearings and regulator. So that pushed me to DIY!
So, this leaves the obvious choice- rebuild mine.
You have 2 or 3 choices in bearings. The economical choice would be VXB bearing.com which can sell you a front bearing (17X52X17) and a rear 6203 for about ~$20 + shipping. You can get the cheapest 6203 bearings are around a $1. You want ABEC 3 bearings which have a little extra clearance designed for electrical motors.
I decided to do hopefully better with purchase of bearings http://smithcoelectric.com/
Front Bosch replacement bearing is $39.95, rear I got a NTN for ~$6.
Brush/regulator I got a bosch from Autohaus az 1 197 311 213 for $27
Smith's also can sell you a new pulley ($38) or a replacement slip ring ($8.95) if yours is severally worn. Some times you'll need the plastic sleeve which fits the rear bearing(got to make sure you got it in the correct place on assembly!).
I knew the history of this alternator- it worked when removed. If yours is DOA, you should consider steps a little more carefully. Online, it appears that mainly failure of the diode packs is due to shorting of leads from jump starting or I guess you could experience this with a lower harness.
Disassembly:
Removed the main pulley (7/8 or 22 mm) with an impact wrench
Milwaukee cordless impact remove the 4 screws on the front. If you are not fully seated and straight- it WILL strip out the philips screw. Got 3 out of 4 removed. 4th, I drilled and tapped a Torx bit in to remove.
Rear of the alternator remove the next nuts for electrical wire attachments
remove rear cover- small hex or screws depending on model. Tabs pull out to allow removal of cover. Work it off with a screw driver or force.
remove regulator (2 #2 philips screws).
To make it easy- mark the housing halves.
Remove the 4 screws for the 2 halves. 8 mm works well.
Gently remove the back half. I put masking tape on the exposed wire to hopefully protect the coating. I cleaned and painted the exposed metal laminated plates.
Now for the rear bearing- I used a cheap-o Cumins small 3 jaw puller. I've ground down the threads to prevent it from damaging the slip ring which is plastic.
To remove the rotor from the front housing. I supported the housing with 2 pieces of 2X4 and hit the top dead blow hammer. I put the nut back on flange out- to provide a hitting surface.
One hand underneath to prevent it from hitting the floor and breaking the slip ring.
Now To remove the front from the shaft- I used a screw driver to work the space off first. Then I ground down the Pittsburg bearing puller ($1.99 harbor freight onside) to fit behind. If there is corrosion on your shaft- might want to
hit it with 400# prior to using the puller.
Slip ring replacement- pretty easy. Desolder wires @ the bottom. Pull/break of old ring, clean. Make a small pressing piece with 3/4 inch schedule 40 pipe and a pipe cap (PVC). Get the length right so you press on the end and the flange which is closest to the fan. There is a tab cutout in the fan so you clock the slip ring correctly. Press on and re-solder wires.
I'll update this with more pictures on re-assembly!
Michael
Attachments


Last edited: