• Hi Guest !

    Welcome to the 500Eboard forum.

    Since its founding in late 2008, 500Eboard has become the leading resource on the Internet for all things related to the Mercedes-Benz 500E and E500. In recent years, we have also expanded to include the 400E and E420 models, which are directly related to the 500E/E500.

    We invite you to browse and take advantage of the information and resources here on the site. If you find helpful information, please register for full membership, and you'll find even more resources available. Feel free to ask questions, and make liberal use of the "Search" function to find answers.

    We hope you will become an active contributor to the community!

    Sincerely,
    500Eboard Management

OWNER bclifton (300D)

You do great videos, Brian. Thanks.

Do you have any trouble with those ramps sliding forward as you're driving up on them? I sure do.
If you go slow up the ramps, the downward pressure from the car's front end should keep things in place for the most part. Some ramps (such as the Rhino Ramps that I use) have small pieces of rubber on the bottom that also serve this purpose.

Separately, if your ramps don't have rubber on the bottom, or do slide no matter how slowly you creep upward, I would consider putting them on a piece of carpeting or a rubber-bottomed doormat to help keep them place (put a doormat under each ramp).
 
Thanks @luckymike!

The ramps work out pretty well as I kick them under the tire to wedge them in AND my driveway has a small incline. I think that's the secret to why I haven't had much trouble. I have tried using them in the garage (which is level but also epoxy coated) and that was impossible. I'm not sure what you do there

edit: some great tips above! 🙂
 
Got a great update!

I finally got all the steering components updated on the 300D! Here's a list of what I tackled:
- Replaced the idler arm bushings (see our HOWTO page and my notes here)
- Replaced the steering drag link
- Replaced both tie rod assemblies
- Replaced the steering damper (mine was shot!)

Video with everything captured is on my channel here 🙂

This wasn't a bad job at all. I did the entire thing on jack stands and had everything finished in one day (started just before noon and finished after dinner). As shared in the HOWTO, I got very lucky having a 300D with the OM603 - the idler arm bushing bolt was a piece of cake to take out. The bushings were super shot, almost falling out. The ball joints on all the old pieces (drag link, tie rods) were torn or very bad shape. The video shows how bad they are - especially the steering damper. This should be a VERY nice upgrade once an alignment is done.

The steering components I did last weekend; this weekend I just did one small project. I replaced the oil level sensor (124-542-00-17) and the rubber O ring seal that goes around it (015-997-39-48).

This is a super easy to do job - just two 10mm bolts. I usually drain the oil first and do this at the same time as an oil change. Not wanting to do an oil change yet, I checked the FSM and it didn't say to drain the oil... so I rolled the dice a bit. Got the car up on ramps and pulled this out. Oil went everywhere 🤣 Not a ton - but enough to cause a giant mess. Got that replaced, topped it off with oil, all ready for tomorrow.

Tomorrow, I'll be going into MB of Chandler to have them do an alignment. I'll see if they'll let me hang out with the tech and see how it's all done. If so and the person doesn't mind, I might record some of that too. I really think it's worthwhile to go to the MB dealership for alignments.
 
Last edited:
Quick update - I got the alignment done today at Mercedes-Benz of Chandler! My cost was $199.95. I wasn't able to hang out during the job- their setup makes it hard to do that. But I did chat with the tech Erik for a bit and will chat w/ him more next time I visit. Besides this work, I'm having them properly push a set of brand new MB branded ball joints (124-333-03-27) and control arm bushings (124-330-05-75) into my old front lower control arms so that I have those as a backup 🙂 I ended up with two sets of Lemforder control arm assemblies on accident when doing the job originally- but returned the extra set in lieu of this plan (restore the old ones).

Here's the test property sheet:

Car feels great after alignment! Before all the components were replaced, I'd get some swaying when hitting 70+ MPH on the highway. Now, it feels a LOT better. Steering is very responsive too - no slop.

Now that the front is done, I might check out the rear parts. Probably starting off with just the shocks - but will inspect the control arms and linkages. Those were off on the alignment and were adjusted, which is great 🙂 If that rubber (in the rear) is beat to shit, I'm not sure how much slop it can have? 🤷 Front of course was noticeable

Are there any docs or videos someone who has a good grasp of alignment can suggest for a noob like me to understand more? What all the values mean - bonus points for W124 specific (which components can affect which values). I did see this thread by @jftu105 that I'm reading through now - definitely some good notes there.
 
Last edited:
The numbers look good! All green except one (in the right column). Bummer they didn't also give you the "summary" page with the easy-to-read pictures, i.e. "Alignment for Dummies", like this one. The visual aids are nice to see how close you are to the tolerance limits.

My guess is that you'll find a couple of the rear links with excess play in the bushings, but most may still be ok. However, if you're replacing any, consider replacing them all. The 4 subframe bushings are usually shot by now. If the differential mounts aren't recent, do those as well.

:banana1:
 
The numbers look good! All green except one (in the right column). Bummer they didn't also give you the "summary" page with the easy-to-read pictures, i.e. "Alignment for Dummies", like this one. The visual aids are nice to see how close you are to the tolerance limits.
I am fortunate to have a mb stealership that has one person that began his tenure with the marque in 1999 and has plenty if 126/124 experience.
 
Brian, I have a 92 300CE that I've been working on for a few months. I usually follow the BenzWorld forum, but you (and the 500E forum) really do a great job researching and sharing info!!!

I sure wish I'd seen your thread here before I started my 300CE project; I would have saved a lot of trial and error!
 
Thank you @4wdave! I love this community - they've been super welcoming and I don't think you'll find a more detail oriented site out there (as you've noticed).

I do wish I had a E500E - I can't speak with any weight or from experience on those models. But there's a lot about the W124 that ALL models have in common and I try to contribute and share as much as possible there 🙂
 
My guess is that you'll find a couple of the rear links with excess play in the bushings, but most may still be ok. However, if you're replacing any, consider replacing them all. The 4 subframe bushings are usually shot by now. If the differential mounts aren't recent, do those as well.
Forgot to mention: The parts for the above work are relatively inexpensive. I think you can get get all 4 links for each side plus subframe+diff bushings for ±$500 using Lemforder parts. The rear LCA generally doesn't need replacement, but new OE LCA's were ~$75/ea last I checked (it isn't easy replacing the 1 bushing, but that does cost less). Only downside? You need another alignment afterwards.

:doh:
 
Had a few good updates to share 🙂

I did get my old lower control arms rebuilt using genuine Mercedes-Benz parts! In doing so, I discovered where I had made a mistake. I captured how I did the old bushing removal here:

Basically, the bushings were pulled out after heating with map gas using pliers. Once they were out, there are some metal rings which are part of the bushing. This is a detail I didn't realize (until the shop that pressed the new ones in returned the removed rings to me)!

No wonder I had such a bad time pushing the new ones in! That said, I am sure you need the special tool - the threaded bolt way I attempted originally would likely still damage the bushing. More notes about that here:

And lastly, I did rebuild and install my grille. The grille mesh insert is NLA and hard to find NOS... so I got it aftermarket. But the other parts, I got all genuine MB parts. I captured a video with a lot of the specifics - worth watching if you are into the details. The genuine MB parts all fit PERFECTLY. No trimming required for the chrome moldings. And they fit better too - sitting more flush. When buying the horizontal ones, I realized the original part for the horizontal molding must have changed. It used to be one solid piece - and then MB moved towards using 4 clips per molding. I'm a bit curious why this changed - the original ones I pull from the junkyard have all been the old style (1 piece). I haven't encountered the clips in the wild yet

Today, I'll be looking at the drivers's seat on my car. I pulled a passenger seat bottom from a 1987 300D (palomino) at the junkyard a few months ago - it has nice MBtex and the springs are great. My springs are broken for sure - you sink into the seat. Should be straightforward. But otherwise, this car is just a pleasure to drive! Lots of W124 lovers out there in the wild too - I've been getting a lot of comments 🙂
 
Somewhat off topic, but my 92300CE is missing the trim on the top of the driver side door panel (see photo from pass side):
1707081163250.jpeg
I've been unsuccessful trying to find one on eBay or wrecking yard. If you happen to see one in your scavenging, I'll buy it from you!
 
Somewhat off topic, but my 92300CE is missing the trim on the top of the driver side door panel (see photo from pass side):

I've been unsuccessful trying to find one on eBay or wrecking yard. If you happen to see one in your scavenging, I'll buy it from you!
Done - as soon as I find one, it's as good as yours 😀 There have been coupes on occasion - but it's been a while. Overall, kind of sad seeing less and less W124 and W126 in the yards 😢
 
Had a few good updates to share 🙂

I did get my old lower control arms rebuilt using genuine Mercedes-Benz parts! In doing so, I discovered where I had made a mistake. I captured how I did the old bushing removal here:

Basically, the bushings were pulled out after heating with map gas using pliers. Once they were out, there are some metal rings which are part of the bushing. This is a detail I didn't realize (until the shop that pressed the new ones in returned the removed rings to me)!

No wonder I had such a bad time pushing the new ones in! That said, I am sure you need the special tool - the threaded bolt way I attempted originally would likely still damage the bushing. More notes about that here:

And lastly, I did rebuild and install my grille. The grille mesh insert is NLA and hard to find NOS... so I got it aftermarket. But the other parts, I got all genuine MB parts. I captured a video with a lot of the specifics - worth watching if you are into the details. The genuine MB parts all fit PERFECTLY. No trimming required for the chrome moldings. And they fit better too - sitting more flush. When buying the horizontal ones, I realized the original part for the horizontal molding must have changed. It used to be one solid piece - and then MB moved towards using 4 clips per molding. I'm a bit curious why this changed - the original ones I pull from the junkyard have all been the old style (1 piece). I haven't encountered the clips in the wild yet

Today, I'll be looking at the drivers's seat on my car. I pulled a passenger seat bottom from a 1987 300D (palomino) at the junkyard a few months ago - it has nice MBtex and the springs are great. My springs are broken for sure - you sink into the seat. Should be straightforward. But otherwise, this car is just a pleasure to drive! Lots of W124 lovers out there in the wild too - I've been getting a lot of comments 🙂
@bclifton, try to hang om to the old ones if you can find them new or in good used condition. The newer trim strip design is so much flimsier than the original design
 
Got an interesting question - need to dig in more.

My rear trunk lock is sticky. I think if taken out and taken apart/cleaned, it might be OK. But I looked for replacement parts.

I found 124-750-15-91 which is still available. However, checking with local MB parts, they shared this:
124-750-15-91 only applies to cars with code 466 central locking which your car does not have. 124-750-01-91 applies to your vin but has been discontinued.

Lastvin does not show me having code 466. But if I physically lock one door or lock the trunk, it locks all the rest (same w/ unlock). I thought this was central locking? What exactly does option code 466 do?
 
Last edited:
124-750-15-91 appears to be a generic lock tumbler, not VIN-coded.

All 124's in North America have central locking (same as they all have ACC, power windows, power seats, etc). These items may have been optional equipment in other markets / ROW, depending on the specific chassis.

Some option codes do not appear on chassis that all have the same standard equipment. For example, the 124.036 datacards do not show code 471 (ASR) because you could not get an 036 without ASR. This is super confusing though. I am not sure if this scenario applies to all North American spec 124's, which all have central locking.

Sadly, the VIN-coded lock tumbler (124-750-01-91) is NLA.

You have EPC access, correct? It sounds like your local parts dude is regurgitating what he is seeing in the EPC / XPISS - screenshot below. I think the 466 reference is a red herring, the part number would not show in the parts list if it wasn't valid - it's a WW/ROW note that still appears in USA to confuse people:

1707156965219.png
 
And lastly, I did rebuild and install my grille. The grille mesh insert is NLA and hard to find NOS... so I got it aftermarket. But the other parts, I got all genuine MB parts. I captured a video with a lot of the specifics - worth watching if you are into the details. The genuine MB parts all fit PERFECTLY. No trimming required for the chrome moldings. And they fit better too - sitting more flush. When buying the horizontal ones, I realized the original part for the horizontal molding must have changed. It used to be one solid piece - and then MB moved towards using 4 clips per molding. I'm a bit curious why this changed - the original ones I pull from the junkyard have all been the old style (1 piece). I haven't encountered the clips in the wild yet
Facelift, but .....

and a smidge more here.

Last photo in the second post linked above is for the @Jlaa
 
For the rear trunk latch / lock assembly, I got 124-750-15-91 ordered and will be taking a gamble! Based on everything I can find, this seems to have a difference with the alarm. I think on newer cars, if you have the doors locked but the trunk is NOT locked for some reason and then you open the trunk, it trips the alarm. The older cars I think the alarm only works with the 4 doors. For example, you should be able to trip the alarm by putting your windows down, locking, and opening the door from the inside.

I did find a few cases where folks retrofit this part (posted to fruit bird and em bee whirled). Will update once I get the part! At a minimum, should get a new key too!

Today, I replaced the driver's side seat bottom. It was very straightforward - pretty easy actually.

PXL_20240210_221506902.jpgPXL_20240210_202655210.jpg

In my case, the springs were definitely tired - one of them was broken which caused the seat to sink in and lean to the left. When I took the seat bottom apart to examine, it also didn't have the foam inserts 🤔 One of the wires going to either the headrest or back motor had the insulation stripped. I cut it clean, butt spliced it, heat shrink wrapped over it, and then wrapped that whole wiring harness with Tesa tape.

While the seat bottom was off and the top half of the seat was disconnected from the seat module, I put the bottom motor assembly back into the car and plugged it in. I generously spread the MB Gleitpaste from the big tub that I know many of us have - lubricating all the important parts so that it's nice and buttery smooth.

The donor seat was the passenger seat from a 1987 300D which I got at Pull N Save in Tucson a few months ago. The internals on that seat bottom are immaculate - I should have taken a picture. The springs themselves had like a green coating on it and there are the foam inserts in the back.

As a bonus, I put on the side tray that helps prevent things from falling through (124-910-03-18). There are two plastic "nubs" or plugs that you push in after fitting it. Were these only on newer models? Both of my seats were missing them - but I have seen some olders cars with them. Whatever the case, it's a nice touch! Will need to put this piece on the passenger side too (passenger side is 124-910-04-18).
PXL_20240210_221735575.jpg

What a difference- first time there's a nice firm ride after a year+ of ownership 🙂

One last thing - I got a Technical Data book from 1988. A lot of people call it the TDM (tech data manual). It has specs for literally everything. Torque specs for all the parts you can think of, even the panel gap measurements. This is definitely a cool addition to my paper manual library 😀
1707617424146.png1707617442983.png
 
Last edited:
Just finished replacing the trunk lock assembly - it's in great working shape now!

I wish there were more pictures - but at the same time, the job was a major PITA. I'll try to share what I can here. This is a great way to restore your trunk lock. I'm not sure if the 500E has the same part number as the 300D but my part number was NLA (124-750-01-91) and I was able to swap the parts over from the generic assembly.

Here's what you get when you order 124-750-15-91:
PXL_20240212_194839788.jpg
- lock assembly with the brass rod
- generic key (despite providing drivers license + registration; it's not keyed to my car).

Basically, I took the assembly apart. Near the part where the brass rod snaps into, there's a cylindrical piece above it which barely pokes through the back of the assembly. It has two springs on it, one sticking out from each side. You can turn this by hand to line up the slot and push it down, and then pull it out at an angle. The bottom has a straight piece of plastic which is going into the cylinder - so it's a bit tricky to remove.

With that removed, you have access to the plastic part the rod is attached to. This is fastened onto the cylinder using an E clip. Use a flathead screwdriver and you can pop that E clip off.

At this point, you can put the key in and turn it. Find the right angle and the cylinder itself will push out (you can push the end of the cylinder for extra help). The tumblers shouldn't fly out since the key is in place. I did this on both the new assembly and my old assembly. In order to remove the key from the now removed cylinder, you need to push the spring at the end of the cylinder down and simultaneously push the pseudo-tumbler (nearest the key) down. Be careful as you remove the key- the tumblers will fly out if you do it too quickly.

Here's what things look like at this step
PXL_20240213_042058315.jpg

Once both keys were removed, I swapped the tumblers. There are 3 full inserts which are the same that I have in my rekey kit (for the center console box; numbered 11 - 15). Then there are 3 sets of 2 halves. As you pull the tumblers out, make sure the spring does NOT come out with it. I stripped the new one and swapped the old parts over into the new one, one at a time. Once you finish that, you can put the key into the new cylinder and verify it fits. When it's loose like this, you'll have to press the tumblers in by hand and pull the key back and forth a bit to get it to slide through. Once the key is in all the way, you can't pull it out (until you press the spring down with that one pseudo-tumbler).

At this point, I realized the housings are not the same and it's not a simple rekey. Basically, the trunk latch itself has three holes in it and the lock assembly has three poles. They line up and help you put the two pieces it together - but it didn't fit (old latch with new housing). If you're up for the challenge, you can use an X-ACTO knife and carve away bits of the new housing until the latch does fit 🤣

I opted to take off the rest of the cylinder housing (the metal push button, basically). On the plastic cap that the metal comes out of, you need to make sure the notch is lined up with an area they provide for you to put a screwdriver into (to hold the button in). You can see the notch in the top above the screwdriver. When it's in this position, you can use a flathead screwdriver to pry the small 1mm gap between the bottom housing and this cap.
PXL_20240213_062509564.jpg

In the above picture, you can see I got it loose and almost removed but didn't remove the cap yet. Once you do remove the cap, the empty cylinder housing and the spring will come out.

At this point (once you do this for new and old), you have two naked housings. Here are the plastic housings stripped down side by side.

The LEFT one is 124-750-01-91 (from my 300D)
The RIGHT one is 124-750-15-91 (new part)

PXL_20240213_061203288.MP.jpgPXL_20240213_061213347.jpgPXL_20240213_061220596.MP.jpgPXL_20240213_061232150.jpg

At this point, I swapped the metal parts over. Putting the cylinder housing in is very easy. Clean the old part, lube up the outside of the metal with some gleitpaste, and install into the old housing. Put the cap back on and then you can put the cylinder in place.

Installing the cylinder into the housing is a pain. I bent the spring both times and had to carefully bend the spring back into shape. Basically, the cylinder has a notch in one area. See the below pic with the red arrows which point at where the notch starts and stops.
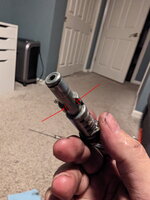
PXL_20240213_062647463.jpg

That portion needs to line up with a raised bevel inside the cylinder housing. Here's what that looks like (this is the old part - which is why it's so dirty). I traced the raised part in red and used an arrow to point at it.
PXL_20240213_062705710.jpg

You have to put the spring at the end of the cylinder, press it down, and then insert into this housing. That's the part where I bent the springs. After multiple tries, I got it and the cylinder went right in. You can give the key a few turns, make sure it locks/unlocks and that you can remove the key without an issue.


At the end of the cylinder, you can put the E clip back on, which keeps the cylinder in place. The part with the two springs goes above it (with a long piece going through the end of the cylinder).
PXL_20240213_061514536.jpg

I hope some of this is useful. In retrospect, I should have taken more pics. But I can walk anyone through this, it's pretty easy if you take your time. After you get this main part sorted, you install, then snap the latch down on top of it, push the whole assembly in, and then have the fun part of lining that up, making sure the rubber weather seal is in place, etc.

All in, this took 3 hours start to finish. That's with me installing the part multiple times the wrong way, feeling hopeless, cussing, etc. It's working beautifully now! Key goes in buttery smooth and pushing the button itself unlatches the trunk every single time. Before, you'd have to hit it or try like 5 times before the trunk popped.

Total cost was $126. I think it was worth it, given how often you use a trunk. While you can disassemble your unit and clean it, mine actually had a broken part. There's a flap that is on the cylinder itself that keeps the elements out of the cylinder:
1707814004421.png

That flap is a spring loaded flat piece of metal that swivels as you put the key in. The spring in mine broke which means dirt and debris have been getting in the keyhole since I bought the car. And then to help give the full flavor experience, the faceplate actually fell off the cylinder as I was taking it out. Perfect timing on this replacement! 🙂
 
Last edited:
Here's what you get when you order 124-750-15-91:

- lock assembly with the brass rod
- generic key (despite providing drivers license + registration; it's not keyed to my car).
Great detective work, Brian! And yes, the flap to keep dirt out is a semi-common failure... really disappointing MB discontinued the VIN-coded tumblers. :gor-gor:

FYI, only certain part numbers for lock tumblers (door, ignition, trunk) are VIN-coded. If you order the generic part number, it doesn't matter if you give the dealer your license/registration/VIN, you'll always get a generic lock. The EPC notes show this. I believe there are coded and non-coded (generic) available for all the locks? Screenshot below for the tunk lock, see notes:

1707837847776.png
 
Whew - another weekend, another project 🙂

This weekend, I replaced the rear shocks, the rear brake rotors and pads, and the soft brake line. Finished up with a brake fluid flush

PXL_20240217_181901179.jpgPXL_20240217_181910771.jpg

Everything went pretty well! Removing the shocks is a piece of cake - that only took maybe 30 minutes total. The hardest part is removing the trunk lining and then getting the hardware off the top (both you do with the car on the ground). The big washer above the rubber was threaded on there and I had to use channel locks to take it off.

Once the hardware is off, you can jack the car up and take the plastic protective cover under the rear control arm off (two 10mm bolts) and then you have access to the 17mm holding the shock in. Counter hold that and remove -push the shock down and it comes right out. I couldn't believe how easy it was!

The brakes took a while longer due to some difficulties. The rotors were REALLY on there. I sprayed as best as I could with PB blaster and used the orange Harbor Freight dead blow hammer and beat the crap out of the rotor. Finally, it came off. Cleaned the hub surface really well with brake parts cleaner and then put a ton of copper paste over the hub before putting the new rotor on.

Replacing the brake pads was easy too - two pins you can get out with a punch. I did run into a problem where the spring that holds the brake pads in broke. Basically, there's a rivet holding the two pieces together. I attempted a fix and it worked pretty nicely! I ended up using a rivet from the front windshield (closed end blind rivet) and was able to put it back together. I don't have a proper rivet gun - but I do have a weird "accordion style" one that I got in our ranch town in San Luis Potosi Mexico for 400 pesos.

PXL_20240217_212704430.jpgPXL_20240217_212719598.jpg

Basically, you stretch the accordion out and load the rivet in the end. You can then push the end of the rivet through the thing you're riveting and then compress the accordion. This will install the rivet and the metal rod part of the rivet falls out the back. I don't know if these brake pad springs are available by themselves - but great that this worked!

Last item was replacing the soft brake lines and doing a brake fluid flush. @gsxr you had recommended a pump by Motive and that worked wonderfully!

I took the car out and it's driving great. Most of the process was captured on video and and will be upload to YouTube sometime soon.

I don't think there's anything major to fix with the car now. It's pretty much just time to enjoy it! We'll have to plan out some road trips 🙂 Mrs Clifton has been talking about highway 1 in California- from Orange County up to Hearst Castle (San Simeon). Maybe even a visit as far as Half Moon Bay. That is a pretty amazing drive that we did back when we got married almost 14 years ago (😱 time is flying by) in our old 2001 SL500.
 
Last edited:
Good work there! I did half that trip on a motor cycle in the mid-80's. Later once married we were out that way, did that trip in reverse and it was really a good time.
 
Awesome stuff!

Just a note- you want to be careful with the amount of anti-seize you’re putting on the hub behind the rotor as it can cause the rotor to be installed slightly off center etc. sounds like your drive didn’t turn up any vibe issues though, so thats good!
 
Just a note- you want to be careful with the amount of anti-seize you’re putting on the hub behind the rotor as it can cause the rotor to be installed slightly off center etc. sounds like your drive didn’t turn up any vibe issues though, so thats good!
Yup - use a super thin coat between rotor and hub face. Basically wipe it off so it looks like an opaque silvery smudge.

:jono:
 
Oh boy - I DEFINITELY put too much 😂 I put it on very thin- but I did cover the entire surface. The rear has a dowel pin to make it a bit easier in addition to the 5mm bolt securing the rotor to the hub.

Drives great- got it to speed and it stops great and no vibrations. I don't think the front has this dowel pin- but I'd have to go back and see my old video. Huge thanks for clarifying - good to learn the proper way 🙂
 

Attachments

  • Screenshot_20240218-165507.png
    Screenshot_20240218-165507.png
    907.5 KB · Views: 7
Hey folks! Just wanted to give an update - it's been a while for sure

Still enjoying the W124 - getting a lot of seat time, driving it a bunch. The family loves it too - great for longer drives 🙂

Did a few notable things:
  • Replaced all 20 old dirty lug bolts two piece lug bolts (end hallow with cap) with new solid one piece lug bolts. Part number 000-990-48-07
  • Ordered a new windshield wiper motor. It actually rained here and while mine is working - it seems to get tired after running for 20+ minutes. Was starting to go slooooooooow and then stopped. Turning windshield wiper off then back on got it moving again. Got this ordered and it should be here soon. Part number 124-820-08-08
  • Got replacement plastic pieces for the rear control arms. Kind of a nice touch and honestly pretty cheap
    • Thrust arm covers x2 201-352-09-88
    • Rear control arm cover x2 203-352-00-88
  • New battery (old one was from Feb 2019?). Part number 000-982-33-08

Besides those, I did order some parts from a site MBZCLASSICPARTS. They have reproductions for a lot of the rubber parts which are NLA. I started off buying the kit with two hood seals (goes on each corner) as mine were broken and I'd been keeping them adhered with double sided tape 😅

This kit includes both 124-889-19-98 and 124-889-20-98. Super easy to install and I was impressed with the quality! I just recently placed another order for a trunk seal which is on the way. Most E500E probably have the removable style trunk seal - but mine is older and has the seal itself adhered into place (more like a W126). Here's a link to what I ordered - part number 124-750-00-98. Mine is ripped and falling apart - each run through the carwash means you need to open the trunk and wipe down the inside lol

Not having any big project left means I've been searching for good preventative maintenance 😂 I might drain and refill the differential fluid as I bet it's pretty nasty. I still need to get the #20 head that I have set aside to a machine shop so when the time comes, I can get it swapped over.

Anything else worth checking out?
 
Hey folks! Just wanted to give an update - it's been a while for sure
I was wondering if you were ok! 😁


Ordered a new windshield wiper motor. It actually rained here and while mine is working - it seems to get tired after running for 20+ minutes. Was starting to go slooooooooow and then stopped. Turning windshield wiper off then back on got it moving again. Got this ordered and it should be here soon. Part number 124-820-08-08
Bad news... the motor almost never fails. Most likely, it's the mechanism has dried-out grease, and the lack of lubrication caused the stoppage. Sometimes, squirting lube on the shaft that pokes out to the wiper arm will help. You'll need to dig into this further. There's a HOW-TO on the forum somewhere about taking apart the wiper mech and repairing / lubricating it.


Most E500E probably have the removable style trunk seal - but mine is older and has the seal itself adhered into place (more like a W126). Here's a link to what I ordered - part number 124-750-00-98. Mine is ripped and falling apart - each run through the carwash means you need to open the trunk and wipe down the inside lol
I am 99% certain the late-style trunk seal can be used on the early 124's. I've looked at both chassis and there doesn't seem to be any reason why you can't use the press-on seal. The trick is finding a good one in the junkyard, now that OE tunk seals went from like $100 to $400 (last I checked). Years ago, I used to pull nice ones from junkyard cars and sell them on eBay. Hard to find nowadays.

Anyway - I am curious what they will send you. The photo is of a press-on seal, not the glue-on seal. I'm not a fan of places that can't bother to show accurate photos of what they are selling. Or, claim a part "fits all 124" (like the 2 hood seals) when that is not accurate - the M119 models have different part numbers with a slightly different design. Yes, the ones they sell will "fit" all 124, but are not correct for M119 cars.


Not having any big project left means I've been searching for good preventative maintenance 😂 I might drain and refill the differential fluid as I bet it's pretty nasty. I still need to get the #20 head that I have set aside to a machine shop so when the time comes, I can get it swapped over.

Anything else worth checking out?
You might be ready to start some upgrades & fun stuff. Do you have the afterglow relay upgrade yet? How about maxing out the injection pump for a modest power increase? I've done this on a few cars, it's tedious and messy, but can be an excuse to remove and re-seal the IP if it's not dry.

:banana1:
 
I was wondering if you were ok! 😁


Bad news... the motor almost never fails. Most likely, it's the mechanism has dried-out grease, and the lack of lubrication caused the stoppage. Sometimes, squirting lube on the shaft that pokes out to the wiper arm will help. You'll need to dig into this further. There's a HOW-TO on the forum somewhere about taking apart the wiper mech and repairing / lubricating it.
Definitely visiting the forums daily 🙂 Great seeing everyone's updates - even if I don't have any

I just got the motor and have been researching it - I see exactly what you mean Dave. The motor could possibly be on the way out - but now I understand more after watching some videos on YouTube (video by member @nehuge) and then looking at the HOW- TO: Complete windshield wiper mechanism lubrication + upgrade.

Basically, the motor is just one part of the puzzle. The front cover, mine being the one secured in place by 3 screws, hides the gear and tooth assembly behind it. As the gear moves along this path, it's what makes the arm extend outward. This is likely the part where there is no lubrication - I think it's encountering a lot of friction. Enough that maybe the motor stops because the resistance is too high?

Whatever the case, definitely looks like an interesting - although slightly intimidating - job. @gsxr what do you think? Pretty forgiving to recover from if you make a mistake here? I'm worried about if I mess up marking the park position, etc. I guess worst case - while doing this job, you can always mount and try it out 🙂 Plus - the disassembly and removal of the entire assembly is easy. I have done that when the windshield was replaced and have done it at the junkyard many times.
 
Last edited:
Brian, I've never done this personally... but the HOW-TO should walk you through it. Worst case you can snag a used spare from the junkyard.

One time, I had a wiper lock up mid-sweep. A squirt of WD-40 (or similar) on the shaft alone freed it up and got it working semi-normally again! Obviously this is an unusual case, and I'm sure it would have worked much better with a total disassembly / clean / lube. I didn't pay much attention years ago as there was good supply of used mechanisms. Now they are hard to find and I'll probably need to figure out how to do this myself...

:scratchchin:
 
It's not difficult and it's interesting to marvel at the engineering. As said, a reference mark will keep things easy. Separating the mechanism from the shaft is easy with the unit on a bench. Make a reference mark at this step as well.

 
Huge thanks for the encouragement, folks! 🙂

I've been battling a cold the past few days- and finally feeling better today. I think that accounted for some of the pessimism I had 😂!

Kudos to those who have tackled before and shared the details. I have a paint pen but might use the dremel to etch the park position in permanently. Super looking forward to this one. It was really awesome reading our post here on 500eboard where you can basically upgrade this unit and have a version in which the front cover IS NOT secured by the 3 bolts. That would make servicing a ton easier. I'll keep an eye out for later model W124.

It's been a while since I've seen any W124 in the junkyards actually 🙁

Hoping there will be an update here in the next week to share - and I can update the HOWTO with any notes
 
I am 99% certain the late-style trunk seal can be used on the early 124's. I've looked at both chassis and there doesn't seem to be any reason why you can't use the press-on seal. The trick is finding a good one in the junkyard, now that OE tunk seals went from like $100 to $400 (last I checked). Years ago, I used to pull nice ones from junkyard cars and sell them on eBay. Hard to find nowadays.

Anyway - I am curious what they will send you. The photo is of a press-on seal, not the glue-on seal. I'm not a fan of places that can't bother to show accurate photos of what they are selling. Or, claim a part "fits all 124" (like the 2 hood seals) when that is not accurate - the M119 models have different part numbers with a slightly different design. Yes, the ones they sell will "fit" all 124, but are not correct for M119 cars.
The day has finally come! I got the seal today - and you're right. It's a press-on type of seal (not the glue on). This is a bit awkward.

For folks that haven't followed along, I had got a 1992 parts car last year around this same time. I did try to retrofit as much as I could, especially since the interior matched.

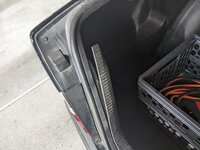
One of the things I tried was the trunk seal, which was also a press on. Technically, the press on one does work and it works great actually. WAY better than the glue on one. But the problem is the fitment around the bottom of the trunk, where the lid goes. Newer W124 have a different part number for that plastic "brace" which includes these square "rivets" that you can press in place (similar to ones on an R129). I could not find a way to retrofit this part unfortunately.

Thinking it through- you might be able to cut the seal at the parts where it's needed (only the side where the plastic is). This isn't the best photo, but along with a description... I think I can demonstrate the problem.
PXL_20240419_000645171.jpg

There's how it fits (above). The older W124 use a press fit for that plastic "brace". Because the seal is adding an extra 1-2mm, it doesn't fit snugly around both sides. There's a plastic edge on both sides that keeps it in place.

For the moment, I'm just going to keep this one in place! It works - even if that whole plastic assembly is flopping around. The bottom portion (where the "key unlocks all doors" and other warning labels go) does snap into place properly. If I had a newer plastic "brace", the car doesn't have cut outs for the square block rivets that fit it in place if I remember correctly.

Just wanted to share - curious if you have some ideas @gsxr 🙂 I think it's a solvable problem - would be great to find something that isn't duct taping the plastic in place LOL
 
Last edited:
The day has finally come! I got the seal today - and you're right. It's a press-on type of seal (not the glue on). This is a bit awkward.

For folks that haven't followed along, I had got a 1992 parts car last year around this same time. I did try to retrofit as much as I could, especially since the interior matched.

One of the things I tried was the trunk seal, which was also a press on. Technically, the press on one does work and it works great actually. WAY better than the glue on one. But the problem is the fitment around the bottom of the trunk, where the lid goes. Newer W124 have a different part number for that plastic "brace" which includes these square "rivets" that you can press in place (similar to ones on an R129). I could not find a way to retrofit this part unfortunately.

Thinking it through- you might be able to cut the seal at the parts where it's needed (only the side where the plastic is). This isn't the best photo, but along with a description... I think I can demonstrate the problem.
View attachment 188345

There's how it fits (above). The older W124 use a press fit for that plastic "brace". Because the seal is adding an extra 1-2mm, it doesn't fit snugly around both sides. There's a plastic edge on both sides that keeps it in place.

For the moment, I'm just going to keep this one in place! It works - even if that whole plastic assembly is flopping around. The bottom portion (where the "key unlocks all doors" and other warning labels go) does snap into place properly. If I had a newer plastic "brace", the car doesn't have cut outs for the square block rivets that fit it in place if I remember correctly.

Just wanted to share - curious if you have some ideas @gsxr 🙂 I think it's a solvable problem - would be great to find something that isn't duct taping the plastic in place LOL

@bclifton - love it, even if I don’t exactly understand from your descriptions and pictures why the press on seal prevents your early plastic brace from mounting correctly (and I read your explanation several times! I am just slow…)
Anyways might black sticks of holt melt glue work? Hot melt glue is holding together the trunk plastic brace for my w210 where some Neanderthal who was working on the car before mangled the mounting tabs for the brace!

BTW I also love how diligent you are at using the code-block formatting style to format all the part numbers. Love it! Now if only we were OCD enough to write a bot that would go through and reformat every part number posted here over the last 20+ years the same way…😅
 
If I understand correctly that the very bottom of the protective plastic seats, then you might drill 2 or 4 holes in the trunk side edges where the square holes were punched by MB later. You could then use some round black plastic rivets MB used elsewhere or pick some up at your local auto parts store to secure things. MB used them higher up at the upper trunk edge for the surround at the trunk stops.
 
@bclifton - love it, even if I don’t exactly understand from your descriptions and pictures why the press on seal prevents your early plastic brace from mounting correctly (and I read your explanation several times! I am just slow…)
Anyways might black sticks of holt melt glue work? Hot melt glue is holding together the trunk plastic brace for my w210 where some Neanderthal who was working on the car before mangled the mounting tabs for the brace!

BTW I also love how diligent you are at using the code-block formatting style to format all the part numbers. Love it! Now if only we were OCD enough to write a bot that would go through and reformat every part number posted here over the last 20+ years the same way…😅
Thanks! I am a programmer after all 😂 It helps zero in on part numbers, for me at least!

Basically, the best way I can describe it is that my current part is press fit. Each edge (left and right, or lower and upper- however you want to look at it) of the brace snaps into place because there is a raised lip only on the edges. When you snap it into place, that lip goes over the metal body of the car and CLICK- the plastic gets held in place.

With the seal now in place, this plastic brace is able to grab around the lower side no problem - no change there. But the side which has the seal on it, the seal is now blocking the plastic lip from snapping where it would usually wrap around and hook around the metal. I could trim an inch of the seal (on that side only) so that the plastic lip can reach the metal to click into place. I don't think this would compromise the seal very much.

If I understand correctly that the very bottom of the protective plastic seats, then you might drill 2 or 4 holes in the trunk side edges where the square holes were punched by MB later. You could then use some round black plastic rivets MB used elsewhere or pick some up at your local auto parts store to secure things. MB used them higher up at the upper trunk edge for the surround at the trunk stops.
This is a good idea - I might try this and if I can find some kind of a solution. I have bins and bins of rivets, brackets, screws, etc from disassembling cars. There's probably a way to make it look "stock-ish" without a lot of work 🙂 I'm going to check this out and report back
 
OK got an update on both things here 🙂

First - with the trunk seal.

No update on a solution... but I did go back to the part I had ordered on the website and it specifically says:
  • Only suitable for models from 09/ 1985 - 09/1989 Mopf 0
  • Seal is for gluing and not for plugging in!!!
I contacted support and we'll see what they come back with... because they definitely shipped me a press seal. Hoping they can come through and ship a glue type one - I have the adhesive to make it work... and then this seal (which is nice) could go to someone who needs one here.

With the windshield wiper, I made a run to the junkyard where there's a 1989 300TE. It's green/green which is kinda cool... but it's in terrible shape. Like someone urinated all over the inside and ripped the interior apart. I found a broken crack pipe in the car too - maybe that helps explain things 😂
PXL_20240419_215417679.jpg

Pulled the wiper assembly and that was a piece of cake. Pull N Save charged me $58 which was a fair, in my opinion.
PXL_20240419_220643429.jpg

Taking this apart was actually a lot easier than I had thought. Basically, there are two areas of the assembly that you can take apart:
1. The motor and the linkage near there
2. The actual wiper arm itself

With the motor itself, you can easily mark and line things back up. The arm was a bit tougher for me. You might be able to mark the bolt and the linkage behind, but I either messed that up or ran into another problem. Basically you can free the 17mm bolt on the back (behind the wiper arm) and then you can use a 3 claw jaw puller to free the linkage from the splines on the bolt. When the assembly breaks free, you can pull it off and set it aside. The wiper arm you can aim directly up (12 o clock position) and pull it straight out. When you do, you can see the plastic tracks inside. If you look at the pic below, you can see the round "divet" at the bottom (6 o clock position) where the gear gets positioned when you pull the cover outward to remove.

PXL_20240420_184026816.jpg1713813839165.pngPXL_20240420_194922633.jpg

I cleaned these up really nicely (soapy water, toothbrush, rags) and then lubricated with some red grease I had for packing wheel bearings. The actual arm itself can then be taken apart and lubricated, which I did too (wish I captured more detailed pics). I had to remove 4 bolts (not 3) and you can crack the top cover off. There was also a rubber O-ring which desperately needed to be replaced. With everything lubed up, I put it back together and tried to line it up with where I had marked.

I swapped the motor with a brand new unit (124-820-08-08) I had gotten from MB of Chandler and proceeded to take off my existing wiper and mount this replacement one.

It might be because this was from another car (1989 that someone retrofit the 94/95 front end on), but this didn't line up properly when I mounted on the car (it was too low - turned too far to the right). It took a lot of tries- 6 to be exact. Each one required breaking the assembly free of the spline using the puller and then manually repositioning it / tightening down / trying again. But I did finally get the positioning perfect 🙂 Again - this might be my bad, not marking properly. You would think the bolt with the splines can be marked against the assembly 🤷

Super happy to have this thing working beautifully again! Buttery smooth 😎 This was a partial upgrade, too. My old arm (where you take the 5mm hex bolt off) has a metal cover with a tiny square plastic flip cover over the bolt (which often breaks). Here's a reference picture for one where the small square cover broke.
1713815334410.png

The new arm I had taken uses a much larger plastic cover 124-824-03-49 which I just happened to have sitting around the shed (brand new MB branded in the bag) from a recent parts stash I acquired. The even newer cars I believe you can take the full lower arm cover off without removing any bolts. I'll definitely look for those newer units in the junkyard too.

I'll try to see if there's anything new I can add in our thread here about the wiper motor rebuild. But having done it, it's not scary at all! It's actually quite easy and satisfying. And now I have my entire assembly as a back up stored away in the shed. I might rebuild that one and take very detailed pics for our thread. I have yet to crack it open to see how bad it got inside - would be fun. Sometimes, trying the job out on junkyard parts is all the confidence you need to do the job 🙂
 
Last edited:
Nice work, Brian! Good to hear you have a working monowiper again.

FYI - the early 124's have a slightly different length spring-loaded arm, which needs a unique/different wiper blade that has the connection point offset slightly. Aftermarket blades will stick out too far (hit the A-pillar) with the early arm. The 1989 should have the later style arm. The break point was mid-1988 model year. I like to use the OE blade since OE refills had been available cheap, but the refills are going NLA... sigh. Anyway, if you compare your 1987 and 1989 arms you may see the difference - something like 1 inch or so.

:jono:
I did notice that! Great attention to detail 🙂

The 1987 wiper assembly and arm got VERY close to the A pillar without hitting. You're correct, aftermarket wiper blade won't fit. The MB part fits and only leaves like 1cm of space between the end of the blade and the A pillar.

The 1989 wiper assembly and arm doesn't stick out quite as far. There's a good inch between the end of the blade and the A pillar. Before putting things together, I operated the wipers and made sure it hits all the good points (drivers side, passenger side, etc) which it definitely did do. I love sticking with the MB branded parts - but nice to have the option in a pinch to use aftermarket.
 
Brian, if you have any OE blades, see if your dealer can still get some refills p/n 000-824-36-27-01. These show NLA at RevParts but there were still some available via the dealer network last time I checked. There's also a guy on eBay selling some NOS as well.

:nos:
 
No update yet from MBZCLASSICPARTS with the trunk seal. I'm really disappointed with them actually. What I have works for now- I still haven't "retrofit" the newer style, so the plastic "brace" panel is still flopping loose. I know it's a German company (different hours, possible language barrier) - but they have responded to emails before and I did translate my email into German also and was very clear about the problem. I tried to contact them 4 times so far since April 19 without luck.

As it stands, I would try to avoid them if you are looking for parts. They are also selling on eBay under the handle mbzclassicpart. What I have purchased is good quality-wise. But signing up for the website will spam you with promotions and the support just seems non-existent. It takes a while for shipping too - both times it took about a month to get my order. 🙁 If something changes here I'll update.

The windshield wiper after service has been great! I'll try to get some refills, thanks for the part# Dave!

One of the next projects I've thought about has been the sunroof. I know that can be nasty - but it might be worth tackling a full service before all of the parts become completely unavailable. Then of course putting fabric tape where needed to eliminate the noises (panels moving around). The sunroof and tilt both work now... but I don't think it's ever had a full service. Given how many W126 and W124 sunroofs I've had seize up, I've been avoiding using it for now 😂 I have the socket for the trunk where you can operate the cable manually just in case 🤣
 
No update yet from MBZCLASSICPARTS with the trunk seal. I'm really disappointed with them actually. What I have works for now- I still haven't "retrofit" the newer style, so the plastic "brace" panel is still flopping loose. I know it's a German company (different hours, possible language barrier) - but they have responded to emails before and I did translate my email into German also and was very clear about the problem. I tried to contact them 4 times so far since April 19 without luck.

As it stands, I would try to avoid them if you are looking for parts. They are also selling on eBay under the handle mbzclassicpart. What I have purchased is good quality-wise. But signing up for the website will spam you with promotions and the support just seems non-existent. It takes a while for shipping too - both times it took about a month to get my order. 🙁 If something changes here I'll update.
UGH. Thanks for the warning. I dislike vendors who are only interested in selling, and ghost you when you need customer service / support.

:oldman:


One of the next projects I've thought about has been the sunroof. I know that can be nasty - but it might be worth tackling a full service before all of the parts become completely unavailable. Then of course putting fabric tape where needed to eliminate the noises (panels moving around). The sunroof and tilt both work now... but I don't think it's ever had a full service. Given how many W126 and W124 sunroofs I've had seize up, I've been avoiding using it for now 😂 I have the socket for the trunk where you can operate the cable manually just in case 🤣
The sunroof service isn't nearly as bad as one might think, as long as it is still operable. If you wait until one of the lift arms break... THAT is when things can turn ugly. You can disassemble everything, clean, lube, and re-assemble. Pull the cable out for a good cleaning / lubrication as well. IIRC there is a good "How-To" on the forum.

Inspect the lift arms closely! If you find anything awry with either side, replace both of them (either with new, or good used ones from a later 124). There is a pivot point/bushing which cannot be repaired if broken. Amazingly, both lift arms (aka "transport bridge") are still available new, for ~$175 each at RevParts dealers. That said, both show "On Promotion" at the MBCC site which is worrisome - makes me suspect they could go NLA when inventory is depleted. Fortunately, good ones can be obtained from junkyards - but it is A LOT of work to extract them, and you have to remove them for inspection, so if one or both are bad... then you're out the 1-2 hours labor for nothing.

:sawzall:
 
Looks like the vendor is a member here - so I'll tag them: @Mbzclassicparts

I definitely appreciate and have love for people making parts for these classic cars. Hoping there can be some resolution as I'd love to keep this W124 on the road as long as possible and it seems the vendor has a lot of hard to find rubber parts. Just to recap - what I have received so far is high quality.

- The parts I mentioned in post 228 fit perfectly.
- The trunk seal I mentioned in post 235 is great - but it's not the glue in type for the 1985 - 1989 cars, which is what it was advertised for. It's for the later model ones.
 
Damn - today was amazing. I went to a junkyard and found a 1988 260E (WDB1240261A739617) that was in good shape, all things considered. It has the same color interior as mine (palomino), so I took as much as I could before getting tired

haul4-car.jpghaul4-headliner.jpg

My headerliner is in "OK" shape - it has tears and there are some jiggling noises for the metal panel occasionally. The headliner here was in pretty good shape - so I went and pulled it. Basically, you take off the "oh shit" grab handles, take the front headliner panel off, and you can get started taking everything apart. There are plastic tacks holding in the front and some metal bars stretching the liner on the rear on each side. After you get those loose, the fabric part of the headliner flops down and you have access to the 12 bolts (10mm) holding the metal "cassette" onto the roof. You do have to disconnect the rubber for the drain - one on each of the four corners.

With all of that loose, the entire assembly comes out - which to my surprise includes the sunroof. I used tin snips and cut the cable behind the assembly. I figure it's easier to work on this at home inside the air conditioning. I had been wanting to service the sunroof - here's a chance to do all the work on the spare part and then swap it over 🙂
haul4-sunroof.jpg

Overall, it was a great haul. I got a ton of parts for a grand total of $200 after taxes, etc. Here's a full pic showing all the goodies:
haul4.jpg

Some of the highlights:
  • The whole sunroof / headerliner assembly
  • 4 of the grab handles and all the hardware / plastic pieces associated with them
  • Both B pillar trims in flawless shape. No tears on vinyl, the foam under the vinyl is nice and supple, the adhesive is still nice and strong. This car was definitely garaged.
  • Fuel level sensor and the metal seal that holds it in place
  • A grille in amazing shape. The plastic mesh is the best condition that I've ever came across, period. I'm going to clean it up more and swap with mine (which is aftermarket). The star is in good shape, the outer surround is in great shape, and the emblem / chrome bars are too. Got really lucky here
  • Push type trunk seal in really good shape. Still nice and soft
  • Updated plastic trunk brace which has the square rivets. I should be able to make this one fit for sure. Lining it up, some holes need to be punched into the metal in the trunk. I think this will be the long term solution for what I mentioned in post 235
  • Lots of small pieces not worth mentioning (plastic covers, rivets, exterior door panel rubber strips, etc)
 
And then just for fun - I had taken time off earlier this month and got a lot of junkyard time in. I got tons of goodies for the W126 that I wanted to share

Each of these hauls was pretty cheap - All 3 of them combined came out to just over $250 (seat modules and clusters the most expensive parts). If you've never been to your local junkyards, I definitely encourage you to check them out! You can check row52.com and find some

Taking the parts off is great practice too - for when you go to do the job on your own car 🙂
haul1.jpghaul2.jpghaul3.jpg
 
Great score, Brian! FYI - the sunroof lift arms (transport bridge) were upgraded circa 1988 or so. It's possible the 1986 car may have had them replaced at some point, but be careful if you plan to use them... the early ones were prone to breaking, and that makes for a FUN job to fix when the assembly is borked. BT, DT.

:banana2:
 
Whew - weekend flew by! I didn't get any repairs done but I did some good research.

Going back to the whole sunroof assembly, I took it apart to figure out how everything works. Since I cut the cable, I had operate that by hand using pliers (to push or pull the roof). I think this assembly might be unique to the earlier models - I've seen other folks on here posting about their headliner and they have a solid board with fabric... versus this headliner fabric which has metal rods pulling the fabric into place. One metal bar by each "oh shit" grab handle (two on each side) and then one long metal bar that connects between the two C pillars.

PXL_20240511_190253383.jpg

Basically, you can open the sunroof 3/4 of the way and then pop the 4 tabs holding the inner sunroof panel (the one covered in fabric). When those pop loose, you can pull the panel forward and out. At this time, I chose to remove the side rails (you can see them on the table in the pic). There are 5 screws for each side. These hold the transport arms in place and help guide them. But also, they hold down a small thin chrome piece which presses the fabric headliner in place.

With the inner sunroof panel removed, you can close the sunroof again and then take off the four 8mm bolts holding it in place. Two bolts on each side bolt the metal roof to the front of each transport arm.

With the metal roof off and the rails off, you can undo the two 8mm bolts holding the cable to the transport bridge and remove it in one piece with the rain guard attached. The rain guard comes off if you clock it at the right angle and push it through the transport arm.
PXL_20240511_194303163.jpgPXL_20240511_203549200.jpg

Here's a close up of one of the transport arms - I think this is the updated model like you're saying @gsxr
PXL_20240511_201118392.jpg

Everything is intact and in decent shape. There are some rubber bits missing or in terrible shape and those are available individually (and appear to be in stock). I'm a bit torn though - not sure if it makes sense to order new rubber bits for both sides (about $50) OR just order new assembles for each side (roughly $190 per side). Some parts are NOT available - like the rubber wheel and small tilt roller wheels and other small bits. Leaning towards just ordering the whole assemblies to ensure no problems in the future.

I lubricated all the parts and then re-assembled to make sure I knew how it all goes back together. It's a bit tricky - but an interesting design 🙂 Glad I pulled the whole assembly for practice - it's fun figuring it out at your own pace on the back patio... versus trying to mess around with all these components when they are all still INSIDE the car 🤣 I'll likely just use this for parts and keep my existing assembly (only replacing transport arms).

Next step is figuring that out and then also figuring out the headliner. Unfortunately, the one I pulled has a few tears. It's in better shape than mine - but I did see GAHH offers a headliner for the early models like mine (great price too - just over $300).
PXL_20240511_204143642.jpg

I emailed GAHH asking for more info - specifically asking if 1) the color I found matches and 2) if they have pictures (including the back). Hopefully, they have fabric sewn to attach the hardware that puts tension on the headliner and I can just swap those bits over. Will report back what I find!

For reference - I redid my old 1991 560SEC with all GAHH products back in 2018/2019 and was very impressed the quality. The seat leather far exceeded my expectations and they helped when it came time to do the sewn in heating element (I was working with a local interior specialist at that time here in Arizona). The only thing I regret with the C126 was replacing the carpets. I blindly ordered and didn't realize they did not have molded carpets (where it's shaped and has foam backing). We figured something out - but it wasn't really "OEM" and I always felt bad about that. This time I'll see what they say before ordering 🙂

I never heard back from MBZCLASSICPARTS GmbH about the trunk seal. I left a review on the product page but it looks like it got hidden when I refreshed the page later 🤷 I do have the part I need to retrofit the newer style in - just need to cleanly puncture holes in the trunk metal for the rivets that will go through.
 
Last edited:
I never heard back from MBZCLASSICPARTS GmbH about the trunk seal. I left a review on the product page but it looks like it got hidden when I refreshed the page later 🤷 I do have the part I need to retrofit the newer style in - just need to cleanly puncture holes in the trunk metal for the rivets that will go through.
Was your tunk seal review not glowing? If they are removing reviews they don't like... that's not cool.

Great work on the sunroof, btw!
 

Who has viewed this thread (Total: 3) View details

Who has watched this thread (Total: 6) View details

Back
Top