• Hi Guest !

    Welcome to the 500Eboard forum.

    Since its founding in late 2008, 500Eboard has become the leading resource on the Internet for all things related to the Mercedes-Benz 500E and E500. In recent years, we have also expanded to include the 400E and E420 models, which are directly related to the 500E/E500.

    We invite you to browse and take advantage of the information and resources here on the site. If you find helpful information, please register for full membership, and you'll find even more resources available. Feel free to ask questions, and make liberal use of the "Search" function to find answers.

    We hope you will become an active contributor to the community!

    Sincerely,
    500Eboard Management

Center Console Switches

8899

E500E **Meister**
Member
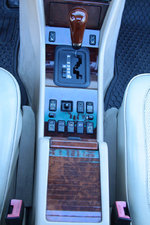
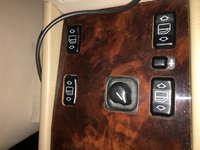
As you can tell from the photos below, my window switches on the center console are not seated properly/consistently. Also, my shift-gate ring does not sit flush with the center console. Before I go through the trouble of removing the the center console to see what the trouble is, I would like to know what others have experienced and done to remediate this problem and perhaps obtain some parts that could correct the problem(s) before I get started. I recall seeing a recent thread that discussed some of the attachment parts (clips maybe) that are used on the underside of the center console to hold everything together.

I have heard from a very reliable source that there are
two different types of attachment for the wood & switches: (1) one type has the switches in a separate plastic frame, and the whole frame clips to the wood, and (2) the other type has the switches individually click into a plastic frame stapled to the wood. This second type is how the seat-heater switches are connected...they click directly into a plastic frame stapled to the wood, there is not a separate switch holder.

Does anyone happen to know which type is used on the E500E? Also, does anyone recall the recent thread that discussed this matter? Last, if anyone could point me to the part group and sub-group for this that would be great!

 

Attachments

  • Console1.JPG
    Console1.JPG
    2.7 MB · Views: 40
  • Console2.JPG
    Console2.JPG
    3 MB · Views: 32
My green car has a similar issue due to what I perceived as a retro fit switch frame. Only the seat heating switches were sitting too low in the wood console. I altered this by some further cutting/grinding in addition to what someone previous had done. What I see seems to support there being two different switch frames. I can post pictures and more info later.

drew
 
From memory, the limo wood (with extra switch holes) requires the separate frame; and I think the stock E500E wood has all the switches snap directly into the wood assembly (no separate frame for the window switches).

Update - I found a photo that appears to be a 1994-95 console wood (no fader hole), and it has the switches snap directly into the plastic piece stapled to the wood - no separate big/square frame.

I need to get photos of the different types for my website!

:detective:
 

Attachments

  • switch_filler_panel2.jpg
    switch_filler_panel2.jpg
    136.2 KB · Views: 35
Update - I found a photo that appears to be a 1994-95 console wood (no fader hole), and it has the switches snap directly into the plastic piece stapled to the wood - no separate big/square frame.

Ok, I will dig around in the EPC and get the part diagram that corresponds to 124 683 0700 and 124 683 0710.
 
Ok, I will dig around in the EPC and get the part diagram that corresponds to 124 683 0700 and 124 683 0710.
It will be in Group 68 (Covering). If the plastic piece stapled to your wood is damaged (tabs broken, etc) you may be able to replace it. More likely it has started to pull away from the wood. You'll have to take it apart to find out.

:pc1:
 
I had the centre console wood out of my 1992 Euro 500E a couple of days ago for the ASR defeat Switch install.


When lifting the wood up the window switches try to come with it so I have to use my thumbs to push them back through to release the wood.


The window switches are all installed in a small black plastic frame. Which stays together when the wood trim is taken off. Then when re-installing the wood trim is pressed down onto the window switch assembly and it clicks into place kind of thing.


It seems to me your console wood has warped slightly and that’s why the switches are sitting too low. Mine has warped a little too but not enough to notice at a glance or to cause problems with the switches.
 
It will be in Group 68 (Covering).

Subgroup 330. I need to up my EPC skillz. I find it a very clunky application.

Best I can tell is that either my console (limo) wood piece is warped, or I need to purchase a new rear switch insert (124 683 0700) plus a couple screws and washers. Thank you all for the help. I have had this problem since purchase and am finally determined to fix it.
 
Last edited:
Oooops, forgot to clarify: The "limo wood" is console wood used in long-wheelbase (limousine / 6-door) 124's and it has extra switch holes, as seen below. These use a different method to attach the switches, IIRC... requires the extra square frame thingy I was talking about. I think. I need to check and get photos.
 

Attachments

  • interior16_console.jpg
    interior16_console.jpg
    160.3 KB · Views: 28
  • limo_wood_burl.jpg
    limo_wood_burl.jpg
    81.5 KB · Views: 17
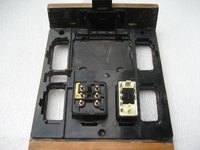
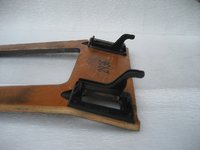
Here are some pictures of the switch frames in my console. You can see the holes from the staples that held the original frames on. These are non standard frames (I assume) that were installed with epoxy prior to my ownership. You can also see the cutting that was done to get the switches to sit properly, which all but the seat heater switches did. I have taken more material off of the two heater switches themselves and got them to sit properly. I have no idea what car these switch frames came from. You can also see how the catch levers that are part of the two heater switch frames have been modified. The console and switches all sit properly so this is a viable option should the original 036 frame be unavailable.
The part no.s on the heater switch frames are 124 683 0123 (drivers side) and 124 683 0223 (passenger side). There is no visible part no. on the main switch frame. The epoxy is holding the frames very well btw. The original rear latch is still intact.

drew
 

Attachments

  • enter console 031.JPG
    enter console 031.JPG
    475 KB · Views: 22
  • enter console 033.JPG
    enter console 033.JPG
    381.7 KB · Views: 17
  • enter console 032.JPG
    enter console 032.JPG
    482.8 KB · Views: 20
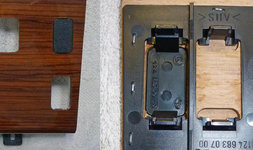
Drew, your pics confirm what I just looked at in my spare parts collection. The 4 window switches are held in a separate, rectangular plastic frame (kind of a "switch carrier") which remains in the console. This frame snaps on to the wood's thin plastic frame (the piece glued on in your photos) via the 4 tabs, one in the middle/outside of each window switch hole, when the wood is pressed into the console. This setup was used on all early 124's, I believe. My original 1992 500E console wood is this type. See edited photo attached.

There is another type of thin plastic frame stapled to the wood; which I believe was used on late-build 124's (1994-95?). This later design does not have a single plastic tab at the middle/outside of each window switch. Instead, it has 2 tabs to retain each window switch - all 4 window switches snap individually into the holes, just like the seat heater switches, stereo fader, and mirror adjustment switch. I prefer the late type as it's easier to get the switches seated properly and sitting all the way up in the wood. Seems that the majority are the early type though... and, IIRC, there is an issue with the wires being too short to easily connect everything before installing the wood. (??)

:klink:
 

Attachments

  • center_console.jpg
    center_console.jpg
    224.3 KB · Views: 18
There is another type of thin plastic frame stapled to the wood; which I believe was used on late-build 124's (1994-95?).

So yea, the EPC confirmed this for me earlier today. Thanks again for your help.
 
I can verify Dave's info on the later cars, mine's exactly like that. I'll try to remember to take some photos next time I'm in there. I agree that it is way easier to get everything seated properly on the later cars.
 
Hi,
I still do not understand what to do with switches sitting too low.
Since the plastic is stapled into the wood, the only thing is glue the plastic (with the switches) on the wood?
Apart from buying all new I meant.
The bulb for the shifter is low too; I can harly see what gear I am in when driving at night.
But I thing that is an easy task, right?
Thanks for any hind,
Rudy
Your best bet is to get a replacement piece of wood, because once the plastic becomes unstapled to the wood, it's difficult to permanently fix it using glue. Possible, but I've found that it's better just to source a new piece of wood. Or send to a refinisher, who can re-affix the backing plastic for the switches.

My two cents.

Cheers,
Gerry
 
Hi Gerry,
Since the piece of wood has a black finish from Madera I cannot simply replace it.
Now I have to find a refinisher which is not easy.
The last threw away the supporting bolsters on my driver seat I had installed for 200 bucks back in Calif.
Not easy to find caring workers.
Will not call them experts or something close to it.
I will try my luck.
Thanks for the quick "two cents",
Rudy
 
I still do not understand what to do with switches sitting too low.

Are you certain that your wood piece is properly seated and that nothing is preventing it from moving down slightly more so that the switches rise further up into the holes?

Regarding you shifter bulb, are you certain that it is properly inserted into the hole that it is meant to reside so that it fully illuminates the gear selector plate?
 
Victor made a video on that:
https://youtu.be/a22NZDkESQo (w12 500e project, part 17)
at 12:45 - center console repair
Plastic repair, glue - easy
relocate the staples - quite difficult imho, the plastic is hard.

[youtube]a22NZDkESQo[/youtube]
 
Remove the console first & check IF the plastic trim is coming loose from the wood. Sometimes the console just needs a firm push down to click & seat it down. This was the case in my 500E when I bought it- I thought the wood was warped but it simply was not fitted properly.

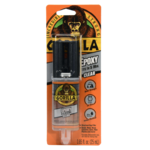
If the plastic trim has separated it would be easy to re-glue back to the wood. Buy a pack of ‘Filler spreaders’ from an Auto parts store & cut one down to a ½ inch width. Then use that to apply a 2 Part epoxy glue. Work fast to coat the plastic trim then press it back in place & jerry rig a clamp / weight to hold it tight for 5 – 10 minutes until the epoxy cures. Since it is a 2x component product it will 100% cure very quickly & not damage the wood.

resized Epoxy Individual in Package.png
 
Just an FYI... read the label carefully on any epoxy products. Many do not work on plastics, you need to buy an epoxy that is specifically for plastic bonding. The plastic-specific products generally will bond plastic to other materials (i.e., wood or fiberglass). "Standard" epoxy will not adhere to plastics very well and can separate after the item is put back into use.

I went through this headache on W210 door panel plastic clip holders; the factory glue fails and the only thing which would properly re-bond the plastic holders to the door panel was a plastic-specific epoxy. I used JB Weld Plastic Bonder epoxy (click here) which worked well. They also have a quick-set version but it is thinner and runny, I preferred the thicker version. The pros use a fancy 3M product that requires a special applicator (Polygun II) and cartridges, apparently this stuff is awesome if you have a pro shop, but it's cost-prohibitive for the DIY'er.

:gsxracer:
 
Besides using an epoxy formulated for plastics it is also helpful to rough up the surface of the plastics with a file and/or sandpaper. Additionally, drill some holes in the plastic to provide even more grip.

Drew
 

Who has viewed this thread (Total: 2) View details

Back
Top