• Hi Guest !

    Welcome to the 500Eboard forum.

    Since its founding in late 2008, 500Eboard has become the leading resource on the Internet for all things related to the Mercedes-Benz 500E and E500. In recent years, we have also expanded to include the 400E and E420 models, which are directly related to the 500E/E500.

    We invite you to browse and take advantage of the information and resources here on the site. If you find helpful information, please register for full membership, and you'll find even more resources available. Feel free to ask questions, and make liberal use of the "Search" function to find answers.

    We hope you will become an active contributor to the community!

    Sincerely,
    500Eboard Management

OWNER DerFuror

A delivery of new parts arrived today, allowing me to officially complete the cam oiler tube replacement job. The car now has:

  • Aluminum cam oiler tubes with new orings
  • new upper timing chain retainers
  • new oil separator & breather tube
  • new cover gaskets
  • new cover bolt washers

I installed the new oil separator with breather tube in the right cylinder head. I stand corrected regarding my previous statement of the old breather tube being salvageable. The new tube is like rubber. It is pliable. It bends & can be squeezed. The old tube was solid like Bakelite. I thanked it for its service, then decommissioned it into the dustbin.

Surprisingly, the right cam cover went on rather quickly & easily compared to how it came off & compared to the left side. I double-checked because I couldn’t believe it. Its infamous lower rear cover bolt (with new crush washer) also went on rather easily.

I believe some of the previous gasket leaking was attributed to the difficulty previous hands may have had in trying to correctly torque the two infamous lower rear cover bolts from Hell. Proper tools on hand excommunicated most of their devilishness this time.

Other jobs officially completed today:
  • new spark plugs
  • new distributor caps & rotors
  • new protective wiring loom replacement
 
Always good. Always right on the money. :spend:

A sincere "Thank you!" for the report, Derf.

:thankyou:


Make sure in a few hundred miles that you check the cam cover bolts. You may want to give each of them another 1/8-1/4 of a turn after they have time to settle. Helps avoid seepage/leaks down the line a bit.
 
Finishing off yesterday's jobs allowed me to reinstall the PS reservoir today & thereby complete that job. The car now has:
  • new power steering short hose & aluminum washer
  • new reservoir gasket & oring
  • new reservoir filter

The new lower wiring harness is scheduled for delivery & will be installed next.
 
I'll ask the inevitable GSXR question with regard to the PS hoses ... the job that I admitted being too much of a wimp to actually do ... Did you replace the long hose from the pump to the steering box along the driver's side frame rail? :stickpoke:
 
I'll ask the inevitable GSXR question with regard to the PS hoses ... the job that I admitted being too much of a wimp to actually do ... Did you replace the long hose from the pump to the steering box along the driver's side frame rail? :stickpoke:

I have indeed been contemplating its replacement. I have access to both ends. The motor mount cold-air tube is removed. The far hose clamp screw (steering box end) is facing the right direction. At the very least, I have new heat shield tubing that has been sitting on the shelf for a few years that I would like to install because the current shielding on the long hose is a little buggered up.

The little S-hose appears relatively new (it is not covered in shielding). Both hoses are either the same age, or I'd suspect the long hose is older. I have to check receipts to verify age.

UPDATE: Receipts show that the PS pump was resealed in 2006 & the steering box Pitman Arm seal replaced in 2007, but I didn't notice any hoses specifically itemized on the parts list...so hoses are at least 9 years old if replaced during Pitman Arm reseal.

I'll probably disconnect the easy end to r&r the shielding. I'll replace the hose if I don't like its looks...and if I find my hose-pull pliers for the far-end.
:hooked:
 
Last edited:
New Lower Harness Installed

The new lower wiring harness was installed today. Only a final tightening of the fasteners is required to finish the job.

Lower_Harness 014.jpg

Like others, I removed the plastic connector and the upper mounting bracket on the top end, tied a cord thru the large eyelet & taped loose ends. Working alone, I removed the old harness thru the bottom, then tied onto the new harness (after removing the same items) and installed from the bottom up.

Lower_Harness 021.jpg

The first connection I made was the large starter solenoid terminal which is roughly the midpoint of the harness & stabilizes the harness for the ensuing tasks.

The most challenging part of the job was figuring out how best to start the small Philips-head screw for the starter solenoid small wire. I decided to remove the small stabilizer bar (connecting member) to provide space for two-handed access to the starter area. Removal was easy, and doing so allowed me to actually start the small screw by hand, then finish tightening it with a stubby screw driver.

The lower mounting bracket was installed over the AT dipstick bracket with a perfect fit & what I believe is a better mounting order than the reverse.

This was a very timely & important replacement. As previously mentioned, I’m surprised I didn’t encounter any electrical issues because of the deteriorating condition of the old harness.

Overall, I’m very pleased with the progress of the various replacements & upgrades being made. I still have more to do & am looking forward to them because I know the end result will be an ever more enjoyable ride.
 
Last edited:
Good work Derf, I did the same with the Phillips screw, wish she was a bolt, I looked thru my mb nuts and bolts bucket for one but no joy.
 
The rain kept me inside today

I made the best of today's inclement weather. :victorious:

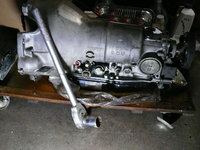
Transmission 020.jpg

I became vehemently pissed recently when once again I walked into my garage & it looked like a gunshot victim bled out from under my car…ATF blood…F*CK!!!! :pissed:

A recent thread discussed the various aspects of garaging an E500E…duration, environment, geographical location, etc. My Texas car is usually stored from the end of November to the 2[SUP]nd[/SUP] week of May. All I can say is that my transmission can’t seem to handle Northeast winter storage. A leak appears every couple years. I believe I locate & correct it. A winter or two later, ATF covers my garage floor again.

Receipts show that a major AT service took place in 2008. The front pump & seal was replaced…no itemized documentation regarding any other AT components (specific orings, etc.), but the overall cost strongly suggests that a gasket rebuild kit must have been applied. A couple years ago after a mid-winter bleed-out, I replaced the gear selector seal. I did everything I could to address this issue without removing the AT (the job was about 90% of an AT removal). The job appeared to be successful. This time around, the leak source was proving difficult to pinpoint, but seemed to be coming from the same general location! :blink:

This AT is mocking me. I quickly decided I’ve had enough of its shenanigans. I’m going to find out exactly where the leak source is, eliminate it & replace whatever else needs replacement. :bat:

I’ve had past-experience with transmissions (working for my Father), but I had always hated dealing with ATs. I’ve grown a big brass set since then. With several items already removed for previous jobs, I dropped this whore of a 500E AT fast…

Transmission 015.jpg

...the only delays were for general documentation, & for noodling out the best way to address a couple key tasks…specifically the removal of the Control Pressure Cable apparatus to better access the top two transmission fasteners (both items are located between the back of the engine block & firewall…limited clearance & hard to get to) & removal of both sets of flexdisc fasteners to provide proper clearance for hassle-free final removal.

Transmission 009.jpg

All for the beste
:thought:
 
Last edited:
CSI AT

I found a culprit (perhaps the culprit). The Modulator Valve oring was pretty deformed & extruded. It may have been installed incorrectly. When the Modulator Valve was removed, the oring remained in the bottom of the hole as if it were installed in the hole first & then the valve tightened down upon it afterward. :blink:

Transmission 029.jpg

I remember reading about other members who ran into a similar situation a few years ago.

Anyway, most every oring is getting replaced this time around.
 
Last edited:
Derf, FYI... if you pull the front pump to replace the big O-ring, you'll need the special tool set to compress the reverse piston springs, and sleeves to re-install the piston without buggering up the new lip seals. (Don't ask how I know.) The SG Motorsports tool kit on eBay is ~$225 delivered and has all the stuff you'll need, including the tool to press the B1 cover so you can replace that O-ring without filling up the swear jar.

Most all the other seals are self-explanatory; I'd skip the rear output shaft seal if it's dry (these almost never leak). Don't forget to replace the speed sensor plastic cup O-ring, buy a new plastic cup as you may need to break it apart to remove... same O-ring is used on the plastic cup to housing, as is used on the sensor itself, so buy two of the same O-rings for that location.

:banana2:
 
Seeing as gsxr has been remiss in providing HOW-TOs for this forum, we're all looking to you for a comprehensive 722.3 "re-seal" HOW-TO, Derf !!
 
Transmission reseal

Yesterday, I plugged orifices then scrubbed the flotsam off the tranny with brakleen, toothbrush, rags & compressed air. Afterwards, I performed a visual inspection, then started removing, cleaning & replacing items one at a time.

My new motto: Speak softly & carry a Big ratchet. I’m showing the AT that I’m not half-stepping this time...I'm pulling out the big guns right away!

Transmission 026.jpg

The various orings for the kickdown solenoid valve, reaction valve, overload protection switch & modulator are now replaced (OLP switch & reaction valve put up a moderate removal defiance, but I assertively persuaded them to see things my way). :whip:

The front & rear seals appear fine, so I’m leaving them alone.


PS: It is rumored that only Prince, the Artist himself, has more stashed away in his personal archives that does gsxr. If we could lobby him to maybe release only just his V8 HOW-TO version...it would prevent other members from developing acute irreversible keyboard-flatfingeritis! :D
 
New Oil Strainer & Level Sensor Orings

These are going in today along with a new oil pan gasket & drain plug ring. I believe this will complete the engine-side of Operation Leak Elimination.

Oil_Strainer 002.jpg
 
That pickup screen is a very delicate operation. I think there's a HOW-TO on that somewhere. Cracks me up that it's a 110 part number


Sent from my iPhone using Tapatalk
 
New Oil Strainer & Level Sensor Orings

I let the oil pan drain for a couple hours this morning before removing it for the first time in my ownership. I was curious what I’d find inside. There were a few small bits of timing chain guide, but the most interesting sight was the strainer intake full of the rest of the timing chain bits (the strainer screen was doing a great job!).

Strainer 009.jpg

The strainer housing was most likely original (or the 2nd one installed) because it was petrified. I had to break it off in pieces (the vast majority of crap in the pan pic is this strainer housing.

Strainer 010.jpg

Similar to gvz, I had to rotate the crank slightly to gain clearance for sensor removal. The sensor clip came off easily using a long screwdriver. The orings were most likely original (or the 2nd ones installed) because they, too, were petrified & had to be broken off.

Strainer 008.jpg Strainer 002.jpg

I thoroughly cleaned the sensor without stressing its wire. Lubed-up with oil, the orings went on nicely. The sensor pressed firmly into its orifice.

Strainer 003.jpg

I tried several different methods to get that retaining clip on until I found the one that worked for me. I have long fingers & was actually able to push & hold the clip into its initial position. I then inserted the same long screwdriver between the 2 fingers holding the clip & pushed it home.

The new strainer housing is nice & rubbery and ready for the next era of service along with its new screen.

Strainer 006.jpg

New oil pan gasket is on with permatex. Screws are all on but will get final torqued tomorrow.

Another key job is crossed off the list. :banana1:
 
Once I get my newly powder coated valve covers from Honch, I too will be doing the upper job as well as the lower to collect all the droppings from the chain guide R/R. Good work again Derf, thanks for illustrating the way and combined with other HOW-TO, its going to be a snap. (wonders aloud... do we need permatex?)
 
I used blue Hylomar on an OE gasket last time. Tighten the bolts in stages (i.e., 5Nm first, before going to 9Nm spec). Check the bolts after a few hundred miles and multiple hot/cold cycles, you will likely find they will need to be re-torqed. The lower gasket can be a real PITA to get leak-free.

:oldman:
 
Dave's procedure is generally what I use for both the lower oilpan gasket, and the transmission oilpan at the time that an ATF change is required. No Permatex is needed -- I HATE that stuff with a passion.

If MB's instructions don't explicitly call for the use of a liquid sealant, then I don't use it. Bottom line.

Torque the gasket/bolts down to the factory specified torque. It's likely it will leak within a few dozen or hundred miles after you do this. Then you just go back and re-torque, and 90% of the time you're good to go for a long time into the future, if not forever. If you have seepage/leak, do same again one more time and that should fix it.

Cheers,
Gerry
 
I used blue Hylomar on an OE gasket last time. Tighten the bolts in stages (i.e., 5Nm first, before going to 9Nm spec). Check the bolts after a few hundred miles and multiple hot/cold cycles, you will likely find they will need to be re-torqed. The lower gasket can be a real PITA to get leak-free.

:oldman:

Yes, right about that, what I experienced after A year and some months, first I was suspecting the front crank sealring.
As it turned out, leak from a long standstill with a cleaned motor. A few annoying drops but when you consider that oil
is standing over that bottom seal constantly, for the new (2:nd) gasket I will use the Dirko-S made by Elring
non corrosive to aluminum, very good adhession and quite expensive...
 
Ditto what Gerry said. For the record, I never have any issues with ATF/tranny pan leaks, when using OE/OEM gaskets and correct torque specs. (And almost every single time it seems the pan is leaking, the actual source has been a seal leaking above the pan, never the pan itself!)

The engine oil lower pan, uggghhhh. I've tried various methods and have never been able to get the blasted thing to seal perfectly on the first try. Sometimes it's trans-pan syndrome, where the leak source is above the pan... difficult to chase down unless your engine is spotless.

:roadrunner:
 
I used blue Hylomar on an OE gasket last time. Tighten the bolts in stages (i.e., 5Nm first, before going to 9Nm spec). Check the bolts after a few hundred miles and multiple hot/cold cycles, you will likely find they will need to be re-torqed. The lower gasket can be a real PITA to get leak-free.

:oldman:
which one GSXR: http://www.hylomarsealant.com/_resources/_html/order.html?gclid=COG-gK3X0MwCFVYdgQod5qIJJA I have Gen-U-Whine bits from MB and had not planned any type of snake oil....
 
Re: New Oil Strainer & Level Sensor Orings

New oil pan gasket is on with permatex. Screws are all on but will get final torqued tomorrow.

Oil pan was final torqued today & both tranny shifter linkrod bushings are now renewed.

Front: Shift Linkrod 017.jpg

Rear: Linkrod_Bushing 005.jpg

Shouldn't have to look at either of them for quite a while. :drink:
 
New O2 Sensor Installed

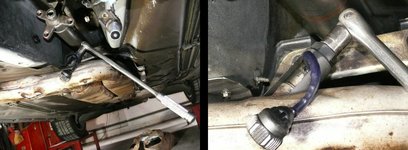
Thankfully the 500E utilizes the Model 129 oxygen sensor design. Smart & simple in which all work is performed underneath the car on the outside as depicted on pages 3 & 4 of FSM 1480 – Replacing Oxygen Sensor.

I used a standard 7/8" sensor removal socket on a 1/2" breaker bar. Removal was easier than I was expecting.

O2_Sensor 007.jpg

The exact Bosch replacement comes "pre-greased" with anti-seize.

O2_Sensor 002.jpg O2_Sensor 005.jpg

Torque to 55Nm / 40 ft lbs.

O2_Sensor 006.jpg

Nothing was really wrong with the old sensor, but I took the opportunity to replace it while I already had open access to its location. :36:

One more item off the spare parts shelf & another job crossed off the list. :star:
 
Tranny Insulation Blanket removed

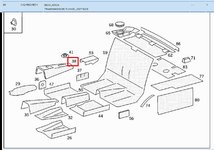
The EPC illustration alludes that a portion of my insulation blanket is MIA. I removed what was left.

Insulation Blanket.jpg

To extract it, I removed all the required heat shields & fasteners (unhidden & hidden) with the exception of one (not disturbing any hydraulic lines until the replacement blanket goes in).

At first look when I laid out the old blanket on the ground, it appeared like a dead manta washed up on the beach...but then I realized it looked more like the tunic the dirtbags from the Mad Max movie wear...grime & all!

Insul_Blanket.jpg

Here's what the tranny tunnel looked with it.

Insul_Blanket 001.jpg

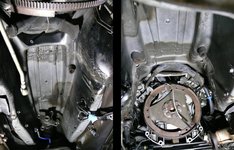
Here's what the tranny tunnel looks like without it.

Tunnel 003.jpg

Moving right along...
 
Last edited:
Power Steering Hoses

I'll ask the inevitable GSXR question with regard to the PS hoses ... the job that I admitted being too much of a wimp to actually do ... Did you replace the long hose from the pump to the steering box along the driver's side frame rail? :stickpoke:

For sh*ts & giggles after removing the tranny blanket, I was also able to remove the three fasteners that hold the steering unit heat shield. Later, I'll see if it allows me to get to the hoses any easier. :scratchchin:
 
Old vs new:

proxy.php
 
Nice! I'll look forward to renewing. :)

Based on the pic, it does look like I'm missing almost half of mine...

Insul_Blanket_Comparo.jpg

Hmm, gotta pimp
xtra hard this week-
end to afford it...
:thought:
 
Last edited:
Scavenge this!

Hmm, gotta pimp
xtra hard this week-
end to afford it...
:thought:

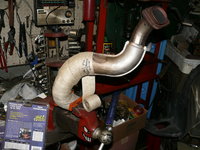
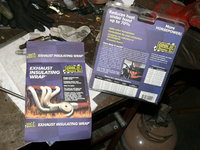
After some profitable pimpin', I had nothing better to do while waiting for parts to arrive besides poke thru the neglected parts shelf. I discovered some leftover Thermo-Tec exhaust pipe wrap…just enough to fully cover the crossover pipe.

What the heck, I think I will…especially now since no nasty fluids should be dripping down to foul it.

Crossover_Pipe_Wrap 004.jpg Crossover_Pipe_Wrap 003.jpg
 
YEAH BABY!!

AP.jpg

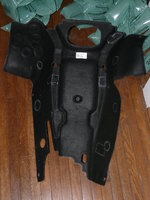
The Snail arrived today with my parts, including the new transmission tunnel insulation & a complimentary year's supply of shipping airbags.

This is a thing of beauty compared to the sad, soggy, sorry remnant it is replacing.

Time to go work again!

Transmission Insulation 002.jpg

Transmission Insulation 003.jpg
 
Last edited:
Out with the Old, In with the New

Don't forget to replace the speed sensor plastic cup O-ring, buy a new plastic cup as you may need to break it apart to remove... same O-ring is used on the plastic cup to housing, as is used on the sensor itself, so buy two of the same O-rings for that location

New speed sensor cup with oring installed.

New vs. Old

Speed Sensor Comparo.jpg

Also:
  • re-installed the Bowden cable control box with its new oring.
  • removed old water drain duct that channels water from the blower motor area under the windshield, down underneath the car around the bell housing to atmosphere.
  • test fit the transmission tunnel insulation.
 
Stay wrenching, my friends…

It’s not often that I find a few free minutes these days, but when I do, I upgrade my 500E.

Brake Hose 001.jpg

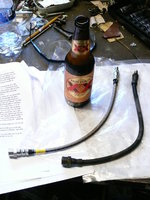
Found myself with some free time today because of damp weather. I headed out to the garage & finally replaced the front brake hoses with the braided sst Deerfields I had sitting on the parts shelf for too long.

Brake Hose 002.jpg Brake Hose 003.jpg Brake Hose 005.jpg Brake Hose 006.jpg

Relatively quick & easy job. Love their look & construction.:hearts:
 
Last edited:
Re: Stay wrenching, my friends…

It’s not often that I find a few free minutes these days, but when I do, I upgrade my 500E.

View attachment 52227

Found myself with some free time today because of damp weather. I headed out to the garage & finally replaced the front brake hoses with the braided sst Deerfields I had sitting on the parts shelf for too long.

View attachment 52228 View attachment 52229 View attachment 52230 View attachment 52231

Relatively quick & easy job. Love their look & construction.:hearts:


nice work..and car looks niiiiice also..the wheel wells n such :)
 
Re: Brake hoses

For this brake hose replacement job, I was also originally considering (and looking forward to) painting the calipers silver. I have the paint. But I've decided to wait until it is time to replace the rotors & brake pads.

I'm itching to button things up & get back on the road. :burnout:

Removing the calipers will also force me to re-bleed the brake fluid system (a penance I humbly agree to pay for my prior years of brakefluid change neglect!) :seesaw:
 
My Loss is my Gain

Thunderstorms forecasted. Too risky to be working (or playing) outside here – my Loss.

Cottage 001.jpg

but I could be inside the garage working on the 500E some more – my Gain.

I installed the Deerfield Precision rear brake hoses which now completes brake hose replacement for all four wheels.

Brake Hose 009.jpg Brake Hose 010.jpg

I thanked the old hoses for their service & promptly decommissioned them to the dustbin.

Brake Hose 011.jpg

Another item crossed off the TO-DO list & more vacant space now on my spare parts shelf.

Awaiting one more small parts order to install prior to getting back on the road
 
Derf very good. I tried to order 4 of the brake lines from them and have not been able to get their website to work. Did you recently purchase or have you had them on the shelf for some time?
 
Another quick job completed this evening. Reinstalled the power steering pump pulley, suppressor cover & installed new poly v-belt.

Belt 001.jpg Belt 002.jpg Belt.jpg
 
Last edited:
Just completed the new transmission blanket installation. All went well. Looks stellar compared to what it has replaced.

Once installed, I spent a couple extra minutes lying on my back staring straight up at it knowing it will never look this pristine again. :angel:

Transmission Insulation 007.jpg

(...everything that appears black in the pic is the insulation blanket.)

Transmission Insulation 017.jpg

The two smaller couplings & tubing support bracket must be disconnected to allow for insulation installation.

Transmission Insulation 009.jpg
 
Last edited:

Who has viewed this thread (Total: 4) View details

Who has watched this thread (Total: 6) View details

Back
Top