Navigation
Install the app
How to install the app on iOS
Follow along with the video below to see how to install our site as a web app on your home screen.
Note: This feature may not be available in some browsers.
More options
Style variation
-
Hi Guest !
Welcome to the 500Eboard forum.
Since its founding in late 2008, 500Eboard has become the leading resource on the Internet for all things related to the Mercedes-Benz 500E and E500. In recent years, we have also expanded to include the 400E and E420 models, which are directly related to the 500E/E500.
We invite you to browse and take advantage of the information and resources here on the site. If you find helpful information, please register for full membership, and you'll find even more resources available. Feel free to ask questions, and make liberal use of the "Search" function to find answers.
We hope you will become an active contributor to the community!
Sincerely,
500Eboard Management
You are using an out of date browser. It may not display this or other websites correctly.
You should upgrade or use an alternative browser.
You should upgrade or use an alternative browser.
OWNER DerFuror
- Thread starter DerFuror
- Start date
The weather reporter stated that this beautifully sunny & temperate day would be the last one for a while, so consider going outside and making the most of it!
The weather reporter touted a very solid argument. Today (23Oct2015) was indeed a gorgeous day deep in the Hinterlands.
Pondering the reality of this statement as I deeply inhaled the delicious smells of autumn from my backporch, I realized I had two choices:
My decision was easy.
I took a spirited 2.5 hour power-tour thru the back country roads with the sunroof wide open & the Beatles - Rubber Soul, Revolver & Sgt Pepper playing as background music.
Good Day Sunshine!
The Car loved the driving conditions…so did the Driver.
I also love how velvety-smooth the stealthy 500E accelerates. The Car deceives the driver’s senses…only a view of the speedometer can actually confirm +100mph speeds.
I had wide open roads like these completely at my disposal.


Lots of beautiful sights were seen along the power-tour.


This kinda stuff never grows stale.
Unfortunately, not many days like this day are left in the current driving season.
The weather reporter touted a very solid argument. Today (23Oct2015) was indeed a gorgeous day deep in the Hinterlands.
Pondering the reality of this statement as I deeply inhaled the delicious smells of autumn from my backporch, I realized I had two choices:
- Work inside, doing a monotonously dirty & dusty home interior renovation.
- Drive the 500E out on the backroads up in the Hills.
My decision was easy.
I took a spirited 2.5 hour power-tour thru the back country roads with the sunroof wide open & the Beatles - Rubber Soul, Revolver & Sgt Pepper playing as background music.
Good Day Sunshine!
The Car loved the driving conditions…so did the Driver.
I also love how velvety-smooth the stealthy 500E accelerates. The Car deceives the driver’s senses…only a view of the speedometer can actually confirm +100mph speeds.
I had wide open roads like these completely at my disposal.


Lots of beautiful sights were seen along the power-tour.


This kinda stuff never grows stale.
Unfortunately, not many days like this day are left in the current driving season.
Last edited:
You've been riding on that stock setup a good long time. Any noticeable difference in the ride and handling?
I only went for a short, leisurely (a.k.a "at or below speed limit") local cruise today, so the tires were not properly warmed up, but the wheels do provide a different feel to me. Being an all-season tire, the Pirelli Zero Nero rubber feels harder than the Michelin Pilot rubber that I am accustomed to. Also, this 8.5" setup provides an extra inch of tracking width over the stock 8" setup & with it a bit more road noise, but the sensation of cornering is lots of fun!
...most noticeably there is no chrome on the rims whatsoever. That is the feature which will take some time getting used to!


I fully expected to have the car garaged for the Winter, but there's no snow! I'll keep driving as long as this warm, sunny weather continues & I'll have more info to report back on. :razz:
Last edited:
Lug bolts seem a bit long, Derf, no? :?
Proving once again that nothing eludes your eagle eyes, Bing. Yes, I did a temporary quick changeover using my existing lugs & centercaps. My shorter lugs are stored away somewhere...somewhere else than where I thought they were.

I've got all winter to find them.

Last edited:
Finally, I now have the two sets of rims that I sought for this car.


I thank the Board members who assisted in my decision-making process, Those who posted these items for sale…and the rest of the Board for not buying them before I did!

PS: No rejoicing out there...I am in no way becoming a wheel whore. This is a one & done activity.
- A refurbished set of painted stock 16x8 500E rims to complement the original unmolested painted spare in the trunk. I bought these last year & will eventually transfer the Michelins over from my chromed 500E rims.

- The recently purchased refurbished set of 17x8.5 AMG Monoblocks. I will eventually buy one more of these rims for a complete set of 5. Gotta have a spare!

I thank the Board members who assisted in my decision-making process, Those who posted these items for sale…and the rest of the Board for not buying them before I did!

PS: No rejoicing out there...I am in no way becoming a wheel whore. This is a one & done activity.
Last edited:
I've got all winter to find them.
I found the lugbolts strashed away in one of my parts honey-holes, Bing, so all is good.
It also seems Winter is on hold until further notice. It’s going to be an unprecedented week in the 60s F (15.5 C) here in the Hinterlands. Looks like I'll still have a good bit of quality road time before hibernation. Time to ride on.

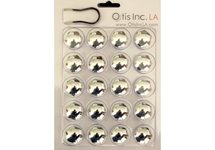
While seeking the shorter lugbolts, I rediscovered a new set of lugbolt covers from Otis Inc LA stashed on my parts shelf for almost 7 years & have finally put them to work providing a nice finishing touch to the refurbished Monoblocks.
The covers fit securely to the stock lugbolt heads & provide a bit of passive wheel security because it takes a special tool & some effort to remove them all.
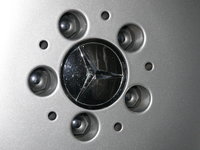


The covers fit securely to the stock lugbolt heads & provide a bit of passive wheel security because it takes a special tool & some effort to remove them all.


Ahhh…the smell of chlorinated brake cleaner in the morning!
I’ve had the parts stocked for quite some time, but today was the day I finally began addressing my current deferred/proactive (which unfortunately aren’t self-cancelling) back-burner maintenance list items.
I’m focusing on the sources of any niggling fluid leaks. My primary focus is the power steering pump reservoir short hose which certainly appears to be the main culprit. The hose has been changed under previous ownership, but now it is my turn.
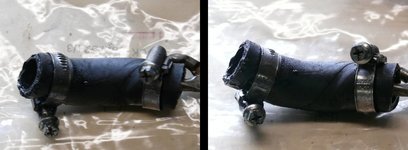
During the dismantling procedure I discovered three E10 torx bolts & one 5mm allen bolt holding the reservoir on its bracket (kinda made me wonder what the fate of the original 4[SUP]th[/SUP] torx bolt was). A replacement torx bolt will be added to my parts order list to correct this situation.

I’m pleased to verify that the LUK power steering pump & the steering box pitman arm shaft seal are not leaking. I still need to verify the cam solenoid.
I also believe the valve cover gaskets are leak sources. New MB gasket kits are on order. I will then install my metal cam oiler tubes, starting with the driver side. The plastic oiler closest to the fire wall voices the “tick-tick-tick” of a blown cap. Spark plugs will get changed & upper timing chain guides will also be inspected & most likely replaced.
The poly v-belt still looks quite good but will be replaced because of its age. The old will be kept as a backup spare. My ML55 150A Bosch alternator will be installed. A new voltage regulator is on order. The old VR is still decent & will be kept as a backup spare.
My upper harness has been PO replaced, but while inspecting the alternator connections, it appears that the lower harness has not. The smaller diameter wires’ insulation is looking unhealthy. A replacement harness will be ordered & the source of oil leak on this side of the block will be remedied.

The driver side distributor cap & rotor look OK with normal wear, but will most likely be replaced because they are over 5 years old. One of the cap mounting bolts will be replaced because its socket is a bit sloppy & I remember other members' horror stories of rounded off sockets...not gonna happen here! Naturally, this particular bolt resided in the most difficult to access location. I was able to remove it without much difficulty using my long reach 5mm Allen socket on 3/8" ratchet.


Looking forward to finally taking care of these jobs & making the driving experience even more pleasurable than it already is!
I’ve had the parts stocked for quite some time, but today was the day I finally began addressing my current deferred/proactive (which unfortunately aren’t self-cancelling) back-burner maintenance list items.
I’m focusing on the sources of any niggling fluid leaks. My primary focus is the power steering pump reservoir short hose which certainly appears to be the main culprit. The hose has been changed under previous ownership, but now it is my turn.

During the dismantling procedure I discovered three E10 torx bolts & one 5mm allen bolt holding the reservoir on its bracket (kinda made me wonder what the fate of the original 4[SUP]th[/SUP] torx bolt was). A replacement torx bolt will be added to my parts order list to correct this situation.

I’m pleased to verify that the LUK power steering pump & the steering box pitman arm shaft seal are not leaking. I still need to verify the cam solenoid.
I also believe the valve cover gaskets are leak sources. New MB gasket kits are on order. I will then install my metal cam oiler tubes, starting with the driver side. The plastic oiler closest to the fire wall voices the “tick-tick-tick” of a blown cap. Spark plugs will get changed & upper timing chain guides will also be inspected & most likely replaced.
The poly v-belt still looks quite good but will be replaced because of its age. The old will be kept as a backup spare. My ML55 150A Bosch alternator will be installed. A new voltage regulator is on order. The old VR is still decent & will be kept as a backup spare.
My upper harness has been PO replaced, but while inspecting the alternator connections, it appears that the lower harness has not. The smaller diameter wires’ insulation is looking unhealthy. A replacement harness will be ordered & the source of oil leak on this side of the block will be remedied.

The driver side distributor cap & rotor look OK with normal wear, but will most likely be replaced because they are over 5 years old. One of the cap mounting bolts will be replaced because its socket is a bit sloppy & I remember other members' horror stories of rounded off sockets...not gonna happen here! Naturally, this particular bolt resided in the most difficult to access location. I was able to remove it without much difficulty using my long reach 5mm Allen socket on 3/8" ratchet.


Looking forward to finally taking care of these jobs & making the driving experience even more pleasurable than it already is!
Last edited:
... I am doing the lower harness first, ...
I've added additional info to the Lower Harness HOW-TO you may not have seen yet.
My lower harness condition was a recent discovery made while underneath visualizing my alternator replacement plan of attack. I'm glad it hasn't caused any problems up to this point.

It's replacement falls right in line with the upgraded alternator & new v-belt installation.
The PS short hose has been bugging me pretty much since day one. That one oil tube has been a close 2nd. Looking forward to crossing them all off the list & liberating their storage space.

Last edited:
Re: Ahhh…the smell of chlorinated brake cleaner in the morning!
Cam solenoid is dry. I'm leaving it alone & moving on.

I continued today with general cleaning, inspection & prepping for Reservoir reinstallation. The smell of Victory costs $2.69 a can this week!

I laid out the necessary parts.

The old gasket got removed from reservoir. Gasket residue was carefully scraped off with the type of razor used to remove vehicle inspection stickers. The reservoir got another thorough blasting with Brakleen.
The gasket mating surface got a final wipe down with acetone & blown dry with compressed air. I tested both sides of the gasket to see which side aligned best with the reservoir features. A few dabs of Permatex were then used to hold the gasket in place.

After removing the old short hose, but prior to blasting & brushing any grime from the area, I pipe-plugged the Pump nipple to keep any crap out. After removing the old crush ring I used a nylon pick to scrape some fastidious residue out of the crush ring seat seat & threads of the reservoir base.

I did some trial & error regarding the length of the replacement short hose. I ended up straightening the old hose in a vice, measuring it, then cutting a similar length of 8 cm from new hose. My car sports the LUK pump. The nipple was exceedingly difficult to align & insert into shorter length hose.
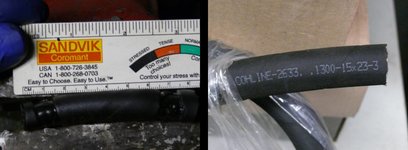
I considered using Permatex sealant on both nipples as a deterrent to future leaking, but opted out because of minimal operating space & not wanting to make a gooey mess fiddling around with it (maybe next time). With clamps on hose, I inserted the hose over the pump nipple after removing its temporary pipe plug. I then used a strong wire to hook around the top of the hose to pull it into alignment with the nipple hole. Nipple insertion went very well using this method.

I also used a mirror as an installation aid. You can see both the above & below decks installation activity.
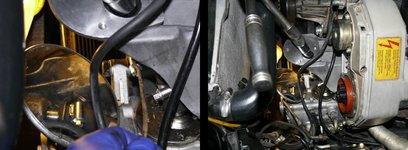
That's it for today. I need to get a replacement torx bolt for mounting the reservoir to its base. I'll finalize a parts list for current needs & send it out.
... I still need to verify the cam solenoid.
Cam solenoid is dry. I'm leaving it alone & moving on.

I continued today with general cleaning, inspection & prepping for Reservoir reinstallation. The smell of Victory costs $2.69 a can this week!

I laid out the necessary parts.

The old gasket got removed from reservoir. Gasket residue was carefully scraped off with the type of razor used to remove vehicle inspection stickers. The reservoir got another thorough blasting with Brakleen.
The gasket mating surface got a final wipe down with acetone & blown dry with compressed air. I tested both sides of the gasket to see which side aligned best with the reservoir features. A few dabs of Permatex were then used to hold the gasket in place.

After removing the old short hose, but prior to blasting & brushing any grime from the area, I pipe-plugged the Pump nipple to keep any crap out. After removing the old crush ring I used a nylon pick to scrape some fastidious residue out of the crush ring seat seat & threads of the reservoir base.

I did some trial & error regarding the length of the replacement short hose. I ended up straightening the old hose in a vice, measuring it, then cutting a similar length of 8 cm from new hose. My car sports the LUK pump. The nipple was exceedingly difficult to align & insert into shorter length hose.

I considered using Permatex sealant on both nipples as a deterrent to future leaking, but opted out because of minimal operating space & not wanting to make a gooey mess fiddling around with it (maybe next time). With clamps on hose, I inserted the hose over the pump nipple after removing its temporary pipe plug. I then used a strong wire to hook around the top of the hose to pull it into alignment with the nipple hole. Nipple insertion went very well using this method.

I also used a mirror as an installation aid. You can see both the above & below decks installation activity.

That's it for today. I need to get a replacement torx bolt for mounting the reservoir to its base. I'll finalize a parts list for current needs & send it out.
Distributor Cap Mounting Bolts
This is now a non-issue. I just verified that new mounting bolts are included with the new distributor cap. All good.
...One of the cap mounting bolts will be replaced because its socket is a bit sloppy & I remember other members' horror stories of rounded off sockets...not gonna happen here!
This is now a non-issue. I just verified that new mounting bolts are included with the new distributor cap. All good.

Attachments
Alternator Removal
I removed the alternator today. I used FSM 15-5032 for reference, but came up with what I believe is a better, time-savingly, less involved method of accomplishment which does not require disconnecting the transmission line union nor sway bar brackets (what a beat-down that would be!).
A HOW-TO is in the works.

Last edited:
The picture looks like (could be just the flash) the pressure hose may be weeping sls fluid.I've added additional info to the Lower Harness HOW-TO you may not have seen yet.
My lower harness condition was a recent discovery made while underneath visualizing my alternator replacement plan of attack. I'm glad it hasn't caused any problems up to this point.
View attachment 48577
It's replacement falls right in line with the upgraded alternator & new v-belt installation.
The PS short hose has been bugging me pretty much since day one. That one oil tube has been a close 2nd. Looking forward to crossing them all off the list & liberating their storage space.
The picture looks like (could be just the flash) the pressure hose may be weeping sls fluid.
Pretty sure that's all engine oil... no way to tell for sure without cleaning up all the oil so everything is totally dry, then driving the car until you can determine the source.

The picture looks like (could be just the flash) the pressure hose may be weeping sls fluid.
The flash does make things look so much worse than reality. SLS hose is fine. It all appears to be engine oil weeping down from above (I'm betting primarily on the oil level sensor oring & perhaps the valve cover gasket to a certain extent).
I'll find out soon enough. The remaining grime is all getting scrubbed clean today. Off to get more Brakleen!
Oil level sensor is a common leaker. Also, if you don't pack rags or paper towels between the oil filter housing & frame rail when replacing the filter, oil dribbles down the outside of the filter housing, making a nice mess below (which you may never see, if you use a TopSider!). Valve cover gaskets are NOT a common leak if they are OE, installed & tightened properly. On almost all of my cars, oil leaks from high above have ended up from the cam solenoid area... which can be one of 3 different things on the solenoid (sealing surface, body halves, or electrical connector). The airflow from the engine fan moves oil around, so don't rule out sources like the front crank seal, timing cover to block junction, and main/upper oil pan gasket.The flash does make things look so much worse than reality. SLS hose is fine. It all appears to be engine oil weeping down from above (I'm betting primarily on the oil level sensor oring & perhaps the valve cover gasket to a certain extent).
The only way to find out is clean everything bone dry, EVERYWHERE, and then check it repeatedly (like, after each day you drive the car) to pinpoint the source(s). Paper towel diapers can help as well when placed in appropriate locations.

Power Steering Short Hose Replacement Update
To paraphrase the Stones, "You can't always get what you want, but you get what you need". An anticlimactic wait provided me what I needed to finish off the Power Steering Short Hose Replacement job.
Afterward, I started removing components for the driver side Cam Oiler Tube Replacement job. I discovered two loose valve cover bolts which may have been minor engine oil leak contributors (I'll have a better view of any evidence once the cover comes off).
After a recent beautiful stretch of warm weather, there has been a drastic temperature drop accompanied by four inches of snow. Neither I, the birds or the flowers are happy about this at all. The garage is now cold. I've opted to wait until tomorrow when I will use a hot air gun to warm up the breather hose for safer & easier removal from the cover. The hoses aren't old, but I'm not taking any chances applying force to them when cold. The cover will then be removed & I'll start replacing the oiler tubes.
New spark plugs (gapped to 1mm) have been installed. I tested the old plugs. They are about 7 years old, still in very decent shape & still provided very good spark. Gaps were slightly over 1mm.
Tomorrow I should be receiving the new rotors & voltage regulator. The left distributor cap & rotor job will be completed & the 150A alternator will be ready for installation.


...I need to get a replacement torx bolt for mounting the reservoir to its base. I'll finalize a parts list for current needs & send it out.
To paraphrase the Stones, "You can't always get what you want, but you get what you need". An anticlimactic wait provided me what I needed to finish off the Power Steering Short Hose Replacement job.
Afterward, I started removing components for the driver side Cam Oiler Tube Replacement job. I discovered two loose valve cover bolts which may have been minor engine oil leak contributors (I'll have a better view of any evidence once the cover comes off).
After a recent beautiful stretch of warm weather, there has been a drastic temperature drop accompanied by four inches of snow. Neither I, the birds or the flowers are happy about this at all. The garage is now cold. I've opted to wait until tomorrow when I will use a hot air gun to warm up the breather hose for safer & easier removal from the cover. The hoses aren't old, but I'm not taking any chances applying force to them when cold. The cover will then be removed & I'll start replacing the oiler tubes.
New spark plugs (gapped to 1mm) have been installed. I tested the old plugs. They are about 7 years old, still in very decent shape & still provided very good spark. Gaps were slightly over 1mm.
Tomorrow I should be receiving the new rotors & voltage regulator. The left distributor cap & rotor job will be completed & the 150A alternator will be ready for installation.

New Rotors & Voltage Regulator
UPS doesn’t disappoint. The parts arrived during lunch break.

The snow is melting & I’m also happy to see that new fasteners are also included with the rotors. Both the caps & rotors will be Bremi this time around. I’ll let you know how they perform as time goes by...
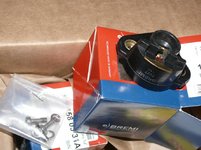
...and the Cat is happy to have a new box of packing paper to nest in!


Tomorrow I should be receiving the new rotors & voltage regulator. The left distributor cap & rotor job will be completed & the 150A alternator will be ready for installation.
UPS doesn’t disappoint. The parts arrived during lunch break.

The snow is melting & I’m also happy to see that new fasteners are also included with the rotors. Both the caps & rotors will be Bremi this time around. I’ll let you know how they perform as time goes by...

...and the Cat is happy to have a new box of packing paper to nest in!


Camshaft Cover Removed
I warmed up the area where the hose clamps to the cover bib. The hose came off easily by hand.
I used the wobbly 5mm plus 14 inches of ¼” drive extensions adapted onto a 3/8” drive ratchet to remove the "slightly less infamous" lower right corner cover bolt (with the help of a telescoping magnet).

The lower right cover portion put up a bit of a removal fight. I had to disconnect both fuel lines terminating at the FPR area to provide the necessary clearance to get the cover free and expose the plastic oiler tubes.
I’m real happy to see how nice the internals appear.

With cover removal, I found evidence of the suspected oil leak on & around the edge of the lower right corner of the head & cover.

The underside of the cover (especially the timing chain area) shows evidence of the car’s dino oil days. I run synthetic. The cover will get a thorough cleaning & will never look this way again.

The stethoscope's indication held true. The next to last oiler has a popped cap.

The cleaned aluminum tubes with new o-rings are ready to go in & will eliminate the dreaded “TICK-Tick-tick” forever.

So far so good
...I've opted to wait until tomorrow when I will use a hot air gun to warm up the breather hose for safer & easier removal from the cover. The hoses aren't old, but I'm not taking any chances applying force to them when cold. The cover will then be removed & I'll start replacing the oiler tubes.
I warmed up the area where the hose clamps to the cover bib. The hose came off easily by hand.
I used the wobbly 5mm plus 14 inches of ¼” drive extensions adapted onto a 3/8” drive ratchet to remove the "slightly less infamous" lower right corner cover bolt (with the help of a telescoping magnet).

The lower right cover portion put up a bit of a removal fight. I had to disconnect both fuel lines terminating at the FPR area to provide the necessary clearance to get the cover free and expose the plastic oiler tubes.
I’m real happy to see how nice the internals appear.

...I started removing components for the driver side Cam Oiler Tube Replacement job. I discovered two loose valve cover bolts which may have been minor engine oil leak contributors (I'll have a better view of any evidence once the cover comes off).
With cover removal, I found evidence of the suspected oil leak on & around the edge of the lower right corner of the head & cover.

The underside of the cover (especially the timing chain area) shows evidence of the car’s dino oil days. I run synthetic. The cover will get a thorough cleaning & will never look this way again.

The stethoscope's indication held true. The next to last oiler has a popped cap.

The cleaned aluminum tubes with new o-rings are ready to go in & will eliminate the dreaded “TICK-Tick-tick” forever.

So far so good

How did the timing chain guides look?
Thank you, Kind Sir. Please take some detailed photos of the popped-cap oiler tube. It would be good to get some documentation for the forum of what that looks like.
Shall do. It will be the first one I remove tomorrow. I took a detour after lunch to the rotor & alternator install.
Previous stethoscope testing told me that the bad tube was one of the last two on the right end. I used an o-ring pick to probe those tube ends to verify the popped-cap perpetrator.

How did the timing chain guides look?
I haven't scrutinized yet, but the upper looks alright at first sight. I'll know for sure upon removal.
Good work, doctor !!Shall do. It will be the first one I remove tomorrow. I took a detour after lunch to the rotor & alternator install.
Previous stethoscope testing told me that the bad tube was one of the last two on the right end. I used an o-ring pick to probe those tube ends to verify the popped-cap perpetrator.

The top/center ones with the "fingers" may break apart when you remove them. Try to avoid dropping plastic bits into the chain cavity.I haven't scrutinized yet, but the upper looks alright at first sight. I'll know for sure upon removal.
The rails you really want to inspect are the ones on the inside of the "V" in the head, you can only see the top tips of them. Make sure the tops are still intact. Look down below with a flashlight to see if the lower tips have snapped off, the lower tips may be sitting in a cavity inside the timing cover until replacement time.

Cap & Rotor Update
With receipt of the new parts, I chose to knock off a few quick jobs before concentrating on cam oiler tube removal.
I started with rotor replacement (Bremi replacing Bosch) using Loctite Blue on the fastener threads.

I identified the wires prior to replacing the cap (Bremi also replacing Bosch).

I discovered that the wires are Bremi. Looks like I’ve got a Bremi trifecta going on.
I’ve taken several Bremi / Bosch comparison pics that I will post in a separate thread.
With receipt of the new parts, I chose to knock off a few quick jobs before concentrating on cam oiler tube removal.
I started with rotor replacement (Bremi replacing Bosch) using Loctite Blue on the fastener threads.

I identified the wires prior to replacing the cap (Bremi also replacing Bosch).

I discovered that the wires are Bremi. Looks like I’ve got a Bremi trifecta going on.
I’ve taken several Bremi / Bosch comparison pics that I will post in a separate thread.
Alternator Upgrade Update
I opened the Bosch voltage regulator box to discover that it was packed by the tentacle of globalism!

The factory fresh VR brush is 7/16” (11.125mm) long.

After a quick reassembly of VR & end cover, the 150A alternator is ready for installation.

The 150A is slightly longer on the backside than the 110A. For a couple minutes I was worried this may prevent the reciprocation of my alternate removal process. But, the alternator does fit (& my right tricep is now gi-normous)!
I’ve proven the ability to install the 150A alternator without removing the transmission cooler line coupling & sway bar.

For lower harness connection, the D+ terminal is in a much more accessible location on the 150A.

I have more informational pics that I will post in a separate thread.
I opened the Bosch voltage regulator box to discover that it was packed by the tentacle of globalism!

The factory fresh VR brush is 7/16” (11.125mm) long.

After a quick reassembly of VR & end cover, the 150A alternator is ready for installation.

The 150A is slightly longer on the backside than the 110A. For a couple minutes I was worried this may prevent the reciprocation of my alternate removal process. But, the alternator does fit (& my right tricep is now gi-normous)!
I’ve proven the ability to install the 150A alternator without removing the transmission cooler line coupling & sway bar.

For lower harness connection, the D+ terminal is in a much more accessible location on the 150A.

I have more informational pics that I will post in a separate thread.
Last edited:
the 150 amp alternator upgrade was the single most noticeable improvement I did on my car, I would recommend to anyone
the 150 amp alternator upgrade was the single most noticeable improvement I did on my car, I would recommend to anyone
Please excuse my ignorance: what does the 150 amp alternator do to improve the car?
The larger alternator has higher output at idle, which is the primary benefit. The stock alternator cannot supply enough current at idle with multiple electrical consumers on... i.e. at night with headlights, foglights, AC on (so auxiliary fans are running too), etc etc. MOST of the time this isn't a big deal.
However if you add any electrical consumers... such as monster stereo amplifiers, or mondo overwattage headlight bulbs (with relays!), the stock unit should be upgraded. Both 143A and 150A units though about 2001 model year are a bolt-in (re-clocking may be needed for some), just make sure it has the same 2 post design as stock.

However if you add any electrical consumers... such as monster stereo amplifiers, or mondo overwattage headlight bulbs (with relays!), the stock unit should be upgraded. Both 143A and 150A units though about 2001 model year are a bolt-in (re-clocking may be needed for some), just make sure it has the same 2 post design as stock.

Alternator replacement is officially done. I bolted up the 150A alternator into its bracket today. I think the most challenging task of the job was the sleight of hand required to install the bottom mounting bolt with hose bracket into the bottom alternator bracket while simultaneously fighting the pesky lower radiator hose. 


The aluminum cam oilers were installed with no issue.

Here is the offending plastic tube. You can see the blown out bottom endcap. This prevented the proper volume of lubrication reaching its destination, thereby causing the “ticking” noise in the valve train.

Next task is to clean & prep the cover for reinstallation & to install a new upper guide assembly. I made a real effort by inserting several sets of old small tweezers alongside the tabs to try to release the two guide parts without damage (just to see if I could do it). I couldn’t. I got the top 4 tabs no problem, but it was too difficult to get the 2 underneath to release, so I broke them off & removed the part.

Just consider the upper guide a "one & done" part. It goes on once.

...oops...upper guide replacement will be delayed a few days. I erroneously thought I had already bought the parts & had them sitting on the shelf. Went & ordered OE from Naperville with the free shipping offer for a very reasonable price.
Other that that, all is going well.


The aluminum cam oilers were installed with no issue.

Here is the offending plastic tube. You can see the blown out bottom endcap. This prevented the proper volume of lubrication reaching its destination, thereby causing the “ticking” noise in the valve train.

Next task is to clean & prep the cover for reinstallation & to install a new upper guide assembly. I made a real effort by inserting several sets of old small tweezers alongside the tabs to try to release the two guide parts without damage (just to see if I could do it). I couldn’t. I got the top 4 tabs no problem, but it was too difficult to get the 2 underneath to release, so I broke them off & removed the part.

Just consider the upper guide a "one & done" part. It goes on once.

...oops...upper guide replacement will be delayed a few days. I erroneously thought I had already bought the parts & had them sitting on the shelf. Went & ordered OE from Naperville with the free shipping offer for a very reasonable price.
Other that that, all is going well.

Last edited:
Re: Guide Rail
Top tip is broken off, but can't be removed from cavity. I can't see anything else.
I bet a fair amount of that inner cam cover soiling above the timing chain area (in previously posted pic) is from broken guide dust as this piece gets occasionally ground down by the rotating timing chain.
Similar to the cam cover, the inner timing chain housing outer wall is coated with a substance that is the same color as this plastic guide.
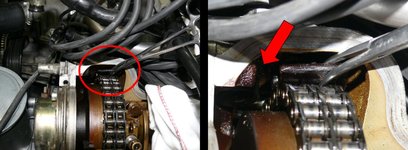
...The rails you really want to inspect are the ones on the inside of the "V" in the head, you can only see the top tips of them. Make sure the tops are still intact. Look down below with a flashlight to see if the lower tips have snapped off, the lower tips may be sitting in a cavity inside the timing cover until replacement time.
Top tip is broken off, but can't be removed from cavity. I can't see anything else.
I bet a fair amount of that inner cam cover soiling above the timing chain area (in previously posted pic) is from broken guide dust as this piece gets occasionally ground down by the rotating timing chain.

Similar to the cam cover, the inner timing chain housing outer wall is coated with a substance that is the same color as this plastic guide.

Last edited:
Left Cam Cover
The left cam cover has been cleaned & its new gaskets are installed. I had to use a hot air gun to soften the old gasket enough for removal. I pulled it off in chunks. The spark plug orifice gaskets were more cooperative.

The gasket part number is displayed on the lower, mid-outer edge of the gasket. If you are installing these for the first time & can’t remember which gasket goes to the left or right cover, look for this part number.
The number is followed by either an RA (right cover) or LA (left cover).

The left cam cover has been cleaned & its new gaskets are installed. I had to use a hot air gun to soften the old gasket enough for removal. I pulled it off in chunks. The spark plug orifice gaskets were more cooperative.

The gasket part number is displayed on the lower, mid-outer edge of the gasket. If you are installing these for the first time & can’t remember which gasket goes to the left or right cover, look for this part number.
The number is followed by either an RA (right cover) or LA (left cover).

Oil Leak Source Discovered
The replacement upper timing chain guides are arriving tomorrow, so today I decided to start disconnecting the more difficult sections of lower wiring harness to get it set for removal.
Its been several days since I cleaned the right side of the engine block for the alternator job. Everything still looks nice, including the oil level sensor area (which is dry).
Upon removing the various heat shields surrounding the starter, I was granted a prime view of the back of the block. Lo & behold, similar to the other side (but worse) was the source of the motor oil leak...the lower half moon section near the rear corner of the right side cam cover gasket.


Its leaky days are numbered...
The replacement upper timing chain guides are arriving tomorrow, so today I decided to start disconnecting the more difficult sections of lower wiring harness to get it set for removal.
Its been several days since I cleaned the right side of the engine block for the alternator job. Everything still looks nice, including the oil level sensor area (which is dry).
Upon removing the various heat shields surrounding the starter, I was granted a prime view of the back of the block. Lo & behold, similar to the other side (but worse) was the source of the motor oil leak...the lower half moon section near the rear corner of the right side cam cover gasket.


Its leaky days are numbered...

Actually it was an E420 where a previous shop smeared RTV on both sides of the M119 v/c gaskets. Took HOURS to R&R and scrape all the orange crap off. New gaskets with no sealant fixed the oil leak on that one.
The M104 oil leak you refer to appears to have been v/c bolts that were not fully tightened. Snugged them down to spec and over the next few months, the residual oil dribbling went away. No mooning issues though.

The M104 oil leak you refer to appears to have been v/c bolts that were not fully tightened. Snugged them down to spec and over the next few months, the residual oil dribbling went away. No mooning issues though.

Left side cam cover is reinstalled.
The right side cam cover has been removed. Even with proper 1/4" drive stuff, it took a while to align & insert the tool into that infamous lower left cover bolt because of the ultra tight firewall to cover clearance.

I had to dick around just like the left cover to free the lower corner from the bearing cap & firewall. The oil separator/breather tube assembly was sacrificed in this liberation process. The tube came off with the cover. The separator remained in the head. Part of the separator broke off in the tube during cover removal The tube is salvageable, but I think I’ll start fresh & just replace both items.

The separator is located in a miserable location. I used a mirror to view it. The separator was partially loose but still quite staid. A handy strong wire pull hook removed it from its orifice. My actions with the tool had to be opposite from what the mirror image was telling me. The inversed activity left my brain with a strange, lingering “outside of the box” sensation…I kinda liked it.

The old plastic oilers & upper guides have been replaced. I looked inside the “V” & was happy to see the inner timing chain guide rail in one piece.


The new oilers are in and looking good.

The old cover gaskets were removed using the same hot air gun technique. The cover is ready for cleaning.
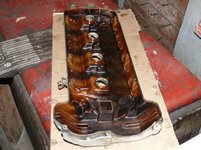
Time to put together another parts order. While waiting, I'll disconnect the upper end of the Lower Wiring Harness, inspect the right side cam solenoid & replace the cap & rotor.
The right side cam cover has been removed. Even with proper 1/4" drive stuff, it took a while to align & insert the tool into that infamous lower left cover bolt because of the ultra tight firewall to cover clearance.

I had to dick around just like the left cover to free the lower corner from the bearing cap & firewall. The oil separator/breather tube assembly was sacrificed in this liberation process. The tube came off with the cover. The separator remained in the head. Part of the separator broke off in the tube during cover removal The tube is salvageable, but I think I’ll start fresh & just replace both items.

The separator is located in a miserable location. I used a mirror to view it. The separator was partially loose but still quite staid. A handy strong wire pull hook removed it from its orifice. My actions with the tool had to be opposite from what the mirror image was telling me. The inversed activity left my brain with a strange, lingering “outside of the box” sensation…I kinda liked it.

The old plastic oilers & upper guides have been replaced. I looked inside the “V” & was happy to see the inner timing chain guide rail in one piece.


The new oilers are in and looking good.

The old cover gaskets were removed using the same hot air gun technique. The cover is ready for cleaning.

Time to put together another parts order. While waiting, I'll disconnect the upper end of the Lower Wiring Harness, inspect the right side cam solenoid & replace the cap & rotor.
Last edited:
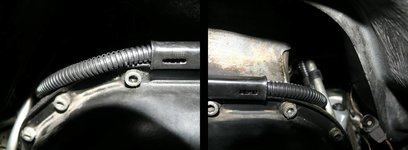
I took the opportunity to remove the entire remaining old petrified protective wiring loom from the engine compartment. Most crumbled away with a squeeze between my fingers.
I replaced the majority of it with new Del City grey-stripe high temperature 0.25” ID split loom (Temperature range: -40° to 300° F / -40° to 149° C). The loom fits perfectly within the rear oil pan trough & the various block-mounted snap-in clamps.
Good again for the next 20+ years.
I replaced the majority of it with new Del City grey-stripe high temperature 0.25” ID split loom (Temperature range: -40° to 300° F / -40° to 149° C). The loom fits perfectly within the rear oil pan trough & the various block-mounted snap-in clamps.
Good again for the next 20+ years.
Attachments
I took the opportunity to remove the entire remaining old petrified protective wiring loom from the engine compartment. Most crumbled away with a squeeze between my fingers.
I replaced the majority of it with new Del City grey-stripe high temperature 0.25” ID split loom (Temperature range: -40° to 300° F / -40° to 149° C). The loom fits perfectly within the rear oil pan trough & the various block-mounted snap-in clamps.
Good again for the next 20+ years.
I know too well, when I did the 6liter conversion, lower harness, anti knock wire protection, EZL vacuum plastic pipe and the plastic pipe from
the kickdown modulator that runs in the same protective tubing, were all changed ( the pipe to the EZL broke easily when touched and removed.
Now it is time for the upper harness, the one from the E50 source, is ready to go in with the new polished AMG manifold, yes there will be
Picture and more. Roger


