So as I indicated earlier today, I owed all of you a more detailed update as to the progress (or lack thereof) on this Group Buy.
I would describe this effort in 3 acts:
- Reproducing
- Machining
- Finishing
The first two phases paled in comparison with effort to the last stage of Finishing (with chrome and the pinstripe under 500E).
As you may have read earlier, the finishing act used the Hexavalent Chroming initially had me mark off with plating tape which would leave the area under the 500E without chrome. After speaking with the chromer, it was decided that this could produce corrosion issues later so the entire badge was chromed. This created challenges for the pinstriper to apply the black line which provide challenging as a paint which adheres to glass did not adhere at all. We attempted to bake the paint on with low heat to no avail. We then tried abrading the surface and muriatic acid solution which had minimal improvement than without.
So this left us with finding a pinstripe material which would adhere to area we have been trying to paint. The resource who helped identify the material which they had used successfully in the past for project like this struggled with finding the material as 3M had stopped manufacturing it in 2020. So a search ensued to find the exact size material because cutting it by (a) drag knife, (b) laser, or (c) die was impossible at the resolution we needed or, in the case of the die, would cost thousands of dollars more for a double sided solution.
So the process then centered on finding 3M Scotchcal in 70202 or 70212 on the secondary market. The first 50' roll was found and delivered on 15 January. The issue was 50' would not cover the 9" needed for each badge (7" plus an inch on each side for positioning) for the entire Group Buy. The good news is I was able to get another 40' roll on Thursday of last week to complete the rest of the badges.
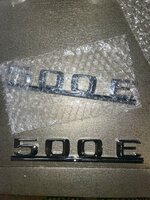
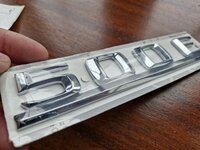
Here is what the final product looks like (and yes, there is a real badge among these):
View attachment 142548
Each badge went through the process of cleaning with 70% isopropyl alcohol before first applying the custom cut double sided adhesive to affix the badge to the car followed by cleaning the area for the the pinstripe, applying and trimming to fit, and then passing it over a heat gun 10x to activate the adhesive. After that final check to ensure no blemishes in the chrome nor issues with the pinstripe, and the rear adhesive, the badge was then bagged in a bubble wrap sleeve for shipment.
So a word of caution (and hope) on these badges - the pinstripe should cure with age. I would recommend holding off as long as possible with handling the badge until it needs to go on to your car. I would exercise caution to not use a pressure washer directly on it. As a backup, I spoke to
@captruff on Sunday about looking at another solution for a custom cut label through his neighbor that he has used for labels like what are put on the Silver Arrow brake calipers.
Lastly, there were some, as we call it in computer industry, "infant mortalities" with the finish which I am having re-addressed with the chromer. With that, in order to provide everyone with a badge that they ordered, I purposely shorted a few orders so that no one would be waiting to get their order but some would wait to have their order completed.
Once again, I am sorry that I have not been communicating which tried your patience. I would expect the same as someone in your shoes. All of you invested in this project and deserved more which I did not provide. I meant no harm and only wanted the best for this.
Robert
View attachment 142549View attachment 142550


")