I know it was done before but like some I think that my effort was unique and awesome.
Thanks to the previous owner, my headliner was pinned up with multiple pins, three screws and some rubber cement like glue with plenty of wrinkling to make it look like a genuine elephant skin.
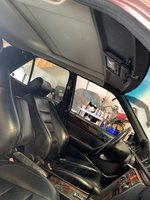
Step 1 - we take the headliner out by wiggling it around about 20 times, until geometrical possibility of extraction is found. I wish I had that filmed so I could lay Benny Hill music over it.
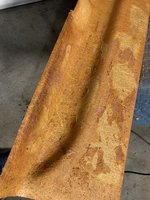
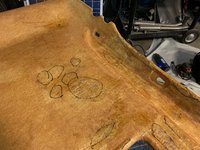
Step 2 - removal of the nasty old fabric, plus painstaking removal of the rubber glue.
Step 3 - sanding and rubbing every square inch of the surface, to make sure there are no bumps or elevations to cause imperfections under new fabric.
Step 4 - strengthening of soft spots in original fiberglass shell with some quick set epoxy.
Step 5 - gluing on of the new fabric. What I picked is this fabulous generic Auto Headliner Upholstery Fabric With Foam Backing 108 " x 60 " Light Gray | eBay with 1/8" foam backing. The beauty of this fabric is that it has dual material with foam in the middle, this allows for a quick removal in case of mistake and adheres to the spray on upholstery glue much better, without any melting of the foam by acetone glue base. It took me only two attempts to apply new fabric, which is my personal best. The glue used was picked out of 3 options and is Loctite 1629134
https://www.amazon.com/Loctite-2267077-adhesive-caulk-Single/dp/B003VWL4ZO it is by far the tackiest and the grabbiest of the other two (3M-90 and Gorilla)
Step 6 - Trim of the edges and re-entry of the headliner (surprisingly easy), it took me about 20 minutes to insert and initially secure it.
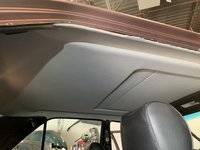
Step 7 - reassembly of the trim and accessories. Sunroof cover trim was kept original and matched well enough to the new fabric, but you decide (pics).
While a professional would certainly find my work imperfect, I would never notice that this was a refurbished headliner, unless pointed to the minor details.
Therefore, I am very happy.
Thanks to the previous owner, my headliner was pinned up with multiple pins, three screws and some rubber cement like glue with plenty of wrinkling to make it look like a genuine elephant skin.
Step 1 - we take the headliner out by wiggling it around about 20 times, until geometrical possibility of extraction is found. I wish I had that filmed so I could lay Benny Hill music over it.
Step 2 - removal of the nasty old fabric, plus painstaking removal of the rubber glue.
Step 3 - sanding and rubbing every square inch of the surface, to make sure there are no bumps or elevations to cause imperfections under new fabric.
Step 4 - strengthening of soft spots in original fiberglass shell with some quick set epoxy.
Step 5 - gluing on of the new fabric. What I picked is this fabulous generic Auto Headliner Upholstery Fabric With Foam Backing 108 " x 60 " Light Gray | eBay with 1/8" foam backing. The beauty of this fabric is that it has dual material with foam in the middle, this allows for a quick removal in case of mistake and adheres to the spray on upholstery glue much better, without any melting of the foam by acetone glue base. It took me only two attempts to apply new fabric, which is my personal best. The glue used was picked out of 3 options and is Loctite 1629134
https://www.amazon.com/Loctite-2267077-adhesive-caulk-Single/dp/B003VWL4ZO it is by far the tackiest and the grabbiest of the other two (3M-90 and Gorilla)
Step 6 - Trim of the edges and re-entry of the headliner (surprisingly easy), it took me about 20 minutes to insert and initially secure it.
Step 7 - reassembly of the trim and accessories. Sunroof cover trim was kept original and matched well enough to the new fabric, but you decide (pics).
While a professional would certainly find my work imperfect, I would never notice that this was a refurbished headliner, unless pointed to the minor details.
Therefore, I am very happy.
Attachments
-
 IMG_4008.JPG2 MB · Views: 50
 -
 IMG_4006.JPG3.7 MB · Views: 44
 -
 IMG_4005.JPG3.9 MB · Views: 45
 -
 IMG_4004.JPG4.2 MB · Views: 49
 -
 IMG_3997.JPG2.7 MB · Views: 51
 -
 IMG_4047.JPG3.5 MB · Views: 50
 -
 IMG_4046.JPG2 MB · Views: 49
 -
 IMG_4045.JPG3.6 MB · Views: 46
 -
 IMG_4044.JPG3.1 MB · Views: 44
 -
 IMG_4043.JPG3 MB · Views: 44
 -
 IMG_4042.JPG3.9 MB · Views: 49
 -
 IMG_4041.JPG3.8 MB · Views: 49
 -
 IMG_4016.JPG3.3 MB · Views: 45
 -
 IMG_4015.JPG3.9 MB · Views: 35
 -
 IMG_4014.JPG3.3 MB · Views: 41
 -
 IMG_4009.JPG3.5 MB · Views: 52