• Hi Guest !

    Welcome to the 500Eboard forum.

    Since its founding in late 2008, 500Eboard has become the leading resource on the Internet for all things related to the Mercedes-Benz 500E and E500. In recent years, we have also expanded to include the 400E and E420 models, which are directly related to the 500E/E500.

    We invite you to browse and take advantage of the information and resources here on the site. If you find helpful information, please register for full membership, and you'll find even more resources available. Feel free to ask questions, and make liberal use of the "Search" function to find answers.

    We hope you will become an active contributor to the community!

    Sincerely,
    500Eboard Management

How to Rebuild CV Axles

silver_diesel_benz

E500E Enthusiast
Member
I just finished rebuilding my cv axles for my 300D and figured id make a DIY write up and parts list:
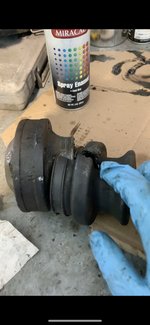
1. Cut the old boots off (there is a metal ring inside the smallest crease do not cut it)
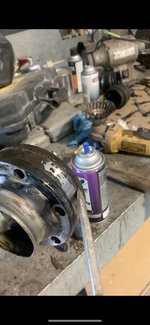
2. Scoop all the old grease you can out and give them a preliminary wash with solvent to make them cleaner to work with.
3. Take a screw driver or something similar and pry the end cap off of the CV joint on the side that attaches to the differential.
4. Clean away the grease and push the cup all the way in to expose the circlip that holds the CV joint onto the axle and remove it.
5. Pull the CV off the axle splines (I pushed the cup all the way in and pulled out and it came right off).
6. Thoroughly clean all the old grease out of the CV joints with solvent. (I did not disassemble the CV joint itself but just used brushes and solvent and moved it around to get everything out.) I didn't take the end of the CV shaft that goes to the wheel off but just soaked and scrubbed it.
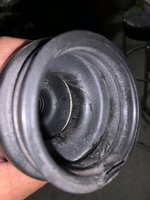
7. Put new boot on, don't forget to put the little ring in the new boot (I had to seat one side of it and then use a screw driver to pry it into its crease where it sits). Everything goes on from the differential side of the CV shaft (you will have to use something such as a screw driver in my case to stretch the small end of the boot over the splines on the end of the CV shaft because they are slightly larger than the rest of the shaft).
8. Grease the joint (I used about 5 two finger scoops of grease per joint or roughly 4oz).
9. Make sure the boot is clean and the CV cup is clean where the clamp goes otherwise the boot will be able to rotate even after clamping it down. Put the clamps on (the large clamp went on easier than the small clamp, it came pre-bent and I just put it on the first two teeth and crimped the ear of the clamp. But the smaller clamp came un-bent and was a pain to bend evenly because if you didn't, it wouldn't be long enough to seat on its two only teeth. I ended up bending it around the shaft and using a hammer and screw driver to flatten any sharp bends that weren't laying smooth. Then stuck a tiny screw driver in the clamp and used the teeth to pry it on and then crimped the ear).
10. Put your 2nd boot on the shaft and then put the CV joint for the differential side on and replace the circlip.
11. Put RTV on the inside of the CV cap on the differential side and hammer it back on.
12. Repeat steps 7-9 on the differential side of the CV axle.

Parts List:
These are what I used, I can't guarantee that all axles use the same boots etc. But in my case these are the parts for axles from a 210mm 2.65 differential.
(4) Axle Boot: 124-357-01-91 $125.80 (For 4)
(4) Small Clamp (35mm): 124-997-34-90 $7.12 (For 4)
(4) Large Clamp (76mm): 124-997-30-90 $7.40 (For 4)
(2) 14 OZ containers of CV grease $30 (For 2)
$140.32 from MB OEM Parts
Total: $170.20

A lot better than $1,800 for 2 new axles from Mercedes.
 

Attachments

  • CV 10.jpg
    CV 10.jpg
    2.9 MB · Views: 90
  • CV 3.jpg
    CV 3.jpg
    227.9 KB · Views: 80
  • CV 2.jpg
    CV 2.jpg
    288.1 KB · Views: 77
  • CV 1.jpg
    CV 1.jpg
    225.2 KB · Views: 74
  • CV 7.jpg
    CV 7.jpg
    2.6 MB · Views: 78
  • CV 9.jpg
    CV 9.jpg
    3.1 MB · Views: 82
  • CV 11.jpg
    CV 11.jpg
    220.4 KB · Views: 78
  • CV 8.jpg
    CV 8.jpg
    2.3 MB · Views: 78
  • CV 5.jpg
    CV 5.jpg
    1.7 MB · Views: 79
  • CV 6.jpg
    CV 6.jpg
    2.5 MB · Views: 85
  • CV 4.jpg
    CV 4.jpg
    3 MB · Views: 90
Great post, thanks for that!

For the smaller inner most clamps of the boot did you locate the boot beside or over the bump in the metal shaft?
 
Good write up. Couple notes:
1. The wheels side shaft cannot be removed, it is fixed.
2. No harm in taking the diff side CV apart to clean it thoroughly. That's what I did and it's fairly easy, don't force it when putting it back together. Some say that the location of each ball has to go back in its same cavity, I didn't do this and I am 5-10k miles into rebuilds with no issues.
3. I was under the impressions the MB ones [shafts] were NLA?
4. I had a vibration under load, showed up at mid 50's and high 70-80mph. Smooth as silk after replacing half shafts. When off the car, you could feel a very very slight slack when ends were counter-rotated. It way barely noticeable but there. This tiny amount of play was the cause of my vibration.

Due to #4, I rebuilt used CVs that only had 100k miles on them. These did not have any play whatsoever compared to the ones removed (Original to car). If you have a vibration, look here for a potential root cause.
 
Great post, thanks for that!

For the smaller inner most clamps of the boot did you locate the boot beside or over the bump in the metal shaft?
Beside I think, I think I would have had to stretch them to get over that bump, I’m not 100% what the right way is but I think I remember them from factory not being over the bump
 
Good write up. Couple notes:
1. The wheels side shaft cannot be removed, it is fixed.
2. No harm in taking the diff side CV apart to clean it thoroughly. That's what I did and it's fairly easy, don't force it when putting it back together. Some say that the location of each ball has to go back in its same cavity, I didn't do this and I am 5-10k miles into rebuilds with no issues.
3. I was under the impressions the MB ones [shafts] were NLA?
4. I had a vibration under load, showed up at mid 50's and high 70-80mph. Smooth as silk after replacing half shafts. When off the car, you could feel a very very slight slack when ends were counter-rotated. It way barely noticeable but there. This tiny amount of play was the cause of my vibration.

Due to #4, I rebuilt used CVs that only had 100k miles on them. These did not have any play whatsoever compared to the ones removed (Original to car). If you have a vibration, look here for a potential root cause.
Weird, good to know
 
Beside I think, I think I would have had to stretch them to get over that bump, I’m not 100% what the right way is but I think I remember them from factory not being over the bump

Yes those are my thoughts too. Rebuilt one last night. Felt like too much to pull the boot over the bump. Got the boots clamped sort of on top of the bumps.

Will carefully check the second shaft to be rebooted tonight
 
5 or so years ago I needed this done and sent it away to a place in Colorado to do this. Quick turnaround and good job - maybe $300? Wish I remembered the name.
 
Parts list is different for E500E with 32mm ASR axles. List below is for TWO axles:

129-357-01-914W124.034/.036 CV joint boot, w/ASR
001-989-05-514Grease tube (1 per CV joint)
124-997-30-904Clamp, large
129-997-36-904Clamp, small
001-990-38-502Axle nut
124-994-06-352Retaining clip ( Was: 000983-026000 )
 
Some say that the location of each ball has to go back in its same cavity, I didn't do this and I am 5-10k miles into rebuilds with no issues.
That is correct, they should go back where they came from.

The reason they should go back in the same location they were removed from is because although they look identical they may have diameter variations (we are talking less than 1 micrometer !) and each track molds its surface by its ball. Disturbing this "marriage" requires a new period of the track to break in with the new ball. If the new ball's diameter is larger then a new preload occurs, if is smaller less preload and then the overall torque transmitted thru the axle will go to the remaining balls with higher preload (which could be only 4, or three, or who knows?). In the end some tracks will take more torque than others and an unbalanced torque transmission between tracks will occur. That will translate in less life of the entire coupling and eventually play will occur. Just because they are okay after 5-10k miles with no issues doesn't mean in the end their total life will be the same.

One suggestion (besides the above): at reinstallation put the driver side one on the passenger side and the passenger on the driver side. The reason: because the rotation direction is reversed, each ball will "ride" on a surface with much less wear of its track while maintaining the same preload.
 
Last edited:
at reinstallation put the driver side one on the passenger side and the passenger on the driver side. The reason: because the rotation direction is reversed, each ball will "ride" on a surface with much less wear of its track while maintaining the same preload.
Here is an example coming from a W126 axle with 70k miles: first picture is the mark left by the ball on one side of its race when the car was in Drive, the second is the mark of the same ball on the opposite side in the same race when the car was in Reverse. Although the wear is minimal because the car was gently driven, the difference is obvious.

IMG_7692.JPGIMG_7691.JPG

A more detailed How-To can be found here: HOW-TO: Replace Axle Rubber Boots | C126 "HOW-TO" Tutorial Articles
 
Last edited:
Here is an example coming from a W126 axle with 70k miles: first picture is the mark left by the ball on one side of its race when the car was in Drive, the second is the mark of the same ball on the opposite side in the same race when the car was in Reverse. Although the wear is minimal because the car was gently driven, the difference is obvious.

View attachment 115346View attachment 115347

A more detailed How-To can be found here: HOW-TO: Replace Axle Rubber Boots | C126 "HOW-TO" Tutorial Articles
If you do take the joint apart, first ‘match mark’ or scribe, the outer center and inner rings for relative location. This will ensure the joint goes back together correctly
 
7/20/2023 I contacted CVJ axles for a quote. They do not stock axles for my W126.

To rebuild mine they charge $390/axle plus shipping.
Do they replace the inner CV joint, or just clean / re-grease both joints, and install new boots? (I'm guessing the 126 joints may also be NLA.)

:scratchchin:
 
Do they replace the inner CV joint, or just clean / re-grease both joints, and install new boots? (I'm guessing the 126 joints may also be NLA.)
"Hello Mike,
We do not stock those axles. We can remanufacture your original equipment Mercedes Benz axles if you send them to the address below. Please include your name, phone number, return shipping and vehicle information if you ship to us. It takes us about two weeks. The axles you send in need to be in a rebuildable condition.
Your cost is $389.00 each axle, plus shipping, which is about $40 (one way) for two axles to your zip code. Severely damaged/neglected axles may require additional parts for additional costs.
We can only remanufacture original equipment manufacturer (OEM) axles since aftermarket (new axles from part stores) cannot be rebuilt and are poor to begin with. We completely remanufacture your axles using OEM parts where it counts and only top quality aftermarket parts for the rest. We use high quality aftermarket neoprene boots on our axles.
These axles have a limited three year warranty. Boots are under warranty for 90 days. When used for off road or in performance/modified applications, there is no warranty.
We accept Visa and MasterCard. This quote is valid for 30 days.
Thanks for your inquiry, I hope we can be of service to you."
 
That sounds like cleaning, using fresh grease, and new (aftermarket!) boots. If the CV joints have excess play, they'll either charge extra for new joints, or let you know you're SOL if the joints are NLA. Hmmm. If you have the time, you could do this via DIY and save probably $750+...

:seesaw:
 
IDK if the outer joint is the same for W126 as it is for 400E, but the last time I asked joints starting with P/N 126 and 140 were NLA. That's exactly why I also didn't send mine to be repaired because if joints are NLA what can they do besides replacing the boots? This is something that you can easily DIY.
 
That sounds like cleaning, using fresh grease, and new (aftermarket!) boots. If the CV joints have excess play, they'll either charge extra for new joints, or let you know you're SOL if the joints are NLA. Hmmm. If you have the time, you could do this via DIY and save probably $750+...
My plan is to DIY this. I have boots and grease on the way. How hard can it be? What could possibly go wrong??
 
It's Christmas!

Now to get off my bottom, get the car in the air, and get the right side axle rebuilt and the new pinion seal installed. Don't hold your breath. But this is eventually imminent and I'll report back.
 

Attachments

  • IMG_3808.jpeg
    IMG_3808.jpeg
    2.6 MB · Views: 15
Last edited:
I'm currently doing this job and axl shafts+parts have been sandblasted+painted with 2k epoxy+polyurethane paint and now waiting for new boots. I have my boot clamps yellow plated also.

Is it necessary to use some sealing agent in inner CV joint covers when putting all back together? Or have you used?
When I disassembled mine I think that there were no sealant between the covers. FSM says to use some Loctite 574/Hylomar..
Will the joint leak if the sealant is not used? :unsure:


IMG_20230909_210508.jpgIMG_20230909_210458.jpgIMG_20230909_161334.jpgIMG_20230903_210317.jpg
 

Attachments

  • IMG-20230925-WA0002.jpeg
    IMG-20230925-WA0002.jpeg
    559.2 KB · Views: 10
Without sealant, it's common to have liquid seep from the covers, from the grease separating. Use sealant sparingly, the cover must be fully seated / level so it doesn't vibrate when rotating at high speed.
 
Is it necessary to install those steel rings to inside the boot? I have tried to install those but tbh I have no clue how to get it seat properly. Ring always tend to slip of. Any tips for installation?
 

Attachments

  • Näyttökuva 2023-10-9 kello 20.12.37.png
    Näyttökuva 2023-10-9 kello 20.12.37.png
    802.3 KB · Views: 5
Without sealant, it's common to have liquid seep from the covers, from the grease separating. Use sealant sparingly, the cover must be fully seated / level so it doesn't vibrate when rotating at high speed.
FSM says that use Loctite 574 or Hylomar. Which one do you recommend or are both good. Hylomar blue is the proper one for sealing?
 
FSM says that use Loctite 574 or Hylomar. Which one do you recommend or are both good. Hylomar blue is the proper one for sealing?
I'm not sure which is preferred, but if the FSM specifies both, either should be fine...?

:klink:
 
I bet they are. Just thinking if you guys have some experience of using those..

Here the Hylomar seems to be bit cheaper than Loctite. I think I'll go with Hylomar.
:mbstar:
 
Ok, finally had time to rebuilt & finish CV axels. I let the pictures speak themself.. :coolgleam:
I used Hylomar for sealing and used some rope to pull those metal rings to boots.

Maybe it is time to do Owner's thread to share this restoration progress for whole car..
 

Attachments

  • Cv_axle3.png
    Cv_axle3.png
    1.9 MB · Views: 14
  • CV_axle2.png
    CV_axle2.png
    1.7 MB · Views: 15
  • cv_axle.png
    cv_axle.png
    1.7 MB · Views: 15
  • driver_side cv axle.png
    driver_side cv axle.png
    3.3 MB · Views: 15
  • fiilistelyä2.png
    fiilistelyä2.png
    3.6 MB · Views: 14

Who has viewed this thread (Total: 2) View details

Who has watched this thread (Total: 1) View details

Back
Top