• Hi Guest !

    Welcome to the 500Eboard forum.

    Since its founding in late 2008, 500Eboard has become the leading resource on the Internet for all things related to the Mercedes-Benz 500E and E500. In recent years, we have also expanded to include the 400E and E420 models, which are directly related to the 500E/E500.

    We invite you to browse and take advantage of the information and resources here on the site. If you find helpful information, please register for full membership, and you'll find even more resources available. Feel free to ask questions, and make liberal use of the "Search" function to find answers.

    We hope you will become an active contributor to the community!

    Sincerely,
    500Eboard Management

OWNER JC220

E36 Widebody or C124 Widebody?

  • Use the 500E widebody kit on my E36 saloon

    Votes: 2 22.2%
  • Adapt the 500E widebody kit for my 320CE

    Votes: 7 77.8%

  • Total voters
    9
  • Poll closed .
Yes, you'll have to remove the exhaust pipe to get at the TC drain. It's much less daunting to do than it seems. Put a little penetrating oil or WD-40 onto the bolts and let it soak in for an hour or so before you remove them. Will make the task a bit easier.

I believe there's a HOW-TO on how to do all this?
 
Yes I found the DIY on the trans service which confirmed what I thought about the Torque Converter drain plug access requiring the exhaust pipe to come off. That's OK the seal 'donut' should be re-useable and the manifold connection has no gasket fitted so I can take it off and replace in one day without waiting on (more!) parts :spend:

I've been looking up all sorts on here planning jobs I want to do on the car over the coming months. Like new Beru Ignition leads & Bosch arms / Caps. The leads fitted look original.

I replaced the spark plugs last night & thought all plugs were a little loose. Sure enough on close inspection the crush washers weren't even marked at all! The threads had carbon on them too indicative of loose plugs. At least they had the correct F8DC4 ones in there though. New replacements fitted & correctly torqued up this time
 
And to think the car was running wicked despite what you're finding. Goes to show that with untrained eyes all is fine and how well these cars are built, hence the deferred maintenance on a lot of them. Or at least till you join this board [emoji12]..Now you can blame all the top notch blokes on here for dwindling your bank account..lol!
 
And to think the car was running wicked despite what you're finding. Goes to show that with untrained eyes all is fine and how well these cars are built, hence the deferred maintenance on a lot of them. Or at least till you join this board [emoji12]..Now you can blame all the top notch blokes on here for dwindling your bank account..lol!

It's amazing just how well the car was running- seeing that loom opened up now is shocking. But I was bit by Eco Junk on my E36 project recently so I knew what to look for when I viewed the car.

It wasn't hard to spot the bare wires at the front of the engine- I did negotiate a better price on the car in light of this so I don't mind spending a few quid on the car.

Funny thing is in the 5+ hour drive home the car did go dead at 80mph for a millisecond a couple of times. It was pouring down & I was on a tight schedule for the Ferry so I pressed on & put it down to the Eco Junk exposed to driving rain through the grill.

A couple of days later I came to realise the PO hadn't bothered tightening either battery terminal they were just sitting in place :shocking:- that's why the car stumbled a couple of times it happened on rough patches of road!


Incredible that no damage was done- try that shit with a modern car!!
 
Last edited:
It's amazing just how well the car was running- seeing that loom opened up now is shocking. But I was bit by Eco Junk on my E36 project recently so I knew what to look for when I viewed the car.

It wasn't hard to spot the bare wires at the front of the engine- I did negotiate a better price on the car in light of this so I don't mind spending a few quid on the car.

Funny thing is in the 5+ hour drive home the car did go dead at 80mph for a millisecond a couple of times. It was pouring down & I was on a tight schedule for the Ferry so I pressed on & put it down to the Eco Junk exposed to driving rain through the grill.

A couple of days later I came to realise the PO hadn't bothered tightening either battery terminal they were just sitting in place :shocking:- that's why the car stumbled a couple of times it happened on rough patches of road!


Incredible that no damage was done- try that shit with a modern car!!

That is another great object lesson for all cars, old and new. There is no way to overstate the mischief that can be caused by loose or poor condition battery terminals. It still burns even experienced mechanics over and over.
:klink:
 
Ok once I get done with the service I REALLY want to get a custom exhaust ordered / made for the car!


This one sounds fantastic-


[youtube]49kl_2NE-8I[/youtube]
:nobmw:

I don’t suppose there are any suppliers still making off the shelf backboxes for the E500E’s? I have tried Ebay etc but nada coming up
 
Last edited:
Yes I don't expect power gains..... just a tasty Rumble from the exhaust! :3gears:


Looking at the system it seems like not much will be gained by re-doing the downpipes area. If I wanted to use a Magnaflow setup myself- I could go for 2 replacement high flow cats & pipe from there to a Magnaflow high flow backbox with mandrel bend pipes.


What do you guys have on your cars? Do you go from the manifold back or from the cat area back?


Would leaving the original MB cat's in place, deleting the centre muffler & fitting a Magnaflow backbox give me the V8 rumble I would like?

I got the X over exhaust pipe removed OK and the trans filter changed last night. Diff also draining overnight. Whilst I was under there I spotted the 2x coolant block drains. The 500E had Blue Antifreeze in it- I have the correct G05 spec yellow fluid now for replacement. If I were to completely drain the radiator will there be much coolant left in the block itself? I don't want to disturb those drain plugs unless I thought there were another 2- 3 litres left in the block.
 
Last edited:
I would try to delete mid-resonator/centre muffler. I'm sure you'll find a good exhaust shop that can custom make a Y pipe for you. Nothing to lose here as it's quite subtle but noticeable note change, and certainly much cheaper than going for anything fancy. This is what i did to my previous 036 and IMO it was just right and not at all intrusive by way of drone noise inside the cabin. Then if you still want to increase the rumble look for a fancy back box later.
 
I would try to delete mid-resonator/centre muffler. I'm sure you'll find a good exhaust shop that can custom make a Y pipe for you. Nothing to lose here as it's quite subtle but noticeable note change, and certainly much cheaper than going for anything fancy. This is what i did to my previous 036 and IMO it was just right and not at all intrusive by way of drone noise inside the cabin. Then if you still want to increase the rumble look for a fancy back box later.

Thankyou for the idea bing- yes I will look into that too

With more digging I found this-

http://www.ebay.co.uk/itm/Fox-Exhau...ss-W124-E420-E500-2xDieseloptik-/391391504895

Looks good to me- what do you all think? It looks to me like it will bolt right on & is good quality
 
Whilst I was under there I spotted the 2x coolant block drains. The 500E had Blue Antifreeze in it- I have the correct G05 spec yellow fluid now for replacement. If I were to completely drain the radiator will there be much coolant left in the block itself? I don't want to disturb those drain plugs unless I thought there were another 2- 3 litres left in the block.
There is another 2-3 liters in the block, plus maybe 0.5-1.0 liter in the heater core and plumbing. If changing types of anti-freeze, you MUST drain the block too, both sides. Then refill the system with water, drive until it gets to operating temp, run heater on max for a bit to circulate the water everywhere, and drain the radiator & block again after it cools down. This should get most of the blue stuff out. Run a garden hose through the radiator & block (with engine COLD!) to help flush those out. Then re-fill with pre-mixed G-05.

Search the forum for threads on antifreeze replacement! The factory spec claims 15-16 quarts capacity but I believe this is an error, and the system only holds about 12 quarts total. This is why you should only fill with pre-mixed coolant, to ensure the percentage in the system is what you want. Also, fill the block via upper radiator hose first, it will take 4-5 quarts - then connect the hose to the radiator and fill the rest via the plastic reservoir. You should be able to get 9-10 quarts back it, then drive the car until the t-stat opens, the level will drop, you will be able to add another ~1 quart after it cools down. If you don't fill the block first, and only fill via the plastic reservoir, you will end up with an air pocket and engine temps heading towards 120C as the system will be underfilled by several quarts...

:klink:


Great instructions- thanks! I will remove both drain plugs tonight and let everything drain. Then re-fill with water and run that through it when I have the car running again. Followed by using a hose at low pressure to rinse the matrix etc out just prior to re-filling with pre-mixed G-05 & de-ionised water.

Good info on filling the block first too- I didn't know that. I'll make sure to fill via the upper hose first.

I had an ATF shower yesterday changing the autobox filter- I guess I'll have a coolant shower tonight, my car has the early type block drains which dumps water on top of you! I'm also removing the lower harness tonight in preparation for the new one arriving tomorrow. I'll use that rope trick I seen on here to feed the harness through the engine compartment.
 
I may be too late with this tip but I used an allen wrench with a ball tip to reach over the cross over pipe and loosen the torque converter drain plug. Worked perfectly.

I tried putting a piece of cardboard over the pipe to direct the ATF over it but that didn't work too well. So the pipe got wet but it was worth it to me to avoid having to remove it.
 
It's NOT a big deal to remove that pipe. Just a few bolts and it's off. Folks seem so fearful of doing it. It adds 10 minutes to the job, and it makes the TC drain INFINITELY easier.

As an alternative to cardboard, have you tried one of those "bendable" funnels that you can get on the counter of your local McParts/FLAPS store?
 
When you remove the plastic plug in preparation for the lower, be sure to take a picture of the wires and their orientation inside the plug for reinstall. removal of that plug and sliding off the bracket makes this a very simple task.
 
I may be too late with this tip but I used an allen wrench with a ball tip to reach over the cross over pipe and loosen the torque converter drain plug. Worked perfectly.

I tried putting a piece of cardboard over the pipe to direct the ATF over it but that didn't work too well. So the pipe got wet but it was worth it to me to avoid having to remove it.


Yes I thought I could have maybe done that but with my luck I would have stripped the Allen head in the TC drain! I already have the X over pipe removed- that bit was OK. I have another reason for taking it off- the heat shields had rusted & were loose / rattling. I have cut the heat shield off and VHT sprayed the exhaust pipe as it was 100% sound. I will re-wrap it with Titanium header wrap to re-insulate the pipe before re-installation.


When you remove the plastic plug in preparation for the lower, be sure to take a picture of the wires and their orientation inside the plug for reinstall. removal of that plug and sliding off the bracket makes this a very simple task.


Yes I had seen that in the pics- it makes sense to split the plug apart to allow the harness to feed through.


Tonight I got on with a few other jobs like replacing the PS filter & fitting the new serpentine belt but I did get the front most section of the lower harness disconnected also.


Now I see that at the very back of the engine there is a bracket which needs to come off as it’s part of the lower harness. It’s got a 17mm nut on it and the gearbox dipstick tube is on the same bolt. I had read that part on the other lower harness DIY thread. It’s going to be a pain to get a wrench in there!!


But what I would like to know is- do I ‘just’ need to get that nut off to allow the harness to come out now or will there also be a solenoid wire to the Starter motor?


If so- how do I access that? There are lots of little heat shields in & around the starter motor do these have to come off to enable access?

Edit- OK I see there is a starter wire mentioned in the DIY thread- looks like more 1/4 drive ratcheting required! I have lots of extensions & stuby spanners etc and I must say I have used practically all of them on the 500E- they really did shoehorn that 5.0 motor in there
Priority="
 
Last edited:
It's NOT a big deal to remove that pipe. Just a few bolts and it's off. Folks seem so fearful of doing it. It adds 10 minutes to the job, and it makes the TC drain INFINITELY easier.

As an alternative to cardboard, have you tried one of those "bendable" funnels that you can get on the counter of your local McParts/FLAPS store?

I recently saw one of those bendable funnels at a friends shop. Brilliant. I may try his next time the car is on the rack.

I'll also look more closely at the removal of that pipe. I assumed difficult fasteners and access. Will pay closer attention next time.
 
Just put a bit of penetrant or WD-40 (not needed, but just makes things about 50% easier) and let it soak for 15 minutes, and you're good to go. When I last did my TC drain, I had no trouble and didn't even use any penetrant on them.

I'm not always a big fan of removing more things (extra work) to make a job easier, but in this case it's more than worth the extra 10 minutes to do this step. Much neater too.
 
Well I got in contact with a local Powerflow exhaust centre by email to see if they could maybe come up with a custom system for the 500E. The boss emailed me back- starting with ‘That’s a very special car you have there’ so he knows what a 500e is!

I have arranged to take the car to them to discuss options Saturday week when I have it up & running again
 
Last edited:
Well I got in contact with a local Powerflow exhaust centre by email to see if they could maybe come up with a custom system for the 500E. The boss emailed me back- starting with ‘That’s a very special car you have there’ so he knows what a 500e is!

I have arranged to take the car to them to discuss options Saturday week when I have it up & running again
If you do anything custom... I would strongly recommend making it a cat-back system, and leaving the front catalyst pipe completely untouched. That way you can return it to stock in the future with just the resonator (middle muffler) and rear muffler. The rear bits are semi-affordable new and sometimes available new. The factory cat pipe is $$$$ new and difficult to find used.

:bbq:
 
I know it's likely not cheap, but the 5SR/L (FifthScaleRacer/Leistung) system is bolt-on and well-engineered for our cars. I know folks have been happy with the results.

proxy.php
 
Right mate, just realised i'd promised to give you an update on the car when we had it - sorry for the delay! I'll keep it short and sweet.

Story is that my uncle bought a 1991 500E in 2003 after we bought a 1995 E280 in 2001. He liked the build quality of the W124 but is a speed freak and wanted something quick alongside his 993 Porsche, C43 and 750i. Came across a 1991 500E at an army base in the UK off eBay and bought it on the spot (after a 240kmh test drive) - still has the car today but its looking worse for wear. This is what originally got me into the 500E's. I was 15 at the time so persuaded my father that we needed one. After much searching (most examples around the 10-12k mark but we really didn't want to spend that much) we found one advertised in Brighton, UK. Truth be told the seller was slightly dodgy and the car was sitting in a dark barn. However it looked ok and for the price we paid it was pretty decent.

We bought the car in August 2004 and kept it until October 2005 I think. During this time we did:

- Numerous oil changes - we did it every 3,000 miles with full synthetic oil, engine was sweet
- New distributor caps and arms as the car kept cutting out at some point
- Replace the 8 hole alloys with the BBS CH alloys off my uncles 500E
- Gearbox oil and filter change at MB Bedford
- New headlight lenses for RHD roads
- MB stainless steel doorsills
- Probably a few more bits and piece, brake pads etc.
- AC never worked
- Stereo etc

Most of our receipts should be with the car.

We enjoyed the car throughly but it always had a problem with pulling to the left. MB couldn't correct it even with max camber adjustment. We didn't realise it was actually a 500E until we checked up VIN etc. Looks like front end and rear trunk etc have been updated, was sold as a 1993 to us but turns out its a 1992.

When we bought the car the seller promised history but never delivered any apart from a few receipts etc. The car was from Germany originally then brought to the UK.

Here are a few photos for when we had it - there are 2004/2005.

136.jpg
137.jpg
138.jpg
139.jpg
140.jpg
141.jpg
142.jpg
143.jpg
144.jpg
145.jpg
146.jpg
147.jpg
148.jpg
149.jpg
150.jpg
151.jpg
152.jpg

As you can tell we're a car mad family. I personally am on my second 500E now, prefer buying from Japan as they're so clean. Check out my build thread. I'd love the AMG suspension off this thing though - very rare!!!

If you want to know anything else give me a shout :agree:

Cheers,

Bill
 
Right mate, just realised i'd promised to give you an update on the car when we had it - sorry for the delay! I'll keep it short and sweet.

Story is that my uncle bought a 1991 500E in 2003 after we bought a 1995 E280 in 2001. He liked the build quality of the W124 but is a speed freak and wanted something quick alongside his 993 Porsche, C43 and 750i. Came across a 1991 500E at an army base in the UK off eBay and bought it on the spot (after a 240kmh test drive) - still has the car today but its looking worse for wear. This is what originally got me into the 500E's. I was 15 at the time so persuaded my father that we needed one. After much searching (most examples around the 10-12k mark but we really didn't want to spend that much) we found one advertised in Brighton, UK. Truth be told the seller was slightly dodgy and the car was sitting in a dark barn. However it looked ok and for the price we paid it was pretty decent.

We bought the car in August 2004 and kept it until October 2005 I think. During this time we did:

- Numerous oil changes - we did it every 3,000 miles with full synthetic oil, engine was sweet
- New distributor caps and arms as the car kept cutting out at some point
- Replace the 8 hole alloys with the BBS CH alloys off my uncles 500E
- Gearbox oil and filter change at MB Bedford
- New headlight lenses for RHD roads
- MB stainless steel doorsills
- Probably a few more bits and piece, brake pads etc.
- AC never worked
- Stereo etc

Most of our receipts should be with the car.

We enjoyed the car throughly but it always had a problem with pulling to the left. MB couldn't correct it even with max camber adjustment. We didn't realise it was actually a 500E until we checked up VIN etc. Looks like front end and rear trunk etc have been updated, was sold as a 1993 to us but turns out its a 1992.

When we bought the car the seller promised history but never delivered any apart from a few receipts etc. The car was from Germany originally then brought to the UK.

Here are a few photos for when we had it - there are 2004/2005.

136.jpg
137.jpg
138.jpg
139.jpg
140.jpg
141.jpg
142.jpg
143.jpg
144.jpg
145.jpg
146.jpg
147.jpg
148.jpg
149.jpg
150.jpg
151.jpg
152.jpg

As you can tell we're a car mad family. I personally am on my second 500E now, prefer buying from Japan as they're so clean. Check out my build thread. I'd love the AMG suspension off this thing though - very rare!!!

If you want to know anything else give me a shout :agree:

Cheers,

Bill

Thanks for the info on the car- I appreciate it! It’s cool to see pics of it dating from 2004 /2005


The alignment issue appears to have been corrected since then- the car drives very well & when I was driving it home I noted that it wasn’t pulling either side. I was also meaning to check on the distributer caps- the car has done very little miles since so they should still be in good order. I’ll wait until I get new leads and check the caps out when fitting the leads. To me the leads on it look original.


Yes there is a folder full of receipts I have been meaning to take another dig through that all again & maybe put some order to it.


The A/C still doesn’t work but I’ll get the car booked into an A/C specialist soon to tend to that. We don’t need A/C in Ireland:miserable:..... but I want everything working as it should really!


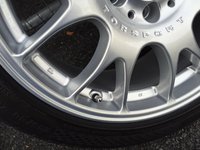
Those BBS wheels do look good on the car- but I couldn’t stand the condition they were in since the car now looks so clean! They are Genuine made in Germany BBS Rims, they cost around £360 per wheel or £1400ish for a new set without tyres! For the last few days they have been with a Pro Refurb place who are giving them the full treatment- will be ready for me to collect tomorrow I can’t wait! :DI have already got new Genuine BBS centre caps (& BBS Valve caps:hump:) for the wheels and they were shod in new Y rated tyres just before I bought the car.


I will get on with cleaning and painting the brake callipers & changing the brake fluid before mounting them back on the 500E next week. There is also some rust on one rear inner fenderwell which I want to attend to now when the car is up on Jackstands.
Better updates to come soon
:beerchug:
 
Last edited:
Glad to hear the car is getting the right tlc. I think we sold it close to 180,000km. Looking forward to seeing pics once the wheels have been refurbished. They'll really make the car look smart!
 
Well since I have got the upper & lower harnesses replaced on the car. Working on the car off & on when I have time it’s hard to tell how many hours it took but I’d say about 8 hours total for both harnesses.


I started it up today for a few minutes just to check all was well since the harness replacements- it appears what was predicted regarding the ETA Wiring has happened. As it had to be disturbed for the install of the other harnesses the ASR light is now on and the car idles high / doesn’t want to rev. So the ETA Wiring has had it.


The new MB ETA Plug / harness still hasn’t been dispatched from Germany so it’ll be yet another wait for parts before I can get stuck into that.


I got the exhaust X Pipe back in. The heat shields are all rusty and loose so I came up with a cunning plan- the pics tell the story. I VHT Painted the pipe to prevent corrosion then wrapped it with Titanium header wrap. The same thing will be done with the other downpipe to cat section before the custom cat back exhaust is figured out in a few weeks.


Added 8 US qrts of the Fuchs Titan ATF 4000 and cycled it through the gears so alls left to do is coolant change and Brake fluid change to complete the mega service.


Now it’s running again (Sort of!) I am going out to change the brake fluid now.


Plus the refurbed BBS wheels should be ready to collect within the hour:gsxracer:


I’ll post pics later of the wheels

IMG_0748.JPGIMG_0746.JPG
 

Attachments

  • IMG_0812.JPG
    IMG_0812.JPG
    938.9 KB · Views: 22
  • IMG_0814.JPG
    IMG_0814.JPG
    1,008.7 KB · Views: 20
Last edited:
One thing after another! Most cars have ETA issues though and like you say once disturbed it causes issues. Move the cable around and it might settle down again. Did you order new ETA wiring from MB? I didn't know you could get it seperately, thought it came with the ETA itself.

Could you send me the part numbers for the ETA wiring and the lower wiring harness? I know my upper wiring harness has been changed but no idea if the lower one has. My ETA wiring is original (I do have a spare ETA but i'd rather keep that for a rainy day).

Looking forward to seeing the car once the freshly refurbished BBS's are on.

Yes I came to realise my ETA has a big round plug that connects to the firewall which can be purchased on it’s own from MB. It will come with the wire harness already attached to the plug- but will require soldering into the ETA itself. That’s OK with me I have re-wired & soldered ETA’s before. With that plug coming complete and ready to go with the harness attached it ‘should’ be a breeze. Plus it’s surprisingly cheap from MB- about £20. I am still waiting on mine to leave Germany- should have it late next week hopefully.


Check for the round plug on your ETA- It’s near the Can Box. The part number is 140-540-15-81


Lower Harness is A 124 540 27 30 (Have your supplier double check this against your Vin to be sure it's the same for your car but I'm sure it would be)


One big Tip Bill is don’t use UK MB Dealers for parts! I now use this supplier- it takes approx 2 weeks for the orders to get to your door but the parts are all 100% genuine from MB Germany and the shipping is cheap at £11 or so.


http://www.genuineautoparts.com/


They are a German company. I find all prices are about 30% cheaper than MB UK / Ireland- on every single part. It soon adds up- between the 500E and my E36 Project car (It’s all 100% new suspension & brakes etc- total rebuild) I have been spending way more than I should be so 30% off everything soon adds up. Plus you can punch the part no into their site & get the price any time. I find dropping the spaces out works. So A 124 540 27 30 becomes 1245402730. I have an email contact of a great parts guy in there I can PM his details to you if you like. I just email him what I need and he finds all the part numbers for me. With the AMG build some parts are very rare he has went out of his way to find the correct parts for me several times.

Here’s a before on the BBS Wheels-

IMG_0802.JPG
 
Last edited:
And here’s the after of the re-furbished BBS Wheels:gsxrock: - these are acid stripped then powder coated in stages. A choose a Metallic Silver base coat- which is then given another powdercoat clearcoat to finish- same finish as new wheels.


Complete with the new Genuine BBS Germany centrecaps the wheels are for all intensive purposes brand new! And it all cost about £300 total- less than what one genuine BBS wheel costs so I’m chuffed with that.


I have another idea of what I would like to do with the car- I will be buying the correct E500 headlamps news from MB soon. But I had also seen an E500 Limited recently with a painted Grill- it looked great. My car actually has a brand new Genuine MB Grill fitted- it looks literally weeks old.


I do have a good spare pre-facelift w124 MB Grill I can have my painter spray in matching 199 Pearl Black Paint to match the car. So it can be un-done anytime and the current new MB Grill popped back in place.


I think with the correct headlights and the colour coded Grill it’ll really look the part

IMG_0820.JPGIMG_0819.JPGIMG_0818.JPGIMG_0817.JPGIMG_0821.JPG
 
Last edited:
I have another idea of what I would like to do with the car- I will be buying the correct E500 headlamps news from MB soon. But I had also seen an E500 Limited recently with a painted Grill- it looked great. My car actually has a brand new Genuine MB Grill fitted- it looks literally weeks old.


I do have a good spare pre-facelift w124 MB Grill I can have my painter spray in matching 199 Pearl Black Paint to match the car. So it can be un-done anytime and the current new MB Grill popped back in place.

I think with the correct headlights and the colour coded Grill it’ll really look the part

What is that they say about great minds??? A preview of what you were describing with a partially re-painted outer grille (extra, still have OE), inside grille is painted 199, matched lower cladding, Euro headlights and custom wiper delete panels.

1.JPG
 
So the mo*&6f7*er battery drain returned last night- car was so it would hardly turn over at all. Maybe the ETA wiring fault isn’t helping now. The replacement Base Module is still sitting in customs somewhere no sign of it yet at all. It could also be that the LH ECU is fried & requires replacing. Before shelling out for a used replacement LH ECU (I have the rarer one I think) I would rather send it to a ECU repair specialist for testing / repair.

Obviously the LH and / or Base modules are still firing up on their own even though I had recently extensively tested the car post harness replacement & found the power drain to be gone.

However in the interim of finding where the problem lies / replacing modules etc I am considering fitting one of these-

http://www.ebay.co.uk/itm/12v-100Am...lit-Charger-Isolator-Make-Break-/181439768282
Since it’s that one cable going to the ECU’s that causes the problem they can be isolated at the flick of a switch. Then flick the switch again to energise the connection without having to do anything in the boot etc. I would site the switch inside the centre console temporarily so as not to damage any trim. Hell I could leave it in there as an extra anti theft device even after the drain is gone for good!
But ultimately I will trace and fix the issue so the lead can be left connected. I know this may lead to having to remove the CAN Box and going through every wire but for right now I want to put some miles on it until beginning more major work / expenditure
 
Last edited:
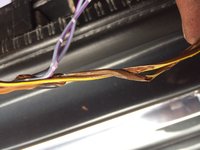
I got to the bottom of why the boot light was removed from the car- it would never turn off. On testing the wiring I found that the fault lay within the boot lid harness.


On removing the sheathing I found the fault- the wires had molted together and made a solid connection which is why the boot light was never off- by chance it was the boot lid switch wires that stuck together. Snipped one wire and the light went out- knowing these can be faulty and seeing old tape repairs on it I cut it out & will make a new loom to replace the faulty section.


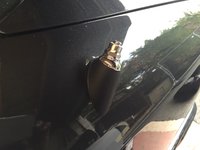
New Hirschmann universal Power Antenna also fitted and working today- replacing the old stuck halfway out one.


Thinking about that Relay for the ECU’s- I am going to wire it to the Accessory Power. So it automatically powers up the ECU’s when the key is turned in the ignition a few milliseconds before the starter is turned, I think that should work just fine and for now will solve the battery problem until further diagnosis can be carried out.
 

Attachments

  • IMG_0826.JPG
    IMG_0826.JPG
    492.4 KB · Views: 18
  • IMG_0829.JPG
    IMG_0829.JPG
    451.1 KB · Views: 17
Last edited:
I would like to remove the ETA tonight to begin prepping it for the re-wire. I got word the parts should be dispatched from Germany today so hopefully the new plug will be here by the weekend. I don't want to run the car anymore with the damaged ETA Loom in case it blows the EGAS Module or something next.

Is there any tips on removing the Throttle body? I can't see any m119 Throttle body removal DIY's that's all.

It's hard to see but it looks like I remove the MAF first then find any Allen bolts holding it down and waggle it out of there popping the throttle linkage off first. Sound about right?

I'll post plenty of pics detailing the M119 Throttle body re-wire. I'll do my own Pin Out diagram first so I can get on with disordering the old wires and prepping the circuit board with solder wick etc. So when the new loom arrives a couple of hours should have it all re-assembled and ready to go back on the car again.

This one should be relatively simple since the plug and harness can be purchased pre assembled from MB. Normally the plug must be split and new wires ran the whole way which is a PITA & very time consuming. In this case I'll have about a dozen solder connections to do inside the ETA & I'm done.
 
Correct -- wiggle the MAF free, and then you will see how the ETA is held on. It's dark down there, so a good, powerful torch or shop light will be helpful. Also good idea to disconnect the battery before you begin.

The ETA is a very very easy thing to remove. It's held on by just four bolts. They are Allen (hex) and you will want to use some brake cleaner or other solvent to spray out the bolt heads to provide a maximum grip for the allen socket/key that you insert into each hole. This area of the car gets very dirty, and it is exceedingly easy to strip out these Allen bolt heads. If I remember correctly, they are 5mm.

You will want to buy a new rubber boot that connects the ETA to the MAF (guaranteed yours will be fossilized) as well as a new paper gasket (get two just to be on the safe side; they are cheap) for between the ETA and the intake manifold.

Once the four ETA-to-intake-manifold bolts are removed, you will need to unhook the linkage (ball socket joint) at one side of it. BE CAREFUL not to bend the thin metal arm attached to the ETA. After you pop the ball joint linkage off, then you can wiggle the ETA out (upward) through the opening between the intake runners.

It can be frustrating if you've not done this before, so just be persistent and you'll find the way to get it out. I find that soothing music (I often listen to Sade when working specifically on intake manifolds, ETAs and the like; Metallica works better for things like power steering pumps and thermostat replacements) helps quite well.

Cheers,
Gerry
 
Perfect thanks for the tips Gerry that's a great help:-) I have the intake gasket ordered but I didn't think about the connection hose, I'll get that ordered also tonight.

The car is still perched on jack stands which will make it a little trickier reaching over to the manifold but I should manage it. I'll post pics of the condition of the ETA Loom when it's out!

Ps- I actually do have a Metallica CD in my Garage stereo at all times!
 
So I got the Throttle body off & cut the loom to check it- WTF- totally fine. No signs of wires degrading at all. Both the loom and ETA are dated 1992.


So to recap- both the upper & lower harnesses were replaced along with the sprak plugs and service. I made sure each connection was correct and tight on all spark plugs and loom wiring / injector connections.


On starting the car up it took a couple of seconds to catch as normal then had a high idle (Around 1k rpm) and the first 3[SUP]rd[/SUP] of the throttle had no response. It would then rev up but if the revs were held it would stumble on it’s own. Like typical ETA loom failure. Plus the white dash ASR Bulb was lit continuous which it never did before.


What gives? I was expecting the ETA Wiring to be in crap. I mean the wires really look fine- whatever material they use in this particular loom it does not degrade. Now I have hacked the loom open I am going to have to rewire the ETA and re-fit which feels like a total waste of about 10 hours work.

I don’t believe the Throttle body could up & fail with the car sitting getting the looms replaced it was 100% AOK before with a good idle and cruise working. I did expect the wiring to have crumbled when the loom was disturbed but now I am stumped

IMG_0834.JPG
 
Last edited:
My guess: The wiring was already replaced with the item you were planning to install.

Can you post a photo of the label on the ETA, and also the "triangle" ink stamp on the ETA housing?

:detective:
 
My guess: The wiring was already replaced with the item you were planning to install.

Can you post a photo of the label on the ETA, and also the "triangle" ink stamp on the ETA housing?

:detective:

Pics of the ETA attached. The Throttle Body & wiring harness both have build dates of 1992. (The ETA Label won't clean up)

What else could have triggered the ASR Light and I believe the car was in Limp Home mode which is what I was experiencing with the laggy throttle.

The Blink code reader still has not arrived wither but it will be about 1 ½ 2 weeks now until I can get the ETA re-wired and re-fitted to test again.

Plus I found rust that had been covered up with mastic prior to the underbody waxoyl. All ripped off reveals a sizable area(s) that require steel welding in along the nearside sill / rear wheelarch.


Sigh

IMG_0841.JPGIMG_0835.JPGIMG_0839.JPG
 
Last edited:
Yep, that looks original, Sept-1992. I'm shocked the wire insulation is all intact. Could be the engine never saw high temps, maybe? What happens if you bend the individual wires around, any cracking?

Next most likely item to cause limp mode would be the NSS at the trans, but that will usually trigger the same couple of codes every time it goes into limp mode.

:cel:
 
The wire insulation is all good- I think it's made from the same stuff as the 2 wires inside the ETA that don't degrade. Teflon maybe? It is pastel coloured and soft but no cracking whatsoever.

I was shifting it in & out of gears for the ATF change so I suppose the NSS could also have triggered it. I guess the next step is to get it running again & clear all codes to get it out of Limp mode again. Then see if it goes back into limp mode & what code appears. I have many hours work ahead now that's for sure!
 
I have been trying to locate a parcel shelf for the car since the original was cut for the install of speakers. This is the fabric covered liner to the rear window opening.

My car has the rear blind and no cars here in the UK have that really! I think I might have to order this new from MB if it’s still available
I have tried looking through here for the part number but can’t figure out where to look with no diagrams.

Mercedes-Benz Teilekatalog (Ersatzteile online)
I also cannot remove the old parcel shelf since the headrest’s wont come out. I have the pins pulled underneath but they hit the fuel tank before the pop fully out of the brackets. So it seems I will have to remove the fuel tank in order to get the rear headrests removed to enable the removal of the parcel shelf!

Can anyone with access to EPC etc let me know what the part number is for the main rear shelf lining? And the first Aid kit cover that goes on top of the liner. Any help with the part numbers would be much appreciated! :nobmw:
 
Last edited:
OK so Genuine Autoparts located the part numbers and the parcel shelf is NLA:doh:


So I will take a closer look at my 300E-24 'Stock' parcel shelf which has the headrests but no roller blind. If it looks like I can cut out the recess for the roller blind then a good used one might be an option if it can be retrofitted to the 500E.

Or failing that I could fill in the speaker cutout & re-cover the original parcel shelf in Black Alacantara Suede. Might look cool actually in the Alacantra
 
Last edited:
I would think that a good interior shop could "recreate" a parcel shelf, complete with cutouts and all you need. May not be cheap, but perhaps the way to go. Otherwise, someone in the US with a spare / parts car who would sell you one. That would probably be the best option. Try captruff....
 
I would think that a good interior shop could "recreate" a parcel shelf, complete with cutouts and all you need. May not be cheap, but perhaps the way to go. Otherwise, someone in the US with a spare / parts car who would sell you one. That would probably be the best option. Try captruff....

Thanks for the idea's Gerry- I have a pro upholsterer company in England who are to make me a set of mats for the car using the original MB ribbed material since these are NLA.

I have asked them if I ship the parcel shelf over can they cover it for me in Black Alacantra. The more I think of it the more I like that idea actually! I wouldn't tackle covering it myself- I can only imagine the disaster that might turn into :-)
 
Good interior shops can work miracles, from my experience. I've seen some amazing work. Helps to have a model to work with, but don't give up on finding a used one per this forum !!!
 
OK so Genuine Autoparts located the part numbers and the parcel shelf is NLA:doh:


So I will take a closer look at my 300E-24 'Stock' parcel shelf which has the headrests but no roller blind. If it looks like I can cut out the recess for the roller blind then a good used one might be an option if it can be retrofitted to the 500E.

Or failing that I could fill in the speaker cutout & re-cover the original parcel shelf in Black Alacantara Suede. Might look cool actually in the Alacantra

The non sunshade parcel shelf out of your 300E should have the template for cutting out the sunshade space - they all have it I think. Might be worth checking this first.

I think i'd be putting my money on a black alcantara headlining rather than parcel shelf.

Who does your interior work mate?

Cheers
 
Good interior shops can work miracles, from my experience. I've seen some amazing work. Helps to have a model to work with, but don't give up on finding a used one per this forum !!!

Yes for sure- I will look at that option to. I have a few inquiries out there for a used 500E one already.

In the meantime however there is a facelift m104 W124 for salvage about 80mile return trip from me. I am going to check it out tomorrow- apparently it has a good black parcel shelf in it. (Black cloth interior) At the very least I should get the first aid box cover off it (£££ from MB!) even if the non blind shelf doesn't work in the 500E. w124's for salvage are few and far between now so I want to see what goodies I can snag off it for any of my 3 w124's!


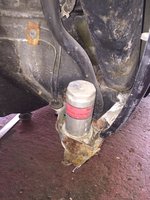
Also- when dealing with rust & prepping for under sealing the car I see a small canister type thing with 2 (I think) small metal Pipes on it at the Driver's wheelarch area. What is that for? I guess Brakes or SLS but either way I can't think of what it's function is? I might have to remove it is all to get in that area properly :detective:


The non sunshade parcel shelf out of your 300E should have the template for cutting out the sunshade space - they all have it I think. Might be worth checking this first.

I think i'd be putting my money on a black alcantara headlining rather than parcel shelf.

Who does your interior work mate?

Cheers


The people who are making the mats can't cover the parcel shelf for me- so If I go that route I may need to find a interior upholsterer yet. Yes my brother had an S55 AMG with a dark anthracite alcantara headlining and it looked great! It's on the future 'upgrade' list but the original headlining in the car is still in good shape anyway.
 
Last edited:
Well I had a good morning w124 parts hunting! I got a black parcel shelf which looks like it will work with the blind BUT it has a burn mark at the front edge. It has a good first aid lid etc which was cut out of my original for a speaker install. Best part is it was.... Free! So I thought it was worth spending the time to remove. I will have this one covered in Black Alcantra then swap out the original bastardised one.


Got lots of other little black trims for the interior too and a spare cubbyhole box which was in great nick. Some little minor trim bits were missing or cracked in my car but really I'll have a whole heap of spare trim left over now but that's Ok!


I also removed the rear cover of the driver's seat to see why the headrest wasn’t moving- turns out only the drive cable had popped out. It's working again- the mech was fine.


Some minor rust repairs are well underway to the rear nearside sill which was hidden behind the plastic trim. Then I'll drop it back on it's refurbed wheels and wait for the ETA harness to turn up from Germany- it still hasn’t been dispatched even which is a bit of a bummer since I want her up & running again to enjoy some hugely expensive V8 motoring!

:e500launch:


IMG_0861.JPGIMG_0862.JPG
 
Last edited:
Hi all, if you recall I this 500E had the boot lamp removed when I bought it. This is because of the Eco Junk wiring in the boot had welded itself together thus bypassing the switch permanently. I am re-making a new loom for the bootlid which will correct this issue.


However, I also noticed the inside of the lamp holder was burned inside. I have seen this on a junker car too on Saturday so it seems that the Festoon bulb, if left on could potentially be a fire hazard.
So I bought these bulbs to try them out


5x Festoon 42mm 264 8 LED 10x42 C10W Interior Car Light Bulb Ceailing Dome Lamp | eBay

They work great- plus on testing the current draw they only use 10% of the ‘stock’ bulbs current draw and give better light- being LED. More importantly they also stay 100% cool to the touch during operation unlike the original festoon bulbs. So I will now check the other interior courtesy festoon bulbs sizes and upgrade them all including the ones in the doors.


The other advantage is; should a bulb be left on accidently over night (such as the rear interior lamp) it will not kill the Battery at the 0.03A LED current draw and the risk of a fire due to the ageing fabrics / lamp holders exposed to heat is thus eliminated entirely.

:tumble:
 

Attachments

  • 264-10x42-8LED-5.jpg
    264-10x42-8LED-5.jpg
    32.8 KB · Views: 211
Last edited:
Well I pulled the inner fender liner on the LH side for access to repair a frilly end of the cill. You can see this is a terrible mud trap and the plastic cill cladding had sopping wet mud packed against the cill end. Hence its rusted through. I have a perfect used cill end from Saturday's parts hoard so I will fully Seam weld this on today to replace the rotted section.

Everything else under the fender liner was 100% rust free but I will galvafroid paint & waxoyl underbody shutz the area now when I have it opened up.

This winter the whole front end will be disassembled for thorough rust inspection & Waxoyling / detailing. As will the underbody. I will also pull the rear subframe and have it blasted / sprayed as per my E36 build. And renew all bushes / arms with Lemforder too.

Anyway- see the pic of the device under the fender liner. It looks like a spin on filter for the AC maybe?

I am thinking I should order a new one & leave the fender liner off. Then when the cars running again drive it to the AC service specialist and have them evac the system & replace the filter / receiver dryer if that's what that is?

IMG_0870.JPG
 
Last edited:
Anyway- see the pic of the device under the fender liner. It looks like a spin on filter for the AC maybe? ... I am thinking I should order a new one & leave the fender liner off. Then when the cars running again drive it to the AC service specialist and have them evac the system & replace the filter / receiver dryer if that's what that is?
That canister is not part of the AC system, it's part of the ASR (traction control) system. I believe it's a pressure reserve canister. If there is no corrosion or damage, it should not need replacement.

:klink:
 

Who has watched this thread (Total: 6) View details

Back
Top