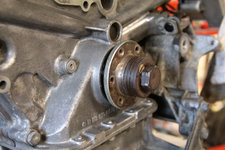
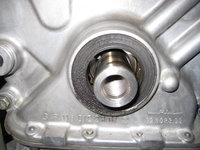
My front main crankshaft seal is leaking and needs replacement. I've looked through the service manual and Mercedes calls for installing a special locking tool to prevent the engine from rotating while undoing the main bolt and later retorquing it to the required 400Nm. I looked for info from others that have done this job before and found very little info online for the M119 unfortunately.
I don't have this tool and it costs over $100 to buy new. Not to mention that it requires removal of the starter and left exhaust downpipe, according to the service manual, both of which I'd like to avoid if at all possible.
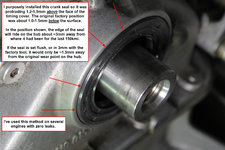
For those that have replaced this seal before, how do you counterhold the engine while removing the crankshaft bolt? I've done the job on front wheel drive vehicles before, and you can use the starter to break the bolt loose by resting the tool solidly against the frame and "bumping" the starter briefly. Even if you could do that here, there's no way you could torque it back to 400Nm without the engine rotating first.
I don't have this tool and it costs over $100 to buy new. Not to mention that it requires removal of the starter and left exhaust downpipe, according to the service manual, both of which I'd like to avoid if at all possible.
For those that have replaced this seal before, how do you counterhold the engine while removing the crankshaft bolt? I've done the job on front wheel drive vehicles before, and you can use the starter to break the bolt loose by resting the tool solidly against the frame and "bumping" the starter briefly. Even if you could do that here, there's no way you could torque it back to 400Nm without the engine rotating first.


")