• Hi Guest !

    Welcome to the 500Eboard forum.

    Since its founding in late 2008, 500Eboard has become the leading resource on the Internet for all things related to the Mercedes-Benz 500E and E500. In recent years, we have also expanded to include the 400E and E420 models, which are directly related to the 500E/E500.

    We invite you to browse and take advantage of the information and resources here on the site. If you find helpful information, please register for full membership, and you'll find even more resources available. Feel free to ask questions, and make liberal use of the "Search" function to find answers.

    We hope you will become an active contributor to the community!

    Sincerely,
    500Eboard Management

M119 Ticking Noise - NOT oiler tubes (1998 SL500)

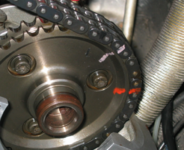
If I'm reading those correctly, you have cams at 0°, two at 20-ish degrees, and one around 40°.

The zero appears to be 2 teeth off, the two at 20-ish are likely 1 tooth off. You'll need to loosen the chain and rotate the cams until you can get all four cams reading near 40-45°. Remember that the cams may "jump" when tension is released. It won't be fun to correct this.

:runexe:
 
Thanks, I’m really perplexed how this has happened because I only disturbed the exhaust cam with the bad lifter as far as I was aware.

I’m busy for the next couple of weekends so won’t be able to correct this straightaway.

I’m guessing they all “off” in the same direction too? Seems odd to me that the one I removed is potentially correct and the other’s aren’t.

🙈
 
Last edited:
A few posts that may be helpful?
 
Thanks, I’m really perplexed how this has happened because I only disturbed the exhaust cam with the bad lifter as far as I was aware.

I’m busy for the next couple of weekends so won’t be able to correct this straightaway.

I’m guessing they all “off” in the same direction too? Seems odd to me that the one I removed is potentially correct and the other’s aren’t.
Weird stuff can happen when the chain is loosened. I don't have an explanation, but I've experienced this too. This is why I tell people to triple-check the cam timing when the work is complete, because it's no fun to tear it apart second time just to check cam timing (and then fix it).

:tumble:
 
A few posts that may be helpful?
Awesome, thanks Gerry, that really reinforces what I need to do next although I doubt my engine will be clean enough to eat my dinner off!

Were these markings related to some previous re-timing activity? Are they chalk or some kind of dry based material?

1710770105934.png

I think part my problem came from using ancient correction fluid to mark my cams. It is almost impossible to buy it new over here (probably everywhere) in a bottle with a brush to apply it and with the oily surfaces and the months I've taken to do this work they effectively disappeared.
 
Weird stuff can happen when the chain is loosened. I don't have an explanation, but I've experienced this too. This is why I tell people to triple-check the cam timing when the work is complete, because it's no fun to tear it apart second time just to check cam timing (and then fix it).
It is the not knowing why that is bugging me, I have spent ages following the MB docs and youtube videos and the advice from here so it really shouldn't have happened.

See my above comment - my poor choice of cam marking material was definitely a factor I'm sure.
 
The marks were fingernail polish that I "borrowed" from my wife -- albeit with her permission. Pink and orange are colors that she does not commonly use/wear. I think I also made a third mark with a black Sharpie marker, but the black ink can potentially be dissolved through handling, motor oil, brake cleaner solvent, etc. I also like having multiple (two or three) separately colored points of reference. This makes everything visually MUCH more sure and able to line up.
 
The marks were fingernail polish that I "borrowed" from my wife -- albeit with her permission. Pink and orange are colors that she does not commonly use/wear. I think I also made a third mark with a black Sharpie marker, but the black ink can potentially be dissolved through handling, motor oil, brake cleaner solvent, etc. I also like having multiple (two or three) separately colored points of reference. This makes everything visually MUCH more sure and able to line up.
Ah, the old "borrowed" nail polish line :)

1710785345226.png

Sorry, but I need to inject some humor into my situation, I'm desperate to get my car back on the road ready for the 2 or 3 days of a UK "Summer"... the problem is that it isn't currently known when it will be this year.
 
An update with sadly a question...

Started today and got all cams pinned, unfortunately there was a father/son miscommunication and the crankshaft wasn't at 45° BTDC.

No problem, we can just stop for lunch and redo it all afterwards having moved the crankshaft to the correct starting position.

The trouble is that after moving the crank to the correct position we have "run out of chain" maybe a link or 2 so something appears to be caught somewhere.

Does anyone know if there is enough room for the chain to skip or double over on itself around the crankshaft sprocket or elsewhere out of sight?

It isn't clear where the missing chain is located or trapped.

I'm thinking of removing both exhaust camshaft sprockets and trying to pull through the excess from one side to the other and roughly measuring if it to see if it is equal or coming from 1 side or the other.

Any other ideas?

The only other thing to note, between the incorrect timing attempt and the last was when removing the chain tensioner in between it came out slightly disassembled as the locking ring was slightly bent about. This has been fixed but obviously not refitted yet.

1712417258532.png

Chain path with possible places of issue highlighted:

1712417724900.png

I also probed lightly with a screwdriver into the tensioner hole in case something was caught up around that area but didn't notice anything.

EDIT - I just went back to the car and was able to get the final (exhaust) sprocket on with 1 fixing but the chain was a tiny bit too tight to get the other 2 fixing holes lined up.

Where's my missing link (or 2) of chain? :)
 
Last edited:
Another update:

After a few weeks and weekends working away, I finally got some time to get back in the garage and try to make some progress.

The endoscope wasn't particularly helpful. The chain was actually very easy to free by just starting to rotate the engine anticlockwise, it immediately pinged out.

The outcome of today is that I now have the cams correctly positioned and the chain tensioner in. After 2 rotations of the engine the cams return to the pinning points. I have checked this a couple more times just to be sure.

I think not using the correct tool was a major factor so we made these, the centres are ~138mm apart:

1714917028474.png

Hopefully I will never need to use them again :)

The next jobs are to replace the front covers and fit the power steering pump and then the chain guides and valve covers, plugs etc. can go back on.
 
I have no clue as to the cost or availability of the MB OEM tool especially in the UK. This is a nice improvisation of one. It looks precise and even adjustable if needed and it did the job.:thumbsup2:
 
I have no clue as to the cost or availability of the MB OEM tool especially in the UK. This is a nice improvisation of one. It looks precise and even adjustable if needed and it did the job.:thumbsup2:
Me neither but probably expensive if still available and a special order.

These were made from 2 different sizes of round bar which was tapped and threaded but you could use M6 studding and threaded collars. They were made fully adjustable so they would definitely fit.
 
It looks like my fuel pump is dead, put the remainder of the engine back together this morning and when I eventually plucked up enough courage to turn the key it cranked fine but didn't fire.

I have checked the relay/fuse in the boot and it seems to be fine.

I squirted some Easy Start down it's throat and it spluttered into a kind of life.

Now it is a matter of establishing if the fuel pump is getting power (likely) vs the fuel pump being dead.

I think the pump (or pumps?) are underneath the car in front of the rear wheel on the RHS. I'll check for 12V tomorrow before giving the pump a tap to try and encourage life.

From memory, the pump makes a bit of noise when the ignition switch is turned to position 2 and this isn't happening currently.

Not the outcome I was hoping for but a huge step closer to getting the car running and back on the road I hope.
 
Apologies, I completely forgot to update this thread, the car is all back together, running perfectly, MOTed and in regular use.

With my paranoia over recharging the battery and wanting to avoid frying the roof module in the process, I had very carefully tucked some of the +ve battery leads well hidden out of sight behind the boot trim and failed to remember to re-connect them hence the electrical issues initially.

I learned as much about myself as I did the car during this work. Many thanks to everyone who helped along the way, particularly @gsxr who did a huge amount of hand holding.

I don’t seem to be able to attach a short (6 second) video - any ideas? I have seen much longer videos posted in thread replies and in my OP.
 
Last edited:

Who has viewed this thread (Total: 2) View details

Who has watched this thread (Total: 4) View details

Back
Top