• Hi Guest !

    Welcome to the 500Eboard forum.

    Since its founding in late 2008, 500Eboard has become the leading resource on the Internet for all things related to the Mercedes-Benz 500E and E500. In recent years, we have also expanded to include the 400E and E420 models, which are directly related to the 500E/E500.

    We invite you to browse and take advantage of the information and resources here on the site. If you find helpful information, please register for full membership, and you'll find even more resources available. Feel free to ask questions, and make liberal use of the "Search" function to find answers.

    We hope you will become an active contributor to the community!

    Sincerely,
    500Eboard Management

M119 Ticking Noise - NOT oiler tubes (1998 SL500)

R129 UK

R129 Infidel
Member
Hello everyone, I have been lurking here for quite a while and I have read many many threads here on M119 engine noises…thanks to all who have contributed to what I’ve seen so far.

My car is a 1998 SL500 with engine code 119982 and 122k miles. It is a UK spec. vehicle i.e. RHD.

When viewing the car I heard what I thought was an intermittent ticking noise from the engine. I suspected cam oilers based on existing knowledge picked up during my research prior to purchasing. In all other aspects the car is perfect and everything works as expected. It appears overall to be a well-cared for example. I managed to get £1000 off the asking price hoping it would be a quick and easy fix...

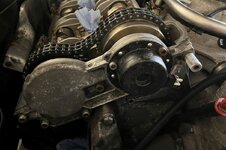
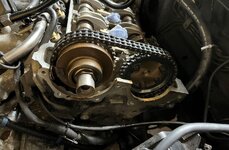
After purchase and reviewing the provided history of receipts etc. in detail the vehicle had engine work done at ~118k miles including the hydraulic tappet elements and the oiler tubes replaced on the nearside (left in the direction of travel) engine bank. I sourced a set of used aluminium tubes from eBay and replaced these on both sides of the engine, sadly, no change. Also, the plastic oiler tubes I removed were fine with no blown end caps.

I tried an additive (Wynn’s hydraulic valve lifter) and also changed the oil and filter adding 20/50 mineral oil (previously it had been using 10/40 - also no change.

The ticking noise is almost always present, that is, if the car is left for more than a week between drives, the ticking isn’t present initially at start-up but quickly appears (probably within about a minute) If the car is used more regularly it is always present between starts either hot or cold. The frequency is linked to engine speed although as the revs increase the noise of the engine masks it so it is no longer audible.

I have gone all over the cam covers and other parts of the top of the engine with a stethoscope and cannot pinpoint any particular area causing the ticking. The noise is particularly noticeable when there are solid objects close to the sides of the car (for example when stopped at traffic lights with other cars beside me or walls etc.) and it seems at least when driving to be equal on both sides of the car.

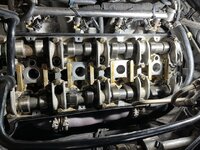
The attached video was taken in my garage which is only 1 metre wider than the car on both sides. I have also attached photos of the engine during the oiler swap, the overall engine and exposed cams look fine from what I can see – I am a novice with these engines.

From the contact details on the old receipts, I contacted a previous owner who was happy to converse on SMS with me. He owned it for a year at ~70K miles and agreed there was an annoying engine ticking noise which didn’t affect performance. Therefore, I’m assuming it isn’t getting any worse over time.

My current thinking is possibly either a damaged cam lobe or a collapsed lifter on the side not previously replaced (4k miles ago) however if this was the case, I would expect the ticking to be more noticeable on a given side of the engine which as previously mentioned, I cannot detect.

The car covered approximately 75k miles in its first 3 years then very low annual mileage for the next 22 years.

I have now taken the car off the road for Winter and would like to investigate this further but I’m unsure what to look at / check.

Does anyone have any other thoughts on what could be causing this and what else to check / look at / consider?

Thanks for looking and listening!!
 

Attachments

  • image0 (4).jpeg
    image0 (4).jpeg
    4.2 MB · Views: 25
  • image1 (4).jpeg
    image1 (4).jpeg
    4.5 MB · Views: 23
  • Video.MOV
    Video.MOV
    1.1 MB
That noise sounds like it's at 1/2 engine speed, so about 6 taps or so per second which would indicate top end noise. A noise equal to engine speed would usually indicate bottom end noise.
 
That noise sounds like it's at 1/2 engine speed, so about 6 taps or so per second which would indicate top end noise. A noise equal to engine speed would usually indicate bottom end noise.
Thanks for your reply, I agree, it isn't a bottom end noise in terms of frequency (thank goodness :) )
 
It still sounds like a bad lifter to me. Even though you changed the oiler tubes to aluminum. It could still be a bad lifter that’s not pumping up.
 
It still sounds like a bad lifter to me. Even though you changed the oiler tubes to aluminum. It could still be a bad lifter that’s not pumping up.
Thanks for the reply, this is what I'm thinking (hoping).

@gsxr @gerryvz - apologies for bothering you both but in my haste to post this and being a newbie I have accidently posted this in the wrong forum. Could it be moved to M119 or should I create a new post there? Thanks.
 
You originally posted the enquiry to the M119 Engine sub-forum.

However, this thread WAS MOVED to the "Off-Topic Discussions" sub-forum, as it relates to the M119.98x engine, not the 119.97x engines (LH Jetronic) as found in the 500E500 and 400E420 models.

This is a different variant of the engine with a different, and integrated, spark and fuel control system, and is considered by this forum as a different engine that is parallel/peripheral to the primary focus of this forum.
Thanks very much for the explanation, I was genuinely questioning my sanity when I looked in the M119 forum and couldn't see my post.

Apologies for any trouble or inconvenience caused.
 
Ok, I'm planning to start investigating my ticking noise (see OP) this coming weekend.

The plan is:

Remove valve covers etc, and spark plugs

Rotate the engine using a 27mm? socket at the front of the engine to expose the lifters from under the cams and push-check all 32

Anything else I've missed?

I will report back on findings and possibly be asking questions regarding how to safely remove the cams if I find anything untoward. When I say safely, I mean correctly so that it goes back together and runs again afterwards. I will be taking lots of photos along the way.

I do have a searchable pdf of the "Service Manual Petrol Engine 119" available too but I find it quite hard to follow as it seems to jump around all over the place and possibly reference other documentation I don't have.


Thanks!
 
A quick update - unfortunately time was tight due to other commitments so progress was not as extensive as I would have liked.

I started on the passenger (the nearside - there is an error in the OP regarding the side which had received new lifters and oiler tubes previously) and removed the valve covers and spark plugs etc. and rotated the engine by hand to point the nearest cam lobes vertically up to check the lifters.

See attached, to my untrained eyes, the engine internals look in good condition compared to what I have seen in various online resources.

Anyway, I only managed to get the first 2 checked - both could be rotated but feel solid in terms of pushing down with the thumb.

I'm away until the weekend now but will aim to finish off the rest and report back on my findings.

Thanks for reading and please feel free to comment on what you can see in these photos if there is anything worthy of note.
 

Attachments

  • image.png
    image.png
    564 KB · Views: 20
  • IMG_6862.jpeg
    IMG_6862.jpeg
    185.4 KB · Views: 20
Update - 18th November 2023

31 out of 32 lifters were firm and could not be pushed down with either thumbs or a wooden chop stick...

See attached video for the 32nd which can be pushed down ~1mm very easily.

I am assuming that this the culprit for the ticking noise I'm experiencing.

Next question - does anyone have the procedure for removing the camshafts? Specifically the exhaust on the left hand side of the car when looking forwards from inside.

Thanks for any assistance provided, I'm happy I appeared to have find the source of the issue, not so keen on the work now involved to resolve.
 

Attachments

Last edited:
I have had another look at the tasks required in the service manuals and I have a few questions:

I only need to remove the exhaust cam on the right hand side of the engine looking from the front backwards.

This involves removing the power steering pump which it seems can be unbolted and moved aside and is purely to expose the front cover fixings.

1) Do I need to removed the V belt and fan shroud? I can't see what benefit this would provide.

2) Do I need to touch the front cover on the other side of the engine? The instructions obviously detail how to remove all the cams which I don't think I need to do in my situation. It might make accessing the chain tensioner a fraction easier but that's it.

3) What is supposed to be in this hole? It looks like some oil is weeping out. Note I removed the fixings for the front cover on this side except the top one while investigating.

1702203042598.png
 
1) The fan & shroud will generally be in the way and restrict access. I'd remove them if you have the tools to do so.

2) If only removing 1 cam on the driver side, I don't think you need to touch the cover on the passenger side.

3) That looks like a bore for one of the pins which hold the upper chain rail in place. If the "leak" is only what shows in the photo, ignore it.

If you have no record of chain guide rails being replaced, you may need to do that... and now would be the time while you have almost everything apart.

:duck:
1) I'm not sure on the 119.982 access is an issue. I could get a 27mm socket on to rotate the engine with a short extension bar. The bottom of the power steering reservoir is fractionally below the V belt but I don't foresee any access issues with what else I need to disturb but will obviously do the necessary if the need arises.

2) Glad to see I got that bit right

3) Thanks, will leave as is.


The chain tensioner and power steering reservoir are my biggest concerns.

Would you happen to know the sizes of the fixings for the tensioner? Will to be easy to remove? It looks like it hasn't been disturbed for a while so I'm concerned it will be a PITA to remove the gasket. I assume replacement gaskets are available...
 
R129 - ooops! Access is an issue on the 124.

The tensioner is attached with 1 bolt and 1 nut, both are 13mm hex IIRC. The OE gasket is a stamped-steel design, p/n 119-052-08-80, and it looks like this went NLA somewhat recently - call a dealer and inquire about availability. I think a steel gasket can be re-used, but if it's fiber it should be replaced.
Thanks again - went to my local Mercedes main dealer this afternoon and part 119-052-08-80 is indeed NLA in the UK.

The chap in the parts dept. was quite helpful and printed me off this page which is better than the exploded view in 05-3100.

I'm not sure if this image is from any of the other pages in the maintenance manuals links but I hadn't come across it to date:

1702410785819.png

He did also advise it was recommended to reuse and attempt a repair if necessary.

It is available from some of those MB parts websites but they won't ship outside the US...worst case I could ask a US based friend or colleague to maybe get one and put it in the post but only as a last resort.
 
Hello again, been back looking at the car recently after the colder UK weather has subsided...

I've removed the chain tensioner, not yet any sign of the chain being loose but I will worry about that detail later.

The power steering pump is proving a little bit tricky so a question for those in the know, are you working on the car only from above or from below too?

I'm only working from the top which makes accessing the tensioner and the pump very difficult - I'm using mirrors etc. but the pump has Torx headed bolts which don't have enough room to fit a socket and ratchet on. I've ordered some Torx spanners which I hope will help but I'm also thinking going in from underneath might be easier if I remove the lower tray - if I was a dentist and used to working with mirrors in confined spaces I would probably be wealthy enough to pay for my car to be repaired by someone else!!!
 
With regard to the timing chain stretch, you should do this with the timing chain tensioner installed, use the crank timing indicator in the front of the engine, to see how many degrees off it is using the factory procedure. Ideally, you want to try to pin all four of the cams at 45 degrees BTDC, and have the marker read right at the 45 mark. Usually chain stretch will mean the timing is off by anywhere from 1-10 degrees. If it is off much beyond about 5 degrees, I'd replace the timing chain, as it is likely stretched. There is a LOT of information here on the forum about timing chain stretch, etc.

To answer your question, I recommend working from BOTH above and below the car (i.e. put the car up on ramps in the front). This will give you plenty of room. However, for the tensioner and smog pump, it's best to access both of them from above. For the power steering pump, I would say it is more of a split job -- you want to have access from both above and below. Especially for the bolts that hold the mounting plate to the front of the engine.

Note that E500Es have a "tandem pump" rather than just a power steering pump, so it is a different setup than if you only have a single-function power steering pump.

There are HOW-TOs on these various operations.

You can see some information about the timing chain tensioner removal and replacement here. You should remove the smog pump, to get to the timing chain tensioner.

Information about the power steering / tandem pump (including the backing plate) is here, and start reading posts here.
Thanks Gerry.

Regarding the chain, I have about 5° on 120K miles so I think I will leave this for another day. Everything else inside the engine looks spanking considering age and mileage so I'm confident with the low miles I drive in this car I can do it in a few years.

What I originally meant was that I didn't notice any releasing of tension when I removed the tensioning device which I was expecting.

Noted the advice regarding the power steering pump and will attack from both directions at the weekend after getting the car on axel stands. The outer rear fixing should be simple with the (yet to be delivered) Torx spanners which just leaves the inner fixing from underneath.
 
I'm back for another installment...

As far as I am aware, I have completed everything up to 05-220 Step 6 "Lift timing chain off camshaft sprockets..."

See below, 3 images.

The first is the left hand chain (the side with the tensioner removed) which shows the chain has some slack

The next is the opposite side with the power steering pump and front cover removed - chain is still taught

3rd image is me lifting the chain showing it not coming off the sprocket.

Do I need to remove the front cover on the left bank?

If not, how do I free up more chain to lift it off the sprockets so that I can rotate the cams as mentioned in step 6?


Thanks again.
 

Attachments

  • Left chain view.JPG
    Left chain view.JPG
    101.3 KB · Views: 15
  • Right chain view.JPG
    Right chain view.JPG
    141.5 KB · Views: 15
  • Left chain lifted.JPG
    Left chain lifted.JPG
    64.2 KB · Views: 15
Are the camshafts pinned in the photos above?
No, I've marked the chain and sprockets but the pins are removed.

As per an earlier post:

What I originally meant was that I didn't notice any releasing of tension when I removed the tensioning device which I was expecting.

Thanks for responding, it is much appreciated.
 
I think there may be a step or two missing in the FSM procedure. If the cams are not pinned, they are under tension and will try to spin one way or the other when chain tension is released. Normally, in between step 3 and 4, I would pin all 4 camshafts if possible. If all 4 won't pin, remove the tensioner and then gently rotate as needed until the pin will insert.

Then, to lift the chain off, you may need to remove the exhaust cam sprocket at the passenger side near (cyl #1) above the tensioner. This will provide enough slack to lift the chain off the intake cam and pull slack into the opposite side (cyl #5-8).

With the chain released, the cams are still under tension, and when you remove the pins some or all will "jump" to the point of least resistance. See the "removal note" in step 6.
Thanks, that mostly makes sense to me except the highlighted in your text above - my tensioner is already removed...

I have just loosened the chain as far around the left hand exhaust sprocket as I could and it appeared to "give" a little more which means there is now literally just enough slack in the chain to clear the sprocket for removal (I think).

Just to clarify my next steps:

1) Pin cams

2) Remove front cover on LHS

3) Remove sprocket on LHS exhaust (is this just the 3 Torx headed fixings? My car is RHD so passenger and driver are swapped as I think you are in a LHD market?

4) Continue with step 6 onwards
 
Last edited:
Saturday morning update:

Cams pinned

LHS front cover removed

LHS exhaust sprocket removed


Do I feed the extra length of chain now available over the top of the LHS inlet sprocket in a clockwise direction towards the centre of the engine to transfer it to the RHS cams?

Does anyone know the size of the special tool 119589000100 which just looks like a slightly thin spanner or what else is special about it?
 

Attachments

  • Special Tool 119589000100.png
    Special Tool 119589000100.png
    91.8 KB · Views: 8
Last edited:
Excellent progress! And yes, you feed the extra chain as needed to clear the other sprockets.

The special tool is just an odd-size spanner, use anything that will rotate the cams without damaging the lobes or lifters.

When re-assembling, triple-check that all 4 cams are pinned near 45°, remove pins and rotate the engine 2 full turns, check all 4 cams again and verify they are within a few degrees of 45. If a tooth is jumped somehow, the difference will be 20° crank angle difference per tooth.

:banana1:
 
Thanks @gsxr you seem to be my eyes for much of this!!

Ok, it seems like I am getting really close to the problem area now...

As I'm not following the instructions now and have all 4 cams pinned, can't I simply loosen the cam clamps on the RH exhaust cam and remove it?

Then I have access to the offending lifter for rework.

As I haven't touched or affected the timing other than lifting the chain off the sprockets presumably I can just put everything back and check the timing by doing the 2 rotations as suggested?

Apologies if I'm missing something silly or obvious which means I can't do this.
 
As I'm not following the instructions now and have all 4 cams pinned, can't I simply loosen the cam clamps on the RH exhaust cam and remove it?
Not yet! With the cam pinned and chain and/or sprocket removed, next you use the spanner to relieve tension against the pin, and remove the pin. The camshaft will now "jump" to the point of least resistance. Follow step #6 in the procedure, you want minimal pressure on all 8 lifters before loosening the caps/bearings as described in step #7-8.


As I haven't touched or affected the timing other than lifting the chain off the sprockets presumably I can just put everything back and check the timing by doing the 2 rotations as suggested?
Yes, that is correct. Don't move the crankshaft, it should still be at 45°. Reinstall the cams and turn so all 4 are pinned, pull chain slack from the left side of the engine (cyl #5, opposite the chain tensioner) over to the right side (cyl #1, closest to chain tensioner). See steps #9-#21.

Note that left/right is as viewed from the driver seat, and is the same for both left-drive (USA/German) and right-drive (UK/Japan).

:strawberry:
 
Not yet! With the cam pinned and chain and/or sprocket removed, next you use the spanner to relieve tension against the pin, and remove the pin. The camshaft will now "jump" to the point of least resistance. Follow step #6 in the procedure, you want minimal pressure on all 8 lifters before loosening the caps/bearings as described in step #7-8.


Yes, that is correct. Don't move the crankshaft, it should still be at 45°. Reinstall the cams and turn so all 4 are pinned, pull chain slack from the left side of the engine (cyl #5, opposite the chain tensioner) over to the right side (cyl #1, closest to chain tensioner). See steps #9-#21.

Note that left/right is as viewed from the driver seat, and is the same for both left-drive (USA/German) and right-drive (UK/Japan).

:strawberry:
Got it thanks, currently the valve springs will be wanting the cam to potentially jump to another position.

I'm sadly not going to have chance to get over the line on this one for a week or so but will update this thread when I do.

So pleased to be nearly there now...
 
It currently has 20/50.

I changed the viscosity to see what effect if any it would have on the noise. It didn’t make any difference.

Once I get the lifter out and refurbed and everything back in again, I will run it for a couple of hundred miles then change back to 10/40.
 
Wow....

Try 5W40 or 0W40 and see. And add the lifter lubricating fluid too.
Reason I say this is because I had exactly the same issue on my M113 last week, replaced oil to 0W40 and added the fluid, immediately the tapping was gone.
 
Wow....

Try 5W40 or 0W40 and see. And add the lifter lubricating fluid too.
Reason I say this is because I had exactly the same issue on my M113 last week, replaced oil to 0W40 and added the fluid, immediately the tapping was gone.
I’m 99% of the way there now so I might as well finish and refurbish the offending lifter.

From what I can establish it’s been like this for 50k miles with money spent trying to fix it.
 
Final update for now as I'm at the halfway stage :)

Camshaft removed and the offending lifter is currently dunked in cleaner.

I found the following post earlier this week from 2012 (link):

1709390922804.png

For anyone who is interested, the part number for the stretch T40 screws with washer/flange is: 120 990 02 04 they are available from MB and are £1.50 each.
Moderator edit: The T40 Torx bolts are only used on the M119.98x engines with coil-on-plug ignition. They will not fit the M119.96x/.97x engines with distributor caps. Original post has been edited as well.

Edit in response to the Mod edit above: FYI to all - the T40 Torx bolts are M7 which I had never heard of before this project. Also, my OP has always started the M119 variant I have which is why the thread was moved to this forum and is not in the M119 one.

I found the following an easy way to rotate the camshaft and avoid needing the special tool or the use of a spanner on flat sections of the camshaft:

1709391179324.png

Now it is time for a beer before finishing the cleaning and then getting ready to put everything back together again...

Assuming I don't need any further info or assistance to finish off (famous last words) I will update when it is ready and the key can be turned in the ignition again.

Thanks to all who have assisted so far - it really is much appreciated.
 
Last edited:
Just checking in again as I'm starting to put things back and I REALLY do not want to make any mistakes with the reassembly.

I have put the new lifter in plus replaced the chain tensioner and now want to double check everything is correct.

Is this an acceptable method to confirm the timing is correct? I have rotated the engine a couple or so times from the crankshaft and then added a sticker as shown in the images below at 12 o'clock on the cam sprockets. I took the photos before and then after 1 rotation of the cams. Is that enough? Does it look ok? Should I do more rotations?

1710683169749.png

1710683219719.png
 
Last edited:
The marks don't tell you where the cams are relative to the crankshaft. You need to pin the cams (1 at a time, if all 4 won't pin simultaneously) and verify they are all close to 45° per factory spec. If so, you are good to go. See post #30 above.

:mushroom:
 
The marks don't tell you where the cams are relative to the crankshaft. You need to pin the cams (1 at a time, if all 4 won't pin simultaneously) and verify they are all close to 45° per factory spec. If so, you are good to go. See post #30 above.

:mushroom:
Thanks, will do that now, presumably as I didn't disturb any of the cams (knowingly except the RH exhaust I should be ok, otherwise all 4 will be out compared to the crankshaft as per my images above?
 
Thanks, will do that now, presumably as I didn't disturb any of the cams (knowingly except the RH exhaust I should be ok, otherwise all 4 will be out compared to the crankshaft as per my images above?
I can't say for sure - the pins are the absolute reference between cam position and crank. Pretty likely you are fine, but definitely check while everything is still apart.

:wormhole:
 
Not good news I think, so glad I asked the question earlier...

It is really tricky to get to exactly 45° as there is a compression stroke somewhere and if I try to move the crankshaft a bit more it shoots over to past 40°

1710686966634.png

This is the right hand bank, the exhaust is fine but the inlet pin is not passing through the reference:
1710687078638.png

This is the left hand bank, on the inlet, the hole is exactly where the tip of the red arrow is and the exhaust is also outside the reference:
1710687196978.png

I think I can advance the camshaft a bit more and the 3 non-pinning cams will align with the holes and the RH exhaust will be off - possibly by a tooth?

I know I have a bit of chain stretch but I thought it was borderline in terms of changing or leaving.

I'll get my boy out to assist with the attempt to pin the 3 cams and get his hands a bit dirty :)
 
Last edited:
Ok, camshaft advanced so that the RH inlet can be pinned:

WTF!!!
1710688689472.png

RH bank, the inlet is pinned and exhaust is a little off:
1710688756217.png

LH bank, the inlet is pinned and exhaust is a little off:
1710688811491.png


Edit - to add the car ran flawlessly before I embarked on this adventure to cure the annoying tick...
 
Last edited:
Pin 1 cam at a time - this is tedious (have to rotate crank twice for each pinning) but will tell you the exact timing on each.

If each read between 40-45° at the crank, you're in the range of normal.

Also - the pins need to be more exact than the bolt you are using. Find the appropriate size drill bit. The amount of slop on the bolt or rod in the photo could result in several degrees of difference at the crankshaft. It is CRITICAL to use the proper diameter pin!!
 
Side note, if you haven't already; removing all the spark plugs will make rotating the crank an easier affair.
Thanks, I have done. Space is quite tight plus I could do with a slightly longer 1/2" drive ratchet and there are a couple of spots which are quite resistive at a crucial point.

I reckon there might just be enough of the knuckle left on my right index finger to finish the job...
 

Who has watched this thread (Total: 5) View details

Back
Top