• Hi Guest !

    Welcome to the 500Eboard forum.

    Since its founding in late 2008, 500Eboard has become the leading resource on the Internet for all things related to the Mercedes-Benz 500E and E500. In recent years, we have also expanded to include the 400E and E420 models, which are directly related to the 500E/E500.

    We invite you to browse and take advantage of the information and resources here on the site. If you find helpful information, please register for full membership, and you'll find even more resources available. Feel free to ask questions, and make liberal use of the "Search" function to find answers.

    We hope you will become an active contributor to the community!

    Sincerely,
    500Eboard Management

M119 Timing Chain Replacement Tools

wally

Member
Member
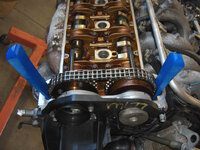
I have a loud knock/tick at the front of the engine that does not go away after startup and seems to get worse when hot.

I have determined is most likely the timing chain, guides or tensioner. The engine is close to 300k and apparently has had the chain stretch checked at 150k and 200k and not received a new chain or tensioner as yet. I have not pulled the pan yet so I hope the lower guides are OK (most posts I've seen say they are usually rare to fail).

I will definitely replace at least the chain and tensioner, as far as tools apparently I will need the following:
- 5mm stubby universal hex-bit for cam covers
- chain crimping tool
- 2 wedges (I will make these myself from some scrap wood)
- pin puller or another tool for guide removal
- locating/locking pins for the cams (I plan to use a 6mm dowel, drill bit, or bolt for this)

The wedges approach seems sketchy to me, the shop manual suggests using wedges and hand pressure to hold the chain while rolling the new one on.

Apparently there exist bolt-on guides that will keep the chain on the cams to simplify the procedure, but I have failed to located a source. If anyone has one of these I would love to borrow/purchase.

I have not worked with chains before. Do I need the crimping tool? If the master link is the type with the spring tab/insert (see link below) I can remove/install with a flat blade screwdriver or punch and a hammer?

http://www.gateopenersunlimited.com/product.asp?itemid=165&gclid=CKbDqPKCvcUCFUISHwod_2cAzQ

If I must use the chain link press, should I get an extra master link, in otherwords will I have to grind off the master link to remove it from the old chain on completion of the loop?
 
First - the ticking noise is PROBABLY a popped oiler tube, assuming you have plastic oil tubes. You might want to check into that before tearing into a chain job. :duck:

The chain+rail replacement is a pretty advanced DIY job. When rolling in the new chain I'd strongly recommend having at least one other person available to help. The chain will want to jump teeth periodically so you'll need to watch for this, adjust the sprockets as needed, and triple-check the cam timing before putting everything back together.

Yes, you will need a chain crimp tool if replacing the chain. You have to grind off a link on the old chain. Some other forums may have additional info on the chain replacement on other engines (M104, OM603, etc are similar). The master link is the crimp style and the new master will be the same. If you use the OE link, the center plate is pressed on and may require the factory tool to press on the center plate (and end plate) before crimping. I'm not 100% sure on this, maybe Klink or Jono can chime in.

To replace the upper/inside rails the intake sprockets have to come off, which means the cam adjusters have to be disassembled, which is a PITA without the factory tool. Make sure you are using the factory manuals (here) for all the work related to this job. Power steering pump/bracket has to come off, so that's a good time to re-seal the pump AND replace all 3 of the low-pressure hoses.

:welcome4:
 

Attachments

  • chain_rails1.jpg
    chain_rails1.jpg
    177.2 KB · Views: 112
  • chain_rails3.jpg
    chain_rails3.jpg
    214.7 KB · Views: 123
  • timing_chain1.jpg
    timing_chain1.jpg
    122.2 KB · Views: 120
  • timing_chain2.jpg
    timing_chain2.jpg
    111.8 KB · Views: 115
This job is super PITA if you are going to do it. I did it on my first car and won't do it on my second. I did mine when I was a trainee at MB of Buckhead and zee German engineers were doing a visit. They were laughing at me doing all that work. They thought it was pointless. One told me the cold start rattle I had was because they updated a valve in the oil filter housing (and it was), and that the double row chain doesn't stretch at all. Not even worth checking at <500,000km. Honestly I don't even remember the rails being in bad shape when I did it. I was just scared by all the old techs who had to rebuild 117/116's because the chain or rails broke.

You also don't need anything special to time the motor, leave the exhaust gear off, pin the cams, put the chain on, put the gear back on, done. That was like the easiest part of the whole process. Also, just buy the plastic shims. MB bearing clearances are seriously microns, don't use wood or junk like that. Its a Mercedes. Also, just take the cams out. That way you don't have to mess with the other gears or buy all those stretch bolts. They are easy to take out and put back in. The last thing is to have two torx bits to remove the cam gear and a rag to stuff below it to catch busted tool pieces if yours breaks. I have had good success with one bit designated OFF and one designated ON. Don't use the off to tighten and don't use the on to loosen or you will break them.

The best advice would be to check for stretch, which is easy (think backlash). See that it is totally fine. Then, do a victory burnout and go about your business.

Good luck!

-Mike
 
Mike brings up a good point. I've suspected that measuring chain stretch with broken rails provides inaccurate results. The first time I did the job, I had measured ~6° of stretch at the right exhaust cam, which was a bit more than I was comfortable with, so I did the chain too. Next motor, I only did the rails and discovered the chain stretch changed from a bit under 5° with broken rails, to a bit under 2° at the right exhaust cam with new rails. Lightbulb: Busted rails = incorrect cam timing. Now, if I had new/good rails in a motor and measured 5-6° (or more) of stretch, then yeah I'd roll in a new chain.

You could replace the rails and measure the stretch afterwards, then decide if you want to replace the chain. If your engine is an early 1992 you might also need the updated oil drain valve and/or the later/stiffer cam adjuster springs. Oh, btw, make sure to use the correct anaerobic sealant on the front covers and cam solenoids. One tube is enough to do a few motors. And only buy OE/Mercedes valve cover gasket kits, not the aftermarket stuff. And you'll probably need all new PCV tubes, unless you already did that, otherwise they'll snap like twigs when you try to remove them. And... and... well, you get the idea.

:spend:
 
Thanks very much for the advice.

I have already replaced the tubes and no effect. See attachment for sound recording I made a few months ago. It is now much louder. My local indy mechanic who specializes in MB and Volvo said he thinks it is the chain, guide or rails, but won't do the job mainly because he hasn't done very many and every time he does it is a fiasco with the cost.

Quicksilver, I like the idea of not rolling the chain in but that implies pulling the front cover which seems like a order of magnitude more difficult as the balancer, water pump, PS pump, etc etc has to come off. Then there is the gasket which is not rubber and requires a sealant, both for the oil seal and water pump.

My plan now is to pull the pan and make damn sure the guides are ok before I measure stretch. If not, I have to replace those before I even consider the chain, it sounds like.

I will also turn the chain one full cycle to be sure there is nothing wrong with it, it seems possible to me one link could break off and make a racket. Heck, maybe I will hear the click/tap while I turn it slowly which will indicate what the exact issue is.

Then, if the chain stretch is OK, I will consider just the tensioner and forget the rest assuming the noise goes away. Is this wise or should I also replace the inner and outer upper guides?
 

Attachments

I think Mike's suggestion was to not replace the chain - only the guides/rails, and leave the old chain in there. If it's not stretched, it should be fine for another few hundred thou... a new tensioner wouldn't hurt though!

:v8:
 
No no, you still roll the chain, but you don't have to have the cams in to do it. Would you replace the chain without doing the guides? Maybe I didn't understand that you were just going to put a chain in it. You still need to get it off the cams so you can pull it to the side and grind the link off away from the motor. Then you just link it to the old one and rotate the balancer a million times till its all the way through. The chain is about 7 feet long.....Put the master link in, put the cams in, time it, put the last exhaust cam gear in and bingo.

Most likely it is a failed lifter. I listened to the clip and its not the chain. If your chain was that loose, you would have broken something. That is lifter tick. I believe a couple of board members have had lifters fail, its uncommon but not impossible. Get your listening screw driver out and try to find where the lifter has failed. I would run the engine with the valve cover off before doing the chain. The fact that it gets worse when its hot is a huge clue, viscosity goes down, less pressure and it can't pump up. Pressures are really really high at cold start. Does it increase with engine speed? At 1000RPM is it twice as fast?

It took me 4 days to do the chain and all the guides and probably $1200 in parts. This is not a throw parts at it job. If you do it wrong the best case you are taking the front of the motor apart again, worse case you are pulling the heads off and replacing valves. You have to take the SLS/PS pump off to get to the rail pin on the left side. Which means you need x-ray vision and a long extension. Which also means you are going to need all of the hoses because why would you take all that apart an not replace the hoses? You have to take the radiator out, and nearly all the upper accessory drive. So you are going to replace the radiator hoses, maybe the water pump, T-stat, because who would take the front of the motor apart and not replace that stuff? If you get that far, you are replacing all the guides you can without taking the front cover off, which I think is 3.

If I remember right, you can measure stretch without taking much apart. I think we used a dial indicator, a 27mm socket, and 2 pairs of eyeballs.
 
Last edited:
I think Mike's suggestion was to not replace the chain - only the guides/rails, and leave the old chain in there. If it's not stretched, it should be fine for another few hundred thou... a new tensioner wouldn't hurt though!

:v8:

Right, but I still don't think it needs to be done :)

I prefer to rebuild transmissions if I am doing work just to do work. There are a lot of parts and it takes more time. In the chain and rail job there aren't as many parts but its like every single one of them is a pain in the ass.
 
Last edited:
I just listened to the audio clip... that is definitely NOT anything related to the timing chain. I think Mike is correct about possibly being a failed lifter... or restricted oil supply to the lifter. At the current mileage, replacing the chain guides/rails is still highly recommended, but it won't fix the ticking. I'd still leave the old chain in there if not stretched (as measured with unbroken rails).

:detective:

New recording made this morning, it is much louder now. This is a few minutes after start so engine is cold. It seems to go away as revs go up - indicating possibly a bad tensioner which is extending when the oil pressure comes up? Then when revs come down it makes a racket as the oil pressure goes low.

I tried using stethoscope today but it is so goddamn loud it is difficult to pinpoint, it was loudest at the front of the cam cover on the left side. It is definitely the front left of the engine. I will be pulling the pan today or tomorrow to look for debris.
 

Attachments

Again, the tensioner would not cause this kind of rhythmic tapping. My money is still on a lifter. Might as well pull the pan to check for debris, plan on replacing the oil sump rubber pickup (old one will be fossilized and it's supposed to be soft rubber), and change the oil level sender O-rings while the pan is off.

If you find rail debris in the pan, you get to pull the valve covers and visually inspect the rails up top. If there is zero debris in the pan, that means a previous owner had the pan off at some time, and/or replaced the rails, but you'll still need to pull the valve covers to inspect up top...

:watchdrama:
 
I have the pan pulled. The plastic pickup screen cover was broken, however there were also a few very small brown plastic pieces, about 1-2mm in size. Another piece was clearly one of the tabs off the top guide that I broken when replacing the camshaft oil tubes. There was very little grit/metal bits, maybe 20-30 grains of metal in there.

Looking up into the engine, I can see the lower part of the guides are intact on both sides. The oil pump chain seems loose on the one side (without the tensier) and the chain itself seems to have some free play in the links (as opposed to the timing chain which is very tight).

I also removed the left cam cover (easier than the right) to inspect the entire length of the chain.

I did not see any chain damage, it also seems very tight. I did not see any broken guides looking down around the cams into the timing cover. The links of the chain are worn, most have a polished crescent on them but are otherwise smooth. At just past 45* on the balancer I was able to insert a 15/64" drill bit into the exhaust and intake timing holes.

I used a feeler gauge to check for clearance on the cam/lifter when off the lobe. I could not get the gauge in on any of the lifters, which I assume means the lifters were all full of oil?

I did see what appears to be light scratches on the #5 cylinder liner (the left front one), and what could be some metal particles stuck to the wall below. On this cylinder, the plug was also black, the others were mostly gray/white. For comparison, also including the #1 picture. My next step might be a compression test.

cylinder-liner-5.jpgcylinder-liner-1.jpg

The frequency of the tick is about 320 ticks/minute which is approximately 1/2 of the engine rpm at idle (Roughly 640 RPM). This would correspond to something camshaft related (lifter, cam adjuster, valve)? If it was the piston pin or bearing would it cycling at the same rate?
 
Sounds like the rails have been replaced already... highly unlikely they would all be intact at 300kmi. Make sure you look down the center, by the intake cam sprocket, this is where they usually break. You can see the top, but not the bottom of the rail. If you can pin the cams within a couple degrees of 45° it's pretty likely that both the chain is ok, and the rails are mostly intact. Which is all good news. Also check the sprocket teeth for unusual wear (not common).

There will not be any clearance between the cam & lifter, this is normal. A rough test for lifters is to push on them by hand with the cams removed, or at least on the base circle. They should be very stiff / difficult to press by hand; if they are squishy, they're bad. I'm not sure if you can get an accurate test with the cams in place - never had to deal with a failed lifter.

The scratches on cyl #5 don't look "light" to me, like look more like "holy crap". The cylinders have no liners, it's a bare Alusil block, and you should normally see perfect factory crosshatch - sample pic below. Vertical scratches = bad juju. Is the oil pressure normal? What oil has been used?

:blink:
 

Attachments

  • post-21-1190844470.jpg
    post-21-1190844470.jpg
    98.7 KB · Views: 104
Dave is right, really there shouldn't really be any visible wear on the cylinder walls. I might get an oil sample tested to see whats in it and cut the filter open....Could the ticking be piston slap? That would 1/2 time right? Pull that plug and see if it has aluminum on it.

-Mike
 
I pushed down on the lifters and they were all hard to push, they did not seem to squish but rather suddenly snapped back when I overcame the valve spring.

I will get the pan and valve cover back on and remove the #5 injector and see if the knock goes away. If it does, could be curtains for this car.
 
The plug did not have metal on it, but it was black, a little oily, whereas the other plugs were gray/white. Yes, the ticking could be piston slap as the power stroke is every 2 revolutions as well. The next test will be with injector unplugged, then if still ticking, sparkplug out.
 
On closer inspection the #1 cylinder also has the vertical scratches. On the #5 I was able to reach up and feel inside the liner (not the part you can see in the pics, the near side) and it felt smooth.

I tried to wiggle the bearings at the crank and the did move a bit (both #1 and #5). The free play is around .012 " using feeler gauge. This may be out of spec, this document:

http://www.w124-zone.com/downloads/MB CD/W124/w124CD1/Program/Engine/119/03-3130.pdf

Says the maximum "Piston Play in Conrod Bush" on is .013 or 0.18 depending on engine, not sure if those are thousands of an inch or cm. If cm this is potentially an issue.
 
FSM specs are in mm, you have a 119.975 engine so the 0.007-0.018 mm spec applies (0.0003 - 0.0007 inch). However, I don't think that is what you were measuring...? I think you need to find a different section in the FSM with the conrod assembly/bearing tolerances.

BTW - forgot to comment previously, but one black spark plug is not a good sign. Compression test would be helpful. I don't like that the fouled plug is also the same cylinder with abnormal cylinder wall wear...

:scratchchin:
 
New recording made this morning, it is much louder now. This is a few minutes after start so engine is cold. It seems to go away as revs go up - indicating possibly a bad tensioner which is extending when the oil pressure comes up? Then when revs come down it makes a racket as the oil pressure goes low.
I just listened to the second recording. The noise seems WAY too loud for a lifter. I'm starting to think you have a bottom end problem with #5...

:runexe:
 
I got it back together, started it up with #5 plug off and the tick got a lot quieter. Then with the spark plug out, it went away completely (listening with a stethoscope). Looks like #5 piston issue now. I did compression and got 140 psi on #5, then my compression gauge presumably broke and it said something like 40-60.

It was also smoking quite badly once it got hot, not sure if this was because I am running with the front end jacked up or perhaps the valve is bad. There was no oil on the #5 plug when I removed it after running for about 10 minutes this way.
 
Bad news: Dead engine.
Good news: You didn't spend 20-30 hours screwing with timing chain and rails on a dead engine.

I'd look for a replacement motor, M119's are plentiful and relatively cheap because they usually last almost forever. What year/model car do you have? Pretty likely you can find a motor with 100-150kmi for somewhere around $500-$1000 depending on if it's a 4.2L or 5.0L.

:roadrunner:
 
Last edited:
Yep, no point fixing it. It's a '94 E420 with the 4.2L. It is just beginning to rust out so I don't know if it is worth the engine. I put a rebuilt transmission it it 2 years ago and would like to recoup the investment there if its practical.
 
That's a tough call. If the body and chassis are tired... may not be worth fixing, especially if the rust is more than superficial. I'd shop for a replacement 94-95 E420 and save the rebuild tranny, which you'll need eventually. When our 95 E420 was wrecked a couple years ago we replaced it with a lower-miles 94 E420. They've come down in price substantially, you can probably find a nice one for under $4k. If you live in the rust belt, I'd shop for western/southern cars and have one transported to you... and find one with the cold weather package (ASR & heated seats) if you are in snow country.

:seesaw:
 
The ticking is a lot quieter so I would like to try running for a while with #5 injector unplugged. Problem is the engine is running really rough, seems like 4 cylinders. The strange part is, when I first removed the #5 injector, the idle was not rough at all. Then after a few minutes, it got super rough.

Now, when I started it cold this morning, it was rough again. I am wondering if the ECU has gone into limp mode with the injector off, or maybe the O2 sensor basically can't work because #5 is dumping lots of extra 02 into the exhaust.
 
So I did the "screwdriver" test which is where you rotate engine just past TDC and push on piston with a screwdriver. There was a "pop" as it jumped down, indicating a cracked piston perhaps resulting in loose wrist pin (seems tight on the crankshaft).

The compression on #5 was 130/195 (dry/wet) as compared with the one next to it, 175/210 which indicates there has been some damage to the cylinder wall but not catastrophic as yet.
 
There was a thread related to timing chain replacement tools posted back on 10-10.2011 by gsxr with information about a timing chain tool.....I quote............
--------------------------------------------------

."FYI. For rolling in a new timing chain, I used the factory method (shown here) using the blue wedges... but this method is awful. I'd highly recommend buying this aftermarket tool (link below), as it should eliminate the chain skipping teeth. Unfortunately I did not know about this tool until*after*I did my timing chain. SG Motorsports is operated by an MB dealer tech in Seattle, btw. Real nice guy. He also sells the chain rail pin puller tool:

http://cgi.ebay.com/ebaymotors/350497872119 "
---------------------------------------------------------------------

I checked with SG Motorsports about that tool and received a reply today............................
---------------------------------------------------

"Hello, Yes those have been unavailable for several years. I had those custom made in 2 separate batches years ago. The problem is in order to make the price reasonable, I need to produce at least 25 of them and the interest just isn't there anymore. It's a shame, because it's a hell of a tool, the best ever available for the job. I wouldn't give up mine for anything because it makes the job so much easier. Sorry for the bad news....

Regards,

- sg-motorsports"
------------------------------------------------------------------

Does anyone know of any tool seller who sells such a tool or similar tool to the now out of production tool sold in the past by SG Motorsports? Thanks for any help

John Gourley
 
All I have are some photos of the tool, in case you want to try to make something similar...

:runexe:
 

Attachments

  • M119_chain_tool3.jpg
    M119_chain_tool3.jpg
    83.5 KB · Views: 55
  • M119_chain_tool4.jpg
    M119_chain_tool4.jpg
    71.5 KB · Views: 48
I would be willing to rent you mine, but would want an astronomical deposit to make sure I got it back in one piece.
 
Thanks for the pictures of the tool. I now have an idea what is needed. Also thanks for the offer to rent me your tool. I am in the early stages so not sure how deep I will have to go. It all started with noticing the lower oil pan gasket was seeping so decided to replace the pan gasket. Upon dropping the pan I found pieces of one of the inner upper guide/rails (1190521116) in the oil pan. I have not torn into anything to see what all it will need, my primary job is caretaker for invalid wife so my car projects take a long time! Thanks again
 
Back
Top