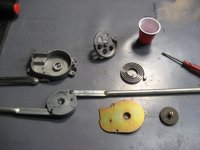
The roller blind in these cars is a very impressive assembly.
Since my blind shows evidence of possible previous work, can anyone look at my pictures and verify all parts are present? The round area of the casting that supports the underside of the metal gear, as a female bushing, seems unusual as the hole is the same diameter as the gears' shoulder which only sits about 1mm into the hole. The remainder of the gears' shaft is smaller as if there where a missing bushing. There is also a small hole in the gears' shaft that aligns with a hole through the the outside of the casting. This is blocked when the casting is mounted on the blind.
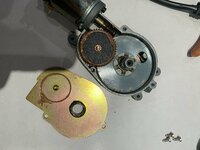
There is nothing present to keep the large metal gear from raising 1 or more mm up and becoming unseated as it has 2 or more mm vertical play with the casting cover installed. I've remedied this with copper washers of the correct thickness to remove any play between upper gear shoulder and cover. If you look closely you may see where the hex end of the shaft and the rotating arm plate are buggered. The screw that holds these two pieces together was not tight. This was the only problem with my blinds' operation.
Also, the spring that resides under the gear provides tension to RAISE, not lower, the blind. The retraction of the blind is assisted by a spring in the roller itself and the weight and mechanics of the levers. I do not yet know why the blind makes the clicking noise at either end of it's run up or down. My own blind was doing this even though the blind was not even moving. There does not appear to be any switch that tells the motor to stop when either up or down. I'll find out when I reassemble and test.
BTW... The long thin carpeted blind cover slides easily out of the aluminum fixture. This means when hunting for a replacement blind one need not be concerned about interior color. There is also a small piece of fabric on the reverse side to prevent rubbing which is glued on to the fixture. Not easily seen however this could be simply dyed.
drew