• Hi Guest !

    Welcome to the 500Eboard forum.

    Since its founding in late 2008, 500Eboard has become the leading resource on the Internet for all things related to the Mercedes-Benz 500E and E500. In recent years, we have also expanded to include the 400E and E420 models, which are directly related to the 500E/E500.

    We invite you to browse and take advantage of the information and resources here on the site. If you find helpful information, please register for full membership, and you'll find even more resources available. Feel free to ask questions, and make liberal use of the "Search" function to find answers.

    We hope you will become an active contributor to the community!

    Sincerely,
    500Eboard Management

The $500 500SL Offroadster

Beater400E

E500E Guru
Member
The $500 S500 limousine project got interrupted when I stumbled across another cheap M119-powered car I couldn't pass on. I found this one on a small town Craigslist auto parts section. It's a 93 500SL.

1000006279.jpg

The seller was asking $1099 and noted that the car had a fuel leak, rough paint, and had not moved in years. I texted and got more details. The car had been parked around 2012 when it developed a significant fuel leak and the prior owner never got around to fixing it. In 2018 the car was donated to a church in Twin Falls, Idaho. The church had planned to eventually repair it in hopes of getting more money out of it, but after sitting on it for several years, they decided the cost to repair it would likely be more than the value of the car, so they finally decided to sell it.

Twin Falls is about 2 hours from my home, and I knew that if I made the drive to pick it up, I'd bring it home, so I was only willing to do it if I knew that no matter what I found, the car would be worth it. I offered $500, and surprisingly they agreed so long as I could come right away and pay cash.

Two and a half hours later I arrived and made the deal. I also discovered that the car had a nice set of Evo wheels. I towed the car back and got to work.

The car was in an accident at some point and was poorly repaired and very badly repainted, and the respray is failing. The tires are 20 years old, cracked and flat spotted. The interior is a bit tired. Mice had taken up residence at some point, and had made nests in a few places. Mouse droppings were everywhere.

That first evening I swapped in a good battery and tried to start it, but found there was no fuel pressure. I added fuel to the tank, but still no fuel pressure. I ordered a pair of cheap Chinese fuel pumps and a filter next day from Amazon.

The next day I swapped the pumps and the car fired up and ran surprisingly well. The convertible top has major hydraulic issues. The motor mounts are tired. The wiring harnesses are all original and are beginning to deteriorate.

The car is definitely not worth restoring, but it'll be a great parts car, and something I can play around with for a while before I do part it out. I had been working on welding two W140s together into the worst limo ever to run the Gambler 500. Details on that build here:


With the SL now running, I had to decide what to do with it. At this point I was getting burned out on the limo project, which was just a farce anyway, so I decided to just part out and scrap the limo, and build up the SL into a Gambler 500 car instead.

1000006343.jpg

With the limo gone, I got the SL on the lift and started hacking.

1000006348.jpg

1000006349.jpg

The plan here is to modify the SL with some much larger tires and then hack the body for clearance. The tires are some used 265/70R16 all terrain tires mounted on the W140 wheels from the limo project. To push the tires out away from the suspension and chassis, I acquired a set of 1.25 inch wheel spacers. I had to swap out all the hardware to make it work.

1000006352.jpg

These spacers have two inner bolt patterns, 5x110 and 5x112, and one outer set of studs at 5x112. I got a set of taper seat 24mm m12x1.5 wheel bolts, and a set of M14x1.5 wheel studs for a Ford F350 Super Duty truck, and a set of Porsche ball seat lug nuts.

This set up actually worked great to get the wheels bolted up. From there I had to do a ton of cutting, hammering, welding, and more cutting for clearance.

1000006350.jpg

1000006351.jpg

I've taken the cutting about as far as I can. The car can be driven as it is, but there's significant rubbing on bumps. I think my next step will be a small suspension lift.
 
It is astonishing that you guys in the US can buy cars for this kind of money.

$500 would just about get you a rust free wing in the UK.
$500 was an abnormally good deal - very unusual, not common. And, you have to live reasonably close to the deal. Otherwise it may cost $1000-$1500 to have the deal transported across the country (plus a surcharge if the car is not running and has to be winched onto the transport truck).

Beater definitely scored with this find!

:gor-gor:
 
It is astonishing that you guys in the US can buy cars for this kind of money.

$500 would just about get you a rust free wing in the UK.

Based on your write-up, the car didn't actually have a fuel leak it seems?
I didn't say how I dealt with that, did I?

It did have a fuel leak. From what I can tell, the fuel strainer in the tank became plugged and restricted. When that happened, the fuel pumps had to work hard to try to pull fuel from the tank. The supply hose from the tank to the pumps was probably already dry rotted and weak. The suction and restriction on the fuel supply collapsed the hose in on itself, at which point it split and began leaking.

1000006284.jpg1000006283.jpg1000006282.jpg

This was a remarkably low price. In truth, the seller didn't know what they had, and didn't know how to sell it. Listing it only in the auto parts section of a small town Craigslist site means that very few people will ever see the ad. It wasn't listed anywhere else. The fact that I have a nice trailer and truck I can tow with is also key. I'd estimate the actual value of the car around maybe $2,000.

I'm not surprised that I was able to get it for $500. I have a history of buying old Mercedes for the same price as the model number. Last year I bought a 300E for $300, then a 400E for $400 and an S500 for $500. This year I bought a 500SEL for $500 and now a 500SL for $500.

Keep in mind, these were all bottom-of-the-barrel parts cars. Only the 400E was worth saving and I have hundreds of hours and thousands of dollars into it at this point.
 
$500 was an abnormally good deal - very unusual, not common. And, you have to live reasonably close to the deal. Otherwise it may cost $1000-$1500 to have the deal transported across the country (plus a surcharge if the car is not running and has to be winched onto the transport truck).

Beater definitely scored with this find!
Yes of course. I have been looking at SLs over here for a good few years now and £2000ish is about the lowest I've seen.

The US seems to have a much higher incidence of multiple car ownership than the UK probably due to space and perhaps prices so there are more opportunities for "forgotten" cars to surface for sale due to changes in circumstances.
 
The US seems to have a much higher incidence of multiple car ownership than the UK probably due to space and prices so there are more opportunities for "forgotten" cars to surface for sale due to changes in circumstances.
Yes, I think you're right. Lots of people have the space to just store a car for years. You don't have to pay for registration or taxes or inspections or insurance if the car is not going to be used on the road, so for many people there's no reason not to just let a car sit for years, expecting to get around to dealing with it in the future.

This is exactly how all the "barn find" classic cars come to be.
Not just space, the climate too - don't forget it rains everyday in England - it actually does except the 2 days we call Summer which haven't been confirmed yet for this year. It's worst in Scotland where it rains twice a day all year :)
 
I'm not surprised that I was able to get it for $500. I have a history of buying old Mercedes for the same price as the model number. Last year I bought a 300E for $300, then a 400E for $400 and an S500 for $500. This year I bought a 500SEL for $500 and now a 500SL for $500.
Go find an X600X for $600...
 
Yes of course. I have been looking at SLs over here for a good few years now and £2000ish is about the lowest I've seen.

The US seems to have a much higher incidence of multiple car ownership than the UK probably due to space and perhaps prices so there are more opportunities for "forgotten" cars to surface for sale due to changes in circumstances.
Example which finished on eBay here earlier today:


Note the rust and note the location...
 
Example which finished on eBay earlier today:

Yeah, £2500 is probably about what that car would be worth around here too if it was sold on a major platform like eBay. If it had good paint it would be double that. The bad paint really is a deal breaker on these old cars.

The paint on these cars really is the key to whether they're worth saving or not. An E500E is likely worth painting at this point, but a more common car just doesn't make sense to repaint unless it's otherwise immaculate. A good, detailed paint job from a reputable shop would probably cost around $10,000. It could be done for less of course, but in my opinion nothing looks worse than a poor respray. I'd rather have the paint falling off of it.

A bad respray looks to me like "I aspire to have a nice looking car, but I'm too cheap to do it properly so I'll go with 'somewhat better' and hope people are fooled."

I'd way rather have a car with original paint that's a little tired. Or even something in rough shape. I have a 66 Buick Wildcat that is not all original paint, but might as well be. It was repainted in probably the 70s or 80s. The car has a bit of a "patina" look at this point, and I like it. I have no plans to paint it.

My 400E was the perfect candidate to bring back to life. The paint was actually original and pretty decent. Not flawless, but good enough. Everything else can be replaced a piece at a time, but you can't bolt on a paint job from another car, so that's the killer.

Link to that build here:

 
Working on lifting the suspension now. This is not a high dollar build, so we're going super basic. I'm making spacers that will sit between the upper spring bucket and the isolator.

A 4x4 shop I buy parts from sells 3-3/4 round, 3/8 inch thick plate steel drops for dirt cheap and over the years I've found them super handy for little fabrication projects. I've tack welded a pair of them together for each corner. Rough guess is that I'll get a 2:1 lift ratio based on the spring location relative to the length of the control arms, so I'm expecting around an inch and a half total lift.

1000006357.jpg


The fronts went in pretty easily. The rears are a bit more work since there is a hump in the middle of the spring bucket. I'll have to bore a hole in the middle of the spacers to make them work there.

1000006359.jpg


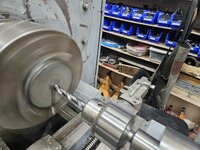
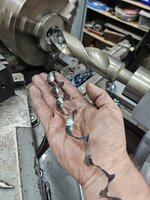
Mighty chips from my most girthy drill. It's not often I get to use a 2 inch drill bit.
1000006362.jpg

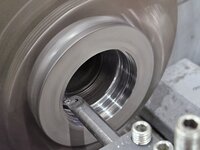
Boring to final dimension.
1000006366.jpg

Ready to install.
1000006367.jpg

I'll adjust the alignment the best I can to compensate for the lift. It won't be perfect, but it'll be better. Still working on getting the spacers installed but hoping to have it back on the ground in the next couple hours and ready for a test.
 
The spring spacers worked. It came up about an inch and a half. That helped a ton with the rubbing. I'll have to cut the front fenders even more. They're cutting into the tires when I hit a bump in a turn.

It was a huge pain to install the rear spacers. Took me quite a while to figure out exactly how to get the springs compressed and get the control arms bolted back up.

The alignment is horrendous now. The front end is toed out very noticeably which makes handling scary. I'll work on that this week. I'm sure I can make it better.

1000006370.jpg

1000006368.jpg

1000006368.jpg
 
More progress has been made this week. I got the alignment sorted, at least for now. I had a bulb out warning I wanted to sort out. The left tail light was not working. I swapped in a different bulb and it still didn't work. I checked voltage and was getting between about 4 and 8 volts, with the voltage wandering around. Fuses were good. I ended up yanking out the bulb out relay and swapping in another one from a W124. Problem solved. I didn't know the relay could itself be the cause of a light being out.

Anyway, with that out of the way, I got the car out and drove it a fair bit. It cruises just fine around town and on the interstate. I took it offroad and got some interesting looks from Jeepers. I have a ton of offroad experience, so can say that it's way more capable than it looks, with nearly 10 inches of ground clearance and a flat belly, but very limited articulation and wheel travel, so certainly not on the level of a real 4x4. You definitely don't want to go fast off road.

The most annoying thing is the ASR. This thing wants to hoon in the dirt, but the fun police won't let it happen. So I'll be installing a defeat switch. The car is surprisingly sorted now.

The biggest issue is the non-functional rollbar and soft top. Also, the top hydraulics are leaking again. I had replaced the cylinder seals in the front latch cylinders, and it no longer dumps a torrent of oil when you try to operate the top. Instead, the distribution block above the mirror leaks, releasing a very slow ooze of oil that will drip one drop every few minutes o to the center console.

I ordered a set of line seals from RSC Autotechnik in Germany. My order arrived today and they sent the wrong seals. Just a fulfillment error I guess. I'll talk to them next week and hopefully have the correct set sent out.

Even with that leak, I'd expect to see some life from the roll bar and top. Actually, the roll bar worked when I first got the car, so I'm guessing it's something I did.

My best guess at this point is that it has to do with the air bags. I disconnected the passenger air bag since I planned to take my 9 year old daughter in the car. Realistically I don't think there's much to worry about there. I'll probably just hook it all back up and see if that helps.

I'd like to get the stereo working. It has the original Becker 1432, and I'm getting an E2 error. Not sure what to do with that.

I'm going to give it a basic tune up and service, including a trans filter. The transmission fluid is pretty brown.

The plan after that is to decorate it like a rally car. Stripes and lights and numbers and decals. Make it look like a former rally car. Kinda. If it was built in a trailer park. I'm not trying to fool anyone. I'm just trying to make people wonder what exactly they're looking at when they see it. Maybe make them laugh. That's what it's all about. Fun for me, and interesting or humorous for anyone I interact with.
 
I contacted RSC Autotechnik about the fulfillment mistake on my hydraulic top seals. They were very apologetic and quickly got the correct seal kit shipped and told me to keep the set they'd sent in error. You learn a lot about a company when they make a mistake. This one impressed me. Mistakes happen, but they did everything they could to remedy the mistake immediately.

I got the Evo wheels dismounted and cleaned up, ready for sale. Still trying to figure out what they're worth. I'll probably just post them for sale here on the forum for now and see if there's any action.

Obviously I got the W140 wheels for the SL painted yesterday. I also went through and replaced the spark plugs, caps, rotors, and insulators. Cam seals are good, and the cam solenoids aren't too bad. There's a little seeping, but it's not terrible. I left them alone for now.

I reconnected the air bag, but there's still no action with the roll bar, and the top doesn't want to work. When I try to pull blink codes from the roll bar module, the light just illuminates continuously. Like I don't even have to push the button. Any time the lead is plugged into that pin, the light is on. I believe that means the module is bad or there is a wiring short. When I unplug the roll bar module, the test light goes out. I believe that confirms a bad module.

It's strange because the roll bar worked with the switch when I first beought the car home. I'm guessing that I might have killed it in the process of trying to jump start and/or troubleshoot a battery drain. Also, I think the roll bar should work with the switch even if the module is bad. So I don't know. I tracked down a used module for cheap and ordered it. We'll try that.

I suspect the top has some bad limit switches. Once the roll bar functions and I can read and clear codes for that, I'll try to get the top sorted.

I'm hoping to get the ASR defeat switch and relays installed today, along with switches and relays for some rally lights I have on the way. I also plan to swap out the upper engine harness, and I may have a look at the lower harness.

I have motor mounts on the way. When I have things apart to deal with motor mounts it might be a good time to rebuild the lower harness.

I realize I'm throwing a lot of time and a bit of money at a car that might not deserve it, but at the end of the day it'll still be a great source of parts, and I'll have fun with it until that day comes. Of course, if past history is anything to go by, the finished product may actually be worth a fair bit more than I have into it. This car also gives me a test mule to try out some customizations if I want.

I'm putting together a 5 liter engine for my 400E, and I'd planned to try installing intake cams in place of the exhaust cams, and using custom-machined exhaust cam sprockets to time them correctly. I'm pretty confident it would work as expected, but I'm considering trying it first with this car to see how it goes.

I have a Racebox telemetry device I could use to gather acceleration data ahead of time, then I could do the swap and retest. Not quite an A/B dyno test, but I assume dyno testing for that would cost way more than I'd want to spend. I've never run a car on a dyno, but it can't be cheap.

I've also been thinking of trying custom motor mounts. The OE style do a good job at damping vibrations, but they obviously aren't the most robust. I wonder just how harsh it would be with a more traditional rubber bushing type mount. I might try it.
 
I'm guessing that I might have killed it in the process of trying to jump start and/or troubleshoot a battery drain. Also, I think the roll bar should work with the switch even if the module is bad.
Correct, the roof modules are very fragile and can get fried through jump starting. Always best to remove at least the -ve battery connection and then charge the battery.

I'm not an expert (fortunately) but I believe the roll bar is in someway connected to the roof module.
 
I have a Racebox telemetry device I could use to gather acceleration data ahead of time, then I could do the swap and retest. Not quite an A/B dyno test, but I assume dyno testing for that would cost way more than I'd want to spend. I've never run a car on a dyno, but it can't be cheap.
Contact Motor Mayhem in Meridian and ask what they are currently charging for a few pulls on their in-ground Dynojet. Pre-COVID it was right around $100 or so. They let you copy the .drf files to a flash drive, which allows you to play with the raw data on your own computer with the Dynojet software. This is waaaay more useful than getting handed a printout that might or might not have a useful scale / smoothing / correction factor / etc. Most places just hand you a single printout and point to the peak numbers, that's not what I want.

Look up the HOW-TO forum thread which has excruciating detail on obtaining useful data from your dyno session. I have good data from several different stock 5.0L engines for comparison.


I've also been thinking of trying custom motor mounts. The OE style do a good job at damping vibrations, but they obviously aren't the most robust. I wonder just how harsh it would be with a more traditional rubber bushing type mount. I might try it.
The OE mounts are really quite robust (when new), they're just bloody expensive now that OEM is NLA (it's OE/dealer only these days, until stock runs out). For "performance" use, I believe @jhodg5ck uses cheap Chinese mounts, drills holes in them to drain the fluid, then injects liquid polyurethane instead. That's likely the hot ticket for a budget build. For hardcore stuff you could always ask Elimivibe to make a custom set. Their catalog is wrong, they do not have W124/M119 mounts, those are W210 which are totally different.

:spend:
 
Contact Motor Mayhem in Meridian and ask what they are currently charging for a few pulls on their in-ground Dynojet. Pre-COVID it was right around $100 or so.
If it's only $100 I'll definitely consider it. Granted, I don't care all that much about the actual numbers. I just want a way to quantify before/after performance, 1/4 mile times with the Racebox can accommodate reasonably well.

The OE mounts are really quite robust (when new), they're just bloody expensive now that OEM is NLA (it's OE/dealer only these days, until stock runs out). For "performance" use, I believe @jhodg5ck uses cheap Chinese mounts, drills holes in them to drain the fluid, then injects liquid polyurethane instead. That's likely the hot ticket for a budget build. For hardcore stuff you could always ask Elimivibe to make a custom set. Their catalog is wrong, they do not have W124/M119 mounts, those are W210 which are totally different.
I was thinking of just fabricating my own, although injecting polyurethane into cheap mounts sounds like a really good option. Any idea what kind of poly he uses? I have a cheap Chinese set if mounts on the way for the SL right now.
 
If it's only $100 I'll definitely consider it. Granted, I don't care all that much about the actual numbers. I just want a way to quantify before/after performance, 1/4 mile times with the Racebox can accommodate reasonably well.
The big deal with the dyno data is you can see the shape of the curves, and the associated RPM's. Acceleration data tells you only part of the story. Wouldn't hurt to see how it runs, drives, and accelerates... then if the ButtDyno® says this was a win, visit the dyno for additional data.


I was thinking of just fabricating my own, although injecting polyurethane into cheap mounts sounds like a really good option. Any idea what kind of poly he uses? I have a cheap Chinese set if mounts on the way for the SL right now.
Great question - I'm not sure. He may have mentioned more details in an old post somewhere?

:apl:
 
Working on some boring maintenance items now. I hadn't ever actually looked at the cam oilers. Being a 93, I was expecting plastic but nope. Looks like I have metal oil tubes in this one. Score!
 
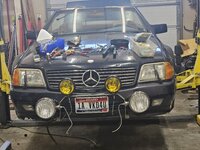
Put together a light bar out of some scrap I had laying around, and mounted a pair of big ridiculous driving lights. I have a pair of fog lights that will be here tomorrow for it too.

Feel free to cringe at the sight of tools and junk piled on the hood.

1000006454.jpg
 
The Becker 1432 stereo in this car does not work. I get an E2 error when I try to power it on. Supposedly that is a tuner error. I have a couple other Becker tuners, but they both have an extra output on the back that the original lacks. I still get the E2 error when I try those. I also tried a different cable, but still nothing.

I'm not going to send this in to Becker for repair. $500 car after all. The question is, is there anything else simple I should try, or should I just install a cheap aftermarket stereo instead? If I do install an aftermarket head unit, will the stock speakers work, or will there be trouble?
 
Ok, I'm dumb.

It was a week or so ago when I actually messed with the stereo and I apparently misremembered things.

The original R129 tuner had the extra output on the back. I tried plugging in a tuner from the 92 W140 I had, but it was missing that output.

Yesterday I snagged another tuner from a 92 400E at the junk yard. It has the extra output in the back. I just tried it, and the problem is solved. The sound quality is great. Far better than the crappy aftermarket stereo in my 400E.

The power antenna isn't working, but I have a half dozen or so in a box that I'm sure I can use to sort that out.

I think I might pick up a Bluetooth cassette adapter and call it good.
 
The power antenna isn't working, but I have a half dozen or so in a box that I'm sure I can use to sort that out.

I think I might pick up a Bluetooth cassette adapter and call it good.
Check fuses, probably a good idea to replace them all anyway if not already done as they can cause all manner of problems on these cars.
 
Does anyone know if there is an option to plug some kind of Bluetooth adapter into the tuner? There's this 6 pin port that I'm guessing is for a CD changer. Wondering if that can be used for Bluetooth instead.

1000006465.jpg
 
I've been slowly continuing the work on the SL. I swapped out the motor mounts for some cheap Chinese mounts. Changed the trans filter and fluid and installed a transmission cooler.

I used a stock Ford Focus transmission cooler. Years ago I discovered that they are surprisingly efficient and are able to be packaged in weird places due to their long, slim design.

1000006487.jpg

I did a bit more freeway driving and noticed a vibration around 60-65 MPH. Sometimes it gets a little spooky. I poked around and inspected things closely and discovered my $60 Facebook Marketplace tires had flat spots.

Guess that's what I get for buying the cheapest tires I could find.

I got some new tires mounted up yesterday, but haven't driven it yet to see how it is.

I'm working on dialing in some suspension adjustments now. I'm planning to extend the struts and rework the bump stops to limit untravel and give me a bit more downtravel. That should make it much better offroad.

The first Gambler event I plan to attend with the car is next weekend, so we're in the home stretch.
 
Last edited:
I got strut extensions installed on all 4 corners. Now I have a new problem. At full droop when I steer hard in either direction, the tie rod contacts the lower control arm and the steering binds. Not too surprising considering the angles involved.

I've thought of several possible solutions. I could build a drop bracket that will move the frame side control arm mounts down. That would give me back my clearance and would improve my control arm angles. It would probably introduce bump steer though since the control arm and tie rod angles would diverge. I'd also lose about half my lift height by doing this, so to maintain the same lift height I'd have to double the height of my spring spacers on the front.

I could flip the outer tie rods upside down. Obviously the taper goes the wrong way, but I think I could unbolt the steering arms from both knuckles and move them to the opposite side. That would flip the taper upside down and allow me to install the outer tie rod end on top of the steering arm instead of the bottom. This would also cause the control arm and tie rod angles to diverge and could create bump steer.

I could potentially do both of the above. That might be the best option since both the control arms and tie rods would move about the same amount, meaning bump steer would not be dramatically changed. This would also give me better camber up front.

There are some other options, like custom tie rods, potentially using heim joints. That could allow me to set up the tie rods at whatever angle I need just by using appropriate spacers on each end.

I have limited time left before the first event, so I think the plan for now is to try swapping the steering arms side for side and flipping the tie rods. Then I'll take it for a drive and see just how bad the bump steer is. If it isn't terrible, I'll probably just call it good enough for now.
 
Got the steering sorted. I tried swapping the steering arms side for side and flipping the tie rods, but there's a problem. The arms have a curve to them, and swapping them side for side results in the steering arms curving down super low. With the tie rods then installed above the arm, the angles are about the same as stock, so there's still interference.

I decided the best solution was to heat the arms and bend them straight, and then swap side for side and install the tie rods on top. Just to be safe, I ran to the junk yard and pulled a pair of arms from a 400E at the yard and heated and straightened those. That way if things didn't work out I had the set of stock arms I could put back on.

1000006492.jpg

With the arms bent straight, I installed them opposite their original locations, and then dropped the tie rods in from the top. Problem solved.

Next, I checked steering clearances, and noticed that at full droop the strut body would actually hit the sway bar mount on the control arm. I've removed both sway bars from the car to provide better flexibility offroad, so I just cut the mounts off the control arms.

Did a tape measure alignment and took it out for a drive. There is a very small bit of bump steer, but it's still easy to control. The car does lean in corners thanks to the missing sway bars. There's still a slight vibration at about 65 MPH. I'm going to replace the tie rod ends, get the car aligned, and then if needed have the tire balance double checked. Even with the vibration, it's no problem to control.

Offroad this thing is hilarious. The shock/strut extenders completely transformed the car. The tires no longer rub in the inner fenders, and the increased droop travel really soaks up bumps off road. The ASR defeat switch lets me keep the tires spinning, even when things get loose.

It's honestly pretty good off road. I'm glad I went as far as I did with it.

Oh yeah, and it's all decorated like a race car now.
1000006497.jpg
 
So let's talk transmission modulator adjustment. This car is pretty lazy shifting 1-2. Very soft shifts. I tried adjusting the modulator. Rotating it clockwise until it stopped only got maybe 30 degrees of movement and made no difference that I could tell.

I popped the cap off and rotated the little T thing like 2 full revolutions clockwise, then I snapped the cap back on. It's noticeably better now. Still not as firm as I'd like though. I would prefer it to be very positive, just short of harsh. Is there any reason not to rotate the modulator another turn or two?
 
I’m not aware of this adjustment. Is it only on the earlier 4 speed transmission?

Have you used the “W/S” button? This starts the car in 2nd for W and 1st for S position.
 
I’m not aware of this adjustment. Is it only on the earlier 4 speed transmission?

Have you used the “W/S” button? This starts the car in 2nd for W and 1st for S position.

I don't know for sure whether the later 5 speed transmissions have an adjustable modulator, but the 722.3 4 speeds do.

This car doesn't have a W/S switch. The shifter has D-3-2, and then B. B enables first gear start. When I say the 1-2 shift is soft, I'm talking about when I start the car in B, and shift up to 2 with the pedal down. The car will run out to 6300ish RPM, and then shift to 2nd.
 
The modulator affects all shifts. You can turn it up even more, as long as the other shifts are acceptable.

To adjust a specific upshift, you need to fiddle with the spring train for that particular piston in the valve body. The Superior kit offers options to make 2-3 and 3-4 firmer, but only has options to make 1-2 softer. However there might be a way to use custom bits in the B1 train to make 1-2 firmer? I've never tried this.


FYI:

The 722.6 electronic five-speed has no vacuum modulator. The W/S switch was used with this transmission, worldwide, including North America.

The 722.5 mechanical five-speed does have a vacuum modulator, but this was never used with V8 engines, and was used on very few models in USA, only a couple years of 6-cyl R129 and W/V140. There was no W/S nor E/S switch with this transmission, at least for North America models.

:3gears:
 
The modulator affects all shifts. You can turn it up even more, as long as the other shifts are acceptable.

To adjust a specific upshift, you need to fiddle with the spring train for that particular piston in the valve body. The Superior kit offers options to make 2-3 and 3-4 firmer, but only has options to make 1-2 softer. However there might be a way to use custom bits in the B1 train to make 1-2 firmer? I've never tried this.
My focus is on the 1-2 shift because with the large tires I'm usually up to speed and lift off the throttle before the 2-3 shift, so I haven't noticed a soft shift in higher gears. I don't think it's 1-2 specific. It's probably all gears, but I only notice it on the 1-2 shift. I'll try turning it up even more.
 
My focus is on the 1-2 shift because with the large tires I'm usually up to speed and lift off the throttle before the 2-3 shift, so I haven't noticed a soft shift in higher gears. I don't think it's 1-2 specific. It's probably all gears, but I only notice it on the 1-2 shift. I'll try turning it up even more.
Turn it up to 11 🎸
 

Who has watched this thread (Total: 2) View details

Back
Top