• Hi Guest !

    Welcome to the 500Eboard forum.

    Since its founding in late 2008, 500Eboard has become the leading resource on the Internet for all things related to the Mercedes-Benz 500E and E500. In recent years, we have also expanded to include the 400E and E420 models, which are directly related to the 500E/E500.

    We invite you to browse and take advantage of the information and resources here on the site. If you find helpful information, please register for full membership, and you'll find even more resources available. Feel free to ask questions, and make liberal use of the "Search" function to find answers.

    We hope you will become an active contributor to the community!

    Sincerely,
    500Eboard Management

Vinyl / MBTEX Dye (SEM) for Cream Beige?

Jlaa

Nitpickio🛡️Maximus
Staff member
For folks with cream beige interiors - i.e. "275 / parchment a la 1992-1993" (NOT parchment in 1994) ---- have you found a vinyl dye that matches?

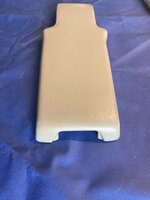
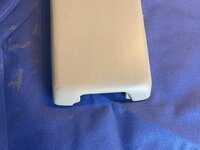
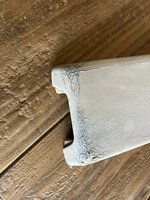
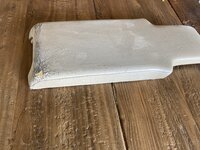
I have found assorted pristine interior trim pieces without any broken mounting tabs from the junkyard -- left side a-pillar sail panel trim for example -- but they are all the wrong color. I would like to try to dye them to the proper color.

Various searches have yielded all kinds of conflicting information and the closest I have gotten is this pdf file (attached) from SEM that points POTENTIALLY to SEM color codes 5048, 4225, and 5079.

Just wondering if anyone has found a definitive match. Thanks.

Untitled 2.png
 

Attachments

I purchased several colors for my 94. I made a post about it. Some paint colors may have been more correct, but I was trying to match existing sun faded parts. Check out the post and grab a few cans and see what you find.

I completely refreshed every grey piece in my C126, using Duplicolor. Either way, prep matters. i used isopropyl to clean the pieces, then sprayed light even coats, 3 and let them dry completely or use a heat gun to quicken dry time. Hit the pieces from different angles for each coat. I then sprayed them down with aerospace 303. While you can do the leather seats, I bought mew leathers. All other leather got sprayed.
 
@Jlaa

So you can spray interior bits with special paint to make them look like new? On my E21 project I will be re-doing the door panels but perhaps I can simply re-spray the harder plastic door pull and door map pockets?

I imagine any high quality interior shop is also familiar with this process? I have brand new covered Recaro sports seats in this car that look amazing but the door panels and interior carpeting need to be redone.

E21 door panel.jpg

061-scaled.jpg
 
Last edited:
@Jlaa

So you can spray interior bits with special paint to make them look like new? On my E21 project I will be re-doing the door panels but perhaps I can simply re-spray the harder plastic door pull and door map pockets?
Yes it is possible. I used to use a guy named Leifur Magnusson who would come by with his Ford Ranger truck and air compressor and custom mix interior dye and then airbrush it onto the part. I had him do the door handles of my 124 as well as various bits in my sport beetle.

The match was fabulous and Leifur was really a seasoned pro at it .... he would spend hours carefully airbrushing door handles / vinyl B pillars / glove box lids / etc. and made all my cars look perfect.

Then I realized that professional upholstery shops used Leifur too. Mike at Val's Upholstery who both I and @dionphaneuf are familiar with used to farm out airbrush dye work to Leifur and Mike was a big fan of Leifur's work as well.

Unfortunately Leifur is now retired, and Mike is now retired as well. :-(

See below / after pics below.

IMG_4585.jpg IMG_4586.jpg IMG_4811.jpg DSC_5299.JPG

And unfortunately I haven't explored any further on what the best "ready made formula" for cream beige is. :-(
 
Last edited:
I know this place could help us, featuring Colourlock products which is for leather and vinyl and plastic.

I learned about them from M539 Restorations video on rejuvenating BMW gray leather seats. Steten went to the Willkommen | Lederzentrum - Spezialist für Lederpflege, Lederreparatur, Beratung in Germany and I think they would know exactly what color mix to use on your 500E or my E21.


I may inquire myself at their USA link: https://www.colourlock.com/?affiliate... and pull out my airbrush and get the products to dial in my color and properly apply this stuff.
 
Last edited:
I've used DupliColor upholstery paints for gray and they match pretty darned well. It helps if the part doesn't adjoin another (old) part, which will make the slight difference in color obvious, but if you're doing it all or a big piece that stands alone like a console, it's great stuff.

Painted a (free) black W124 console gray for my first 400E and it turned out really well. I don't know how well it holds up long-term, but considering the option was a pretty rough-looking console, I was happy with it. I was somewhat reluctant to go the paint route, but was very pleased with the results and would definitely do it again, as I'm about to do for a little interior part for the CL600 that was only available in Java (my interior is gray.)

And yes, prep is important, especially if the part has any kind of texture.

As an aside, I would be curious to know what, if anything, people have used to mask parts on the trim. For example, the piece I need to change colors on for my CL600 has two tiny metal pieces that I can't remove. They're pressed into the part with plastic sprues that are the "rivets" with the sprue melted down on the back to make a "head". I don't like the idea of painting over them and then going back and removing the paint with an orange stick or something like that. They're so small and have "holes" in them, making masking even more difficult, I'm afraid. See the attached photo for what I'm describing. Thoughts?

CL600 Console Release.jpg

Dan
 
What's interesting about the Colourlock products is that the YouTube video I shared starts out with the durability testing lab as their system is not just about color match but a color product that lasts. They claim they work direct with Mercedes & BMW on repairs and the repairs have to have the same durability as brand new leather.

Can you mask the usual way? with tape and then follow up very carefully with an X-acto knife to cut away the tape to review the trim that needs to be painted?
 
I know this place could help us, featuring Colourlock products which is for leather and vinyl and plastic.

I learned about them from M539 Restorations video on rejuvenating BMW gray leather seats. Steten went to the Willkommen | Lederzentrum - Spezialist für Lederpflege, Lederreparatur, Beratung in Germany and I think they would know exactly what color mix to use on your 500E or my E21.


I may inquire myself at their USA link: https://www.colourlock.com/?affiliate... and pull out my airbrush and get the products to dial in my color and properly apply this stuff.
Awesome let us know what you find!

Another approach I think is to pay a visit to a custom upholstery shop near you / San Jose --- and ask who they use locally to airbrush / color dye interior parts. I am sure these guys exist. Leifur used to come to my house, but it was clear that I was just a lowly retail customer and that most of his work was done on behalf of bigger custom upholstery shops......

For instance, the center armrest on my 124 was worn when I first bought the car. Replacing the leather / skivving it would have been quite difficult with potential fitment problems, and airbrushing it (via Leifur) yielded a fantastic result with no fitment problems whatsover. You can see in the below before / after photos that professional airbrushing also includes filling any divots / depressions with vinyl filler type stuff so that the end result looks perfect ..... i.e. surface prep.

IMG_4584.jpg DSC_5302.JPG
 
Last edited:
That is an incredible before and after on the armrest. It would be a 100x easier for me to find a local shop I can trust otherwise I think I found my retirement job if I master these types of repairs.
Do it! Interior Leather/Vinyl Restoration + Road Force Balance Specialists!! 😂

I found Leifur's old website on the wayback machine: https://web.archive.org/web/20030125171757/http://leatherrestore.com/

Probably if you talk to high-end used car dealers, they will have their network of interior reconditioning guys that they use (just like how they have their own network of PDR guys).

1698796822696.png 1698796836614.png
1698796883269.png 1698796898067.png 1698796915320.png
 
What's interesting about the Colourlock products is that the YouTube video I shared starts out with the durability testing lab as their system is not just about color match but a color product that lasts. They claim they work direct with Mercedes & BMW on repairs and the repairs have to have the same durability as brand new leather.

Can you mask the usual way? with tape and then follow up very carefully with an X-acto knife to cut away the tape to review the trim that needs to be painted?
That's good to know, Ricardo, thanks!

I could mask them the usual way but I'm really concerned about using a knife anywhere near the "circles" as they are held tightly against the material, and if I was unlucky enough to cut it the pressure might cause the covering to lift around them. I may not have a choice in this situation.

I was thinking about experimenting with making a mask with masking tape on another substrate where I could cut it out to match the trim shape of the "button" and then place it on the trim and press it down. It might not cover it perfectly, but I figure that if there was any overspray it would either be imperceptible or could be gently scraped or rubbed off after painting with a toothpick or other non-aggressive material.

This is a really weird piece of trim that serves as the opener for the center console. Apparently, the little metal "circles" on it indicate where to press to release or open a specific part of the console - the top "tray" under the armrest or the larger "bucket" underneath. It's the same setup as other models of similar vintage where there are different places to press to release the console cover. Mine was missing when I bought the car, and as mentioned previously, the only available version of the part is Java rather than Gray, which is my interior color.

I'll have a look at it and report back. It will be a few weeks as I'm in AZ right now and this is at the FL house.

Dan
 
^^^ you might have to "trace tape" it... mask it, draw an outline of the chrome trim pieces, remove the tape and x-acto cut the outline, then mask the cutouts to the chrome trim. That might not adhere as well but should hold for air brushing. If it's not exact you should be able to lightly tuck the mask around the chrome.

I checked on eBay for a "practice" piece and that little leather strip with the chrome rivets appears to be its own separate piece :doh:

maw

EDIT... I got it... its the leather cover for the switch mechanism... 00-06 Mercedes CL600 W215 Center Console Armrest Button Switch Mechanism Oem | eBay I might buy that for practice / spare / see if it matches better, etc. Get it in a hurry @LWB250 because most don't have the leather attached. You might also see if it's still dealer available.
 
Last edited:
Colourlock also make the Elephant Leather Preserver that’s used by about everyone in Germany. Especially nice for Recaro Classic seats.


COLOURLOCK Elephant Leather Preserve wax to restore, care, nourish and waterproof leather car interior, handbags, chesterfield sofas, etc (125 ml) Amazon.com
 
@Jlaa

Superior Restoration in Sacramento is THE interior specialist for decades.

I went in to see about a match to the interior door handle trim. Old timer showed me the hundreds or cans of paint that was premixed for sale and color charts after he said the color was SEM Trim Black.

I spent a hour looking at colors inside, outside in the shade and the sun and settled on two choices. Old guy said “no, that’s not it, let me show you”. He pulled the cans down, shook them and sprayed my plastic piece. My very particular self felt they were as close as I could possibly hope for and was ready to settle. He told me “hold on Sonny” and shook up a can of the SEM Trim Black and I’ll be damn it’s a perfect match. He said “after 41 years of doing this I can color match paint from across the street”!

Highly recommend this place and they also have low prices.

 
^^^ you might have to "trace tape" it... mask it, draw an outline of the chrome trim pieces, remove the tape and x-acto cut the outline, then mask the cutouts to the chrome trim. That might not adhere as well but should hold for air brushing. If it's not exact you should be able to lightly tuck the mask around the chrome.

I checked on eBay for a "practice" piece and that little leather strip with the chrome rivets appears to be its own separate piece :doh:

maw

EDIT... I got it... its the leather cover for the switch mechanism... 00-06 Mercedes CL600 W215 Center Console Armrest Button Switch Mechanism Oem | eBay I might buy that for practice / spare / see if it matches better, etc. Get it in a hurry @LWB250 because most don't have the leather attached. You might also see if it's still dealer available.
Thanks, but if you go back a bit I mentioned that I bought one from Mercedes in Java because they still had them - but only in Java. There's just a handful of them left, and they're all in Germany.

I like your trace tape idea. I could see that working. It doesn't have to be super exact, in fact, I would almost rather it didn't totally cover the chrome trim pieces, as then there would be some overlap that I could clean up. It would also ensure that the original leather color wouldn't show, too.

Thanks for the ideas!

Dan
 
I would suggest you seek the service of a mobile leather repair company, as they have all the dyes and can tint to match any color. After the fiasco I had with Leatherique, this is the route I went, perfect work and perfect color match. I even had him color match some plastic trim pieces and a center console armrest which was parchment and not cream beige.
 
Just some 2 cents - I tried to do that with my C126, I ended up doing everything so that it was fresh. The tex and plastic bits fade differently so in my view it is better to just do all of it with the same color. I cleaned it all with dish soap and let it all dry. Then using rubbing alcohol I quickly wiped down each piece prior to spraying. Several light coats over multiple paint/dry sessions. Then after an overnight dry, I would mist them all with Aerospace 303. Installed everything the following day. I use Aerospace 303 on the interior bits often. The only section I really have had to "touch up" is the Driver door pull and this is after about 8-10 years.
 
Thanks !

I think I will call in a professional...there seems to be a few right close by.

Like many driver seats at this age and my mileage...the upper side bolster is showing its age and wear. The rest of the seat, and seats, are like excellent.

The mis-matched beige colors on all the panels don't bother me; but yeah, they all aged differently. I especially remembered how odd the grey interior pieces aged all individually on my old E420.
 
Gray is probably the WORST interior color for aging on 124s. You tend to get varying fades based on the component. Center consoles are among the worst, and they tend to curl slightly at the wide bottom edges along the transmission tunnel, too.

I’d say black is one of the better wearing interior colors.
 
I’m in the process of redoing my driver seat, headliner armrest etc. in my E420.I’m attaching a few before and after pictures of the armrest which is 1995 parchment number 265 I did this with the parchment dye from the Seat doctor. Looks pretty good to me.

The bolt cover on my armrest shattered as I tried to pry it off with plastic upholstery tools 😕.I found a printed piece at Octoclassics, better hurry before next round of tarrifs‼️ Any other sources out there?
 

Attachments

  • IMG_4747.jpeg
    IMG_4747.jpeg
    2.2 MB · Views: 19
  • IMG_4750.jpeg
    IMG_4750.jpeg
    4.4 MB · Views: 18
  • IMG_4749.jpeg
    IMG_4749.jpeg
    4.1 MB · Views: 20
  • IMG_4714.jpeg
    IMG_4714.jpeg
    2.8 MB · Views: 19
  • IMG_4715.jpeg
    IMG_4715.jpeg
    3.7 MB · Views: 20
I’m in the process of redoing my driver seat, headliner armrest etc. in my E420.I’m attaching a few before and after pictures of the armrest which is 1995 parchment number 265 I did this with the parchment dye from the Seat doctor. Looks pretty good to me.

The bolt cover on my armrest shattered as I tried to pry it off with plastic upholstery tools 😕.I found a printed piece at Octoclassics, better hurry before next round of tarrifs‼️ Any other sources out there?
Indeed looks awesome! How did you fill in the worn area (hole) at the front?
 
Used several light coats of Angelus Paintable Repair Filler , of course sanding between applications. I used the sponge daubing technique on this small surface as shown in previous threads. I invested $20 at Harbor Freight for HVLP spray gun to do my replacement seat skins for an easier more even application. I probably used it less than 1 ounce of dye to redo the armrest. Andy at the Seat doctors also has a leather crack filler which I have used before.
 

Attachments

  • image.jpg
    image.jpg
    4 MB · Views: 6
Thanks. I just ordered the 4 oz parchment. I didn’t see black for our vintage cars. I wonder if it’s the same as the 2011-2022 black that they list.
:gsxrepc:
 
Back
Top