• Hi Guest !

    Welcome to the 500Eboard forum.

    Since its founding in late 2008, 500Eboard has become the leading resource on the Internet for all things related to the Mercedes-Benz 500E and E500. In recent years, we have also expanded to include the 400E and E420 models, which are directly related to the 500E/E500.

    We invite you to browse and take advantage of the information and resources here on the site. If you find helpful information, please register for full membership, and you'll find even more resources available. Feel free to ask questions, and make liberal use of the "Search" function to find answers.

    We hope you will become an active contributor to the community!

    Sincerely,
    500Eboard Management

Rear Brake Shoe Tools

emerydc8

E500E **Meister**
Member
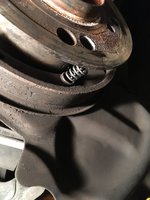
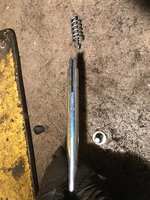
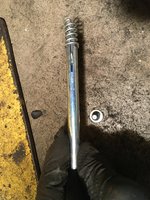
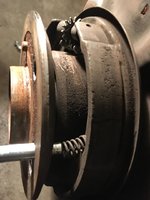
I am planning to do rear shoes on both E420s. I pulled the rear tire and rotor off and noticed that I need a tool to compress the spring that retains the shoes. Actually there are two tools. The spring compressor is 112 589 09 61 00 ($41.40) and the spring hook 116 589 01 62 00 ($12.00). I decided to delay this job until I have the tools. With the recent announcement of extensive delays at Naperville, I think this job is going to have to wait for quite some time. Hopefully, with the tools this job will be pretty straight forward. I did this on my 400E back in 1998 but I have zero recollection of how I managed to do it without the tools. Anyone have a picture of the brake spring compressor tool?
 

Attachments

  • IMG_0926.JPG
    IMG_0926.JPG
    1.5 MB · Views: 27
Great video. Even the same chassis!
So needle nose pliers will do the trick. I may give it a try before the tools come. It looks easy enough and I have shoes for both cars. I noticed in the video he didn't adjust the thumb wheel for the parking brake but that's simple enough once you've done it. before. Thanks again.
 
I noticed in the video he didn't adjust the thumb wheel

Noticed that as well. It's easy enough.

On a tangent, has anyone been able to source rotors that are coated for the rear (the pedestrian ones, not the 300mm)? These are the same across 034 and 036, I believe. The only source I can find online is OE, and lowest is $75/ea - steeper than fronts. Just want to make sure I'm not missing anything before ordering from Napster.
 
I used both tools (both aftermarket, not Mercedes) and they proved to be of GREAT help. Needle pliers may work fine, but the guy in the video took few shortcuts. By my standards he also kind of "butchered" the parts a little bit with those pliers and he did not use a torque wrench at reassembly.

I did this job on my W126 and the setup is identical with the one in the video. For that reason I am assuming the FRMs steps are very similar or even identical between the two cars. I think the video misses some things and perhaps it does because he only wanted to show the major steps. At any rate, here is what I think the video misses:

  • The little allen bolt that holds the rotor in place is supposed to be Loctited before being installed. Is also supposed to be torqued to a specific torque, not "by hand" (I think the torque is 10Nm for 126)
  • The exact same thing with the two bolts holding the caliper (for 126 the torque is 90 Nm)
  • Adjustment of the brake shoes (already mentioned)
  • IMHO is not correct (and a bit unprofessional) to bend the end hooks of springs, which is exactly what he did. I used a different assembly sequence and didn't have to bend anything (IMO if a part has to be modified to be assembled then something is wrong with the assembler). What I did: first I installed the bottom spring on the car, then I "built" the rest of the assembly aside: put the two shoes facing each other like they are on the car, hooked up the top spring to them, then installed the adjusting mechanism (slightly lubricated) between the two shoes. Next I picked everything up and installed it on the car: first putting one shoe in position, then rotate the other one and pass it over the hub and bring it in its position. No spring hook bending! Next I used the hook tool (116 589 01 62 00) to connect the bottom spring to both shoes. The other tool (112 589 09 61 00 ) helped me to put the last two springs in place.
  • He did not show (not even symbolic) that he cleaned the hub before installing the new rotor
  • Is always good practice to not assume that a new rotor as installed has the radial runout within spec, therefore should be checked with an indicator. The pictures below were taken recently. One indicator is enough, I have two because I tested another indicator type with a different holder (and because I always like to ... play with my tools).

So, for this job to be done correctly IMHO a little bit more than is shown in that video should be done and some shown should be done differently. Just saying.
 

Attachments

  • IMG_20200404_004443.jpg
    IMG_20200404_004443.jpg
    1.3 MB · Views: 32
  • IMG_20200404_004537.jpg
    IMG_20200404_004537.jpg
    1.1 MB · Views: 29
  • IMG_20200404_164431.jpg
    IMG_20200404_164431.jpg
    1.2 MB · Views: 34
I normally have an old screwdriver with a slot cut in it that I use for the spring removal. Went to take a pic and cant find it! Oops.

Bought one of these


And a hook tool which might help to pull the springs into place which can be a PITA at times

 
My tools arrived today too. I just changed the rear shoes. I didn't have time to document every step for a DIY but I do want to add some observations to the Youtube. video Kiev posted above.

The spring hook tool was totally worthless and I ended up not even using it. The other tool worked very well and made removing the retaining springs a piece of cake.

The large brake shoe spring is by far the hardest part of this job but it is easy if you use an awl. The large spring is installed with the spring visible (to the outside). It has a curve in the middle. Make sure the curve conforms to the axle so it curves around in that direction. It was tough to keep the upper hook of this spring from falling out of the slot while I was working on getting the lower part of the spring into the lower slot. In order to get the large spring to slide into the lower brake shoe slot, I had to bend the lower end out at 135-degrees using vice grips (pic).

The guy in the video is either an expert and has done hundreds of shoes or he tried multiple times to get the right shot. He used a flat screwdriver at the end to push the spring into the slot. He also used needle nose pliers to stretch the spring. I struggled for about an hour trying to emulate him using needle nose pliers. In the end, I decided to try a pointed awl to stretch the spring. I put the pointed part of the awl in the slot in the lower brake shoe. I wish I had tried this at first. With this technique it slid right in and I was able to do the other side on my first attempt.

The small spring goes on second and I did bend it out at 135 degrees on both sides like the guy did in the video. That spring is installed from behind so you can't see it once it's installed. Always install the adjuster with the thumb-wheel facing forward. Make sure the adjuster is fully retracted. Pay attention to the direction of the shoes. The slotted female sides go into the parking brake mechanism (connected to the cable). Once both springs are installed, you have to pull apart the shoes in order to slide the adjuster in there. I was able to do that using my hands but it took quite a lot of effort. Don't install the holding springs until both tension return springs are installed and the shoes are correctly situated into the parking brake mechanism.

The factory kit comes with new caliper bolts. The original bolts have a 17mm head. The replacement bolts are 16mm (one of the few 16mm bolts on the car now). Unlike the small Allen bolt that holds the rotor on, the caliper bolts did not have any Locktite on them so I applied my own.

The big takeaway on this post is to modify the lower part of the large spring and use an awl to install it into the slot on the lower shoe.
 

Attachments

  • Rear Brake Shoe Tools.JPG
    Rear Brake Shoe Tools.JPG
    1.3 MB · Views: 25
  • Brake Tool Slot.JPG
    Brake Tool Slot.JPG
    2.4 MB · Views: 25
  • Brake Tool with Spring.JPG
    Brake Tool with Spring.JPG
    2.4 MB · Views: 22
  • Brake Tool Installing Spring.JPG
    Brake Tool Installing Spring.JPG
    82.2 KB · Views: 21
  • Rear Brake Shoe Kit.JPG
    Rear Brake Shoe Kit.JPG
    3.1 MB · Views: 23
  • Modify Large Spring.jpg
    Modify Large Spring.jpg
    111.2 KB · Views: 27
  • Installing Large Spring.jpg
    Installing Large Spring.jpg
    122.5 KB · Views: 29
Looks great, Jon! Thanks for the tips. I haven't done this job in forever.

Tip: Before installing the brake rotor, clean the hub surface (and center round area) with a wire wheel on a drill. Then wipe down with solvent, and apply a very thin coat of anti-seize to the flat surface and around the center area, any place the rotor contacts the hub. Wipe off excess with a paper towel so the end result looks like thin silver paint. This should prevent the rotor from seizing to the hub in the future. If the rotor is not new, clean the back/center surfaces of the rotor as well.

I've encountered some rotors that requires smashing with a sledgehammer to break loose. After the clean + antiseize treatment, they always slide off by hand.

:strawberry:
 
Thanks, Dave. It was so long ago that I did this job that I forgot anything about it. On one rotor I did have some difficulty aligning the small Allen bolt that secures it so I applied some silver anti-seize around the hub and it made it much easier. I didn't use a wire brush on the inside of the rotor but I did clean it thoroughly with brake parts cleaner (the good stuff in the red can). The video definitely makes it look easier than it is! I had some trouble with the drum rubbing slightly on the shoes even with the adjuster all the way in, so I decided to drive it a bit until the shoes seat, then I'll go back and adjust the parking brake. Right now it's pretty close to the floor to keep the car from rolling down a grade.
 
apply a very thin coat of anti-seize to the flat surface and around the center area, any place the rotor contacts the hub.

Sorry if this is a dumb question, but can a Mercedes copper paste be used in this application (applied to wheel hub face) ?
 
Sorry if this is a dumb question, but can a Mercedes copper paste be used in this application (applied to wheel hub face) ?
Any type of anti-seize paste should work. The critical part is to apply very, very sparingly. That means wiping off most of what you initially apply, as described above. Same procedure for front rotors/hubs too. This is most important in areas where corrosion/rust is common (northeast, etc).
 
The shop manual specifies "heat-resistance permanent lubricant (Molykote paste "U", Molykote past G Rapid, Liqui-Moly past 36)." I just use the silver Permatex anti-seize lubricant.
 
I did the rear shoes on the other car tonight and found a good use for the Mercedes spring puller tool. It takes a lot of strength to pull the two shoes apart and insert the adjuster gear once both springs are installed, but using the spring tool to pull one shoe away fron the other makes it much easier (pic).

One other note I discovered tonight while installing the shoes. In addition to bending/modifying the large spring end out at 135 degrees so it will drop in the slot on the bottom shoe using the awl, as discussed above, if you pinch closed the top end of the spring it will be less likely to fall out of the top slot as you are maneuvering with the awl to pry the bottom end into the slot. Changing the shoes tonight took less than an hour.
 

Attachments

  • Spreading Shoes to Insert Adjuster.JPG
    Spreading Shoes to Insert Adjuster.JPG
    99.9 KB · Views: 24
I normally have an old screwdriver with a slot cut in it that I use for the spring removal. Went to take a pic and cant find it! Oops.

Bought one of these


And a hook tool which might help to pull the springs into place which can be a PITA at times


I used both of these tools for the first time today whilst cleaning the shoes and installing new springs on my S320.

Both tools were excellent and I highly recommend them. They made the task so much faster and easier I wish I had them for the dozens of times I've done this job before.

It is also a great idea to keep new spare fitting kits on the shelf. For example today I found a spring that was damaged. It was easy to go grab a new fitting kit and replace all srings for good measure whilst in there.
 

Who has viewed this thread (Total: 1) View details

Back
Top