• Hi Guest !

    Welcome to the 500Eboard forum.

    Since its founding in late 2008, 500Eboard has become the leading resource on the Internet for all things related to the Mercedes-Benz 500E and E500. In recent years, we have also expanded to include the 400E and E420 models, which are directly related to the 500E/E500.

    We invite you to browse and take advantage of the information and resources here on the site. If you find helpful information, please register for full membership, and you'll find even more resources available. Feel free to ask questions, and make liberal use of the "Search" function to find answers.

    We hope you will become an active contributor to the community!

    Sincerely,
    500Eboard Management

Compressing springs. Need pep talk

Kyiv

1993 400E | Azov мой кумир!
Member
I'm a real novice at DIY auto maintenance. I'm trying to remove front springs with Klann clone, new, from eBay
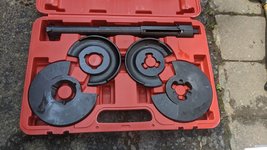
IMG_20200415_141819.jpg
Never removed or observed someone else removing springs in my life before. Since this a potentially life threatening procedure, I need some pep talk.

I've read instructions and watched a YouTube video so I grasp the process. I've practiced already and was able to compress the spring about 3/4 of the way. I need to know if:
  1. both pressure plates are installed correctly (lower plate's skirt looking up, upper plate's skirt looking down)
  2. 3 point interlock on top of compressor is engaged.
  3. I'm able to compress the spring 3/4 of the way
Is it fail safe at this point? Anything else I can do to ensure safety? I'm afraid, due to a complete absence of any experience, that I may be omitting or failing to notice something that might tell someone with experience to abort the process.... Thanks
 
Take your time and be cautious, not afraid. With each turn you visually look for even compression, the teeth are placed in the plate etc. it will creek and be noisy. ACt deliberatly a d take time. Be smart, use the hand tools with leverage and dont twist things, turn them. Watch fingers in dumb places, sont hover over the spring if it should slip.... leave yourself an out. COppress the controll arm a good amount then use the compressor the rest of the way.
 
COppress the controll arm a good amount then use the compressor the rest of the way.

Thanks. So you suggest placing a hydraulic jack under ball joint to raise control arm some, to do half of spring compressor's job for it?
 
Questions:

1) Are you replacing springs, i.e. removing them from the car, and replacing with different springs? Or....

2) Compressing the spring as a safety measure while working on front suspension, i.e. replacing struts or LCA's?

:sawzall:
 
Dave, I'm replacing springs. If you recall, one of my front springs broke. I made a thread about it about a week and a half ago. I purchased used springs and front struts that have about 5k mi on them from @northNH

I'm just trying to grasp, whether once springs are compressed 3/4 of the way, is it fail-safe from them on? As in, if I'm able to compress them that much, does it mean the tool was installed properly, or is there still a chance for user error?
 
OK, that helps. And yes, if you can get ANY tension on the spring, it's locked in place. The 3 tabs are designed so they can't pop out of place.

Soooo... as someone (@JC220?) mentioned in the other thread, when removing springs for replacement, it's slightly more complicated.

In short, you must rotate the top & bottom plates as far as possible apart. FSM job 32-0200 says to have ~8 coils between the plates. When the center shaft is fully compressed (or, when the coils "bind", limiting further compression) it should be easy to remove the front spring. From memory I don't think you need to fully compress the spring, just compress enough so it will wiggle out of the LCA. If the plates aren't far enough apart, you can't do this. Be careful decompressing.

The next trick is marking the position of the plates on the old spring; take a photo if it helps. Otherwise, when installing the new spring, when you decompress it one or both plates may bind... then you get to repeat the job until the plates will come out again. Don't forget the make sure the lower end of the spring is fully seated in the LCA pocket.

Note the FSM step 7 says not to remove the strut top bolt unless the compressed spring cannot be removed... this should not be necessary, the spring should come out with the strut in place. You can skip step #13 for the same reason.

:banana1:
 
I would recommend you read and follow the instructions in the shop manual first. Then combine that with advice from members here. You need to grab the correct number of coils so that you'll be able to completely relax the spring to allow removal of the compressor.

Here's a writeup of my experience on a W126. Might help increase your confidence: Removing and Installing Front Springs, 1989 560SEL

Oh, just saw gsxr's post. Great info. I use masking tape to mark the location of the plates so you can transfer the plates correctly to the new springs. Didn't do this the first time and had a plate bind up in the upper cup. Aggravating.
 
I believe we also have a HOW-TO written up here for the W124.

 
Thank you all for advice, suggestions, encouragement. The thought of handling a grenade is unnerving, even if I have the right tool and read instructions thoroughly.

From Gerry's "how-to", I can see the he was able to remove front spring compressing 7 coils only (instead of 8)
 
Random tip 1: Make sure the rubber spring pad is seated properly on the spring. If it's old/original, there will be a clear indentation where the spring will sit. If brand new, it can be tricky to get them seated nicely.

Random tip 2: The compressor won't work on the rear springs; you'll need to use a floor jack to gently lower the rear LCA down, after removing the inner LCA pivot bolt. Getting the bolt in+out can be a nuisance. Note the bolt and washer orientations before disassembling, and don't tighten the nut without the weight of the car on the wheels...

:sawzall:
 
Dave, I'll be installing new spring pads.

As to rear springs... Why won't compressor work? I have new rear springs on order, as my current ones that were installed by an indie mechanic soon after I aquired the car (5.5 years ago) are for 300E/E320. I supplied them to him, relying on online catalogs (did not know better at the time)
 
Nothing else to add to all the great comments and pointers that everyone posted already. I do however completely understand how handling the loaded spring for the first time can be a little uneasy. Use care, take your time, and when it's all done - awwwww, so rewarding!!!
 
Nothing else to add to all the great comments and pointers that everyone posted already. I do however completely understand how handling the loaded spring for the first time can be a little uneasy. Use care, take your time, and when it's all done - awwwww, so rewarding!!!

I've never removed the springs on My 500E before but I've done plenty of springs - mostly McPherson struts.
Last time I removed a spring I just used an impact driver to zap the bolt to save time and quickly compress / decompress the spring.
Don't be an impatient, foolhardy idiot like me. Use hand tools. 🤣
LOL Speaking of those air tools: First time I've read the instructions, somewhere along the lines of "Never use impact gun to compress the spring" - I got a that message so heavily imprinted in my head! And I had no air tools, but then, I discovered the speed of the air ratchet, still use it only to decompress (not impact gun). I figured I get a work out as a positive side effect using hand tools to crank it down!

I personally feel much more at ease using these plates on MB vs McPherson "claw" style compressor with 2 individual rods, 14 Audi's over the years, so yeah, had my share of compress/decompress!!!

Regards,
D
 
As to rear springs... Why won't compressor work?
The shaft is too long. It will compress the spring part way, then the threaded center portion will hit the roof of the frame. And due to limited space, there's only room to grab a few coils between the plates. Note the FSM procedure specifies a different compressor shaft tool part number, which is shorter than the one used for the front springs. You don't have the short shaft in your Klann Klone Kit.

If desired, you could use what you have and compress the spring partially. This may or may not be easier. I haven't messed with non-500E rear springs in forever. The 500E rear springs are shorter than normal due to SLS and are even easier to R&R.

EDIT: To clarify, neither the long-shaft nor short-shaft compressors will allow removal of ANY rear springs on the 124/129/201/etc, while allowing the rear LCA to remain bolted in place. You always end up having to unbolt the inner pivot of the rear LCA to get the spring out.

:lightning:
 
Last edited:
The shaft is too long. It will compress the spring part way, then the threaded center portion will hit the roof of the frame. And due to limited space, there's only room to grab a few coils between the plates....
Yeah, that! Learned it the hard way, on W201. Same for W202, R129 as well, just drop the LCA down...

@kiev As for the front, if it helps, this a good visual of these compressors in use:

 
That compressor will work for the rears... you just have to max out the distance/push the plates as far up and as far down as you can. I usually spin the plates towards one another some, slide the bolt through and spin the plates out. Air/Electric ratchet makes life a LOT easier.

If you are installing shorter/H&R Springs you barely need to compress them for the rear...it's Nice:)

Jono
 
Tool is new and visually is well lubed :) I'll point out that Klann clone, to my untrained eye, looks and feels of proper quality. Even instructions are written well, in correct English

@sheward, thanks.
I have the same Klann clone and have used it a few times. I consider it a well made tool and i have confidence in it.

@luckymike My thoughts on this are with three variables. If you turn bolts all day for a living you learn to manage your energy with time saving methods. Experience with the same impact wrench day after day and the ability to perform this job from directly under the car where your body is in a safe position vs. from the wheel well. Only the last variable applies to me so i use hand tools.

drew
 
Not to scare you, but this is why we use spring compressors.
The aftermarket compressor used in that video is a flawed design. I don't know if any place still sells those, but definitely don't use one.

Note the 1 plate on that style have a notch...

spring_compressor_bad.jpg spring_compressor_bad_SirTools_M0070a.jpg
 
If you are using this same type tool for your 140 springs then my confidence level has been raised to no worries but always cautious.

drew
 
I had one of the eBay clone tools which worked well enough but ended up buying a genuine Klann tool a few years ago for the front suspension on my 240D. The clone will not work properly on a W123 since the shaft goes in from the top and will not fit thru the hole in the engine bay without modifications. The clone works just fine for the W124 though I will say the overall quality of the genuine Klann tool is far superior.

Some tips for removal and installation are you need to make sure the plates are as far away as possible and while compressing them, once you think they are compressed enough, keep going since they have a bit more to go. For the rears I did use the compressor to remove my stock springs but I just used a small floor jack to get the shorter replacement H&R springs back in. I highly recommend replacing the rear lower control arm inner pivot bolt and nut while its out since they can have rust.
 
The idea of any sort of compressing of the springs to remove them to me sounds ridiculous.

The problem with the springs to begin with is that they are compressed so why not solve that problem first? The spring will come out easy.

Put a jack under the shock mounting point, raise a bit to find a point where the shock mount is floating if you will. Release the shock bolts and gently lower the jack which will decompress the spring. I've done it like this my whole life plus its a lot faster.


The other way is counter intuitive to me.
 
The compressor allows safe removal. That is the whole reason for using it, safety. Did you watch the video in post #25?

Any other method involves risk. The spring will curve outward as the LCA is lowered with a jack, so it should be chained to the LCA until decompressed.

It isn't much faster using a jack, once you know how to properly use the compressor. And there's no need to remove any bolts (on the 124/129/201) to R&R front springs using a compressor. When adjusting ride height up front by changing rubber spring pads, it's possible to swap the pads out in probably less than 10 mins per side.
 
Yeah I think the whole goal is to release the energy stored in a compressed spring in a controlled manner. The more control over the way the energy is released, the greater the safety. Putting a jack under the shock mount can work, but there is less control ... jack slippage, spring force not completely in same exact axis as jack motion, inferface between jack saddle and shock mount not secure, etc.

I think as one gets older, one tends to be more conscious of safety — more to lose.
 
Post #25 shows a spring compressor involved that was obviously installed incorrectly. Why the hell would anyone compress something beyond where it should be compressed and then attempts to take it out? The spring in that video flew out after it was already removed off the car and it happened due to the sprint compressor

Most spring compressors involve huge nuts and bolts that take longer to set up vs removing only one nut from a shock.

Removing the spring using a jack only involves almost no risk. by the time the control arm is lowered half way, the spring is already probably 80% decompressed and still secured. Its not going to fly out. Only time it would is if it wasn't installed incorrectly but then it would have come out before anything.

Lets just admit, not everything that was created and shoved down our throat to make money is efficient and safe.
 
Jlaa nailed it. ^^^

Decades ago, spring compressors were expensive (~$1k for a Klann) and even the aftermarket copies were $500+, so nobody wanted to buy one... but you could rent one for maybe $100 or so, which I recall doing 20 years ago. Now, offshore copies flooded the market, nobody has reported a failure (yet), and they are so cheap ($60-$75!) it doesn't make sense not to have one in your toolbox.

:banana1:
 
Most spring compressors involve huge nuts and bolts that take longer to set up vs removing only one nut from a shock.
Mercedes (Klann) spring compressors are not like this. No nuts, no bolts, no complicated setup. It LITERALLY takes less than 60 seconds to set up if you've done it before.


Lets just admit, not everything that was created and shoved down our throat to make money is efficient and safe.
The proper Klann-style compressor used on Mercedes springs is efficient and safe. I'm not understanding why you think it's somehow less efficient and less safe than using a jack...?

:mushroom:
 
Im sure it works fine but Id rather risk taking a spring out by dropping the control arm than compressing something thats supposed to hold four thousand pounds. It just doesn't seem logical.

Its just my opinion and I dont advise anyone to do it one way or another.
 
Removing the spring using a jack only involves almost no risk. by the time the control arm is lowered half way, the spring is already probably 80% decompressed and still secured. Its not going to fly out.
Its just my opinion and I dont advise anyone to do it one way or another.

Cool. You do you. I’m here to learn, not criticize! :-) Just something to consider ... the energy stored in a spring is not linear wrt it’s compression. The energy stored in a spring is proportional to the SQUARE of the amount of compression. At 80% decompression, there may still be a lot of energy stored in a spring.
E90B02CA-E195-49E7-B98F-C26282AC4150.jpeg
 
To recoup, a week ago I've started this thread to receive some pep-talk, as I'm a complete novice to a automotive DIY.

Today I've decided to finally tackle springs job using new Klann clone from eBay. And, of course, I'm having an issue, which I attribute to my inexperience.

I've read the FSM for this job and Klann's instructions for using the tooI several times.

I started compressing the spring. Half way though - BAM - spring decompressed completely.

Examine compression plates - they have no damage. This means compressor did not break through either of the compression plates, so something inside compressor itself gave in.

Examining compressor, there are no damaged or stripped threads on the shaft, as far I can see. The unit is oiled and does not appear damaged.

What could I be doing wrong? Don't want to give up, but the risk is TOO BIG :miserable:
 
If you have your replacement set, lets do this by hand on the ground. Practice with the springs with out a load, only the load you get while compressing them about 2-3". see how that goes.
 
Are you 100% certain all 3 tabs on the top of the shaft, were fully seated into the 3 notches on the top plate? If nothing is broken, that is about the only way the parts can separate unexpectedly.

😨
 
Are you 100% certain all 3 tabs on the top of the shaft, were fully seated into the 3 notches on the top plate? If nothing is broken, that is about the only way the parts can separate unexpectedly.

😨
I had this happen once. Turns out I hadn't properly seated one end of the compressor in the plate. When you start compressing, only one of the three tabs may be engaged since the plate is slightly tilted. Watch this as you compress so each of the three tabs are dropping into their notch in the plate.
 
this is why I say practice on a box or a rug with spring laying on the ground, you can see WTH is going on, and it is safer to learn. Plates will still twist etc, but safer to try a few inches and study it. It definitely is a confidence booster.
 
I had this happen once. Turns out I hadn't properly seated one end of the compressor in the plate. When you start compressing, only one of the three tabs may be engaged since the plate is slightly tilted. Watch this as you compress so each of the three tabs are dropping into their notch in the plate.

I just practiced on a replacement spring on the ground, as @nocfn suggested. Couldn't bring myself to compress the spring more than 1.5 inches - 🐔I did notice what you're talking about, I'll try again and on the car watch this.

@gsxr, Dave, so indeed unless all 3 notches on the top go into their grooves, that is the only way things could come apart?

Lastly, how many inches is it safe to compress front spring on the ground, for additional practice, so that if someone goes wrong the spring won't go flying?

Thanks for babysitting me 😁
 
One more thing I noticed. Sometimes when I install plates and compressor on a spring (spring on car) the compressor will start biting and compressing spring almost right away. At other times, I can turn and turn and turning bolt will disappear into the lower control arm without biting/compressing spring. Like I need to use extension to reach the bolt to further turn it

I'm definitely doing something wrong...
 
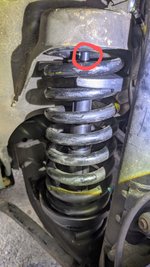
Here, you can see the shaft is already peering above the top 3-pont interlock. At this point turning bolt is an 1-1.5 inches inside control arm (need extension) to reach it. Yet spring has not yet began to compress. I can still wiggle the compressor. At other times it will start biting and compress almost right away...
IMG_20200420_165530~2.jpg
 
This is the problem with the non-Klann/Miller compressors from eBay. Unfortunately the shaft's lugs don't bite into the plate grooves as easily/readily as the factory compressors do. It requires extra care to ensure that a good bite exists. Something that should be double and triple checked. This is the only way that anything could suddenly "let go".
 
Back
Top