• Hi Guest !

    Welcome to the 500Eboard forum.

    Since its founding in late 2008, 500Eboard has become the leading resource on the Internet for all things related to the Mercedes-Benz 500E and E500. In recent years, we have also expanded to include the 400E and E420 models, which are directly related to the 500E/E500.

    We invite you to browse and take advantage of the information and resources here on the site. If you find helpful information, please register for full membership, and you'll find even more resources available. Feel free to ask questions, and make liberal use of the "Search" function to find answers.

    We hope you will become an active contributor to the community!

    Sincerely,
    500Eboard Management

400E power steering leak

Kyiv

1993 400E | Azov мой кумир!
Member
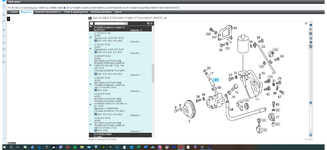
My 1993 400E power steering fluid was leaking from the day I purchased my car, back in August of 2014. Over the last 5.5 years/26k mi I had to add a total of 4/5 of a quart of MB steering fluid. My indy says it's the pump, but as I understand from reading on the forum, oftentimes it's a hose between reservoir and the pump (#47 on the diagram), so I'd like to try that first...
PS Hose.png

Questions:

1.
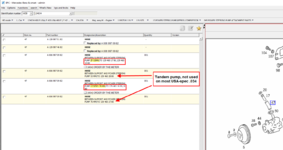
I think - I will double check - my pump is made by Vickers, so I'll be getting part #A0069970982. Xentry portal has two entries for this part #. What do highlighted in orange notes mean? Why are there 2 entries for the same part #? I'm just getting acquainted with using EPC.
2. How likely that the fitting (#17 on the diagram) needs to be replaced?

Thanks!
 
There are two different entries, because there are two different types of tandem pumps: Vickers, and ZF. Basically though, the "short hose" is the same. I recommend you add perhaps 0.5-1 cm to the length of the hose, just to provide a bit of extra length.

The orange note "TO 129 460 16 80" and "129 460 18 80" and "TO 129 460 27 80" denotes different tandem pump part numbers. Meaning that the short hose length leads TO the tandem pump. Different chassis used different pump numbers.

The "970, 971, 972, 974, 975" notations denote different variants of the M119.97x engine, as used in the W140, R129 and W124 chassis. For the 500E/E500, the relevant number is .974. For the 400E/E420, the relevant number is .975. The 970, 971 and 972 numbers are for the R129 and W140.

That is a tubular metal fitting (#17) and thus WILL NOT need to be replaced. It fits INSIDE of the short-hose.

The HOW-TO on rebuilding the tandem pump should be helpful in seeing all of the parts and how things are taken apart, and put back together.
 
Apparently the newfangled XPISS is lacking in some areas. The crusty old EPC is much more clear in this case. Screen shot below.

1) The references to 970, 971, etc are meaningless. All the .97x engines use the same part number hose! You need to know the LENGTH of hose for the application (see #2 below).

2) You need to know the LENGTH of the hose required for Vickers-LuK or ZF pumps. Ignore the pump part numbers shown, the important item is the pump manufacturer: ZF = 53mm, and LuK = 76mm. This is shown in XPISS but is overshadowed by the superfluous 970/971/972/974/975 notation.

3) Why are there 2 entries for the same part #? Because the same hose is used with multiple different pumps on the same chassis/engine combinatoin. The "other" pumps are either ZF vs LuK, and/or models with SLS (tandem pump) vs without SLS (standard, non-tandem pump). The R129 and W124 share identical pumps, all have a 129- prefix. The W140 has pumps with identical dimensions, but slightly different pressure ratings, and a 140-prefix.

4) Gerry is correct, fitting #17 does not need replacement unless you damage it (unlikely). A new aluminum seal ring (#20) is recommended but the old one could be re-used in a pinch, if undamaged.


1585233265753.png
 
My 1993 400E power steering fluid was leaking from the day I purchased my car, back in August of 2014. Over the last 5.5 years/26k mi I had to add a total of 4/5 of a quart of MB steering fluid. My indy says it's the pump, but as I understand from reading on the forum, oftentimes it's a hose between reservoir and the pump (#47 on the diagram), so I'd like to try that first...
You can determine which area is leaking by removing the pulley and cleaning EVERYTHING bone dry.

If the pump is leaking, it will leak out the front shaft seal, the bottom of the pump will be dripping wet, and the top of the pump (short hose) will be dry.

If the short hose is leaking, the entire pump will be wet, top to bottom, more so on the side which angles downward (gravity pulls the fluid in that direction). The very front of the pump snout by the seal may be dry while the body of the pump is wet.

The pump can be re-sealed without removing it from the bracket, btw...

:seesaw:
 
The pump can be re-sealed without removing it from the bracket

I re-checked, my pump is made by Vickers. Xentry shows identical part # for it and ZF, that's correct, right? Only difference is hose diameter?

Would you recommend to change any other parts on that axis, aside from those in red squares, like, for instance, #112? mboemparts.com shows it as NLA...

Also, the sequence to reseal the pump: remove coolant hose from radiator to water pump, remove distributor cap, relax belt tensioner, remove belt, unbolt power steering pump pulley? I know there is a how-to for a tandem pump, just want to make sure it's the same for non-tandem pump. Thanks!

power steering pump reseal.png
 
Last edited:
Same hose part number, sames hose diameter, only a different length of hose needed. It's only sold in 1 meter increments so you'll have enough left over for a dozen other cars.

All the items you have higlighted, and #112, are part of the seal kit. The seal kit (#179) includes all the items that the lines touch, i.e. numbers 32, 65, 80, 74, etc... and 112. That weird symbol of a triangle inside a circle is the EPC indicator of a repair/service kit that includes multiple separate items.

Your sequence is basically correct, just follow Gerry's writeup. Remember to loosen the pulley bolts before you remove the belt (easier that way). The tandem pump procedure is more complicated when you take the pump apart, but the principles are the same. The P/S pump is easier. With stuff out of the way you can unbolt the cover (4 or 5 bolts) and pull it straight out of the body, which remains bolted to the engine bracket. Then re-seal the front/snout part on the workbench. Be careful with those flat metal tabs, they look non-directional, but they are directional!

Also follow the FSM procedure, which will help.

:banana2:

ps_hose1.jpg
 
Dave, thanks a lot! Hopefully last thing I'll bug you with:

Vickers pump had 3 part #s - original and 2 superseded it. There are x3 part numbers for seal kits as well. Only one of them is not NLA and it pertains to the original (the very first) power steering pump part #. The other two kits are linked with later power steering part #s.

How imperative is it to make sure that the pump on my car has the very first part # and not a neither superseded part #s? Hopefully it makes sense what I'm asking...
 
Ideally you wipe off the tag on your pump, and read the pump part number. Then order the seal kit for that pump. This ensures zero mistakes.

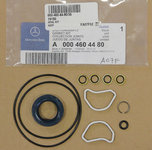
Wild guessing, I'd think your Vickers pump on the car is 129-460-25-80, if so it requires seal kit 000-460-44-80. It also appears the "early" Vickers pump, 129-460-16-80, uses the same seal kit 000-460-44-80. $40 from Napsterville (click here).

Photo attached below of the pump tag for a ZF pump.

ps_pump1_tag.jpg
 
As I mentioned, add a few mms (0.5-0.8cm) when cutting the length of "short hose" that you need, to give yourself a little more material to bite into.

Also, I put two ring clamps on each end of the short hose when I did the job. I know the factory only put one, but I felt that a little extra security is not a bad thing. To date, I've not leaked a drop of fluid from the short hose area.
 
Be careful adding much length to the hose. If too long, it can cause more problems. If you use 2 clamps, only use OE-type narrow clamps. There isn't room for two wide clamps. For the record, I have only used a single clamp on each end, but I haven't done this job in years.
 
Less than 1 cm in length is not going to cause any problem. If you look at my HOW-TO, where I document this, you will see proof of such.
 
Also - be sure the clamps (either 2 or 4) are not too tight, really just get them oriented for easy adjustment and only start them a thread or two. The new rubber can cause you trouble getting the lip of the threaded pipe into the hose.

Side note (I considered a silicone hose rated for hydraulics at 500F temp and ample PSI and will most likely do so next time around)
 
One other thing, that is important.

A couple or three weeks after replacing the hose, be sure to go back in and snug-tighten down the clamps. This is because the rubber compresses and can cause weep-leaks after the fact. So a quick quarter-turn on each clamp bolt will snug things down and ensure a secure seal going forward, after the initial compression of the rubber hose ends.

I recommend the same procedure with M119 valve cover and 722.3 transmission gaskets, when installing new ones.
 
One other thing, that is important. A couple or three weeks after replacing the hose, be sure to go back in and snug-tighten down the clamps. This is because the rubber compresses and can cause weep-leaks after the fact. So a quick quarter-turn on each clamp bolt will snug things down and ensure a secure seal going forward, after the initial compression of the rubber hose ends.
Yes, this is highly recommended for all hoses, including coolant hoses. And it's why you want to orient the clamps so they can be easily accessed & tightened in the future *without* taking anything apart.


I recommend the same procedure with M119 valve cover and 722.3 transmission gaskets, when installing new ones.
I've found that when the valve cover and trans pan gaskets are evenly torqued to spec, they rarely need to be re-tightened later. However, the engine oil pan gasket seems to almost always need re-torquing after a few hours of operation with a new gasket...

:scratchchin:
 
Gentlemen, thank you for the information and guidance. I've ordered a seal kit, angst other things from mbodmparts.com
 
Be careful with those flat metal tabs, they look non-directional, but they are directional!

Dave I'm about to reseal the snout of my non-tundem pump. Already have it out. The tabs that you are referring to, are they the ones that - I'm guessing here - suppose to scoop steering fluid as the pump spins? If yes, how do you determine direction? Thanks
 
Yes, that is correct. One side has a rounded edge, the other side is flat. It's very hard to tell the difference, IMO. If possible keep them inserted so they don't lose orientation. There's no need to take them out, but sometimes they'll fall out while you're working.

:oops:
 
Ok, good! That's what I noticed, that one side is just ever so slightly curved - to scoop better. Thanks!
 
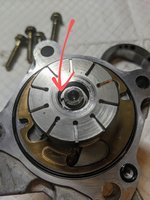
Would someone please point to the best size/type circlip pliers to remove this circlip? I've tried with two minutes flat blade screwdrivers, with one of them snapping in half, without a result. I'm completely new to circlip pliers.

IMG_20200516_212421~2.jpg
 
Would someone please point to the best size/type circlip pliers to remove this circlip? I've tried with two minutes flat blade screwdrivers, with one of them snapping in half, without a result. I'm completely new to circlip pliers.

View attachment 103663

Are there any holes in that clip for the ends of snap ring pliers to "slot" in to?


BTW I have the el-cheapo kind with interchageable tips. It's kind of annoying to change out the tips, but I don't use the tool often enough to really care for spending money to replace it.

 
@Jlaa, thanks. I've got an idea now, from your Amazon link what I think I need, before heading to home depo tomorrow. The ring in the picture doesn't have any holes, but it's not a closed circle - a packman with a semi-opened mouth
 
I think you can remove the surrounding piece first, that holds all the little flat paddles. Should slide off, but the fun part is keeping the paddles in place. Doesn't Gerry's writeup show this? Even if he has a different pump, the procedure is similar.

With that part removed you have better access to the pesky clip. I bought the pliers shown below after fighting this stupid clip, but don't think I've actually used it yet.

 
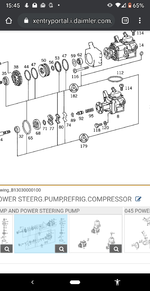
So I've replaced all seals on the snout of my non-tundem power steering pump using MB kit A0004604480 (#179 on the diagram)
Screenshot_20200518-154529.png


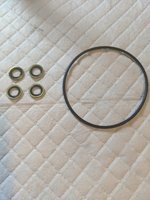
I've got spare parts left from this kit:
  • x1 sealing ring, which I believe is #112 from the above diagram
  • x4 washers with a rubberized internal circumference
Could someone please tell me where are they supposed to go?
IMG_20200518_155101.jpg


Below are the only seals that were available to me for replacement. I don't see any other seals or washers with rubberized inner circumference to replace.
IMG_20200518_155540.jpg
 
The kit may include parts you don't need and won't use. Haven't done this in years so I can't say for sure, but if you didn't find those items in your pump, you can safely ignore them.

seal_kit_000-460-44-80_OE2.jpg
 
Thanks Dave. That's exactly what my kit contained. As always just needed a reassurance from the expert before proceeding: a novice and spare parts combo is a proverbial phenomenon :D

Just in case, I'd like to double check with you. I pulled out pump's snout only. The spring with a plunger (?) remained in the pump's housing. I only resealed the snout, that's all good, right? Thanks
 
I believe my tandem seal kit had a number of parts that I didn't use. I may have documented this toward the end of the HOW-TO.
 
Did it fix it?

Are you asking me or Gerry? Just in case, if you're asking me, I don't think my pump was leaking, most likely it's the short hose between reservoir and pump, as it's 95% petrified. Resealing pump is just a prudent thing to do. I haven't assembled yet everything back into the car. My leak is a minor one - almost a quart added in almost 6 years
 
Just in case, I'd like to double check with you. I pulled out pump's snout only. The spring with a plunger (?) remained in the pump's housing. I only resealed the snout, that's all good, right? Thanks
The big seal at the snout front is what leaks. But you have to take everything else apart to replace the blasted thing!
 
I've got all my parts ready to go for this short hose replacement. Unfortunately I somehow overlooked ordering the aluminum crush washer. I have various sizes in stock but can someone tell me the I.D. and O.D. of the washer?
 
I think it is 20 x 24 x 1.3 (approximately), but you can usually re-use the old one.
 
My '93 400E pump is leaking also and I'm hoping it's just the hose from the reservoir to the pump so I will try replacing that first. Can this be done by just removing the reservoir and leaving the pump in place? I know I will need to drain the reservoir and refill after I replace the hose so does that mean I will need to bleed the system? I saw a bleeding procedure for other MB chassis where you turn the steering wheel lock to lock 30 times BEFORE you start the engine but does apply to the 400E pump also? I guess putting the front on jack stands would make this easier to do. And do our pumps have that gasket between the reservoir and pump bracket? I've seen some pictures with it and without it, just need to know if I need to order that also, not sure what brand pump I have but car is a '93 400E...
 
Does your car have rear SLS (thus, a tandem pump), or no rear SLS?

Yes, you can replace the hose by removing the reservoir and the long metal pipe that screws down through the hose from the reservoir platform. There is a HOW-TO article on it and I also covered it in my Top End Refresh project thread late this summer.

I wouldn't worry too much about bleeding the system. It will bleed itself if you start the engine and slowly turn things lock to lock a number of times.

Yes, there is a thin gasket between the base of the reservoir and the pump bracket. I would recommend replacing this gasket. You will ALSO need to get a new aluminum washer. DO NOT re-use the alu washer, or it will leak. One-time use only. Buy 2-3 of them, just in case.

Again, look at the HOW-TO and at my project thread and you'll see all of it well laid out. There is a PLETHORA of information here on the forum that answers all of your questions.

Read the HOW-TO.
Read this second HOW-TO as well.
Read this post.
Read this post too.
 
If you are replacing the reservoir hose to the pump for the first time for the car, it is my humbled opinion that you change the aluminum washer for the threaded 12mm rod, two new style hose clamps, the gasket for the reservoir and the proper hose length for your type of pump. (brand). Search for PS short hose and you will find the info you need. Since I have replaced factory stuff once, I did not renew gasket or aluminum washer when I needed to replace hose. As it turned out, that washer in my case the second time did not seal properly and that was the source of my leak. YMMV, I will change that washer out every time I remove that 12mm threaded rod nipple.
 
I'm hoping it's just the hose from the reservoir to the pump so I will try replacing that first. Can this be done by just removing the reservoir and leaving the pump in place?

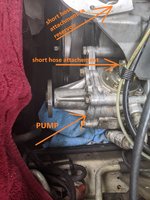
Yes it can. Here is picture with steering fluid reservoir and pump's pulley removed on my 1993 400E. There is enough space to replace short hose with pump untouched
IMG_20200518_175702.jpg

Same are, view from above (but with pump removed):
IMG_20200516_163045.jpg


know I will need to drain the reservoir and refill after I replace the hose so does that mean I will need to bleed the system?

Here are M-B's instructions on how to bleed the pump. Turning steering wheel lock-to-lock several times really does it.

do our pumps have that gasket between the reservoir and pump bracket?

Yes, #127 on the diagram.

reservoir gasket.png

You can also replace the gasket on the reservoir cover, #155

reservoir cover gasket.png


On my car, the fluid was slowly leaking. I've added about 4/5 of a quart over 5.5 years. I resealed the pump AND replaced the short hose and NO more leaking ever since. Hard to say what was the culprit. My STRONG advice to you is to reseal the pump AND replace the short hose. It was easy and straightforward for me and it hasn't been 18 months since my first DIY oil change :coolgleam:. You can see in the very first picture above that the pump is held by the 4 bolts. Once unbolted you just pull the pump straight out and replace a few seals (last pic in the post #23 above) on a workbench. Again, it was easy even for rookie such as myself. You'll need a reseal kit #179 in the above diagram. I'm not giving you a part # for #179 as diagram shows info for my specific VIN. If you give me yours I can look up the correct part # for your pump.

View of the pump extracted:
IMG_20200516_163053.jpg

Lastly, sealing ring (#20) that @nocfn mentioned above - replace it too:
sealing ring.png
 
Does your 400E have rear SLS, or not? If it doesn't have rear SLS, then it won't have the tandem pump, and will only have a power steering pump. Please advise.
 
Wow, Thanks for all the info, really gives me the confidence to attempt this myself. As far as SLS, I didn't even know that was an option on the 400E. I've been under the car and don't see any air bladders or anything, just spring and shock. Is there a definitive way to know for sure if I have SLS? Self Leveling System right? I did order the power steering reservoir to pump hose which to my understanding you just cut to size depending on your brand of pump. I also got the crush washer as well. I still need to order the reservoir base gasket and I guess some new hose clamps as well. Not sure if I'll attempt to reseal the pump if it looks like it's just leaking from the hose although I did buy a cheap reseal kit in case I decide to try to tackle that; not sure I trust it though, it was only like 6 bucks and can't remember where I got it; here is a pic of the reseal kit and it did come with the shaft seal as well
 
Last edited:
Here’s the seal kit I got but it looks like it's missing a couple things compared to the ones shown earlier in the thread:image.jpg
 
Last edited:
USA-spec 400E/E420 did not have SLS unless it was special ordered. I've only confirmed 2 or 3 in USA with SLS, ever. If there is no separate hydraulic tank under the hood for SLS fluid, your car doesn't have SLS.

For the pump seal kit, the primary one needed is the front shaft seal. The rest of it is mostly just "while you're in there" O-rings. Make sure to get the correct kit; ZF and Vickers/LuK pumps use totally different seals.
 
Here’s the seal kit I got but it looks like it's missing a couple things compared to the ones shown earlier in the thread:View attachment 119764

in the post #36 above, the very first picture, if you zoom in, you'll see a tag on the pump saying who made it. It could be Vickers or ZF. Tag is likely covered by the grime, so you'll need to wipe it off to see the information on it
 
I had one more question, per the bleeding instructions above, it says to turn steering lock to lock 2-3 times after starting the engine for a second two or three times; do you do this lock to lock with the engine running or not running?
 
The PS system will self-bleed 99% with the engine off, turning lock-to-lock multiple times. After starting the engine you can double-check the fluid level but it should not change significantly. This only applies to W124's with M119 engines; the V8 steering boxes are different.

Turning lock-to-lock with engine off can also be used to pump out most of the fluid from the system before removing lower hoses, but this requires a second person...
 
Back
Top