• Hi Guest !

    Welcome to the 500Eboard forum.

    Since its founding in late 2008, 500Eboard has become the leading resource on the Internet for all things related to the Mercedes-Benz 500E and E500. In recent years, we have also expanded to include the 400E and E420 models, which are directly related to the 500E/E500.

    We invite you to browse and take advantage of the information and resources here on the site. If you find helpful information, please register for full membership, and you'll find even more resources available. Feel free to ask questions, and make liberal use of the "Search" function to find answers.

    We hope you will become an active contributor to the community!

    Sincerely,
    500Eboard Management

E500 engine swap completed

gsxr

.036 Hoonigan™, E500E Boffin, @DITOG
Staff member
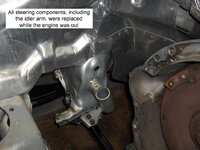
My E500 has had a slight coolant leak where the cylinder heads meet the block, for a couple of years now. It would lose maybe a pint of coolant over 1,000 miles or so... not a serious leak, but enough to be of concern. After seeing photos of Austin's car with the heads off, I decided there was no way I'd do this job with the engine in the car. It is 10 times easier with the motor removed, and bolted to an engine stand. This thread will cover the engine R&R, and maintenance done while the engine was out.

In spring 2009, I picked up a low-miles spare engine from a 1992 500E. I did some basic prep on that motor (all chain rails except the two inside the timing cover, some new gaskets, etc) and planned to swap motors. This will allow me to still drive the car, while taking my time with the head gasket replacement on the original 1994 engine. (I'll post a separate thread about the spare engine prep - stay tuned for a link when that thread is posted.)

Pulling the engine and transmission together looked like a real nightmare, so I opted to use an alternate method. Steve (of SG Motorsports) recommended pulling the transmission first, then pulling the engine. He is absolutely right - this is the easiest method, as I learned the hard way. Since I do not yet own a tranny jack, I decided to leave the transmission in the car. This is a pain because you have to support the transmission while pushing it straight back at least 1.5 inches. I fabricated some supports, which did the job, but I don't think I'd do it again. Next time, I'll pull the tranny.

With the tranny separated, the engine pulls straight out the top with minimal fuss. The load leveler I used added a bit of distance from the hoist to engine, and the hoist itself has a foot of chain, which led to the oil pan clearing the hood latch by a gnat's eyelash with the hoist at maximum extension. Next time, I'm shortening the hoist chain!!

Once the motor is out, it's time to bolt it to the stand. This presents another challenge... the light or medium duty stands don't have long enough mounting tubes, i.e. there isn't enough space between the stand and the flywheel. Only the 2000-lb stand from Harbor Freight had long enough mounting ears, and even then I had to unbolt the flywheel (the flywheel won't turn if you leave it installed). This is really annoying, and I would really like to get a better quality engine stand, but I haven't been able to find one - everyone sells the same cheap Taiwan crap. *sigh*

Another hassle is the fact that the 2000-lb engine stand has splayed / angled legs that do not play nice with the splayed / angled legs of the hoist. You can't just roll the stand under the engine hanging off the hoist and lower it into place. It only fits one way, and just barely, with the hoist boom fully extended in the "1/2 ton" position. The hoist is also a Harbor Freight special, the 2-ton foldable type, and it works fine (although the chain should be shortened, as mentioned previously).

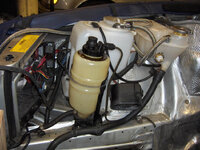
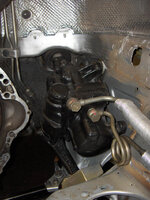
Here are a few photos of the removal process:


:spend:
 

Attachments

  • engine_pulling1.jpg
    engine_pulling1.jpg
    96.6 KB · Views: 56
  • engine_stand3.jpg
    engine_stand3.jpg
    102.8 KB · Views: 41
  • engine_stand2.jpg
    engine_stand2.jpg
    117.2 KB · Views: 34
  • engine_stand1.jpg
    engine_stand1.jpg
    94.2 KB · Views: 39
  • engine_stand6.jpg
    engine_stand6.jpg
    127.6 KB · Views: 44
  • engine_stand5.jpg
    engine_stand5.jpg
    125.5 KB · Views: 43
  • engine_stand4.jpg
    engine_stand4.jpg
    132.1 KB · Views: 48
  • engine_pulling4.jpg
    engine_pulling4.jpg
    117.9 KB · Views: 48
  • engine_pulling2.jpg
    engine_pulling2.jpg
    106 KB · Views: 59
With the engine removed, there is a cavernous empty space to work with. Previously maddening jobs become simple, for example removing the steering box to replace the pitman arm shaft seal and bearing cover seals (separate thread coming for that as well). Pulling the steering box with the engine in the car is a nightmare, mostly because it's extremely difficult to access the two fluid line banjo bolts. With the engine out of the way, it's a breeze.

The idler arm was not particularly loose, but had about 1mm of play, which I believe is the limit specified in the FSM. It was never going to be any easier to replace, so that started me on the path of complete steering refresh. The 400E/500E use an idler arm which is 2mm larger diameter than the standard 124 idler arm, and the rebuild kit is a dealer-only item at over $100... far more expensive than the smaller kit used on its 4/5/6-cyl siblings. The E500 has 104k on the odo and I assume all steering links were original, so even though none had significant play (if any), I replaced everything on principle: new left + right tie rod assemblies, drag link, idler arm bushings, and steering shock. Parts were either OE Mercedes from the dealer or OEM Lemfoerder. I used the Klann tie rod popper to separate the joints, this is a fabulous tool, and again it's easier to use with the added clearance of the engine removed.

Everything got scrubbed up nice & clean, as you can see in the photos below. Notice the short, straight section of power steering hose hidden behind the heat shield... this is very difficult to replace with the engine in place (I'm not even sure it's possible without pulling the steering box). I also replaced the braided SLS low-pressure hose, drained & cleaned the reservoir, and re-filled with clean hydraulic fluid. The tandem pump was leaking at the front pump seal (despite a re-seal only a few years ago by the previous owner's tech) so the tandem pump got re-sealed again. I'll probably post a separate thread about that as well, along with the engine mount swap.
 

Attachments

  • engine_compartment10.jpg
    engine_compartment10.jpg
    119.5 KB · Views: 32
  • engine_compartment09.jpg
    engine_compartment09.jpg
    141.8 KB · Views: 31
  • engine_compartment08.jpg
    engine_compartment08.jpg
    124.9 KB · Views: 28
  • engine_compartment07.jpg
    engine_compartment07.jpg
    132.8 KB · Views: 33
  • engine_compartment06.jpg
    engine_compartment06.jpg
    114.8 KB · Views: 30
  • engine_compartment05.jpg
    engine_compartment05.jpg
    92.7 KB · Views: 28
  • engine_compartment04.jpg
    engine_compartment04.jpg
    131.3 KB · Views: 28
  • engine_compartment03.jpg
    engine_compartment03.jpg
    124.6 KB · Views: 33
  • engine_compartment02.jpg
    engine_compartment02.jpg
    131.7 KB · Views: 56
  • engine_compartment01.jpg
    engine_compartment01.jpg
    139 KB · Views: 34
  • engine_compartment11.jpg
    engine_compartment11.jpg
    88.5 KB · Views: 35
Close-up pics of the steering box itself are below. I'll post the info on replacing the seals in a separate thread.


:driving:
 

Attachments

  • steering_box_leak.jpg
    steering_box_leak.jpg
    36.4 KB · Views: 24
  • steering_box1.jpg
    steering_box1.jpg
    116.8 KB · Views: 25
  • steering_box2.jpg
    steering_box2.jpg
    113.7 KB · Views: 33
  • steering_box3.jpg
    steering_box3.jpg
    111 KB · Views: 25
Nice job, Dave. Do you think installing larger casters on the hoist and/or shorter ones on the stand would help? Basically, if the legs on the stand could slide under the legs on the hoist, wouldn't that be all that's needed?
 
Since the spare engine was 1992 vintage, I had to use my 6-rib pulleys (because my AC compressor and smog pump are both 6-rib). But the 1992 manual belt tensioner was only used with 8-rib belts, and the two belts are different lengths! I'm just glad I noticed the difference in belt length BEFORE it all went back together. I ended up using the idler pulley from a 603 diesel engine and a shorter 6-rib belt from another MB engine (M113 kompressor) to make the funky hybrid setup work. I obtained a 1993-up style timing cover which would allow using the automatic tensioner, but I did not want to pull the timing cover on the spare motor until I was sure it was a good engine (too much work, if the engine turned out to be a dud). When I swap the original engine back in, I will then pull the timing cover on the spare engine, and install the late style timing cover. This will allow the spare engine to work with both 8-rib (manual tensioner) as well as 6-rib (automatic tensioner) belt setups, and eliminate the need for the funky hybrid that I'm currently using. This may come in handy since I own both a 1992 500E and 1994 E500... the spare motor would work for either car without belt hassles.

After dropping the engine back into the car and re-connecting everything (which takes approximately forever), it fired right up. Well - it fired right up after I plugged in the starter harness, lol! Hey, at least the one thing I forgot was relatively minor. My wife spotted the clamp missing on the heater hose by the brake booster, which was the only other mistake (that would have been ugly - I owe her big time for that one!). But anyway, the engine lit up with no ugly noises, no spurting fluids, and no major disasters - phew. Just a bit of rattle for a few seconds as the dry cam advance mechanisms filled with oil. I was initially worried because the right cylinder head quieted down within a few minutes, but the left head had numerous lifters tapping away. I went on a 20-mile test drive and thankfully the tapping noises vanished by the end of the drive. I didn't push it hard at first, only part throttle and not more than approx 4krpm, to break it in easy to start with. After about 100 miles without incident I started leaning on it harder, with no problems thus far.

Since the engine was not run for approximately 2 years, the fuel in the injection rail and injectors was likely varnished up. I couldn't easily locate Red Line locally, so at first I put in a bottle of 3M Total Fuel System Cleaner. It's due for another fillup now, and it will get a bottle of Red Line SI-1 to help ensure the injectors are free of any remaining gunk. I've got approx 400 miles on it since it fired up 10 days ago, driving it almost every day. While it was on the engine stand I cleaned every last trace of oil from the motor so it should be easy to spot any leaks. I haven't seen a single one yet. (knock on wood!)

The dragstrip opens up on April-3, and it will get a proper shakedown run at that time. After the second tank of fuel is run through (approx another 400 miles), I'll do a compression test on the spare engine to compare to the original motor (which I tested just prior to pulling it out).


:e500launch: :checkeredflag: :e500launch:
 
Glen said:
Nice job, Dave. Do you think installing larger casters on the hoist and/or shorter ones on the stand would help? Basically, if the legs on the stand could slide under the legs on the hoist, wouldn't that be all that's needed?
Yes, if the legs would overlap, that would help. Swapping caster size would not be practical, as taller casters on the hoist would not let it go under the car (it barely fit as-is). I suppose the casters could be removed from the stand while attaching the engine, but then you'd have to lift it somehow to get the casters back on. No easy solution either way, other than buying well-designed tools from ????.

:wormhole:
 
Nice. I'm on the cleanup phase as you showed with the heads off of my block, using a combination of Simple Green and brake cleaner.

Interesting that the steering box has a heat shield. It doesn't on the C126.

Cheers,
Gerry
 
Yeah, I'm cleaning up an M103 3-liter that's going into my daughter's 190E 2.6 in the near future. I find Simple Green with brass and stainless steel brushes work great with old microfiber towels to pick up and hold the wet greasy dirt.
 
I'm all for well designed tools but for the number of times I will actually pull engines, I'm not willing to spend the money for a better hoist or stand. If I have this issue when I pull the M119, I might try building a platform for the hoist to stand on just to attach the engine to the stand.
 
You can build a "cradle" for the transmission that can be used with an ordinary hydraulic floor jack, at least that's what I've done in the past with cars I've owned where I've needed to pull the gearbox.

The investment in special tools is always a conundrum. I had to invest about $200 in "special tools" for my 560SEC heads and I was glad to do it, although the largest investment (the valve spring compressor) is only usable with SOHC Benz engines such as the M103, 116/117, etc. So Glen, if you need to do any head-related work on your 103, do let me know and you are welcome to borrow the tool. I was able to justify it (in my own mind, at least) given that I also own a 560SL with the same motor (albeit with only 50,010 miles on it) so if I need to do any head-work on that car, I can readily do it.

I had an engine stand in Portland but I sold it via Craigslist before I moved to Houston as I didn't want to bother with bringing it along. Harbor Freight is just a few minutes away if I need them ....

Cheers,
Gerry
 
Glen said:
I'm all for well designed tools but for the number of times I will actually pull engines, I'm not willing to spend the money for a better hoist or stand. If I have this issue when I pull the M119, I might try building a platform for the hoist to stand on just to attach the engine to the stand.
For the hoist, I agree. For the engine stand, after dealing with the various annoyances several times on different engines, I would gladly invest in a "real" stand - if I could FIND one!!! :banghead:


gerryvz said:
You can build a "cradle" for the transmission that can be used with an ordinary hydraulic floor jack, at least that's what I've done in the past with cars I've owned where I've needed to pull the gearbox.
Yup, and Harbor Freight sells both cradles/adapters for your existing floor jack, as well as special jacks designed specifically for transmissions. They're not expensive, but I didn't have one handy, and I dislike paying full price for anything at HF. I'll probably wait for a good sale and pick one up eventually.


gerryvz said:
The investment in special tools is always a conundrum. I had to invest about $200 in "special tools" for my 560SEC heads and I was glad to do it, although the largest investment (the valve spring compressor) is only usable with SOHC Benz engines such as the M103, 116/117, etc.
In general, you can justify the purchase of special tools by figuring that you'd spend at least twice the amount if you paid a shop to do the work. So, you saved a bundle of $$$, and have a nice tool to add to your collection, which often will get used again on a future MB. Another option is to re-sell the tool when the job is done, you can usually recoup roughly 60-70% of your expenditure. Rental is a third option but this can be a hassle, and it takes time to deal with it, but you can make a little money after the tool is rented out a few times. The factory valve spring tool kit is fantastic, but not particularly cheap... but for cars with bucket hydrualic lifters (such as the M104, M119, M120, and all OM60x diesels) it's worth every penny.

:hornets:
 
Thanks Gerry, I may take you up on that offer!

For special tools, up to about $300 isn't too bad but after that it's really hard to justify. I basically factor in the number of times I will actually use it, my convenience and what a particular job will cost at an indy shop or dealer. And for larger item, floor space for storage.
 
I got my valve spring compressor (a $200 tool) from Baum's eBay close-out for $99, which I was happy about. I had to get the chain guide rail pin-puller which cost about $30-35 on eBay new, and also the 8mm hex "C" socket for the head bolts, which allows you to remove the top bolts while the cam is installed (also obtained new via eBay). Also had to get a 24mm deep socket from Craftsman (for the hydraulic lifters), a 7/8" 6-point socket from Craftsman (for the cam sprockets), and a 1/2" drive long swiveling breaker bar to use with the "C" socket to break the head bolts loose.

That was really the extent of the special tools that I needed to get, or things I didn't have. I have a Craftsman store about a mile from my house (not a regular Sears store but only tools) so it's easy to buzz over there on the motorcycle to grab things as needed (the $75 gift card my mom gave me for Christmas came in handy, too).

Cheers,
Gerry
 
Any pics of the leaks area? is it just a head gasket replacement or is there more to it?
 
195910 said:
Any pics of the leaks area? is it just a head gasket replacement or is there more to it?
I did take a few pics but they're not posted to my website yet. I'll be starting a separate thread about the head gasket replacement project, which will show the coolant leak. It's apparent from the white residue which is left when the yellow-colored MB anti-freeze mix dries.

At the moment, I'm only expecting a head gasket swap with no other repairs needed, but I really can't say for sure until I get the heads removed. I will do some other maintenance while I'm in there of course - new timing chain, all chain rails, probably valve stem seals, stuff like that. Due to the cost and time contraints, I'm not planning to begin that project until Nov/Dec 2010. I'd like to have it done in early 2011 and swap motors back a year from now, but it wouldn't surprise me if it ends up being two years (as long as the spare motor continues to behave itself!).


:nos:
 
So you're going to pull the timing cover and do the lower rails? Not a huge deal with the motor out, but the lower rails don't really get much wear. It's the upper rails that ya have to worry about. Valve stem seals would be a good one - I'd carefully inspect the heads (how many miles on the motor? 104K?) and IIWY would just have them refirb'd while off the car. Can't be more than a few hundred bucks. At least have them cleaned and checked, and maybe P&P / EXTHN'D if you want to drop the big bucks for 10 incremental HP.

The M119 is commensurately more complex than the M117 so I am not envying you. I have gained new appreciation for the relative low-techness and simplicity of the C126 / M117 combo and also am loving the extra working room under a hood and engine compartment that was designed for a proper V-8.... ;-)

Cheers,
Gerry
 
gerryvz said:
So you're going to pull the timing cover and do the lower rails? Not a huge deal with the motor out, but the lower rails don't really get much wear. It's the upper rails that ya have to worry about.
Correct. The timing cover is a PITA to remove with the heads and oil pan in place, but with the heads off, it's simple to remove it. There are also four O-rings between the timing cover and block that seal coolant passages, and I'd feel better with those replaced as well. Once the heads are off, the additional labor to pull the cover, and extra cost for the two lower rails, is negligible. IMHO, it would be silly *not* to replace all wear items behind the timing cover, while the heads are off. I will probably also change the oil pump drive chain and oil pump chain rail as well. The idea is to never have to open up this engine again - do it once, do it right, and fuhgeddaboudit.


gerryvz said:
Valve stem seals would be a good one - I'd carefully inspect the heads (how many miles on the motor? 104K?) and IIWY would just have them refirb'd while off the car. Can't be more than a few hundred bucks. At least have them cleaned and checked, and maybe P&P / EXTHN'D if you want to drop the big bucks for 10 incremental HP.
Yup, I plan to check the heads out closely, if anything looks amiss they will end up at a competent machine shop (likely shipped out of state - I doubt there's any place local that has ever touched M119 heads). I am tempted to send them to the same place Talbir had his work done, and have them mildly ported / polished, but this will depend largely on the cost, and current state of my piggy bank when I get there. I expect the guides, valves, and seats should not need any work at all with only 104k on the clock. The valve stem seals are another one of those "while you're in there, replace the soft parts" deals. Besides, I have the tools to do them, no need to pay a shop.


gerryvz said:
The M119 is commensurately more complex than the M117 so I am not envying you. I have gained new appreciation for the relative low-techness and simplicity of the C126 / M117 combo and also am loving the extra working room under a hood and engine compartment that was designed for a proper V-8.... ;-)
That's an understatement. I have gained new appreciation for the relative high-techness and complexity of the W124 / M119 combo. More details on that will be in the engine thread (which I still need to write up - stay tuned). It's abundantly clear that the 124 was never designed to hold a V8 motor, that's for sure. It's amazing that the MB engineers were able to shoehorn one in there at all.

:drink:
 
Yes, the M117/C126 combo is very akin to the early W124/M103 combo, as compared to the M119 and M104 in the later W124 chassis ..... both have their advantages, but for the DIYer the answer is pretty clear as to which is preferable to work on.

gsxr said:
t's abundantly clear that the 124 was never designed to hold a V8 motor, that's for sure. It's amazing that the MB engineers were able to shoehorn one in there at all. :drink:

REALLY makes me marvel at the fact that M120s have been more than shoehorned in there.

Cheers,
Gerry
 
Just so you know .... lower rails on an M117 can easily go 300-400K miles without needing to be changed. I am not sure if the M119 is harder on the lower rails than then M117 is.

For the 117s, it's generally the top rails, and in particular the inside rail on the left-hand bank (driver's side) on US cars that tends to break from chain slap, get caught in the chain and cam sprocket, and cause the chain to jump a tooth (which is equivalent to 18 degrees) and then the valves to hit the pistons....grenading the motor.

The one thing that the 117 has going for it, is that it is (as much as can be) the MB equivalent of a Chevy small-block V-8. Lots of them around, lots of spare parts out there, and cheap and relatively easy to fix.

The 119 is a much more exotic piece of machinery - kind of like the original Corvette ZR-1 engine, which was built by Mercury Marine.

Cheers,
Gerry
 
Christian_K said:
Hi,
how did you get the engine compartment so clean? What have you used? Mine is a pure Mess...
Three easy steps:

1) Remove engine

2) Scrub everything in sight with degreaser, rags, and paper towels

3) Install engine

Works every time!!! Various liquids can be used for cleaning... degreaser like Simple Green would be ok, or Gunk Engine Brite (or similar), WD-40 works surprisingly well (but isn't cheap), and for serious deposits try careful application of carburetor cleaner (this can remove paint, it's better for engine components than the chassis).

:lolol:
 
Dave! I am pulling mine soon. Too many things need to be done, so I'm just gonna yank it and go from there. Ive got to do the starter, lower harness, Lower alternator bracket needs to be welded (dont ask), power steering hose, timing chain/rails....etc.

My question to you is, do you have any other parts you recommend to replace while I have it out? IE motor mounts, pitman seal...

Also, what do you think of this engine stand? Seems like it may avoid the issue of the legs bumping into each other.

http://www.harborfreight.com/750-lb-capacity-engine-stand-32915.html

proxy.php
 
J-Sauce said:
Dave! I am pulling mine soon. Too many things need to be done, so I'm just gonna yank it and go from there. Ive got to do the starter, lower harness, Lower alternator bracket needs to be welded (dont ask), power steering hose, timing chain/rails....etc. My question to you is, do you have any other parts you recommend to replace while I have it out? IE motor mounts, pitman seal...
Good idea, Justin! That will definitely make things easier. Here's a list of things to do:

All 3 low-pressure p/s hoses
Both SLS hoses (also remove tank for cleaning inside & out)
2 small coolant hoses at rear of engine
All upper chain rails (inspect lower rails with flashlight, hope they are ok)
Check chain stretch, replace if necessary
Install new tensioner if it's the old/original style, I'd probably leave it alone if it's the new type
New OE/OEM motor mounts (mandatory - don't even think about skipping these!)
Pull the steering box and re-seal the output flange on the workbench, even if it's not leaking - well worth the few bucks and ~1 hour
Check idler arm, if there is any play (spec is 1mm max) replace the bushings
Check/replace all steering links: if either L or R tie rod assy or drag link has play, replace ALL THREE, and get dealer alignment afterwards
You already have new late-style LCA's, correct?
Make sure to use the MB anaerobic sealant where specified, including on bolt threads as noted in the FSM. DO NOT use RTV.
New valve cover gaskets, new copper seals for the v/c bolts, replace any v/c bolts with damaged allen socket heads
Replace all PCV tubes/pipes on intake manifold if they are not recent (should be soft, not fossilized)
Check knock sensors, if they are all cracked up (which is pretty common) it would be wise to replace them now; the R&R with engine installed is miserable
If the front and/or rear crank seals are leaking, replace them while the engine is out
You'll need a few special tools for this work, btw
Pull transmission and do complete re-seal (this is a separate topic though)


J-Sauce said:
Also, what do you think of this engine stand? Seems like it may avoid the issue of the legs bumping into each other.
http://www.harborfreight.com/750-lb-capacity-engine-stand-32915.html
I would pass on the 750# stand and go for at least the 1000# stand (below) if you want to avoid interference. I had the 1000# stand and it barely supported a 6-cyl inline engine (OM603). The M119 is shorter and weighs less, so it might work OK on the 1000# stand:
http://www.harborfreight.com/1000-lb-ca ... 32916.html

While it's on the stand, you'll need to scrape off every trace of oil and dirt from the block and upper oil pan. Use engine cleaner and/or carb cleaner to rinse and wipe with rags. This will allow you to pinpoint any future leaks, which hopefully will not appear for many years to come...

:matrix:
 
Call me paranoid. I do not mind using a Harbor Freight engine stand, but I do not use the bolts that come with it, just don't trust that hardware and I go get some better graded bolts to hold the arms that attach to the motor/bell housing.
 

Who has viewed this thread (Total: 2) View details

Who has watched this thread (Total: 1) View details

Back
Top