My rear bumper’s right side was slightly out of position & bugging me. Its forward end was not lining up properly with the rear wheel fender arch. Because of this, I could also slightly see the yellowish color of the urethane impact insert (p/n 124 880 03 14) in the right bumper corner. Too much of a contrast against an 040 Black background for my liking.
Instead of just readjusting the bumper back into correct position, I decided to remove the bumper & do several tasks. With the bumper removed, I’d:
• Inspect both the bumper underside & the car body covered by the bumper.
• Thoroughly wash, clean and wax the car body (normally covered by the rear bumper) so it is good to go for the next 18 years.
• Paint the visible yellow inserts flat black so they disappear from my view.
• Cosmetically refurbish the exhaust tips
• Install a new amplifier
But it all starts with bumper removal. The FSM leaves out several important E500E removal steps. This “HOW-TO” procedure will provide detail & tips.
Reference Info:
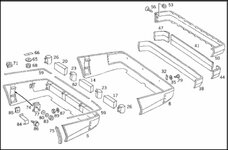
FSM 88-220 Removal, Installation & Adjustment of Rear Bumper
EPC Group 88 Attachment Parts, SubGrp 075 Rear Bumper
Tools:
Body Trim Removal Set
10mm wrench
13mm wrench
10 & 12mm hex sockets
Philips head screwdriver
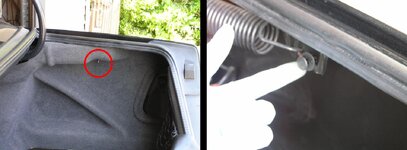
1. Remove the inner trunk fender well linings to expose the rear bumper mounting fasteners (this step is omitted from the FSM). Each lining is secured in place with a friction rivet. Use a trim removal tool or equivalent to pry the rivet loose & remove. Upon removal, I made a discovery in the left trunk well that would sidetrack me for a couple days (this event is explained in another thread called, “All is not well that is in the well”)
http://500eboard.com/forums/showthread.php?1470-All-is-not-well-that-is-in-the-well
2. Disconnect the battery to be safe. Place some mover’s blankets underneath the bumper’s perimeter. This will provide a safe surface to set the bumper down on once removed.
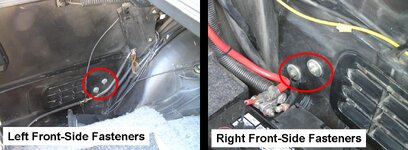
3. Unscrew the rear bumper fastening nuts (quantity 10). The front set (qty 2 x 2) are 10mm. The corner & rear sets (qty 3 x 2) are 12mm.
NOTE: only loosen the fastening nuts if your purpose is to adjust the rear bumper. Reposition the bumper to your liking, then retighten the fastening nuts.
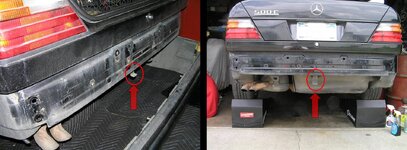
4. Unscrew the Philips head metal screw which faces up from the bottom center of the rear bumper (this step is omitted from the FSM). The bumper can now be removed.
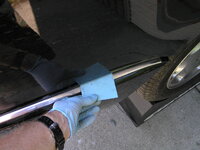
5. Gently pull the wheel arch ends of the bumper out so the mounting studs clear the car body mounting holes.
6. Center your body with the license plate, grab each corner of the bumper & pull straight out away from the car. Set the bumper down on the blankets.
7. Reverse process for reinstallation.
While retightening the fastening nuts, use a playing card or equivalent as a feeler gauge to ensure an even gap with no surface to surface contact between bumper & body.
Instead of just readjusting the bumper back into correct position, I decided to remove the bumper & do several tasks. With the bumper removed, I’d:
• Inspect both the bumper underside & the car body covered by the bumper.
• Thoroughly wash, clean and wax the car body (normally covered by the rear bumper) so it is good to go for the next 18 years.
• Paint the visible yellow inserts flat black so they disappear from my view.
• Cosmetically refurbish the exhaust tips
• Install a new amplifier
But it all starts with bumper removal. The FSM leaves out several important E500E removal steps. This “HOW-TO” procedure will provide detail & tips.
Reference Info:
FSM 88-220 Removal, Installation & Adjustment of Rear Bumper
EPC Group 88 Attachment Parts, SubGrp 075 Rear Bumper
Tools:
Body Trim Removal Set
10mm wrench
13mm wrench
10 & 12mm hex sockets
Philips head screwdriver
1. Remove the inner trunk fender well linings to expose the rear bumper mounting fasteners (this step is omitted from the FSM). Each lining is secured in place with a friction rivet. Use a trim removal tool or equivalent to pry the rivet loose & remove. Upon removal, I made a discovery in the left trunk well that would sidetrack me for a couple days (this event is explained in another thread called, “All is not well that is in the well”)
http://500eboard.com/forums/showthread.php?1470-All-is-not-well-that-is-in-the-well
2. Disconnect the battery to be safe. Place some mover’s blankets underneath the bumper’s perimeter. This will provide a safe surface to set the bumper down on once removed.
3. Unscrew the rear bumper fastening nuts (quantity 10). The front set (qty 2 x 2) are 10mm. The corner & rear sets (qty 3 x 2) are 12mm.
NOTE: only loosen the fastening nuts if your purpose is to adjust the rear bumper. Reposition the bumper to your liking, then retighten the fastening nuts.
4. Unscrew the Philips head metal screw which faces up from the bottom center of the rear bumper (this step is omitted from the FSM). The bumper can now be removed.
5. Gently pull the wheel arch ends of the bumper out so the mounting studs clear the car body mounting holes.
6. Center your body with the license plate, grab each corner of the bumper & pull straight out away from the car. Set the bumper down on the blankets.
7. Reverse process for reinstallation.
While retightening the fastening nuts, use a playing card or equivalent as a feeler gauge to ensure an even gap with no surface to surface contact between bumper & body.
Attachments
-
 Rear Bumper_88_075.jpg66.9 KB · Views: 51
 -
 P7080300.JPG254.2 KB · Views: 42
 -
 Left Trunk Lining.jpg109.7 KB · Views: 52
 -
 Right Trunk Lining.jpg96.5 KB · Views: 49
 -
 Front Fasteners.jpg114.1 KB · Views: 58
 -
 Rear Fasteners.jpg106.6 KB · Views: 64
 -
 P7080289.JPG248.8 KB · Views: 57
 -
 Bottom Fastener.jpg141.2 KB · Views: 71
 -
 P7080294.JPG238.4 KB · Views: 61
Last edited: