• Hi Guest !

    Welcome to the 500Eboard forum.

    Since its founding in late 2008, 500Eboard has become the leading resource on the Internet for all things related to the Mercedes-Benz 500E and E500. In recent years, we have also expanded to include the 400E and E420 models, which are directly related to the 500E/E500.

    We invite you to browse and take advantage of the information and resources here on the site. If you find helpful information, please register for full membership, and you'll find even more resources available. Feel free to ask questions, and make liberal use of the "Search" function to find answers.

    We hope you will become an active contributor to the community!

    Sincerely,
    500Eboard Management

Need part numbers for All Upper Engine PCV/Breather Hoses

I have not replaced the valve stem seals just yet. I will share pics when I do this week. The replacement motor came less the flywheel. So I need to remove and swap over the one from the S500’s original motor. And before that is bolted on I will renew the rear crank oil seal “Whilst in there”.

Why do you need a flywheel to renew the valve stem oil seals? Basically I will set each respective cylinder at or near TDC as extra insurance against valves dropping it out of sight if things should go wrong! And since I will be feeding compressed air into each cylinder in turn (in order to hold the valves in place for seal replacement)– you must be able to lock the flywheel to prevent the engine turning over.

Speaking of which although I made a flywheel locking tool before, that was more for use in car and from below. So now I will make another custom tool to lock the flywheel from the starter motor slot.
 
Joe, when replacing the rear seal, you may also want to remove the rear carrier from the block and re-seal that as well. And make sure the new seal is seated *perfectly* flat/parallel.

There is a factory tool which allows using the flywheel lock with the transmission removed, it is a bracket you bolt to the block that the locking tool slides into, but the factory bracket is NLA. Martin was working on designing a copy but I don't think he has completed it yet. There's not much demand for this bracket as very few people replace rear main seal on the M119. It's a PITA to hold the flywheel without it.

BTW: Shell out for new bolts. I've tried a few different sealants when re-using old bolts and none worked perfectly. Anaerobic sealant worked the best IME, if you plan to re-use the old bolts. I'd love to know what the dry sealant is that is on the new MB bolt$.

85990
 
Great thankyou for the info Dave. Dang I forgot the starter slots for the m119 are part of the gearbox and not on the motor.

I'll make 2x more m119 crank lock tools. One for use without the gearbox and one that slots into the opening of the starter motor (Side with the little blank plate so the starter doesn't have to come out to lock it)

Precise position of the rear crank tool doesn't matter since it only has to hold the crank to facilitate tightening the flywheel bolts.

The starter slot tool will however be set to precise 45 before TDC (per engine timing setup)

Got started on the rear tool:
20190722_191708.jpg
20190722_192129.jpg
20190722_194125.jpg

(Its not a critical tool - and dont want to wait on the post. I can fabricoble my own) No m119 ring gears were harmed! Paint wiped off after.
 
SWEET! Joe, what would you charge to build a duplicate of that tool?

:woot:

Hi Dave, yes I guess since the MB tool is NLA now there may be some folks who would like one to hand in the future!

It's not too often someone will require a rear m119 crank tool though. Members can borrow this one if needed! (Deposit and use postal service to send / return)

In terms of how I made this one, it was cut with a grinder from scrap steel and MIG welded up. Perfect fitment and function and just fine for someone to make themselves that way. It took a coupe hours to fabricoble.

But not ideal to sell to someone this way I guess. I could draw up one in CAD and have a small production run made - if at least 5x people were interested say. (Aka plasma cut the plates and ill weld them together + paint before shipping)

And / or create a thread on "How to" fabricoble your own m119 engine locks. I did another m119 lock tool before for use from under the car. And will be making yet another one for the starter motor slot to cover all bases
20190725_212602.jpg
 
Last edited:
I found my old posts on the other tool which is still in my cabinet! Ready for use again shortly
This is a pic of the factory blank plate. I am cutting a replica out of 5mm Mild Steel.

View attachment 50811

Then two extra bolt locations will be drilled through this 5mm plate to align with the bolts as pictured below. (This is a shot I took under my 500E through the small access hole last night. The crank needs turned a little more to centre the bolts in the access opening but you can see 2x m8 bolts there & a single m6)

View attachment 50812


The 5mm plate will be bolted to the bell housing first & it's a tight fit. Then 2 bolts will pass through the 5mm plate via mild steel dowels and be tightened to both TC M8 bolt slots side by side. This means the tool will have a very strong hold on the TC. The steel dowels will also brace the bolts and plate tight & at right angles to the TC thus eliminating the fear of the bolt bending or breaking off in the TC
The lock tool is coming along- for anyone who would like to make one of their own this is progress so far-

I had scrap 20x20mm solid steel stock so I cut them to 22.25mm long & drilled a 8mm hole through.

View attachment 50826


Then cut 2x M8 bolts down which will sit slightly under the top of the dowels when threaded into the TC. (NB; These bolts are only for fabricating the tool)

View attachment 50827


Now coat only the outer end of the dowels with 2 part epoxy & fit dowels over the M8 studs.

View attachment 50828


Bolt on a 4mm steel plate cut to fit the bellhousing tight. Fit the 2x m6 bolts & tighten to bellhousing.

View attachment 50829


This will hold the dowels in perfect alignment with the plate & TC bolt holes. Once the epoxy is cured I can withdraw the plate with the dowels now stuck to the back of it. Then carefully scrape off excess epoxy at the edges & MIG weld the dowels to the plate. Pass a 8mm drill through the dowels & out through the front face of the 4mm plate.


Voila!! Free; & better than the MB tool IMHO as this only takes minutes to remove / install.
Got the crank lock finished & installed:

View attachment 50927

View attachment 50928
 
And will be making yet another one for the starter motor slot to cover all bases
Joe, I believe tools are available from either MB or aftermarket, to fit into the starter motor slot of the transmission, when the trans is attached. At least, I haven't heard of that tool going NLA. The problem is when the trans is removed and you need to torque the bolts on the flexplate, after replacing the rear main seal. Then you need the JC220 Special!

:jono:
 
Joe, I believe tools are available from either MB or aftermarket, to fit into the starter motor slot of the transmission, when the trans is attached. At least, I haven't heard of that tool going NLA. The problem is when the trans is removed and you need to torque the bolts on the flexplate, after replacing the rear main seal. Then you need the JC220 Special!

:jono:

Dave, yes the rear crank tool is the one that is NLA as you say. Actually the bracket that would facilitate the MB crank lock to be used when the gearbox is off.

I did price the genuine MB crank lock (for use in the started motor slot) this morning and it wasnt too horrific so I ordered it

:v8:
 
The starter motor lock crank lock is definitely available both from MB and quality aftermarket sources. It works equally well for both the M119 and M117.
 
Last edited:
Here is a photo of the part I refer to as the "fingered" rail... it clips on to the large rail shown in Eno's photos above.

This part (119-052-09-16) gets brittle and often breaks when removed, because the U-shaped "fingers" have to be bent outward to clear the tabs on the large rail it attaches to.

View attachment 85816

And when you replace the “fingered” rails, before you start jam a couple of shop towels around the rails to seal up the opening into the crankcase/timing cover, as the “fingers” will break off and drop into the nether regions of the engine.

Dan
 
I have not replaced the valve stem seals just yet. I will share pics when I do this week. The replacement motor came less the flywheel. So I need to remove and swap over the one from the S500’s original motor. And before that is bolted on I will renew the rear crank oil seal “Whilst in there”.

Why do you need a flywheel to renew the valve stem oil seals? Basically I will set each respective cylinder at or near TDC as extra insurance against valves dropping it out of sight if things should go wrong! And since I will be feeding compressed air into each cylinder in turn (in order to hold the valves in place for seal replacement)– you must be able to lock the flywheel to prevent the engine turning over.

Speaking of which although I made a flywheel locking tool before, that was more for use in car and from below. So now I will make another custom tool to lock the flywheel from the starter motor slot.

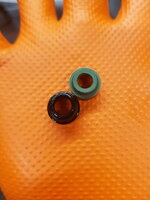
Got started on this tonight. Oh my those 1992 seals are as hard as stone. Wallared out too. For those on the fence about changing these out take a look at this

20190801_215010.jpg

Do you guys want to see a DIY?
 
Would love to see a DIY! I need to do this job on one of my engines which is using oil... I was hoping it might just be these seals, figured it was worth a try before condemning more expensive parts.

:duck:
 
Would love to see a DIY! I need to do this job on one of my engines which is using oil... I was hoping it might just be these seals, figured it was worth a try before condemning more expensive parts.

OK I will take photos and write detailed step by step notes on how to swap them out. And some tools / tricks I found essential.

Note that the valve stem guides can also wear out. The only way to test that is to pull the head unfortunately. But, certainly if valve guides are not badly worn then they will benefit from the old stem oil seals being renewed
 
Joe, can you get a rough idea on guide condition while replacing seals? I'd think if the guides were substantially worn, there might be some side-to-side movement noticeable with the seal removed? Pulling the heads isn't fun.

:(
 
Joe, can you get a rough idea on guide condition while replacing seals? I'd think if the guides were substantially worn, there might be some side-to-side movement noticeable with the seal removed? Pulling the heads isn't fun.

:(

That's a good question but I dont think there is any way to check valve stem wear with the heads in situ. My method is to put the piston to TDC and lock the crank. Then feed 60psi approx compressed air into the cylinder to hold the valve in situ whilst renewing the valve stem oil seals.

I have had a couple of w124 engines before with worn valve guides. (An m102 and m104) and the machine shop had demonstrated how to check the guides for wear when I brought the cylinder heads in.

They remove the valve collets / keeper / springs and with the valve loose in the head they simply withdraw it slightly by hand from the cylinder side and waggle the valve to feel for side to side play in the guides. From those heads, and the machinist showing me this, I know what a worn valve guide feels like. There are ways of measuring the wear of course but an experienced engine builder will know just by feel alone.

So, alas as far as I am aware there is no way to check for valve guide wear with the heads installed and valves held in place by air / rope
 
This video demonstrates how I have seen them checked before


Although my heads weren't just as bad as that! My machine shop then measures the valve stems for wear and reams out the old guides before installing Titanium liners.
 
Last edited:
Joe,

I third this!!

Since I originally brought up the inquiry about the valve seals. YES, I think a How To would be great!!

Since I am already changing the Oiler Tubes and will be in there anyway it makes since to me if it’s possible. Like I said I’ve done this on a early 300E and it was easy but it was a simple engine. The degree of difficulty on a 4 cam engine has to be exponentially greater. I’m not sure I’m up to it.

I’m anxious to see your How To

Thanks for your efforts.
 
Joe,

I third this!!

Since I originally brought up the inquiry about the valve seals. YES, I think a How To would be great!!

Since I am already changing the Oiler Tubes and will be in there anyway it makes since to me if it’s possible. Like I said I’ve done this on a early 300E and it was easy but it was a simple engine. The degree of difficulty on a 4 cam engine has to be exponentially greater. I’m not sure I’m up to it.

I’m anxious to see your How To

Thanks for your efforts.

Yes a DIY is forthcoming Terry! One caveat is that whilst you can replace oiler tubes with the cams in situ - to renew the valve stem seals all 4x cams and all bearing caps need to come out

I am replacing these seals with the motor removed and sitting on a dolly. Full easy access. It may be possible with the motor in the car but it will be much more difficult. I am not sure that my universal valve spring compressor kit would would in the confines of a V8 w124 engine compartment. In particular to the rear of the block
 
Terry, just to reiterate... if your engine doesn't use oil between changes, I wouldn't replace the seals. It's a LOT of work, and if it ain't broke, don't fix it. Don't forget that if anything goes seriously wrong and a valve drops inside the engine, you may need to pull the head to fix it. *eek*

Now, for anyone who has an engine that is consuming oil... that's a different story and it might be worth a try.

:seesaw:
 
Would love to see a DIY! I need to do this job on one of my engines which is using oil... I was hoping it might just be these seals, figured it was worth a try before condemning more expensive parts.

Just out of interest Dave - what oil consumption are you having? Eg 0.25L per 1000 miles etc.

Do you ever see blue smoke on startup? Blue smoke when applying or lifting off the throttle?

Have you done a compression test? Or better yet - a leak down test on all cylinders and recorded the values? Note that a leak down test will not test valve guides or stem seals. But will give an indication of the cylinder bore wear of your motor. I have posted m119 leak down test results very recently for comparison purposes
 
Install them new Italian made seals 😀
 

Attachments

  • 492378F1-6089-4DFC-A2F1-C3B5C9172C77.jpeg
    492378F1-6089-4DFC-A2F1-C3B5C9172C77.jpeg
    1.2 MB · Views: 11
  • E2B2357C-3AF8-4589-9FA9-08C9224CF0A7.jpeg
    E2B2357C-3AF8-4589-9FA9-08C9224CF0A7.jpeg
    1.3 MB · Views: 11
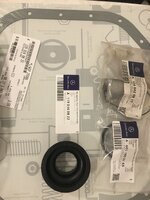
Yes Gerry, green oiler tube seals 32 pcs replaced in the 1992 Bornite 500E I am using here where I live and work until my friend is ready to ship it/take it.

Of course both valve cover gaskets, and all intake manifold seals/gaskets, injectors seals pressure/cleaning.
Basically I am doing the complete top half and bottom half of the engine with all PS and cooling hoses and oil pressure and sensor, etc.
As per the European Enginer and garage owner the valve leak test was within allowance and endoscopic test with that famous German tool Karl Storz which I was allowed to look into the piston/valve chamber, was ok for an early 00627 M119.974 engine.
Air pump plug as I am removing the air pump and putting a delete bracket.
Bottom half meaning new big oil pan gasket, rear main crank seal, new oil pan and gasket and so many other parts I can’t remember now.
The garage owner has modified an engine stand for my M119.974 with used lift arms.
I am using the car as a daily driver, it had vaccum and misfiring issues, oil leaks, fuel leaks, engine mounts and transmission parts will be replaced and so on.


Do you have the part number for the oil pump rubber neck that goes inside the lower oil pan?

4B51CCB6-00C0-434D-825F-97C75AA6C66E.jpeg
 
Do you have the part number for the oil pump rubber neck that goes inside the lower oil pan?

View attachment 93875
I believe this is detailed in the HOW-TO article that covers replacement of this part (along with the oil level sensor).


:searchdammit:
 

Who has viewed this thread (Total: 7) View details

Who has watched this thread (Total: 1) View details

Back
Top