• Hi Guest !

    Welcome to the 500Eboard forum.

    Since its founding in late 2008, 500Eboard has become the leading resource on the Internet for all things related to the Mercedes-Benz 500E and E500. In recent years, we have also expanded to include the 400E and E420 models, which are directly related to the 500E/E500.

    We invite you to browse and take advantage of the information and resources here on the site. If you find helpful information, please register for full membership, and you'll find even more resources available. Feel free to ask questions, and make liberal use of the "Search" function to find answers.

    We hope you will become an active contributor to the community!

    Sincerely,
    500Eboard Management

SLS struts (Repaired by RMT in Florida)

Are there any major differences in the normal SLS struts versus the AMG ones? Do the AMG versions reduce roll and increase stiffness? They seem extremely rare.
There must be SOME difference between standard E500E, and the AMG E60 SLS struts. Total wild guessing:

1) Different internal valving / fluid flow rates
2) Different internal spring rate and/or length
3) Different length and/or durometer of the external foam stop buffer

The AMG suspension lowered the 036 chassis approximately 10mm, and the changes may only be to accommodate that 10mm difference.

:klink:
 
In other news: I sent Martin a damaged 500E SLS strut for analysis and R&D. He's currently investigating what can be done. Right now I believe he's trying to determine how to separate the main shaft from the lower housing that contains the spherical joint. This is needed to replace the foam stop buffer.

Based on what Martin has discovered so far, I am 99.44% certain that any company claiming to "rebuild" these, are doing nothing but applying paint, installing an aftermarket accordion boot, and (in some cases) replacing the spherical joint with a rubber bushing.

:yayo:
 
I am 99.44% certain that any company claiming to "rebuild" these,
I feel the same way about outfits that claim (RMT) that they repair EZLs of the type installed in my 300-24. My feeling is that the pictures shown by them show clean, "ready to go new" EZLs but they may be, in fact, cleaned up used ones that carry a smart logo.

Has anyone repaired a dead EZL? If so, I have three and we can do a deal.

R

1749494613596.png

R
 
I feel the same way about outfits that claim (RMT) that they repair EZLs of the type installed in my 300-24. My feeling is that the pictures shown by them show clean, "ready to go new" EZLs but they may be, in fact, cleaned up used ones that carry a smart logo.
You are 100% correct. All those outfits do is clean a used EZL... maybe test it, IF they have a correct vehicle available to test with.


Has anyone repaired a dead EZL? If so, I have three and we can do a deal.
Nope. Dead EZL's are dead. They are unrepairable, for various reasons. Someone cut one open years ago and posted photos here on the forum. Once you see inside, you understand why they can't be fixed. I have good, tested EZL's available for M119's with LH-SFI if anyone needs them.

:shocking:
 
In other news: I sent Martin a damaged 500E SLS strut for analysis and R&D. He's currently investigating what can be done. Right now I believe he's trying to determine how to separate the main shaft from the lower housing that contains the spherical joint. This is needed to replace the foam stop buffer.

Based on what Martin has discovered so far, I am 99.44% certain that any company claiming to "rebuild" these, are doing nothing but applying paint, installing an aftermarket accordion boot, and (in some cases) replacing the spherical joint with a rubber bushing.
:update:

Update from Martin below on the potential for proper SLS hydroleg repair. Note his request for an additional failed strut. If anyone has an old, defective SLS hydroleg they would be willing to donate so Martin can continue his forensic analysis, please let me know and I'll connect you with Martin. In particular, he'd like a strut with a failed lower joint. The bad hydroleg I sent him had a good lower joint, and he'd prefer not to destroy a good one.


"I am doing my first sketches and the design is becoming clearer.
I cannot pull the piston out of the tube right now. I guess there must be a second retainer further back that is not allowing me to move the piston shaft out of the tube. The second retainer must be accessible for disassembly. One way would be to disconnect the bottom joint from the piston shaft, so I can move the piston seal out. Then I have at least a chance to remove the second retainer. Do you know if people could open that connection? I would guess that the 22mm chromed piston shaft has a threaded connection to the aluminum housing/ spherical joint. pictures are always welcome. I'll build a tool and try to remove the bottom joint from the piston shaft.
Spherical Joint: this joint is flanged into the aluminum housing. So once the flange is opened there is no good way to flange again (if we had an original
dimensioned joint). As this joint looks relatively intact I don't want to destroy the joint housing... so with a second strut that is in bad shape I'd feel much better to cut it open.
Once the joint is removed I'll see how the spherical joint is designed and we can go and hunt for a proper replacement. Still unsure if we can use the old housing again or the other (better) option is reproducing the aluminum housing and installing a new joint. Here we had a much better chance of success.
I have some good success reproducing relatively complicated geometries in China for the Mercedes 600 hydraulics. So I see a chance here. We also should reproduce the PU end stop [foam stop buffer].
I believe the repairs are possible with some effort (reproduction of bottom joint, reproduction of PU buffer, reproduction of accordion boot, reproduction
of Teflon piston seal)."
:sawzall:
 
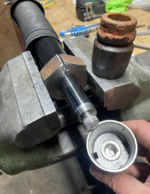
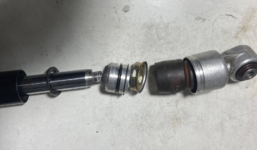
Another update: Martin was able to successfully remove the lower housing which contains the spherical joint. As expected, this is threaded onto the shaft. A special tool is needed to clamp the shaft.

In the second photo, the foam stop buffer is backwards... the pointy end should go into the lower housing.

1762459502947.png 1762459509254.png
 
Back
Top