• Hi Guest !

    Welcome to the 500Eboard forum.

    Since its founding in late 2008, 500Eboard has become the leading resource on the Internet for all things related to the Mercedes-Benz 500E and E500. In recent years, we have also expanded to include the 400E and E420 models, which are directly related to the 500E/E500.

    We invite you to browse and take advantage of the information and resources here on the site. If you find helpful information, please register for full membership, and you'll find even more resources available. Feel free to ask questions, and make liberal use of the "Search" function to find answers.

    We hope you will become an active contributor to the community!

    Sincerely,
    500Eboard Management

Under Hood Insulation Pad

Bill Walsh

E500E Enthusiast
Member
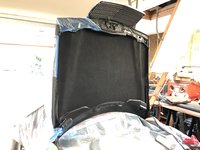
I noticed the front left corner of my underhood insulation pad was sagging when I washed my car last weekend. It appears the pad is glued to the underside of the front hood. Is it best just to re-glue the portion that is hanging? If so what glue is recommended? Thanks.

Bill
 
'3M spray adhesive' in the big black can with red lettering....I recommend spending the $100 on a new pad too....I suspect yours is prolly as dried up and crumbly as mine was.

Just BTDT myself !
 
Be sure to get the 3M 08090 "Super Trim Adhesive" .... NOT the 3M 08088 "Trim Adhesive"

There is a significant difference in the strength between the two, and the Super adhesive is required for under-hood applications. The regular trim adhesive will not hold up to the requirements.

Cheers,
Gerry

proxy.php
 
Thanks Jerry and Jimbo. Think I'll try the repair before the replacement. Not sure how well the old pad will come off without leaving gobs of insulation stuck to the hood.

Bill
 
It's not that bad of a job to replace it, if it's petrified like Jimbo's was. Put a blanket or bedsheet on top of your motor if you remove the old hoodpad, and you'll want to scrape any remains off the bottom of the hood with a plastic putty knife or scraper. Then you can install the new pad easily -- best as a 2-person job.

With the Super Trim Adhesive you spray a coat both on the bottom of the hood and on the pad, and let it air-dry for 10-12 minutes (so it gets tacky) before installing the pad and pressing it into place. I just did this last year on my 560SEC and did it all by myself. It is best done as a 2-person job, though.

Cheers,
Gerry
 
Definitely install a new hood pad. I'd recommend an OE hood pad, the aftermarket ones often are of inferior quality and/or look noticeably different than OE.

An alternative adhesive is Liquid Nails, it takes about three normal-size tubes for one hood pad. The Liquid Nails takes a while to set up, so you have plenty of time to re-position the pad on the hood before it sets. The problem is that you have to press the pad firmly on to the hood everywhere and this requires more muscle than you might think. With the 3M spray, there is little (if any) time to re-position once the pad touches the hood, so get it lined up PERFECTLY before you stick it in place. And do a test-fit / dry-run, before applying any adhesive!

:banana1:
 
Dave and Gerry, thanks. My pad is only hanging down in one front corner. It seems fairly intact and is not crumbling like you said Jimbo's was. I'll probably just re-glue the corner and see what happens. If it doesn't work I'll replace the pad.

Bill
 
I received my latest goodie order from MB Naperville today, and in the box was a new MB hood pad!

Had noticed, after 16 years of ownership, that my hood pad is feeling a bit "crunchy" on the surface, and thus is in need of replacement. The replacement was made in February 2019, and does have the "foil" rectangle on the underside. The MB label says "Made in Germany."

I have to acquire a second can of the 3M 8090 adhesive (I only have one can in my chemical locker in the shop) from Amazon, and then I will do this job.

It's interesting as the E500E/W124 hood pad is of a different type of material than the 126 pads are. The 126 pads are straight foam, whereas the 124 pads have a fabric type cover (even the stock/OE one on my E500 has the fabric cover, but not the foil rectangle).

The 126 sedan hood pads have been consolidated, as the 124 ones have, so that all 560 sedans have the foil rectangle on the underside, which is designed as a heat shield for the turbocharged examples of the 126 sedan. Same with the 124s. The 126 coupes don't have a foil rectangle, as they were only ever powered by gasoline engines, and they are of a different shape than the 126 sedan models.

Cheers,
Gerry
 

Attachments

  • F86EC8C7-24D2-4808-8DDF-74BE2D2EC73C.jpeg
    F86EC8C7-24D2-4808-8DDF-74BE2D2EC73C.jpeg
    300.1 KB · Views: 40
  • FB4E7021-41FF-4A42-B36C-B8DF3A586C4D.jpeg
    FB4E7021-41FF-4A42-B36C-B8DF3A586C4D.jpeg
    283.5 KB · Views: 37
  • CB608F80-DBC4-4B07-81FE-717EEBC85967.jpeg
    CB608F80-DBC4-4B07-81FE-717EEBC85967.jpeg
    296.1 KB · Views: 33
Nice to know these aren't NLA ! (Even thought they differ slightly from what was originally installed on the .036 with the new foil heat piece....)
 
Found that I had two and a third cans of 8090 adhesive out in the shop -- :wahoo:

No need for an Amazon order !! I can do the update this weekend !
 
I would also suggest that when you replace the hood pad if you're using a spray adhesive such as the 3M 08090 to be sure to cover the car from the cowl all the way over the roof and doors as far as you can. An old bed sheet does a great job. Otherwise, you risk getting overspray on the car.

While I've been a big proponent of the 3M 08090, Pierre Hedary turned me on to the "official" Mercedes contact cement used for the hood pads. It's pricey (surprise!) but really does the job. It's a part number 000 989 92 71 09 and costs about $35-$40 a can from the dealer. It takes two cans to do a hood pad. Ideally, you have a helper and you pour the cement onto the pad and use a short chip brush to spread it as quickly as you possibly can, making sure to get around the edges.

Dan
 
I have done 5 hood pad replacements so far. First, scrape off the old ones. I place newspaper to cover the engine compartment. After that, I scrape further to get ride of the old pad as much as possible. Then, I vacuum. After that, I simply use rubber cement. A big can from homedepot or Lowe's. Brush it on and wait for a while. Then, from the top down, I push it in and use a mallete to ensure the ahesion. So far, after a few years, they are all staying in place. The pad was either from FCP or off eBay, all made in Germany.

jftu105
 
Last edited:
I finally replaced my hood pad this evening. I would say that it took about 30 minutes to do the job.

The tools you will need to do this are as follows:
  • 1-2 cans of 3M 08090 "Super Trim Adhesive"
  • Shop vacuum with necked-down attachment
  • Plastic scraper or plastic putty knife (if needed)
  • Old bed sheet, moving blanket or other large cloth cover
I used about one full can of 3M 08090, but it is probably a good idea to have two cans on hand in case you go over.

First, put your sheet or moving blanket over the engine. Make sure you tuck it up under the hood and partially up the windshield, over the windshield wiper.

Next, peel the old hood pad downward, starting at the top.
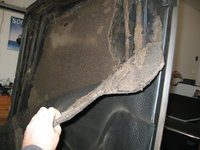
IMG_1277.JPG IMG_1278.JPG


After the pad is peeled off, you will see some residue consisting of old foam backing, glue, and foam dust. With your shop vac, use the attachment to go back and forth in fine patterns, and "vacuum" off the old foam dust. If you do it right, most of the crumbling foam will go into the vacuum. However, some fine dust will also migrate to the floor, to the car's fenders, and in your general work area.
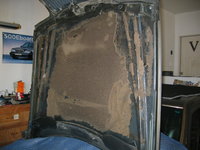
IMG_1279.JPG


Here is what the hood looks like, once all of the foam residue is vacuumed off of the hood. This is a clean enough surface to apply new 3M glue in a later step. You can see some foam residue and dist on the moving blanket that I used to cover the engine.
IMG_1280.JPG IMG_1281.JPG


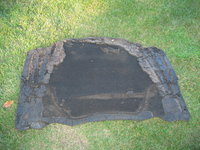
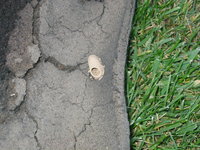
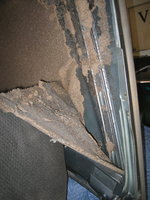
This is what the old hood pad looks like after it is removed -- top and bottom sides. The third photo shows a mud house that was evidently started by a red wasp when I lived in Texas !!!
IMG_1282.JPG IMG_1283.JPG IMG_1284.JPG


Test fit your new hood pad by tucking it into the edges of the hood along the top, sides and bottom. Get it into place generally where you need it to be.
IMG_1285.JPG IMG_1286.JPG


With the hood pad generally in the right place, peel it back from the top, about half-way down the hood. The flanges on the lower edges/sides of the hood should keep the lower part of the pad in place. Spray the yellow 3M 08090 adhesive liberally on both the hood surface, and the hood pad surface. Do this on ONE-HALF of the hood, and then walk over to the other side of the car and do the same on the other half of the upper half of the hood pad. Wait 5-10 minutes after spraying, and press the upper half of the hood pad into place with your hand. It will immediately go into place. MAKE SURE THAT YOU ARE PRESSING IT INTO THE RIGHT POSITION -- you may not get a second chance to remove and reposition it.

Then, peel UP the lower half of the hood pad. Spread 3M adhesive on the lower quarter of the pad and to the hood surface, and do the same for the other side. Wait 5-10 minutes, and then press the lower half of the pad into place. You can use your hand, or a roller, to press the pad against the hood's under-side surface.

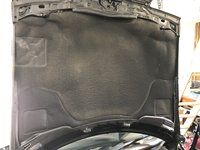
At this point, you will be done. The photo below is the final view of my hood pad, after installation.
IMG_1287.JPG
 
Great tip on fitting the pad first and working it in 2 halves. I started at a corner I'd checked for fitment and proceeded across then down (or was it up?) It worked fine but it was a little nerve wracking.
I also used the 3M adhesive. It's been holding for years now.

drew
 
By the way, despite having the MB pad with the foil square, I DID NOT use it. I ended up also buying and using the "GK Hood" aftermarket pad, which was not only an exact fit, but also the proper black cloth covered foam WITHOUT the fugly and un-necessary foil square.

I’ll sell the spare factory pad I have to the @gsxr for one of the future 1987 or 1995 W124 diesels that will be coming into his life....

As reference for others who may be replacing their hood pads in the future, here are the options for the 500E / E500:

Factory hood pad (with foil square): MB part number 124 680 00 25 (current list $129; discounted ~$95)
(AutohauZ is claiming an "OEM" hood pad here with foil for $35)

Aftermarket hood pad (much closer to OE E500E hood pad): GK Hood Insulation Pad ($43.99 at AutohauZ)

RM Yurropean and FCP Yurro also have the aftermarket hood pads and GK Hood pads. Evidently GK is a factory OEM for the pads.

@sheward -- Indeed, the 3M 08090 adhesive works great, is simple and non-fussy to apply (just spray it on liberally), and holds like iron. Link to the 3M 08090 product on Amazon. Wow -- the price has REALLY gone up. $80 for two cans, whereas it used to be about $25-30 a can.

You can get away with one can, but I have generally/typically used about 1.25 cans when I've done hood pads in the past.
 
Last edited:
Us poor fools with foil pads. I am not worthy (but I didn't pay for it either) and will have me a sad.

:stickpoke:
 
Us poor fools with foil pads. I am not worthy (but I didn't pay for it either) and will have me a sad.

:stickpoke:
I can imagine it is very tough for those 500E owners with hood pads with the foil squares embedded on them, knowing that the part you have installed is not correct for the car. Personally, it would be too much burden for me to have.
 
Well, I just did this job today. Thanks to Honch's typically excellent documentation it turned out well. The protip from him which really helped me was to do the job in quarters. Once you fix the upper left in place with the adhesive, the other segments are relatively easy. I would add one other tip which helped me. After I put the pad into place with no adhesive and got everything evened up, I put a piece of tape on the pad in each lower corner aligned with the flange on the hood to mark how far down the pad should go, which was also an indication that the pad was level.

When gluing the first corner, after the short wait for the adhesive to set, start rolling/pressing it from the middle upwards, making sure that your bottom mark is where you want it when you start. When you are rolling and pressing glue to glue, you can't slide it at all. So you want to make sure that the bottom is right on, before you start locking the top section down. For the subsequent quarters, always roll/press from the middle up or down and outwards.

My pad was from FCP with no foil piece, so I have that going for me! A few other comments. I used a plastic scraper and I also turned a paint stir stick into a chisel edged scraper. I scraped pretty hard but there was still some residue. You WILL want to wear a respirator while scraping. I also taped up the gap on the lower edge of the hood to prevent sticky debris from falling down in there, and blew everything out with compressed air after that. I gave it a last go over with a red rag soaked in brake cleaner, but it honestly did not do a lot. I don't think I got the hood as surgically clean as Gerry, but I didn't sweat it. The 3M good stuff was available at my small town NAPA. Yay. The price was about $39.00! Boo. The can looked different than what you see on Amazon, with green accents rather than red. But the part number is the same. I used less than one 19 oz. can, so I can return the other I bought. You can spray it fairly accurately, so you may not need to mask much. I went overboard for the first side masking and not so much on the other side.

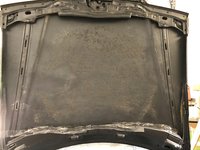
For the sharp eyed among you, you can see some funkiness more or less in the upper middle of the new pad. My pesky cat started scratching on it while I had it rolled flat in my spare bedroom to uncurl. Fortunately I heard it and the damage was minimal. Grrrr.


Hood pad 1.jpg Hood pad 2.jpg Hood pad 3.jpg Hood pad 4.jpg Hood pad 5.jpg
 
Well done! I did this job on my 84 Euro 500SL but I removed the hood from the car and laid it on a plywood sheet covered with heavy blankets on sawhorses. It was much easier to work on especially the scraping off of the old adhesive. Installing the new pad was a piece of cake.

Just had to be extra careful R&R the hood. A job for 2 people.
 
Looks good to me. It is not necessary to get the bottom of the hood anally clean; basically just all of the dried glue and pad residue/remnants off, so that the new 3M glue or Liquid Nails (pick your poison) has something firm to adhere to. I agree that it usually takes me about 1 entire can, or slightly more than 1 can, to do a hood pad.

With the 3M stuff, at least, which is what I hae always used, it's helpful to wait about 8-10 minutes after spraying the glue on both surfaces, to begin fitment of the pad. This gives the glue time to tack up, and for you to enjoy the buzzzzz from inhaling the 3M.
 
Is the 3M Super Trim Adhesive 08090 still the way to go or is there a MB glue that is better or equal?
 
Is the 3M Super Trim Adhesive 08090 still the way to go or is there a MB glue that is better or equal?
The factory adhesive is p/n 000-989-92-71-09 which is a 340g brush can. It's sort of a rubber-cement consistency. $42 USD list price, about $32 from discount dealers. It's Teroson SB2444 if you can find that at a lower price. This stuff has a shelf life, so don't buy it until you are ready to install in the near future.

From memory, the MB adhesive allows some repositioning the pad after contact. With the 3M 08090, there is no repositioning... once the pad touches the hood with 3M, it's stuck. Some additional info is at this link. Also see videos from Cousin Pierre below.

:seesaw:


1676431_x800.jpg mercedes-hood-pad-glue-jpeg.jpg
 
When I replaced the hood pad on my 84-500SL. MB of Anaheim’s wholesale counter for enthusiasts sold me the 3M spray adhesive to attach it. It worked great for me. I don’t remember the 3M number since it was 30+ years ago but it was formulated for hood pads.

I did remove the hood from the car and laid it upside/down on a padded table. This allowed me to line it up perfectly. If I had to replace my 500E hood pad I would do it the same way albeit I would use what ever modern day adhesive MB would provide.
 
The factory adhesive is p/n 000-989-92-71-09 which is a 340g brush can. It's sort of a rubber-cement consistency. $42 USD list price, about $32 from discount dealers. It's Teroson SB2444 if you can find that at a lower price. This stuff has a shelf life, so don't buy it until you are ready to install in the near future.

From memory, the MB adhesive allows some repositioning the pad after contact. With the 3M 08090, there is no repositioning... once the pad touches the hood with 3M, it's stuck. Some additional info is at this link. Also see videos from Cousin Pierre below.

:seesaw:


View attachment 189848 View attachment 189849
Since I can't find any 3M 08090 Super Adhesive within EU I think I'm going to go with the MB glue. How many cans is needed to do this properly? 2-3? Thanks for the help!
 
Since I can't find any 3M 08090 Super Adhesive within EU I think I'm going to go with the MB glue. How many cans is needed to do this properly? 2-3? Thanks for the help!
Based on Pierre's video, I'd say minimum 1 can, and 2 should be plenty.

:spend:
 
Since I can't find any 3M 08090 Super Adhesive within EU I think I'm going to go with the MB glue. How many cans is needed to do this properly? 2-3? Thanks for the help!
Here is a Swedish vendor of 3M 08090, and they have 5 cans in stock as well. :)

It's available here in Norway as well at approx the same price.
 
Here is a Swedish vendor of 3M 08090, and they have 5 cans in stock as well. :)

It's available here in Norway as well at approx the same price.
I saw them but their reviews are terrible and since I don't trust myself to fit the hood pad on the first try with the 3M I'm just gonna go with the MB glue so I have time to readjust if anything goes wrong. And the company domain seem to be Swedish but apparently they are located in Denmark.
 
It is POSSIBLE to attach a hood pad using a single can of 3M 8090, but in reality for good coverage it requires 1.25-1.3 cans. Don't skimp, and just buy two cans if possible.

Wait for approximately 5-10 minutes after spraying BOTH surfaces (hood and pad) to affix the pad to the underside of the hood. This gives the adhesive some time to start tacking.
Im going to try the MB glue instead. Would you say there is any difference between the 3M Super Adhesive and the MB glue on how long the hood pad is gonna sit?
 
I don't know as I have never used the MB glue, but I have used the 3M product on 3-4 hood pads over the years and NEVER had any problem with it. It holds extremely well.
 
I finally replaced my hood pad this evening. I would say that it took about 30 minutes to do the job.

The tools you will need to do this are as follows:
  • 1-2 cans of 3M 08090 "Super Trim Adhesive"
  • Shop vacuum with necked-down attachment
  • Plastic scraper or plastic putty knife (if needed)
  • Old bed sheet, moving blanket or other large cloth cover
I used about one full can of 3M 08090, but it is probably a good idea to have two cans on hand in case you go over.

First, put your sheet or moving blanket over the engine. Make sure you tuck it up under the hood and partially up the windshield, over the windshield wiper.

Next, peel the old hood pad downward, starting at the top.
View attachment 115422 View attachment 115423


After the pad is peeled off, you will see some residue consisting of old foam backing, glue, and foam dust. With your shop vac, use the attachment to go back and forth in fine patterns, and "vacuum" off the old foam dust. If you do it right, most of the crumbling foam will go into the vacuum. However, some fine dust will also migrate to the floor, to the car's fenders, and in your general work area.
View attachment 115424


Here is what the hood looks like, once all of the foam residue is vacuumed off of the hood. This is a clean enough surface to apply new 3M glue in a later step. You can see some foam residue and dist on the moving blanket that I used to cover the engine.
View attachment 115425 View attachment 115426


This is what the old hood pad looks like after it is removed -- top and bottom sides. The third photo shows a mud house that was evidently started by a red wasp when I lived in Texas !!!
View attachment 115427 View attachment 115428 View attachment 115429


Test fit your new hood pad by tucking it into the edges of the hood along the top, sides and bottom. Get it into place generally where you need it to be.
View attachment 115430 View attachment 115431


With the hood pad generally in the right place, peel it back from the top, about half-way down the hood. The flanges on the lower edges/sides of the hood should keep the lower part of the pad in place. Spray the yellow 3M 08090 adhesive liberally on both the hood surface, and the hood pad surface. Do this on ONE-HALF of the hood, and then walk over to the other side of the car and do the same on the other half of the upper half of the hood pad. Wait 5-10 minutes after spraying, and press the upper half of the hood pad into place with your hand. It will immediately go into place. MAKE SURE THAT YOU ARE PRESSING IT INTO THE RIGHT POSITION -- you may not get a second chance to remove and reposition it.

Then, peel UP the lower half of the hood pad. Spread 3M adhesive on the lower quarter of the pad and to the hood surface, and do the same for the other side. Wait 5-10 minutes, and then press the lower half of the pad into place. You can use your hand, or a roller, to press the pad against the hood's under-side surface.

At this point, you will be done. The photo below is the final view of my hood pad, after installation.
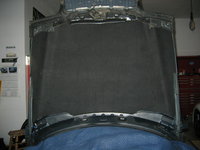
View attachment 115432
i used about 1.3 cans and followed this technique of applying half and half. the pad kinda just stays in place when you're test fitting it
 

Who has viewed this thread (Total: 1) View details

Who has watched this thread (Total: 1) View details

Back
Top