• Hi Guest !

    Welcome to the 500Eboard forum.

    Since its founding in late 2008, 500Eboard has become the leading resource on the Internet for all things related to the Mercedes-Benz 500E and E500. In recent years, we have also expanded to include the 400E and E420 models, which are directly related to the 500E/E500.

    We invite you to browse and take advantage of the information and resources here on the site. If you find helpful information, please register for full membership, and you'll find even more resources available. Feel free to ask questions, and make liberal use of the "Search" function to find answers.

    We hope you will become an active contributor to the community!

    Sincerely,
    500Eboard Management

OWNER JC220

E36 Widebody or C124 Widebody?

  • Use the 500E widebody kit on my E36 saloon

    Votes: 2 22.2%
  • Adapt the 500E widebody kit for my 320CE

    Votes: 7 77.8%

  • Total voters
    9
  • Poll closed .
AHE is trailer hitch control. Seems that your car has one but it is not set in either the rear Sam or CGW, put that trailer recognition or AHE as present in one these units (not sure which one or both) then this CAN "error" will go. Not really an error more a wrong status...
Next what you could do is to unplug the instrument cluster. Pull out the black frame surrounding it and unscrew the 4 t20 screws which hold the cluster. Unplug the socket and see what happens. Maybe not much. Try to get another icm to plug in. Careful, mileage can get overwritten.
 
Last edited:
AHE is trailer hitch control. Seems that your car has one but it is not set in either the rear Sam or CGW, put that trailer recognition or AHE as present in one these units (not sure which one or both) then this CAN "error" will go. Not really an error more a wrong status...

Thanks Rouven, yes I think I know why that might be. I fitted a towbar to this car myself about 2 years ago. When I did that I bought an aftermarket W211 Specific trailer plug kit. This plugged directly into the rear Sam. No warning lamps etc it functions perfect. So now I have Star I guess I need to tell it that’s fitted.

Doing more research – I am beginning to think I have a dud Instrument Cluster. I think I will test fit a replacement at a local wrecking yard on Monday evening. If that solves it I might send my original unit off to get repaired by a specialist. Re- Mileage / coding etc will be undisturbed.


Do you think it could be the Cluster?
 
Last edited:
Most welcome! Yes I think it's quite plausible that the icm is toasted.

Cool, Thanks. Well it’ll cost nothing to try test fitting a replacement Cluster so Ill let you know how I get on early next week. For now I have ASR & ABS back which is great! With never ending rain in Ireland those functions are pretty essential
 
Last edited:
I found this on the interweb-

A lot of the car's systems go through the IC, including the steering wheel controls, parktronic and the lights.
Your headlights are coming on as this is a fall-back safety system meaning you still have lights even though the car has a major fault.

It could well be that you've an electrical fault somewhere that is preventing power getting to the cluster. If so you must attempt to find that first.

So tomorrow I am going to pull the Cluster. Then follow the WIS procedure to confirm it’s getting Power & Earth at the appropriate pins in the plug.

If the Plug checks out then I can say with 100% certainty the problem is the Instrument Cluster itself.

If so I will pack it up & send it off for repair on Monday. Looks like the 500E will be getting some more miles on it this week but that’s OK!
 
Last edited:
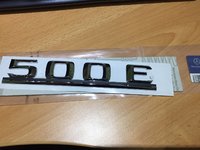
So this evening I was looking for a MB Hose clamp in my spares (To replace a non original one on the 500E) and I stumbled upon something I really can’t even remember buying :) – would have been years ago


IMG_1603.JPG


I read a while back that these were NLA so I was a bit worried that if I wanted to convert the car back to original pre- facelift trim I would never find a new Genuine early 500E badge – I’ll keep this one safe now I’ve 'found' it!
 
Last edited:
So today was the dreaded MOT. Our tests here are rigorous so with a 24 year old car anything can happen!

It failed- but I knew it would. On the night before the test I tried to set the headlamp beams. But realised they were dipping the wrong direction. I had no choice but to take it as is today since it was too late to re-schedule.

Here's what bugs me- the car had a receipt for replacement UK spec lenses with it dating back to 2004 (bogus- I should have checked the lenses sooner). The car had a current English MOT on it which expired today. So it's went through at least 12 MOTs with these headlamps and not even an advisory. But predictably with our strict government run test they failed it literally at the door on the way in.

It doesn't matter anyway- the headlamps were the stock type not 124.036- I was going to replace them in the next couple of weeks anyway. The correct E500 headlamps are now on order new from MB.

It passed everything else, brakes, emissions, suspension etc with flying colours. The car is now gleaming underneath I spent hours today steam cleaning it. So I'm happy really that it's only the headlamps that need sorted.

I'll just let it sit until the new headlamps get here, fit them & go pick up the cert. They will only re test the headlamp beam alignment next time nothing else.

Reconditioned 150amp Alternator upgrade is next on the list, fitting the 2 new Aux fans (I need new copper crush washers first so I can re-fit the rad) and the Fox cat back exhaust system will be delivered on week 36 (The Germans are very precise :deutscher:)
 
Last edited:
We used to run stickers on the headlights so they dip the right way mate. You've really turned this car around, dying to see more detailed photos and to have a ride in it one day!
 
Thanks Bill – yes it thought of that but they don’t allow those stickers here either! They are a pretty anal retentive bunch our local MOT testers. I’m looking forward to getting the proper E500 chrome / clear headlamps anyway – I think they will be the finishing touch to the front end of the car. Plus getting nice shiny new parts is always exciting :)

It is unrecognisable from the sad car it was a few months back when I picked it up. When the exhaust gets here I'll get pics of underneath the 500E when it's on my friends lift.


Yes I intend to make it over next year for the E500 meet for sure. It’s alot of miles to drive getting to London from here but it’ll stretch the 500’s legs!
 
Last edited:
Congratulations on the "Almost Pass" Inspection, really just the headlights is a easy one... All your hard work is paying off...
 
Congratulations on the "Almost Pass" Inspection, really just the headlights is a easy one... All your hard work is paying off...

Thanks Oscar – I also watched the latest part 4 video on your car it looks to be coming on very well! I hope you get enjoying it on the open road soon


:e500launch:
 
Last edited:
Just planning ahead now for what jobs I’ll carry out during the Winter ‘off season’- I know that m119's can have issues with the upper timing chain guides falling apart. So this winter I would like to do some preventative maintenance and renew the timing chain & all guides. That that end I have some questions-

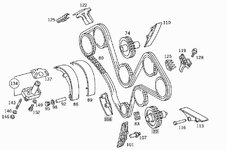
This is the pic from EPC-

This is the shopping list I think I will need-


80; Chain- A0029978494

137; Tensioner gasket- A1190520880

86; Lower sliding rail- A1190500416

101; sliding rail- A1190521216

110; Upper sliding rail- A1190521116

119; Upper guide- A1190500216

122; Upper guide- A1190500316

125; Guide covers (x2) A1190520916

113; Sliding rail- A1190521316


Is that everything? I'll get the correct tool to join the chain.


Is it a real pain to remove the front timing cover- Ie- can it be done in situ? I would really like to replace all chain guides I presume this will require removal of the front engine cover for full access?

The chain currently is 100% quiet at all times and there is on startup rattle even after sitting for a couple of weeks. But it seems prudent to renew these items before they give trouble!

Untitled.jpg
 
Last edited:
You may not need to do all of that, just the upper chain guides. IIRC, that is the usual failure due to age/heat. If you rattle after sitting, consider removing the CPS from the ezl and crank it a bit to get oil pressure. Then reattach the CPS and see if the rattle is there. "could" be just that - oil pressure building and not necessarily bad tensioner. I plan to replace pickup and screen when I replace the level sensor, but since I am there I will do the chain guides and install metal oilers (new breather etc) then run, drain remove pan for the sensor change (my only leak) and get it all done at once (obviously an oil/filter change) Just a thought.
 
Hi nocfn, OK so maybe I should order the cam gaskets and upper rails to start with. If that's what's usually the weak point then I'll follow that advice.

Really the car is totally quiet- no rattles of any kind. It's just the unknown condition of the timing chain that weighs on me every time I run it at WOT. Maybe if I set the crank at TDC and check the alignment of the cam timing marks that would be sufficient to determine if the timing chain has any adverse stretch / wear. But If properly checking the chain for stretch requires chain removal then I'll just fit a new one instead.

I plan on changing the oil again soon enough. At that same time I will fit a recon 150amp alternator and fit the updated oil check valve whilst I'm there. Again there are no issues at present but since I intend to hold onto this 500E forever I like taking care of stuff like that
 
I hear you! Just didn't want you to go thru all that if not required, but you are in there and I am all for getting stuff done with thought and planning for sure. Perhaps Honch or Gsxr will chime in soon.
 
Thanks for the replies -OK I have been reading up more on here and it does seem renewing the lower chain guides is alot of work and for the most part not necessary unless the miles are really high etc. Mine has ‘only’ 125k miles.

So I will plan on the upper guide renewal and new cam cover gaskets first. If any bits are broken off then I will also drop the lower sump pan for cleaning of it & the pick up screen incase debris are in there. It seems this is the list of what I need for that (3 Rails?)

110; Upper sliding rail (x2) - A1190521116

119; Upper guide - A1190500216

122; Upper guide - A1190500316

113; Sliding rail - A1190521316

125; Guide covers (x2) - A1190520916

137; Tensioner gasket- A1190520880 - Am I right in thinking this has to come off for upper guide renewal? I guess the DIY will answer that

Cam cover gasket sets (x2)

I’ll get this stuff in my next parts order.

I have searched for the DIY of upper guide renewal but can’t find it! :hiding:

Would anyone mind pointing me to it?
 
Last edited:
Here is all I replaced when doing the metal oil tube job:

Upper plastic chain rail guides (MB part numbers 119 052 09 16 (two required); 119 050 03 16; and 119 050 02 16)

From Gerry's write up:

The next step is super-important and delicate ... the removal and replacement of the plastic sliding rail for the top of the timing chain, located between the cam sprockets. This plastic rail consists of two plastic pieces (which are rather inexpensive) that press together and are locked by six small tangs, which snap into slots. It's fairly self-explanatory once you see it. I used a couple of small flat-blade screwdrivers to release the tangs. It's a GREAT idea to place rags below the sprockets and plastic slide rail area, because you WILL break some of the tangs off in the process, and you don't want to lose these pieces of plastic down into the motor. As you can see from the photo, I broke off quite a few pieces and was able to capture them. This plastic is quite old and brittle, and is subjected to quite a lot of heat and abuse, so it's IMPORTANT that you purchase new plastic rails BEFORE you do this job. Part numbers are above. Trust me, you WILL break the plastic in the process of removing it, unless it is brand new or near new.

The large piece is held on with two 5mm allen bolts.


You can see the difference between the old (right, dark brown plastic) and new (left, lighter brown plastic) guide pieces.


Also, notice on the older piece that there is a square rubber piece. This piece should be transferred over from the older guide piece to the newer piece. This can be accomplished in just seconds.


Here I am fitting the two plastic pieces into place around the timing chain, and locking the upper and lower tangs (there are 6 tangs in total .. four on the top side and two on the underside.
 
I don't think there is any DIY writeup for the full upper-rail replacement, including the two in the "V" of the heads, and the rail below the driver side exhaust sprocket. The cam adjusters have to be removed for this job which adds further time and complexity. The "fingered" clips and rails that go between the sprockets shown in Trae's post above are frequently replaced when the valve covers come off for any reason; these probably last ~10 years or so (?) before becoming brittle. The 'fingered' rails are cheap, unless you know they are very recent, just replace them.

As you mentioned, the long banana rail inside the timing cover (#86) and the bottom inside rail (#101) rarely need replacement, and make the job an order of magnitude more complicated. I would not consider replacing those unless you can confirm they are damaged or worn enough to warrant replacement.

Don't forget to order the parts for inside the oil pan; the rubber pickup boot and the O-ring for the level sender are the main 2 items. There are a few threads discussing this, along with general comments about getting the oil pan properly torqued without crushing the gasket, etc etc.

:banana2:
 
Trae – thankyou for posting Gerry’s Pics those help alot.

Dave many thanks for the information. Yes you are correct I will ensure I order all of the sundries as required when the time comes. Maybe I’ll post a parts list before ordering just to make sure I’ve covered everything.

full upper-rail replacement, including the two in the "V" of the heads, and the rail below the driver side exhaust sprocket

For the bit above- does this mean I need more parts Dave? Or are the items as listed in post#417 all I need for replacing the timing guides accessed from above with the Cam Covers off?
Maybe I’m picking it up wrong but it kind of sounds like there are two more guides that go in the V of the heads.


PS the w211 is now fixed – it WAS the darn Instrument Cluster all along. I got it back from BBA Reman today and the car is happy again. The IC with the CAN Network shutting most of the car down in one go & locking out Star.– I now refer this as the CAN’T Network.
 
Last edited:
... it kind of sounds like there are two more guides that go in the V of the heads.
Yes - these are callout # 110 in your list/diagram; Upper sliding rail (x2) - A1190521116

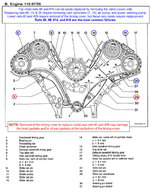
See attached for more info, in this diagram (from the FSM) they would be items 8 and 14 (same part number for each).

:klink:
 

Attachments

  • M119_timing_chain_rail_layout.jpg
    M119_timing_chain_rail_layout.jpg
    171.3 KB · Views: 30
Thanks Dave for the pic that's great. I'll get an email off to price all the parts.

I just got confirmation that the Stainless Fox exhaust for the 500E has been dispatched from Germany. That & the E500 headlamps will be here next week #Awesome! :)
 
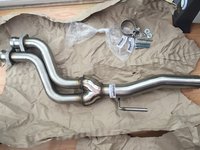
A large box arrived from Germany today - it's the Fox exhaust!

A quick peek in the box & it looks sweet - high quality. It'll bolt up to the factory CAT's etc. I will be fitting this as soon as I get home tonight.

I'll weigh the old back box / resonator just for comparison. It might offer a slight weight saving with the Y pipe. If there's any other information you guys would like ask now or forever hold your peace!
 
Last edited:
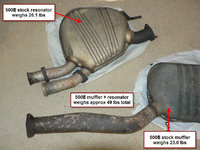
I've got data on the weights for stock bits... would love to know what the Fox weighs by comparison! Also need lots of photos!

:drool5:
 

Attachments

  • 500E_stock_mufflers1.jpg
    500E_stock_mufflers1.jpg
    118 KB · Views: 29
Ok so here's some pics :gsxrock:

Dave- the weights are-

Y pipe- 9.4ib


Backbox- 21.2ib

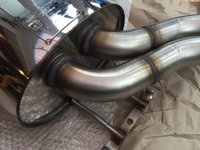
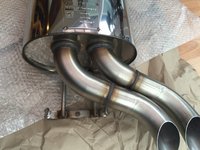
The system is very well made- big fat smooth welds, mandrel bends and just a real high quality feel to it. It arrived well wrapped and came with the fitting kit. (Although I'll be using my own bolts & copper nuts to fit)


Heading out now to fit this sucker- can't wait to hear what it sounds like


:8-banger:

IMG_1706.JPGIMG_1695.JPG
 

Attachments

  • IMG_1705.JPG
    IMG_1705.JPG
    1.9 MB · Views: 54
  • IMG_1704.JPG
    IMG_1704.JPG
    1.7 MB · Views: 53
  • IMG_1703.JPG
    IMG_1703.JPG
    1.7 MB · Views: 52
  • IMG_1702.JPG
    IMG_1702.JPG
    1.9 MB · Views: 57
  • IMG_1701.JPG
    IMG_1701.JPG
    1.9 MB · Views: 49
  • IMG_1700.JPG
    IMG_1700.JPG
    1.9 MB · Views: 52
  • IMG_1699.JPG
    IMG_1699.JPG
    2 MB · Views: 56
  • IMG_1698.JPG
    IMG_1698.JPG
    2.1 MB · Views: 52
  • IMG_1696.JPG
    IMG_1696.JPG
    2.1 MB · Views: 46
  • IMG_1694.JPG
    IMG_1694.JPG
    1.7 MB · Views: 44
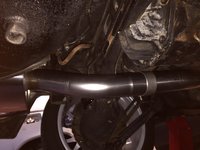
Well I just got the system bolted up – it fits very well. There is one area where it came very close to the existing heat shields. I bent them back a little out of the way. (At the double pipe bit) But otherwise it slid right on and it hugs the axle etc very nice.

The sound is nice – subtle which is what I was looking for. At idle it’s just a little deeper than stock – but when revved a v8 growl spits out the back! It’s late here now and my neighbours think I’m mad enough as it is- without me revving a V8 at night so I’ll get a video of the sound at the weekend!

Looks nice!. Hopefully 5thscaleracer will weigh on the Fox build vs his performance exhaust.


I am not intending to compare this with 5thscaleracer’s system. His looks good too and if I lived within a 5 hour drive of him (Or in the USA for that matter) I would likely have considered one of those. In terms of cost- the import duty alone on the 5thscaleracer system would have cost more than this Fox system cost! This Fox system was £560 including shipping from Germany – and made new to order. I think this offers tremendous value for money and I’m glad I tracked down ‘maybe’ the only sports exhaust factory in the world that still makes ‘off the shelf’ 500E performance exhausts.

#Diesel optik! ."giggles"


Yeah I think that refers to the exhaust tip design. They mean – stock or standard diesel style tips. They do other styles of tips as well for the 500E like dual round tips that stick out but I like keeping the car looking original & not having to cut the bumper.


So yeah I’m really pleased with this system :) It’s just a shame I can’t drive the car right now to see how it sounds on the road since I’m still waiting on those E500 headlamps and the all important MOT certificate to follow.

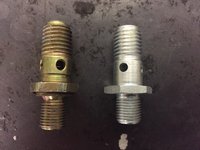
When under the car tonight I also noticed the fuel pumps copper crush washers are weeping fuel. So I'll order new crush washer from MB and renew all
 
Last edited:
£560 (~$750 USD) including shipping from Germany sounds like a bargain. Does the vendor ship to USA? :drool5:
(Edit: From this vendor, it appears they may not ship to USA... haven't found any others yet.)


When you have time, please post a photo of how the tips look at the rear edge of the bumper!

BTW - about the fuel pumps, if they are old/original, replace both with new Bosch while you have it apart. And, inspect both the feed hose from tank to pump inlet, and outlet high-pressure hose from filter to chassis main line. Both of these hoses are known to be common crackers; the high-pressure one at the filter outlet is dangerous if it leaks. More info here:
http://www.500eboard.com/forums/showthread.php?t=8977


:banana2:
 
This is the Ebay Link I used to buy the Fox exhaust

http://www.ebay.co.uk/itm/Fox-Exhau...ss-W124-E420-E500-2xDieseloptik-/391391504895
There are other styles / tips / dual silencer Fox 500E systems available too on other German websites. Like this site for example

http://www.sportauspuff-direkt.com/...l?cPath=2278_2704_2718_2719&products_id=73469
Do bear in mind that sometimes they only list the rear silencer – so make sure there are x2 part numbers listed which will be the Y piece and the silencer.

They don’t list USA as a shipping location on the Ebay listing – but I’m sure they would be able to ship to the USA if asked. BTW- if sending them an email send it in German – otherwise they won’t respond!

Thanks for the info on the Pumps Dave- I might fit the washers just to let me away for the last few weeks of driving before winter then I’ll renew the pumps in the 'off' season. I fitted a Bosch 044 pump to my E36 build..... I liked it! The Fuel lines are not cracked or anything but yes I will renew them too
 
Last edited:
Well here’s a quick video of how the 500E sounds now! I love it – sounds really brutal at high revs! But low key at idle – perfect for this car.


The Iphone Audio isn’t great quality so I thoroughly recommend using earphones and turning it up so you can catch the rumble at idle too!

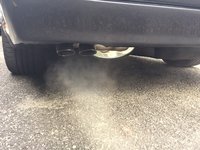
Lots of condensation in the exhaust she’s had a few cold starts and is garage bound until the Headlamps get here.


[video=youtube_share;_3IXy5Tmw7Q]

Enjoy
 
Last edited:
Sounds nice! :deniro:

BTW - I got a reply back fromthe vendor mentioned in post #429 (sportauspuff.de)... appears they are willing to ship to USA for approximately €180. If their catalog price includes VAT (which it appears to) AND if they will remove the VAT charge, looks like it would be $825-$850 USD delivered to USA. If we have to pay VAT it would be around $925-$950 USD delivered, at the current ~1.13 exchange rates. Hmmm.... I don't need a cat-back exhaust, but nobody sells a bolt-on Y-pipe to delete the resonator, and Leistung said they will not make one... the Fox is looking tempting! I'm impressed with the fit & finish in your photos & video.

:scratchchin: :apl:
 
Yeah that shipping charge isn’t bad – if they knock the VAT off that’s a good price too. I see where you asked for pics at the tips Dave in post #429 – here’s some more pics of the fitment.

IMG_1713.JPGIMG_1714.JPGIMG_1720.JPGIMG_1708.JPG


The Tips are not really visible at all unless you crouch down (Just like the stock tips) Then you can see the edge of the silencer too.

IMG_1711.JPG

It does fit really nice – with the exception of that one area where at the curve on the double pipes it comes very close to the body. I suspect there is some tolerance in their moulds and also how the factory cats are bolted up on your car / condition of Engine / Gearbox mounts etc. On mine if I moved the exhaust by hand it would touch the edges of 2 heat shields at this location. So I pried the edges of the heat shields back a little and now no matter how much I try to move the exhaust around now it does not touch any more. I’ll try to gets pics of this tight area when I am replacing the Pump seals.
 
Last edited:
I really like that it retains stock appearance, AND does not require cutting a notch in the bumper. The bumpers are already expensive and may become NLA if they aren't already!

:duck:
 
Well Dave, you were right! It wasn’t just the banjo fittings leaking it was them AND the upper pump’s housing seal. So I am going to go for a single more powerful Fuel Pump as I did on my E36 build. For the 500E I have settled on a Genuine Walbro GSL392 300lph+ Pump with a M10 x 1 x 15mm Fitting for the inlet to allow the stock fuel hose to mount up.


The Bosch 044 is a loud pump! I’m hoping the Walbro item isn’t just as loud and it’s dimensions should make it fit into the bracket a little better.


Also as well as just renewing the leaking fuel pumps- this one will offer an upgrade too. Should I add a NOS setup in the future this pump will capable already.
 
Last edited:
The Walbro GSL392 is not quiet. It's not as loud as the Bosch 044, but it is louder than the stock twin Bosch pumps. If you do get the GSL392, you can use the factory mounting bracket and fuel filter that was stock on the very, very late build 124 chassis with single fuel pump. Everything fits perfectly.

Another option, for stock power levels, is using the late factory single pump which is dead silent. It's made by Pierburg and you can't hear it over the engine... and, it pulls a tiny amount of electrical current; only around 5A. It's good for 420-450hp max, I think... at least RENNtech used the same stock pump on their W210 E60 builds which are over 400hp. But, I'm not sure if it will push the extra pressure desired for a NOS system over ~125 shot.

:nos:
 
:gsxr:

I did go for the Walbro Pump Dave I think it'll be just the ticket. For now I will slot this pump into the twin pump bracket that's on the car. (One slot empty) but when I am buying the new Fuel Hoses from MB I will get the later braket you mention so it looks more like original fitment.

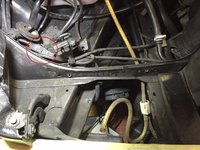
I finally got the Air Pump unplugged today. They have the connecter well buried those sneaky germans - headlamp Air Scoop had to come out too. No rust lurking which is good - usually this corner is bad in our climate.

IMG_1722.JPG

The Airpump is totally silent now at cold startup etc so the bearing is good- it must be the internals which are noisy when activated. In any case we do not need the Air Pump here for emmisions testing or anything. Some day I will get the Delete Pulley and remove it.
 
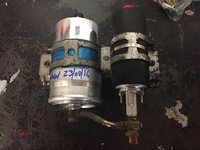
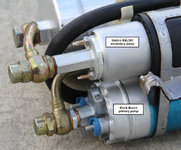
Well the new Walbro pump got here today so I took the old assembly out & binned both pumps.

IMG_1749.JPG

As can be seen in the pic the Walbro pump + it's sound deadening sleeve are the exact diameter of one of the existing pumps. Plus the hard lines hook up perfect. (Dry fit for now until the correct size crush washers get here) The single pump is secured with a stainless steel tie so it's not going anywhere. The fuel pump is positioned in the lower holder where the fuel tank hose fits on. New Knecht fuel filter fitted too.

IMG_1756.JPG

Question- the Walbro banjo outlet has no check valve in it. Whereas the 500E's pumps did. Dave, do you think I should fit the checked valve into the new pump?

IMG_1753.JPG

I presume the check valve is there to maintain fuel system pressure after shutdown. But If it was simply fitted for the old pump's benefit then maybe I can use the Walbro fitting w/out check valve.
 
Last edited:
Thanks Dave, do I need to run 2 pumps still? I figured the single pump would work on its own since it's got a higher output.

Since both my Bosch pumps are original I don't even think the one that's not leaking is fit for re-use.
 
Last edited:
No need for 2 pumps... I was just enjoying the old-school MB overkill. :) The late 124's used a single pump as I mentioned earlier. I am using the Walbro as a high-pressure/high-flow pump to support a dry nitrous system.

:nos:
 
The Walbro pump install was completed last night- no more fuel leaks!

I made a new harness with heavy gauge quality copper auto wire- soldered both ends. This is because the original fuel pump loom has 2 pairs of cables inside (slightly thinner gauge) for powering the twin pump setup.

So now a single pair of thicker cables power the single upgrade fuel pump.The single Walbro pump is quieter than the old twin pumps. Maybe my old pumps were louder than normal since they were past their best- who knows. But now the pump has a quieter whine to it that's not any near as noticeable as the car was before. And to think it pushes more fuel than those twin pumps- nice!

I can't fit the other new headlamp just yet- Im actually in Berlin currently!
 

Attachments

  • image.jpeg
    image.jpeg
    2 MB · Views: 13
The 500E has it’s headlamps fitted now & ready for the MOT re-test tomorrow morning. I still need to set the beam tonight when it gets dark.


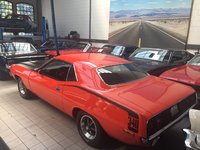
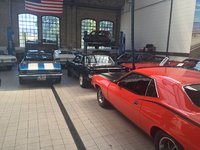
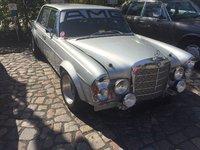
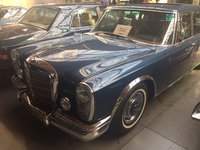
When in Berlin last weekend we visited the Classic Remise- awesome place. It has a very large collection of classics which are on show and / or in real ‘shops’ getting restored.


Some pics attached of the cars there on the day we visited. Our favourite was the 300SEL 6.3 AMG


There was also a 500E there- maybe someone on the forum recognises it?

IMG_1833.JPGIMG_1799.JPGIMG_1803.JPGIMG_1804.JPGIMG_1805.JPGIMG_1815.JPGIMG_1817.JPGIMG_1826.JPG
 

Attachments

  • IMG_1800.JPG
    IMG_1800.JPG
    824 KB · Views: 14
  • IMG_1802.JPG
    IMG_1802.JPG
    913.5 KB · Views: 15
  • IMG_1830.JPG
    IMG_1830.JPG
    575 KB · Views: 14
  • IMG_1831.JPG
    IMG_1831.JPG
    567.4 KB · Views: 12
Last edited:
I've just picked up on your comments about the single fuel pump being somewhat quieter than the original twin pump set up. Can u describe if poss what the old set up sounded like?
I ask because I have an odd muffled whine from the back of my 500e. It is only occasionally distuishable between 20 - 45 mph. It does not change in pitch, is present whether under acceleration or overrunm, but the frequency does increase slightly at the higher end of the "envelope ". When slowing down, one can follow the sound down to about 15 mph, at which point it disappears.
Does this sound familiar?
 
Hi r44raven, the Fuel Pump noise from my old twin Fuel Pumps can be heard in the exhaust video I posted not long ago. Just before the car starts up & during running you can hear the fuel pump whine.

I could not ever hear the fuel pumps whilst driving though- I think you couldn't hear them in your car either whilst moving. They can be heard inside the car at standstill but after that road noise easily drowns them out even at low speeds. If the whine is relative with speed then it could maybe be the diff or a wheel bearing going out. (Just off the top of my head that's where I would look first)
 
Hi JC220! What has always confused me is that the pitch of the whine doesn't change; all my previous experiences of diff/wheel bearing problems have always demonstrated
change in pitch. And i've put almost 10k miles on the car since I bought it - without any change in the volume of the noise.
Thanks for your thoughts - as they say think I'll "let it develop "!
By the way, hope all goes well with the MOT
 
The 500E passed it’s MOT this morning – the headlamps were all that was needed for the re-test.


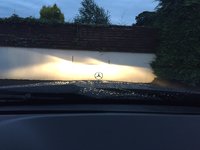
I set the beam alignment last night and took it for a drive – wow what a difference with those E500 headlamps and the driving lamps. Although not a requirement for the MOT I also set the beam alignment for the driving lamp beam (High Beam) – which out of the box was pointing to the Sky. In fact the aligment of the new headlamps was way off but that’s to be expected. It’s CRITICAL that anyone fitting new headlamps has the beam alignment correctly set before venturing out on the road at night for the first time.

IMG_1875.JPG
IMG_1879.JPG

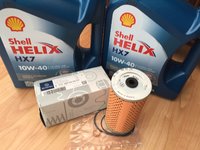
I also treated it to another Oil change even though it’s only been about 1k km since the last change. It had started to turn black as the detergents cleaned up the inside of the motor. When I looked in through the oil cap before the bearing covers were tan coloured. (But Zero sludge) now they are white again that Shell Helix Oil has worked wonders.


I have decided to keep running the car on the 10w 40 Helix – since it’s so good at keeping the engine clean but also the car run’s at 2.75 Bar Oil Pressure at hot idle so it’s happy with this Oil. Running Fully Synthetic Oil in a early 90’s Benz is wasted on me since I would rather change the oil much more frequently. (Twice a year regardless of mileage) I usually fit Knecht filters but thought I’d make the long trip to the dealer’s for the Genuine Filter this time. Took it out of the box and it’s branded Knecht inside also :doh:

At least it comes with a sump plug crush washer

IMG_1880.JPG
 
Last edited:
Looking good mate. That Shell oil is good but not the best. I did run this stuff for a while and then changed over to the MB genuine oil - fully synthetic. Motor looked seriously clean after running this stuff and the car ran so much better. I'd recommend it!
 
Hi Bill, thanks for the info. Did the Oil Pressure drop any at hot idle with the fully synthetic lighter grade oil?
 

Who has watched this thread (Total: 6) View details

Back
Top