Let's talk about the seat adjustment motors, for a moment.
If there is a seat adjustment failure (i.e. you hit the adjustment switch, and nothing happens), there are generally five things that can be wrong with the system:
- the fuse controlling the seat adjustment circuit has blown (that's always the first thing to check)
- the gear(s) that moves along the "back and forth" track(s) or "up and down" track(s) are somehow hung/bound up, restricting movement
- the square-shaped cable that goes from the seat adjustment motor to the gear mechanism, is stripped on one of the ends, or has popped out of the gear mechanism
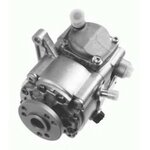
- the electric motor that controls a particular function has failed
- the wiring and/or connector between the switch and the seat has failed due to grounding, or other interruption (breakage, etc.)
The last two items (motor failure and wiring failure) are the least likely to occur, simply because the motor doesn't honestly get much use (most of us don't adjust our seats that often), and the wiring is generally fixed in place, so doesn't also get flexed or abraded so that it breaks, a connector gets broken, or the insulation gets stripped off.
That leaves the first three options as the most likely candidates for failure.
The fuse should always be the first item to check. So that is a "given" -- I recommend that you find the correct fuse in the fuse box (use the card inside the fuse box lid, or the card/table here on the wiki to identify the correct circuit). I'd recommend physically removing and then replacing the fuse with a spare to see if there is any change in functionality.
For most seat adjustment failures, it is usually the second or third items. Often the lubrication in the seat tracks and gears gets worn away or dissipates over the years, and this lack of lubrication can bind the gears. Some of the mechanisms are sealed with grease inside, and these are usually OK. But you have to remember that the seat adjustment mechanisms/gears live in a harsh environment, with a LOT of dust, dirt, spilled coffee and Cokes, dropped McDonald's French fries, ball point pen caps, and other crud that falls into the area under the seat and can easily physically bind up the adjustment gears.
So, what you honestly have to do is to remove the seat from the vehicle to properly diagnose and then solve the problem.
The seat is only held into the vehicle by four bolts -- two in front, and two in back. The factory procedure (which is
detailed here for the driver's seat,
and here for the passenger seat) is generally pretty good as a guide for removing the seats. You first move the seat all the way back (if possible) to expose and loosen the front bolts; then you move it all the way forward to expose and loosen the rear bolts. Then move the seatback all the way forward to make the seat as compact as possible, and then tilt the seat rearward toward the back seat. CAREFULLY unplug all electrical connections you find, including the red airbag plug (it's a good idea to disconnect the battery before doing this). Then lift the seat CAREFULLY out of the vehicle (put a mover's blanket or other heavy cloth on the door sill so as not to scratch the sill with the seat-bottom) and onto the ground.
I spread a mover's blanket onto the ground to put the seat on to disassemble it, in a wide open space. Oh, and threw some Santana on the shop stereo system for ambiance.
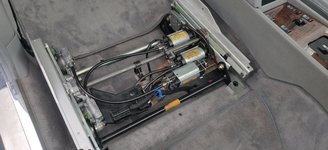
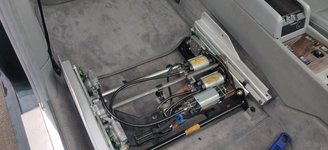
Then you need to remove the seat bottom/back assembly from the metal frame piece, which contains the electrical items. The seat bottom is held to the frame by six bolts -- four large (13mm) bolts that go in from the sides, and two much smaller Torx bolts that attach the forward ends of the seat tracks up and into the bottom of the seat.
Once you remove the seat assembly from the metal base frame, the motors and cables are exposed.
The next step moves you into diagnostic mode. What you need to do is bring the seat frame back to the vehicle, and reconnect the battery (if you disconnected it). Plug the front-most electrical plugs back into the their connectors, and with the door open (this will allow you to adjust the seats without having to turn the key) activate the seat adjustment buttons, working to isolate the function that is not working. You will see the cables tense up and hear activity from the seat adjustment motors, and see the seat base move on the tracks as you activate things (if they are working correctly).
You will quickly isolate the problem function visually. After doing that, you need to disconnect the plugs and bring the seat base back over to your work area. Then you need to disconnect things so that you can remove one end of the seat adjustment cable from the motor, and pull the cable out of the housing.
Carefully inspect the ends of the cable to ensure they are still square. If they are rounded off (which means they are stripped and just turning freely inside the end of the motor) then you need to go to a grinder and carefully grind the end down to a place where it is square, or if slightly rounded you may be able to just grind the straight edges flat again, into a square pattern. You should re-insert the finished ends of the cable (both ends) back into the square sockets in the ends of the motor and the adjuster so that you can feel that they "grab" into the sockets and make solid contact.
If you remove any material from the end of the cable, if it is rounded off, then you will need to remove the cable housing from the motor and adjuster (simple bolt on, nothing big) and remove some material (say 1/4-1/2") from the end of it (
see procedure to do this here) before re-assembling things.
The other issue, if the cable ends check out to be still square, is that the cable is slightly too short / cable housing slightly too long, and the end of the cable has popped out of the socket in the adjuster (or at the motor) which allows the cable to just spin and not activate the seat adjuster mechanism.
To remedy this, you just remove the cable housing and (like with the previous problem) remove 1/4-1/2" of cable housing before re-installing it onto the motor and adjuster mechanism.
90% of the time, it's just that that cable has popped out of the adjuster and the housing needs to be shortened a bit to give more end of the cable to insert into the adjuster socket.
After you make the repair and shorten the cable housing, re-install the cable and then bring the seat frame back over to the car for a function check. That should solve the problem. If all is working as it should, take the opportunity to clean the old lubrication from the seat gears and tracks and replace it with new lubrication (I used white Lubriplate grease and some MB "gleitpaste" for sunroofs (gleitpaste means "sliding paste" for sliding mechanisms).
Then re-install the seat back onto the frame, once you are satisfied that all is working correctly, and installation of the seat is the exact reverse of the removal process. Be sure to plug back in all of the electrical connections on the bottom of the seat. For seat-memory connections, which are at the back of the seat, you may want to install the seat and then plug them back in after installation, by moving the seat forward to expose the plugs.
It's also an excellent time while the seat is out to treat and condition the seat leather, either with Leatherique Prestine Clean and Rejuvenator Oil, or with something like Griot's Leather Care cream.
Doing my driver's seat in my wife's E320 wagon took me about 7 hours, taking my time. I'd expect this process could be done in about 2-3 hours (per seat, if needed) with some decent focus.
Hope this helps.
Cheers,
Gerry