• Hi Guest !

    Welcome to the 500Eboard forum.

    Since its founding in late 2008, 500Eboard has become the leading resource on the Internet for all things related to the Mercedes-Benz 500E and E500. In recent years, we have also expanded to include the 400E and E420 models, which are directly related to the 500E/E500.

    We invite you to browse and take advantage of the information and resources here on the site. If you find helpful information, please register for full membership, and you'll find even more resources available. Feel free to ask questions, and make liberal use of the "Search" function to find answers.

    We hope you will become an active contributor to the community!

    Sincerely,
    500Eboard Management

Exhaust Crossover Pipe and Downpipe removal tips

Jlaa

OG ⏰ 500E
Staff member
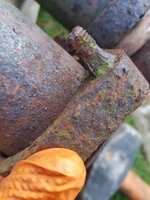
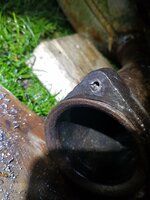
I've searched high and low - does anyone have any tips on removal the downpipe and the crossover pipe? Let me explain. I decided to fix what ain't broke, so I decided to change the O2 sensor. I soaked it in Kroil / PB blaster for two weeks (ModeratelyPaced Jack for the win BTW). Anyways, this O2 sensor is original. After 30 years of living attached to this bung, it ain't moving. I cannot get enough leverage with the scant amount of room above the O2 sensor bung / below the floor of the car to get any serious leverage on the O2 sensor socket.

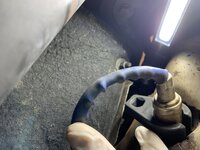
IMG_5080.jpeg IMG_5086.jpeg

So I decided --- well, I might as well drop the downpipe assembly to get at the O2 sensor where I can get a lot more leverage out in the open.
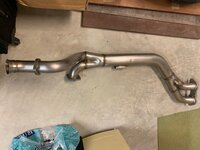
But then I thought - heck, I have a Flieben downpipe, crossover pipe, and catalytic converter on the shelf. If I'm gonna fuss with doing all that, I might as well just replace all that that jazz.

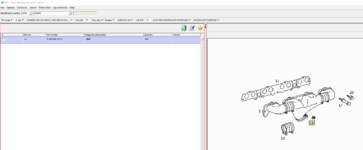
First, my lower crossover connection looks pretty crusty. Diagram for reference. My lower crossover connection is the circled one. Those nuts look like I'll probably be hitting them with an air chisel or something? @kegmankipp suggests a sawzall (or in @RicardoD's case a Milwaukee Hackzall) but I dunno, I mean an air chisel can probably split the nut.

Diagram.jpg Crossover Pipe Conection - Lower - Mine - 2.jpeg Crossover Pipe Conection - Lower - Mine - 1.jpeg

@sheward's crossover pipe lower connection below <--- I am majorly jealous of this.

Crossover Pipe - Sheward - 1.JPG

Anyways I am not too worried about the lower circled connection. I am worried about the UPPER connections, the ones indicated by the red square.

So far I have found - always use a 6 point socket of the proper size - and I have also found that @gsxr has "never had a problem" with the UPPER connections. I also found that @gerryvz recently dropped his crossover pipe (his pics below) --- but his crossover pipe was relatively smooth sailing.

Crossover Pipe Removal - GVZ - 3.JPG Crossover Pipe Removal - GVZ - 4.JPG Crossover Pipe Removal - GVZ - 5.JPG

What I would like to avoid is this experience by @hnyc, where, and I quote:

That’s how this whole thing started.
I snapped off a crossover pipe bolt in the d/s manifold end. So the manifold had to come out.

Anyways, thoughts appreciated. I'm not even sure I can hit those upper crossover / downpipe bolts with PB blaster from below, the are so far up there!
 
I shared your concern however my removal proved to support GSXRs encouraging words. The factory nuts may be bronze copper and held captive in the manifold by design. The nuts at the lower joint were. You should be able to get creative and squirt some lubrication onto both sides. even some WD with a straw. A length of small vacuum tube may work as an extension for the straw. Oil on top of the nuts is going to be better.

My plan was to try loosening them with moderate torque and if they would not turn, I would then start the car and heat up the manifolds some and try again. One could do this multiple times with oil additionally. There was no need in my case.

Crossover envy... sounds like some kind of term we may be hearing in the news soon.
 
Last edited:
When reinstalling: The crossover pipe has a radiused union at the manifold as well as at the connecting donut. This allows slight movement so to push the pipe upwards away from the chassis tie over bar before tightening the bolts. I haven't seen the design of the Flieben downpipe.
 
Do you have a MAP torch or similar?

Heat those nuts up for a long time, get a pair of vice grips on them and an impact or spanner and they should come out fine. (Use impact rated wobbles)

Or cut the bolts and punch out the remains. Never tried an air chisel for that it may cause damage IMO.

For the sensor itself when I have a stuck one I get violent with it. Cut the top off with a grinder, heat it up with MAP torch and large impact on it. You will need an 02 sensor thread chase tool to clean the threads they are always bad.

For the manifold bolts spray em for a day or two and have at it from below. They should come out OK. If they snap then punch out the remains as that is just a captive square nut above. Sometimes that nut turns and you'll need small vice grips to grab it if it does.

PS - most all 02 sensor sockets won't fit these sensors due to the fat body on them. Hence why I just chop em off so a normal impact socket will fit.
 
Last edited:
FWIW - I always renew the manifold and exhaust connection bolts with A2 Marine Stainless bolts. And for the nuts on the exhaust connecitons underneath I use M8 Copper manifold nuts - which also self lock.

This means you will never have to deal with corroded bolts again. Do use some antiseize on the threads - just al ittle to prevent disimilar corrosion. There is a specialist paste for this I use here.
 
For the manifold bolts spray em for a day or two and have at it from below. They should come out OK. If they snap then punch out the remains as that is just a captive square nut above. Sometimes that nut turns and youll need small vice grips to grab it if it does.

Thanks - Okay two questions

1) If the captive square nut turns, then how is this possible? Does the mechanism that enforces captivity corrode that the nut is no longer captive?
2) If the manifold bolts snap (I mean the bolts that hold the downpipe and the crossover pipe to the manifold) then what happens next to "punch out the remains"? How difficult is this? I don't need to remove the exhaust manifold to do this do I?
 
+1 on everything Drew and Joe stated above. :gor-gor:

Stainless hardware is likely a requirement in corrosive environments. I live in a dry area (high desert) and have always installed new OE MB hardware (see below). The generic gray bolts have remained corrosion-free and easy to remove years later in my dry environment, as always YMMV. Anti-seize on the manifold bolts is mandatory. The manifold bolts should come out with minimal headache if you can get Kroil on the nut from above. As noted, worst case you replace the captive nuts 000-990-25-52. Tthere is a tool to pull them in from below - should not require manifold removal. Some pics here. Use destructive methods on the other bolts as needed, since you'll be replacing them anyway.

Dumb question: Do you have the resonator removed from the catalyst pipe already? And/or, has this been removed in the recent past? Separating that connection can be a nightmare if it's not been touched since 1993.

:run:

1679583940646.jpeg
 
+1 on everything Drew and Joe stated above. :gor-gor:

Stainless hardware is likely a requirement in corrosive environments. I live in a dry area (high desert) and have always installed new OE MB hardware (see below). The generic gray bolts have remained corrosion-free and easy to remove years later in my dry environment, as always YMMV. Anti-seize on the manifold bolts is mandatory.

Thank you. FWIW 304017-008018 is NLA. However, it is still avail on ebay, and shouldn't matter if I get a generic stainless M8x1.25 35mm bolt on ebay right? Actually getting generic stainless A2 for all the bolts on ebay should be good yeah? Like these:


I have some of these from MB but not all - hate dealing with the local MB dealer for small parts orders.

IMG_5098.jpeg

The manifold bolts should come out with minimal headache if you can get Kroil on the nut from above.

Are you suggesting one can get penetrant from above (under the hood?). I'll need to look there again. I thought it was only possible to go from below.

As noted, worst case you replace the captive nuts 000-990-25-52. Tthere is a tool to pull them in from below - should not require manifold removal. Some pics here. Use destructive methods on the other bolts as needed, since youll be replacing them anyway.

The EPC does not show 034/036 as using this nut. Is this an EPC error?

Screenshot 2023-03-23 at 9.08.45 AM.png Screenshot 2023-03-23 at 9.08.01 AM.png

I noticed the EPC shows this for other models:

Screenshot 2023-03-23 at 9.10.26 AM.png


Dumb question: Do you have the resonator removed from the catalyst pipe already? And/or, has this been removed in the recent past? Separating that connection can be a nightmare if its not been touched since 1993.
View attachment 163335

Good question. That resonator was replaced with a new unit in early 2017 by a shop when the old one broke when trying to remove it. I looked at the hardware connecting the resonator with the OE cat yesterday it the HW still looks crispy clean and new.

When I separate the cat from the 2017 resonator, say I want to add more lube there --- do you have a recommendation? Graphite lube?
Thanks.
 
Thank you. FWIW 304017-008018 is NLA. However, it is still avail on ebay, and shouldnt matter if I get a generic stainless M8x1.25 35mm bolt on ebay right? Actually getting generic stainless A2 for all the bolts on ebay should be good yeah? Like these:

I have some of these from MB but not all - hate dealing with the local MB dealer for small parts orders.
Most of the OE bolts are nothing special, as you can see. I'd prefer to use the factory wide-seat bolt to the manifold, but the rest can be replaced with aftermarket. I think stainless bolts with copper nuts will be ok metallurgically?


Are you suggesting one can get penetrant from above (under the hood?). Ill need to look there again. I thought it was only possible to go from below.
I *think* so, using a long flexible tube? I can't remember if I've ever done this. Visibility is poor at best. Applying from below will require a U-shaped tube at the end to get lube at the exit of the captive nut, so gravity will pull it down into the threads.


The EPC does not show 034/036 as using this nut. Is this an EPC error?
Nope, it's an EPC "feature". The captive nut is shown with the exhaust manifold:

1679590309219.png


Good question. That resonator was replaced with a new unit in early 2017 by a shop when the old one broke when trying to remove it. I looked at the hardware connecting the resonator with the OE cat yesterday it the HW still looks crispy clean and new.
The hardware isn't the problem, it's the passenger side catalyst tube that slides into the resonator, with a graphite ring seal. The two pipes corrode together and can be a bear to separate without damaging either pipe. You can hammer, twist, pull, and pry... but don't overdo it, or you can break off the end of the cat pipe if you go all Hulk on it. I broke one and then had to buy an extractor to pull the broken piece out of the resonator (see attached). The resonator and cat are both NLA so treat both like they are platinum plated.


When I separate the cat from the 2017 resonator, say I want to add more lube there --- do you have a recommendation? Graphite lube?
Thanks.
Only if assembling the OE parts again, first remove the old graphite ring, then scrape & clean out the resonator female pipe internally with a wire brush on a drill. Wire brush the catalyst pipe externally where it slides into the resonator. Test-fit dry without a seal, they should slide together with zero effort. To assemble, paint the inside/female portion of the resonator with anti-seize, install a new graphite seal, and bolt up the resonator after the catalyst pipe is installed on the car.

If assembling / installing the shiny new Flerken pipes, I don't know how those go together... but any slip-fit joints may benefit from anti-seize.

Don't tighten any bolts fully until the ENTIRE exhaust is bolted. You must yank and tug everything around to find the best alignment, then tighten one pair of bolts at a time.

:sawzall:


exhaust_pipe_extraction1.jpgexhaust_pipe_extraction2.jpg
 
The hardware isnt the problem, its the passenger side catalyst tube that slides into the resonator, with a graphite ring seal. The two pipes corrode together and can be a bear to separate without damaging either pipe. You can hammer, twist, pull, and pry... but dont overdo it, or you can break off the end of the cat pipe if you go all Hulk on it. I broke one and then had to buy an extractor to pull the broken piece out of the resonator (see attached). The resonator and cat are both NLA so treat both like they are platinum plated.


Only if assembling the OE parts again, first remove the old graphite ring, then scrape & clean out the resonator female pipe internally with a wire brush on a drill. Wire brush the catalyst pipe externally where it slides into the resonator. Test-fit dry without a seal, they should slide together with zero effort. To assemble, paint the inside/female portion of the resonator with anti-seize, install a new graphite seal, and bolt up the resonator after the catalyst pipe is installed on the car.

If assembling / installing the shiny new Flerken pipes, I dont know how those go together... but any slip-fit joints may benefit from anti-seize.
Thank you. Which part is the graphite ring (if ordering a new one?) Is it part 74 - 126-997-00-41?

1679594220853.png
 
Thank you. Which part is the graphite ring (if ordering a new one?) Is it part 74 - 126-997-00-41?
That is correct! Only buy OE. This is for the OE resonator, btw. The graphite seal may not be used with the Flerken setup - not sure, never owned one of those.

🐱
 
I cannot find my exhaust pictures however the Flieben rear section, which I installed, does not use the graphite seal, so it would follow that the entire system does not utilize it either.
 
That is correct! Only buy OE. This is for the OE resonator, btw. The graphite seal may not be used with the Flerken setup - not sure, never owned one of those.

🐱
Thanks! I'm keeping the OE resonator (circa 2017). Just replacing the downpipe / crossover pipe, and catalyst with the Flerken pieces.

Received Revised Unit 2023-1-11 - Magnaflow - Neck Down Sooner for Factory Resonator 4.jpeg IMG_4497.jpeg IMG_4490.jpeg
 
Has anyone confirmed the Flerken cat pipe OD is identical to the MB OE cat pipe OD? This slip joint needs to be juuuuust right for fitment & sealing.

:hide1:
 
Has anyone confirmed the Flerken cat pipe OD is identical to the MB OE cat pipe OD? This slip joint needs to be juuuuust right for fitment & sealing.
I have not measured the OD of the OE catalyst pipe, but here is the OD of the flerken - supposed to be made to fit.
 

Attachments

  • C1A87246-1782-4BCE-A186-D3D4550B3FC6.jpeg
    C1A87246-1782-4BCE-A186-D3D4550B3FC6.jpeg
    2 MB · Views: 4
Thanks - Okay two questions

1) If the captive square nut turns, then how is this possible? Does the mechanism that enforces captivity corrode that the nut is no longer captive?
2) If the manifold bolts snap (I mean the bolts that hold the downpipe and the crossover pipe to the manifold) then what happens next to punch out the remains? How difficult is this? I dont need to remove the exhaust manifold to do this do I?
1: The captive nuts are square shaped. And just locate into manifold and with one side blocked with the casting. There are times when they are so seized that when you try to undo them from below they will "skip" over this small edge and therefore you can't undo them. I have used small vice grips and alot of swearing in the past from above

20230323_212101.jpg20230323_211856.jpg

Different MB V8 but same idea as m119:

20230323_211949.jpg20230323_212020.jpg

I use stainless bolts as I said which are just generic bolts yes.

20230323_211912.jpg

For the exhaust connections below I use stainless bolts and these copper coated self locking nuts also used on manifolds typically

20230323_212227.jpg

2: If they do snap off (not very likely!) Then it's "just" a matter of getting a punch up in there and knocking out what's left from below. I'm sure there are better pictures out there but this is a spare m119 of mine

20230323_211707.jpg

Stainless is perhaps overkill but it costs almost nothing extra and it sure is nice to see shiny bolts under there in years to come! And it is a pleasure doing any future exhaust work once the 25+ year old fasteners are banished.
 
Interesting. I just measure the I.D. of an OE pipe from a '95 W140 S500 and it measured 2.25 inches. This is the pipe after the cats and the crossover.

Post edit: to be more clear (for those who are unaware) All M119 cars with a left-to-right crossover pipe have an oval (not round) section between the crossover collector (oval as well) and the post-cat collector. They are then back into dual piping. My measurement was taken from that pipe: post cat and collector. Being accustomed to the MB does things I would be near certain that the oval part of those exhaust measure 3" across. Meaning that the oval pipe may cover as much cu.sq.ft. as two 2 1/4 pipes do

What is most interesting though (at least to me) is Mercedes installed dual down pipe exhaust from the L/R manifold collector on M119 cars from around 1997-1999. Even the W210 AMG E50 M119 car seems to have been equipped with this style. (They are so rare that I have only seen one undercarriage and it had been modified I believe). Attached:

(That M119 is said to have 39mm intake valves as well and Bosch ME).
 

Attachments

  • E50 AMG exhaust.png
    E50 AMG exhaust.png
    845.4 KB · Views: 8
Last edited:

Who has viewed this thread (Total: 1) View details

Who has watched this thread (Total: 2) View details

Back
Top