• Hi Guest !

    Welcome to the 500Eboard forum.

    Since its founding in late 2008, 500Eboard has become the leading resource on the Internet for all things related to the Mercedes-Benz 500E and E500. In recent years, we have also expanded to include the 400E and E420 models, which are directly related to the 500E/E500.

    We invite you to browse and take advantage of the information and resources here on the site. If you find helpful information, please register for full membership, and you'll find even more resources available. Feel free to ask questions, and make liberal use of the "Search" function to find answers.
    We hope you will become an active contributor to the community!

    Sincerely,
    500Eboard Management

1993 400e rescue

Yep, try rotating the plates slightly (when loose!) until the shaft is accessible from below with tools. With the plates in some positions, the shaft will not be centered in the LCA access hole. Also, as Jlaa noted above, make sure to have the plates clamping as many coils as possible.
 
As noted, the more compression on the spring, the straighter it is so use a floor jack to add compression once the plates are in. Then install the screw tensioner.
Remember to reverse the procedure when removing. It can be a bit frustrating.
 
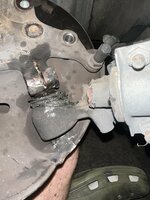
Why can I not lift the wheel hub off the ball joint? It is loose but the dust shield is in the way, won’t let it lift off the LCA.

Do I really have to disassemble the entire wheel, bearings etc to get the dust shield off?

If so that is a stupid design.IMG_0978.jpeg
 
Looks like your dust shield is bent. You don’t have to disassemble the hub to remove the ball joint stud. What I do to make removing easy is support the LCA at the ball joint. Remove the pinch bolt. Hose it with your favorite penetrating oil and slowly lower the jack. Stud pops right out of the knuckle.
 
I haven't done this job in years, but I recall it being a serious PITA.

That said - remove the brake rotor only. This will allow the dust shield to bend forward slightly and allow the ball joint to slide in & out. After installing, bend the dust shield back into place as needed so it doesn't rub the brake rotor. There should be a few mm air gap between shield and rotor surface.

To fully remove the dust shield, yes you need to remove the hub+bearings, but this isn't required for what you are trying to do. I recently learned the dust shields are NLA (at least one side, possibly both) so you'll want to salvage what you have there.

:sawzall:
 
Removing the rotor allowed me to bend the dust shield just enough to remove the hub.


Here is the boot! Not good.

IMG_0980.jpegCleaned it out the best I could with Q tips

IMG_0982.jpeg

IMG_0984.jpeg


IMG_0986.jpeg


Thankfully no play in the ball joint!! Still moves smoothly no play. Reboot, grease, and move on.

I think I got lucky.
 
Also changed out my drag link. Had a surprising amount of play in one of the ball joints.

IMG_0987.jpeg

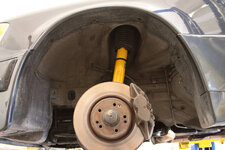
the original shocks also felt a little sluggish, didn’t offer as much resistance as I would have expected? I don’t see any leaks but I’ve ordered some new ones while I’m in here.


Couldn’t find bilstein or OE, only could find Sachs HD for the front. Hopefully that’s a fine brand.

 
Nice you installed the OE drag link! Aftermarket is made in Turkey and not the same as OE.

Sachs has been good stuff and should be fine for the struts. I'm curious if they are still made in Germany or not. Some Sachs production has also moved to Turkey. I didn't realize the OE struts for 034 wen NLA. The Sportline strut (which is just the E500E strut) is still available but made in Turkey now (link).

1717767401890.png
 
Got the new Sachs shocks installed. They are made in Turkey and were the only replacement option I could find. Seem to be of high quality.

Comparing the OE to the new shock I am amazed. Huge, huge difference in resistance and “spring back” time. i think my old shocks were more worn out than I expected.

I had to slightly widen the upper hole on the new shocks. Not sure why? Otherwise they appear identical to OE design. Used a dremel no big deal.

IMG_1030.jpeg

IMG_1031.jpeg
IMG_1032.jpegIMG_1033.jpeg
IMG_5182.jpeg
 
I had to slightly widen the upper hole on the new shocks. Not sure why? Otherwise they appear identical to OE design. Used a dremel no big deal.
Those new Sachs struts must be specified for 6-cyl applications, not V8. The pinch bolt on the V8 models was embiggened from M12 to M14, which is why you had to Dremel it. (Early 036 had the M12, but IIRC all 034 had M14.)

I bet the new struts will make a big difference in handling! Did you replace the foam stop buffer as well, or was the existing one still intact?

:sawzall:
 
Original foam bumpers were crumbling and the accordion dust shield totally missing. I replaced both.
Excellent! BTW... the accordion dust boot only attaches at the top. I've seen people try to connect it to the plastic tabs on the tie-wrap around the strut, don't do that (if the strap is present).

When is the test drive?

:3gears:
 
Excellent! BTW... the accordion dust boot only attaches at the top. I've seen people try to connect it to the plastic tabs on the tie-wrap around the strut, don't do that (if the strap is present).

When is the test drive?

:3gears:
Wait the dust boot attaches to the fender mount? How does it attach? It’s currently just resting loose on top of the little “fingers” of the zip tie.
I couldn't find a good photo online.

I’ve got one side done need to do the other tonight.

Going on a 5 hr road trip Friday and will be taking the 400e if I can get it done in time. We will see
 
Oh maybe it stretches over that lip thing…

Hopefully I installed it right side up, one side is wider than the other ugh
 
Yep, the boot connects to the strut mount, and it's a PITA to attach the stupid thing. The wider end of the boot connects to the mount, the narrower end points down.

I don't have any good photos but this is what it should look like:

1718206392048.jpeg
 
All done!

Drivers side went a lot smoother. Ball joint was in good shape as well.

The drivers side shock was so worn out it wouldn’t even return to the extended position when pressed down.


Wow what a difference this has made. No more clunking or noises. Car corners very differently now. I didn’t realize how bad my old shocks were. Car only has 130k miles so I’m surprised by the condition.

Also changing the drag link has taken quite a bit of slop out of the steering wheel.


IMG_1058.jpeg
IMG_1059.jpeg
 
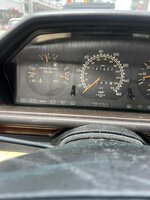
What do we think about these temperatures?

90 degrees outside, high humidity, ac on full blast.
City traffic, simi stop and go,

IMG_1060.jpeg
 
That's indicating 102-103°C, which is higher than normal for the conditions you describe. There's no concern about engine damage (that's worry above ~115C) but it would be nice to keep things under 100C in 90F ambients.

Question 1: Are the electric fans running on low speed? They should be, in 90F with the A/C on max. If not, you'll need to figure out why. Low speed fans are triggered by refrigerant pressure over 16 bar.

Question 2:
What mechanical fan clutch is installed, and when you see 100C+ on the gauge, does the fan roar like a hurricane if you slowly increase RPM's from idle up to about 3000rpm? Or does the fan audibly stop roaring at a lower RPM?

:detective:
 
That's indicating 102-103°C, which is higher than normal for the conditions you describe. There's no concern about engine damage (that's worry above ~115C) but it would be nice to keep things under 100C in 90F ambients.

Question 1: Are the electric fans running on low speed? They should be, in 90F with the A/C on max. If not, you'll need to figure out why. Low speed fans are triggered by refrigerant pressure over 16 bar.

Question 2: What mechanical fan clutch is installed, and when you see 100C+ on the gauge, does the fan roar like a hurricane if you slowly increase RPM's from idle up to about 3000rpm? Or does the fan audibly stop roaring at a lower RPM?

:detective:
The dual electric fans are on yes. The main fan is certainly spinning but it’s not as “wooshy” as I would expect.

My radiator, overflow tank, and cap are brand new genuine parts. Passes pressure test no leaks.

I think I need a new clutch. Genuine Is unavailable, the aftermarket one everyone recommends is unavailable, I don’t know what to do.

I also can’t get the damn clutch off. I tried a few months ago and it was seriously stuck. Need some special tool to hold pulley
 
The dual electric fans are on yes. The main fan is certainly spinning but it’s not as “wooshy” as I would expect.

My radiator, overflow tank, and cap are brand new genuine parts. Passes pressure test no leaks.
It does sound like your fan clutch is not engaged as it should be and may be the root cause of your higher temps.


I think I need a new clutch. Genuine Is unavailable, the aftermarket one everyone recommends is unavailable, I don’t know what to do.
Ugh. This is a real problem nowadays. You can try one of the "thin" aftermarket clutches, along with a shorter center bolt (search the forum for details). Try to pick a recognizable brand and hope for the best. Another option would be to tweak the OE Sachs clutch bimetal spring with the Stu Ritter modification, which should get the clutch engaging at a lower temp. Be really careful if you attempt this.

You can convert to an electric fan, but this is not easy and not cheap to do properly. It should be a factory fan from a mid-2000's MB and use a PWM controller. This is the best solution IMO but it's a LOT of work, and also requires upgrading to a 143A-150A alternator.


I also can’t get the damn clutch off. I tried a few months ago and it was seriously stuck. Need some special tool to hold pulley
Yes - you must have the special tool to hold the pulley. Or you have to fabricate something to hold the pulley without damaging it. Also make sure the 8mm hex tool is FULLY seated into the bolt, and the bolt hole head is in good condition. If you strip out the socket head you'll be in a world of hurt. Once the bolt is free, if you re-install the OE clutch, don't over-tighten the bolt (a tiny bit of anti-seize on the threads won't hurt either). Don't discard either the OE clutch, or the original long bolt (also NLA).


:tumble:
 
@natejgreene9871 — before I got the Mercedes tool, I was able to get by with the jumbo-size (approx. 18”) Sears channel locks and a towel to keep from scratching the pulley. Just wrap the back side of the pulley and clamp it with the channel locks.

BTW, the tool is 603 589 00 40 00. Surprised it’s still showing available.


Attachments

  • IMG_20240621_0801051.jpg
    IMG_20240621_0801051.jpg
    1.9 MB · Views: 12
Last edited:
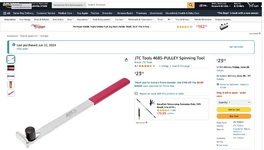
ordered this tool on amazon. It looks similar to factory tool and is much much cheaper.
Screenshot 2024-06-22 at 2.10.52 PM.png


Also ordered a replacement fan clutch. Febi-Bilstein from Autohausaz. Thats about the best I can do, fingers crossed.
 
It does sound like your fan clutch is not engaged as it should be and may be the root cause of your higher temps.


Ugh. This is a real problem nowadays. You can try one of the "thin" aftermarket clutches, along with a shorter center bolt (search the forum for details). Try to pick a recognizable brand and hope for the best. Another option would be to tweak the OE Sachs clutch bimetal spring with the Stu Ritter modification, which should get the clutch engaging at a lower temp. Be really careful if you attempt this.

You can convert to an electric fan, but this is not easy and not cheap to do properly. It should be a factory fan from a mid-2000's MB and use a PWM controller. This is the best solution IMO but it's a LOT of work, and also requires upgrading to a 143A-150A alternator.


Yes - you must have the special tool to hold the pulley. Or you have to fabricate something to hold the pulley without damaging it. Also make sure the 8mm hex tool is FULLY seated into the bolt, and the bolt hole head is in good condition. If you strip out the socket head you'll be in a world of hurt. Once the bolt is free, if you re-install the OE clutch, don't over-tighten the bolt (a tiny bit of anti-seize on the threads won't hurt either). Don't discard either the OE clutch, or the original long bolt (also NLA).


:tumble:
do we think this Febi clutch comes with a new smaller center bolt? Or do I reuse my old center bolt?

 
do we think this Febi clutch comes with a new smaller center bolt?
Aftermarket clutches of any brand do not include a shorter center bolt.


Or do I reuse my old center bolt?
You MUST NOT use the old center bolt from the OE clutch. I would not cut it down either, the bolt is NLA.

Locate and buy the correct length bolt with the proper hex head. I do not know if OE bolt 000912-010222 is still available and/or if it still has the proper hex head.

1719111343781.png

1719111349116.png
 
Aftermarket clutches of any brand do not include a shorter center bolt.


You MUST NOT use the old center bolt from the OE clutch. I would not cut it down either, the bolt is NLA.

Locate and buy the correct length bolt with the proper hex head. I do not know if OE bolt 000912-010222 is still available and/or if it still has the proper hex head.

View attachment 195101

View attachment 195102
thank you I have ordered the bolt you listed 000912-010222 from dealer

fingers crossed. Seems odd that the new clutch wouldn't have a smaller bolt
 
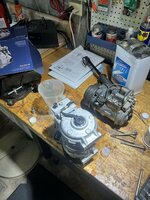
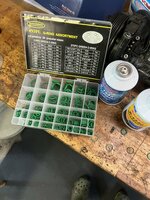
In an attempt to get my ac up to snuff and to stop leaking I threw the parts cannon at it today.

  • Installed a new compressor.
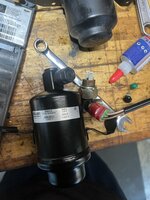
  • New receiver drier and both pressure switches from the dealer. Nissens drier was clocked slightly different, it works but I can’t screw the brackets in, oh well…
  • Removed the expansion valve (what a bitch) and installed all new orings on the hoses
  • New high pressure fitting on condenser
I didn’t have a failed compressor but I flushed the entire system anyway. I wasn’t happy with the cooling performance and I suspected it had too much oil. Compressor had been replaced at some point, wasn’t original. New compressors ship with oil so each time you install one you add more to the system. Only way to get a known value is to clear the whole system out.

Reinstalled 8oz of PAG 100.

Its on a vacuum and I’ll verify it’s holding overnight. Fingers crossed.

Also ready to install the new fan clutch if I can ever get the new center bolt. Damn thing is taking forever to arrive from dealer…

IMG_1095.jpegIMG_1096.jpegIMG_1098.jpegIMG_1097.jpegIMG_1100.jpegIMG_1101.jpegIMG_1102.jpegIMG_1103.jpegIMG_1104.jpeg
 
Last edited:
Cool! (*rimshot*)

The Nissens drier is for a 6-cyl car... doesn't fit right, but will work fine if you got the pipes connected. There's an older thread discussing this in more detail. The V8 driers are NLA and all the blasted advertisements for the 6-cyl drier claim they fit V8 cars, and they don't (well, they don't fit properly.)
So there’s no option on the market for the V8’s that actually fits ? It’s jammed in there so tight I’m not really worried about it moving
 
Help I can’t get this high side port to seal. I installed a new one from the dealer but it leaked at the threads. The oring got bunched up and tore. I’ve tried every oring I can find, I have every size imaginable but nothing will seal.

I even tried reinstalling the old service port and old oring and it just won’t seal. I’ve tried cranking it down to the point where I’m about to blow out the threads and it won’t seal.

What the fuck?


IMG_1109.jpegIMG_1106.jpegIMG_1107.jpeg
 
I’ve even tried plumbing teflon tape and it’s not working. I’m going to have to replace this entire fucking condenser aren’t I? Of course it’s NLA. Can’t find used, can’t find aftermarket. What a joke
 
Last edited:
when you hand thread the port to start the install are you meeting any resistance? In my limited experience I've pinched a few O rings and discovered the hand threading must go in with no resistance. It took me several attempts to get it right.


Regards,

Peter
 
when you hand thread the port to start the install are you meeting any resistance? In my limited experience I've pinched a few O rings and discovered the hand threading must go in with no resistance. It took me several attempts to get it right.


Regards,

Peter
No, no resistance to speak of. It threads in pretty smooth. Everything feels pretty good.
I’ve ordered two more of the service ports online just to try again with a new fitting/oring but I’m not sure what to do.

I’ve searched all afternoon for an evap online and it’s really NLA. I cant find anything remotely usable. Not even used on eBay. Big problem.

I guess at the end of the day if I can’t get this fitting to seal with an O ring I could try brazing it? You can buy aluminum brazing rods online, perhaps I just braze around the threads with mapp gas? I’ve never tried.

I also considered using some kind of epoxy on the threads. Maybe smear the threads up with JB weld and screw it in? I just need it to not leak.

Obviously I would have one shot at either of these two methods.

The threads are aluminum so the more times I mess with it the more the threads wear down and I risk stripping it.

Maybe I’m just not cranking this thing down tight enough (I feel like I am). Anybody know a torque value?
 
The new OE port includes a new O-ring - did this tear? That's odd... it should not pinch or tear.

For the other O-rings you tried, it sounds like the size is just sliiiightly off, if aftermarket.

Oddly, MB does not appear to sell the O-ring separately!

:scratchchin:
 
The new OE port includes a new O-ring - did this tear? That's odd... it should not pinch or tear.

For the other O-rings you tried, it sounds like the size is just sliiiightly off, if aftermarket.

Oddly, MB does not appear to sell the O-ring separately!

:scratchchin:
Yes, it included a new purple oring. It felt a tad too large and bunched up and got pinched. Again this was a dealer part. I have lots of other orings and tried many that appeared the same size but did not work. I also tried using the oring off the old fitting, it was in decent looking shape but old fitting would not seal either.
 
Ok so here is an update.

I ordered an aftermarket Santech port from RM european. It is identical to the original whereas the updated genuine MB part that leaked had a removable stem. Not sure why that would matter?


IMG_1132.jpeg
I dried off the threads really good making sure no oil and screwed it in very tight. I couldn't find a torqe spec in the manual but much tighter than made me comfortable. It doesn't appear to be leaking anymore thankfully.

A few days ago I also ordered an aftermarket condenser on Rock Auto that supposedly would fit.


It does not fit and I plan to return it. I have no idea what car this is for, it seems close but the lower connection and middle connection seem swapped? It is a parallel flow so would provide a nice cooling upgrade if it could be modified to fit but I see no easy way. ANybody recognize what it goes to?


Also got the new febi fan clutch installed (Borg warner shing long ding dong ).


The shorter fan clutch bolt (OE bolt 000912-010222) is still avaliable from dealer and correct.

IMG_1128.jpeg

Also this aftermarket fan pulley holder worked really well. $25 on amazon vs the genuine tool at well over $100


IMG_1133.jpeg
1720071494005.png


On the downside the febi fan clutch sounds like a damn hurricane (it does eventually disengage at high rpm) and i feel like i've lost about 30 horsepower. However the car is no longer overheating and my A/C temps are now frigid. I suppose I have no other choice, maybe check junkyards for used fan clutches?

Time to swap the differential ratio to make up for the power loss?? My yeller box is here just need to source a rear end from junkyard.
 
Last edited:
On the downside the febi fan clutch sounds like a damn hurricane (it does eventually disengage at high rpm) and i feel like i've lost about 30 horsepower.
It may feel like 30hp but in reality it's probably less than half that much. You are correct, different gears may provide a noticeable improvement.


However the car is no longer overheating and my A/C temps are now frigid. I suppose I have no other choice,
The best solution was mentioned back in post #270 above, electric conversion with OE fan (used) and PWM controller. Fairly difficult to install properly, but it's the best of all worlds... only runs when needed, silent when not needed.


maybe check junkyards for used fan clutches?
Used clutches are a gamble, as they are likely out of calibration same as your original. Worth a try if you can find one cheap, but don't get your hopes up.


:blower:
 
It may feel like 30hp but in reality it's probably less than half that much. You are correct, different gears may provide a noticeable improvement.


The best solution was mentioned back in post #270 above, electric conversion with OE fan (used) and PWM controller. Fairly difficult to install properly, but it's the best of all worlds... only runs when needed, silent when not needed.


Used clutches are a gamble, as they are likely out of calibration same as your original. Worth a try if you can find one cheap, but don't get your hopes up.


:blower:
I found a lightly used BEHR China fan clutch on eBay and ordered it. Looks to be from 2016 perhaps??

IMG_1139.png

Anybody have experience with this one? Is it the same Borg Warner shinglong ? Hopefully not.

I’m looking for something that doesn’t engage so aggressively.
 
I'd expect the engagement to be similar between the Behr and BW, but the only way to know is install & test. I have a feeling there are only 1 or 2 mfr's of these and all vendors are reboxing under their own label / brand name.

:klink3:
 
Well it’s been a hot summer with a lot of AC use. Been daily driving the 400e.
I’m running envirosafe refrigerant which is heavily scented (wintergreen).

A few days ago I noticed a whiff of smell coming out of the vents when first turned the a/c on. I continue to smell it every now and again. Pretty sure I know what this means :(

Evap part number appears to be 1248300758

Genuine NLA

I see

-mahle/behr/hella service made in China
-Nissens made in Tiawan

Which do we prefer?
 
I'd be really, really tempted to try ClipLight first... the evap replacement is like 30 hours of DIY misery. More info here.
tempting but after shelling out the money for a new compressor and totally going through the whole system I'm not too excited to dump the sealant goop in there. I also have been collecting vacuum pods and I think I have them all
 
tempting but after shelling out the money for a new compressor and totally going through the whole system I'm not too excited to dump the sealant goop in there. I also have been collecting vacuum pods and I think I have them all
Ah, got it... yeah with a new compressor and other stuff, and if you have to pull the dash anyway to replace the pods... might as well go all-in and do the evaporator too.

:banana2:
 
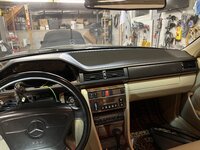
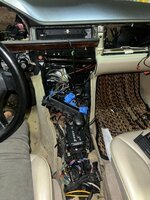
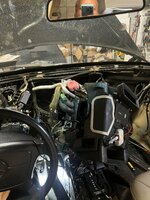
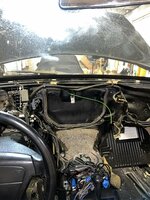
I worked tonight for about 5 hours tearing the dash down. Wow I thought I had mentally prepared myself for this but it is quite the ordeal. The number of parts and how they all fit together is staggering. I’ve done this on a w123 before and it was a lot easier.

Just removing the dash is half the battle, once you have it out there is still much work to be done. Hoping to have the box out soon.

I’m curious what a shop would charge to do this? I can only imagine.

If this wasn’t a cosmetically nice car I would try the sealant, especially on a cheaper 6 cylinder model……not sure this is worth it.

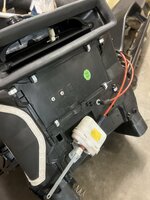
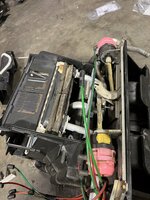
IMG_1316.jpegIMG_1335.jpegIMG_1339.jpegIMG_1336.jpegIMG_1344.jpegIMG_1337.jpeg
 
Wow. Well it took me a few weeks but I think this was a success. Everything seems to be working. I got it all put back together tonight and went for a drive. I'm going to dump some photos below.

Some notes:

I ended up ordering both the Behr (china) evap and the Nissens evap to compare side by side. The Nissens was about 1 inch shorter than the factory evap so I ended up using the Behr. I didn't want to loose any cooling capacity even though the welds on the Nissens looked a little better. I think the hardest part of the job was getting the expansion valve back in place under the hood. The evap hard lines are petty rigid where they come through the firewall. I wrestled with them for an hour or two to get it all to line up correctly under the hood and get hoses connected.

Also, another surprise is that the heater/evap case is both screwed AND glued to the firewall. You have to violently pry and yank it out. Thankfully nothing broke.

Once you get the evap case out of the car, you still have a couple hours of taking it apart.

I replaced ALL the vacuum pods. For the NLA pods I purchased a similar still available part number, took it apart and swapped the rubber diaphragms. All the pods can be taken apart and rebuilt, you just have to to get creative.

I reused the heater core but installed new seals from the dealer (part number 124-835-04-98)

For condensate drip tubes I used the W210 part, it worked great

This was the hardest job I have ever done. I've replaced head gaskets, timing chains, transmissions, you name it but this takes the prize. It really is brutal. Photo dump below. I think I could shave a significant number of hours off if I had to do it again but I hope I never do.

IMG_1334.jpeg IMG_1335.jpeg IMG_1336.jpeg IMG_1339.jpeg IMG_1457 2.jpeg IMG_1457.jpeg
 

Attachments

  • IMG_1457 2.jpeg
    IMG_1457 2.jpeg
    2.1 MB · Views: 12
Last edited:
Another piece of advice is you must test everything as you put it back together. I tested all the vacuum pods before I put the heater/evap case back in the car. Before putting any of the dash back together, I plugged the CCU controls back in charged the A/C. Tested that all the flaps work, evap draining properly, no heater core leaks, etc. You really must do this, there are just too many small vacuum hoses, electrical connectors , etc things that could be missed and would require taking it all back out.
 

Who has viewed this thread (Total: 6) View details

Back
Top